惯性聚合 高效追踪和阅读你感兴趣的博客、新闻、科技资讯
阅读原文 在惯性聚合中打开

推荐订阅源

Martin Fowler
Martin Fowler
CTFtime.org: upcoming CTF events
A
About on SuperTechFans
Apple Machine Learning Research
The Register - Security
Vercel News
Vercel News
H
Hackread – Cybersecurity News, Data Breaches, AI and More
人人都是产品经理
人人都是产品经理
MyScale Blog
MyScale Blog
云风的 BLOG
云风的 BLOG
博客园_首页
U
Unit 42
T
Tailwind CSS Blog
G
GRAHAM CLULEY
F
Full Disclosure
V
Vulnerabilities – Threatpost
T
Tenable Blog
月光博客
月光博客
P
Privacy & Cybersecurity Law Blog
P
Privacy International News Feed
K
Kaspersky official blog
Scott Helme
Scott Helme
cs.AI updates on arXiv.org
N
News and Events Feed by Topic
T
The Exploit Database - CXSecurity.com
N
News and Events Feed by Topic
有赞技术团队
有赞技术团队
Recent Commits to openclaw:main
L
LINUX DO - 最新话题
Recorded Future
Recorded Future
Application and Cybersecurity Blog
Help Net Security
Help Net Security
The GitHub Blog
The GitHub Blog
Cisco Talos Blog
Cisco Talos Blog
SecWiki News
SecWiki News
P
Proofpoint News Feed
Security Latest
Security Latest
cs.CL updates on arXiv.org
罗磊的独立博客
S
Security Affairs
M
MIT News - Artificial intelligence
L
LINUX DO - 热门话题
美团技术团队
Simon Willison's Weblog
T
Threat Research - Cisco Blogs
Stack Overflow Blog
Stack Overflow Blog
Forbes - Security
Forbes - Security
Hugging Face - Blog
Hugging Face - Blog
博客园 - Franky
V
Visual Studio Blog

ThinkAlone

JavaCard 上手 灵车!开创! Step-CA 日常使用教程 灵上加灵:使用 Pico HSM 和 step-ca 自建一个CA 友善 FriendlyELEC NanoPC-T4 CPU跑分测试 CPU Benchmark 常见物品尺寸记录 树莓派5 Raspberry Pi 5 CPU跑分测试 CPU Benchmark 鼎阳 SDS804X HD 示波器带宽与选件升级 OrangePi Zero3 CPU跑分测试 CPU Benchmark Canokey Canary上手 在2024年配置IPv6是什么怎样一种体验 难绷的Zip与中文密码 OrangePi Zero CPU跑分测试 CPU Benchmark 使用 Docker 部署 zhenxun_bot(绪山真寻Bot) 在Docker中运行Klipper 如何优雅的跳过/禁止Steam更新你的游戏 使用 GitHub Actions 自动部署Hexo 使用 Travis CI 自动构建 Hexo 博客 使DockerHub的Autobuild自动构建ARM/其他 架构的镜像 CoffeeMiner:劫持WiFi网络接入设备进行“挖矿”的框架
用 Orange Pi Zero 搭建一台 Stratum 1 的 NTP 服务器
Disappear9 · 2024-07-11 · via ThinkAlone

前言

首先:这个东西有什么用?
答:没有任何用处,但是能让你内网的设备时间精度达到亚毫秒级

time.is

当然,不要以这个网页为参考,实际误差要远远低于显示:

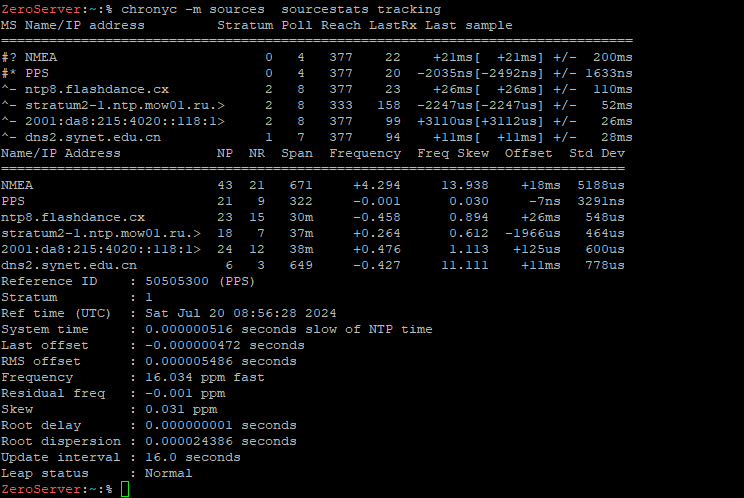
chronyc sources

实际应该是几个微秒的误差。


材料准备

  1. Orange Pi Zero LTS 一个
    也就是初代的Orange Pi Zero,理论上Zero2、3也可以,但是需要根据实际接线情况修改配置
  2. ATGM336H GPS模块 一个
    可替换,只要带PPS输出的就行,我选这个型号是因为他是ipex接口可以外接天线
    2.1 GPS天线(3.3v供电) 一个
    2.2 SMA转IPEX射频转接线 一条
  3. DS3231 实时时钟模块 一个
    DS3231M也可以,这里只是用作掉电后的时间备份,精度不太重要
  4. 2*13双排26P 2.54杜邦插头双排端子线 一个
    用于优雅的连接到Orange Pi的26P GPIO接口

其他电子配件不再赘述

硬件配置

GPS模块

使用USB-TTL板将模块连接到电脑,使用对应的工具将GPS模块的串口波特率调整到115200(模块一般默认为9600,过低,时间报文传输时间太长,会导致延迟过高)
我使用的ATGM336H模块可以用GnssToolKit3进行配置
其他模块可以参考手册进行配置

DS3231模块

如果你使用的是同款模块(大概率),使用烙铁拆焊掉这里的电阻以防止VCC倒灌进入电池
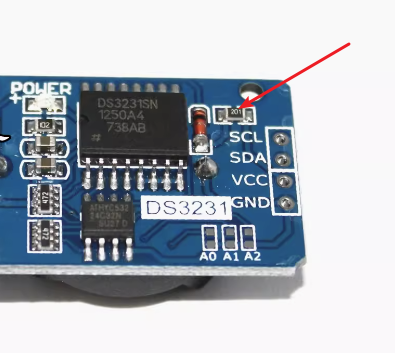
DS3231

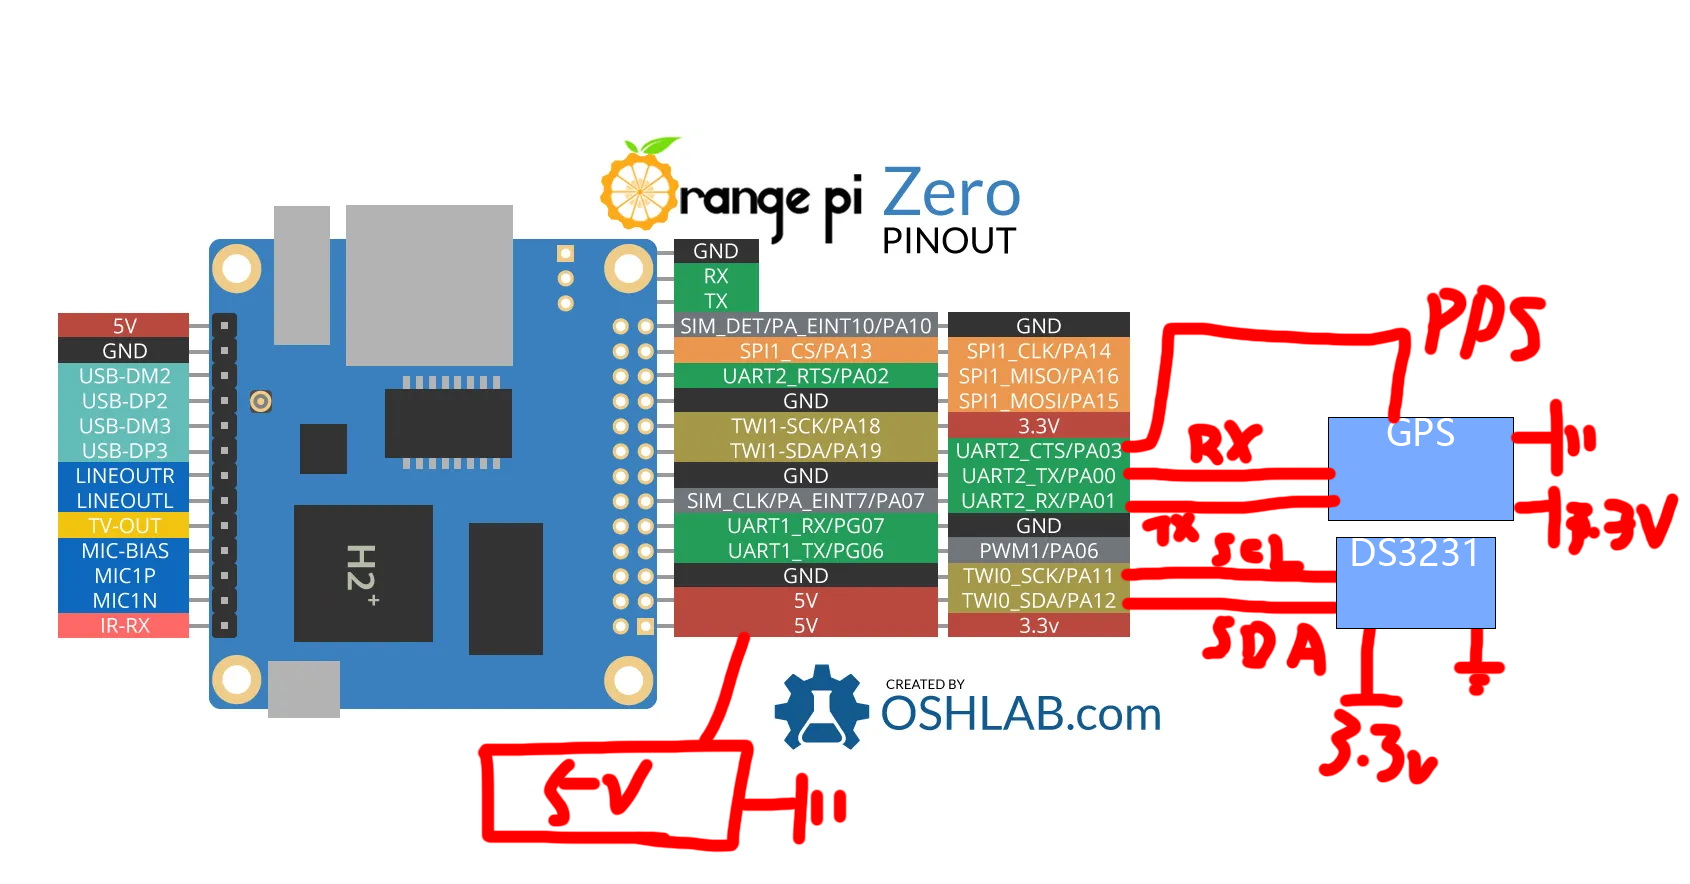
接线图

接线图

系统配置

参考:https://github.com/moonbuggy/Orange-Pi-Zero-GPS-NTP
下载对应的armbian系统并将系统安装到TF卡
系统初始化完成后,使用armbian-config工具,进入System => Hardware启用i2c0, pps-gpio, uart2
运行命令

1
sudo sh -c "echo 'param_pps_pin=PA3' >> /boot/armbianEnv.txt"

指定PA3为PPS输入

更新:使用Orange Pi Zero3时,armbian可能没有带pps的dts,可以手动创建一个,和ds3231的dts一样安装:

1
2
3
4
5
6
7
8
9
10
11
12
13
14
15
16
17
18
19
20
21
22
23
24
25
26
27
28
29
30
/dts-v1/;
/plugin/;

/ {
compatible = "allwinner,sun50i-h616";

fragment@0 {
target = <&pio>;
__overlay__ {
pps_pins: pps_pins {
pins = "PC11";
function = "pps";
};
};
};

fragment@1 {
target-path = "/";
__overlay__ {
pps@0 {
compatible = "pps-gpio";
pinctrl-names = "default";
pinctrl-0 = <&pps_pins>;
gpios = <&pio 2 11 0>; /* PC11 */
status = "okay";
};
};
};
};

新建文件ds3231.dts:

1
2
3
4
5
6
7
8
9
10
11
12
13
14
15
16
17
18
19
20
21
22
23
24
25
26
27
/dts-v1/;
/plugin/;

/ {
compatible = "xunlong,orangepi-zero", "allwinner,sun8i-h2-plus";

fragment@0 {
target-path = "/aliases";

__overlay__ {
rtc0 = "/soc/i2c@1c2b400/ds3231";
};
};


fragment@1 {
target-path = "/soc/i2c@1c2b400";

__overlay__ {
ds3231: rtc@68 {
compatible = "maxim,ds3231";
reg = <0x68>;
#clock-cells = <1>;
};
};
};
};

运行命令

1
sudo armbian-add-overlay ds3231.dts

启用DS3231的DTS

软件配置

配置gpsd

安装

1
sudo apt install gpsd gpsd-tools pps-tools i2c-tools

修改配置文件/etc/default/gpsd

1
2
3
4
5
6
7
8
9
10
11
12
# Devices gpsd should connect to at boot time.
# They need to be read/writeable, either by user gpsd or the group dialout.
DEVICES="/dev/ttyS2 /dev/pps0"

# Other options you want to pass to gpsd
GPSD_OPTIONS="-n -s 115200"

# Automatically hot add/remove USB GPS devices via gpsdctl
USBAUTO="true"

/bin/stty -F /dev/ttyS2 115200
/bin/setserial /dev/ttyS2 low_latency

运行命令启动gpsd服务:

1
2
3
sudo systemctl daemon-reload
sudo systemctl enable gpsd
sudo systemctl start gpsd

运行gpsmon查看是否有输出,如配置正确应该可以看到NMEA报文,位置,卫星数等信息
手动调整天线的位置、角度,尽量靠窗,让可见卫星数尽可能的多,使定位误差尽可能的小
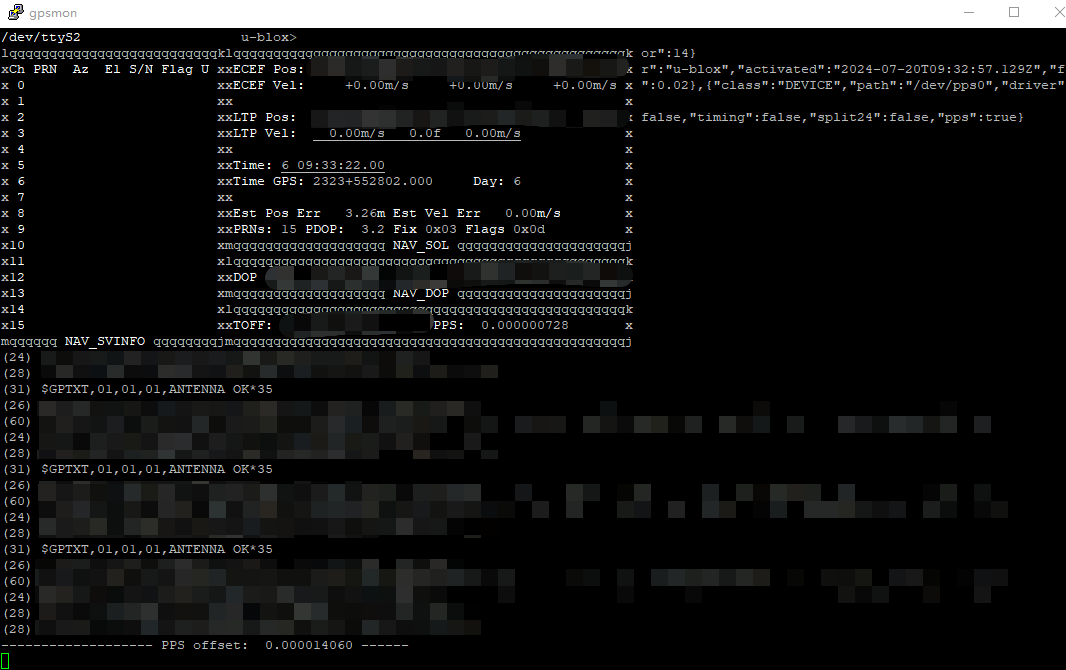
gpsmon

配置chrony

安装:

1
sudo apt install chrony

创建配置文件/etc/chrony/conf.d/gpsd.conf

1
2
refclock SHM 0 precision 1e-1 offset 0.0 delay 0.2 refid NMEA noselect
refclock PPS /dev/pps0 lock NMEA refid PPS maxlockage 32 prefer

修改配置文件/etc/default/chrony

1
2
3
4
5
6
# This is a configuration file for /etc/init.d/chrony and
# /lib/systemd/system/chrony.service; it allows you to pass various options to
# the chrony daemon without editing the init script or service file.

# Options to pass to chrony.
DAEMON_OPTS="-F 1 -r -m -s"

配置DS3231:

1
2
3
4
5
6
7
8
9
10
11
# E̅O̅S̅C̅
i2cset -y 0 0x68 0x0e 0x1c

# OSF
i2cset -y 0 0x68 0x0f 0x08

# 设置时间
sudo hwclock -w -f /dev/rtc

# 读取时间
sudo hwclock -r -f /dev/rtc

杂项与微调

配置上游NTP server

使用就近的NTP server
将配置文件/etc/chrony/chrony.conf中原来的pool/server部分修改如下:

1
2
3
4
server 0.cn.pool.ntp.org iburst
server 1.cn.pool.ntp.org iburst
server 2.cn.pool.ntp.org iburst
server 3.cn.pool.ntp.org iburst

offset整定

前文在配置文件/etc/chrony/conf.d/gpsd.conf中,暂时将offset设置为了0.0,在chrony服务正常运行半小时后,运行命令:

1
chronyc sourcestats

查看NMEA项的Offset部分:

1
2
3
4
5
Name/IP Address            NP  NR  Span  Frequency  Freq Skew  Offset  Std Dev
==============================================================================
NMEA 7 3 95 -134.817 741.206 +4490us 9095us
PPS 39 26 608 -0.000 0.008 -1ns 2553ns
......

Offset的数值转化为秒,填入配置文件中,重启chrony
我的数值已经整定过了,所以只有几毫秒,未整定情况下一般会在±0.2秒。
offset值不应超过±0.45秒。

开启chrony的服务器模式

在配置文件/etc/chrony/chrony.conf末尾,加一行:

1
allow

现在chrony已经可以被局域网内的设备访问到了,将服务器地址设为chrony的IP后同步时间,然后就可以截图去炫耀了。