



 We’re launching a new service for the project, and this service needs Redis and MongoDB.
The “technical task” itself looks roughly like this:
What’s clear from this:
I spent a while thinking about how to run them – with AWS managed services like ElastiCache or MemoryDB instead of Redis, and DocumentDB or Atlas for MongoDB, but in the end we decided to run everything in Kubernetes:
We’ll start with Redis – this post is about that, and we’ll cover MongoDB somewhere further down the line.
Note: I’ll be using Valkey and Redis as synonyms here, may the Valkey developers forgive me.
Contents
It’s been ages since I last dealt with Redis, and when I asked people in the RTFM chat what’s currently the go-to choice for Redis in Kubernetes – almost everyone said Valkey.
On their own site, Redis, of course, describes the difference as “Redis can do everything, Valkey is a stripped-down knockoff” (see Fast data you can trust: Redis vs. Valkey), but that’s mostly about Redis Enterprise vs Valkey. The difference between plain Redis OSS and Valkey is much less noticeable – see also the docs from AWS: Compare Redis OSS and Valkey.
The main difference is the license, since Valkey is fully open-source under a BSD license. But personally, licensing isn’t that big of a deal for me, since it changes like gloves (hi, Hashicorp, MongoDB, Elasticsearch, and Redis itself).
There are also differences in the technical implementation, like I/O and the caching mechanism, and probably a bunch of other things – but nothing fundamental, nothing that would drastically change how you work with it.
Everything will run in AWS Elastic Kubernetes Service, and for the new service we have a separate NodePool in Karpenter.
What we need to do:
Valkey has its own Helm charts – we’ll use those, but we’ll do it through our own chart with Helm dependencies – because we’ll need to create our own resources.
There’s also a Valkey Operator, but right now it’s “This operator is in active development and not ready for production use“, and this isn’t the kind of setup where we need to drag it in anyway – so we’ll skip it.
Deployment Modes:
Valkey, just like Redis, also supports cluster mode – see Cluster tutorial – but the chart doesn’t support that, and in my case it’s overkill anyway.
Authentication will go through AWS Secrets Store or Param Store to store credentials, and then External Secrets Operator (ESO) passes them on to the Valkey Pods.
Adding the Valkey repository locally:
$ helm repo add valkey https://valkey.io/valkey-helm/
"valkey" has been added to your repositories

$ helm repo update
Looking for the current version of the valkey/valkey chart – at the time of writing this post, it’s 0.10.0:
$ helm search repo valkey
NAME                    CHART VERSION   APP VERSION     DESCRIPTION
valkey/valkey           0.10.0          9.1.0           A Helm chart for Kubernetes
valkey/valkey-operator  0.3.2           v0.3.0          A Helm chart for the Valkey Operator
valkey/valkey-resources 0.1.0           v0.3.0          Helm chart for operator-managed Valkey resource...
Creating our own Chart.yaml file, setting Valkey in dependencies, and giving it our own name via alias:
apiVersion: v2
name: agents-mainframe-redis
description: >-
  Helm chart for the Redis master-slave setup on the shared hOS EKS cluster.
type: application
version: 0.10.0
appVersion: "0.10.0"
dependencies:
  - name: valkey
    repository: https://valkey.io/valkey-helm/
    version: 0.10.0
    alias: valkey-redis
Writing our own Makefile:
SHELL := /usr/bin/env bash

.PHONY: helm-dependencies-upgrade \
  helm-dependencies-build \
  helm-lint-test-1-33 \
  helm-template-test-1-33 \
  helm-diff-test-1-33 \
  helm-install-test-1-33 \
  helm-lint-dev-1-33 \
  helm-template-dev-1-33 \
  helm-diff-dev-1-33 \
  helm-install-dev-1-33 \
  helm-lint-staging-1-33 \
  helm-template-staging-1-33 \
  helm-diff-staging-1-33 \
  helm-install-staging-1-33 \
  helm-lint-prod-1-33 \
  helm-template-prod-1-33 \
  helm-diff-prod-1-33 \
  helm-install-prod-1-33

helm-dependencies-upgrade:
  helm dependency update .

helm-dependencies-build:
  helm dependency build .

helm-lint-test-1-33: helm-dependencies-build
  helm lint . \
    -f values/common-values.yaml \
    -f values/test/test-1-33-values.yaml

helm-template-test-1-33: helm-dependencies-build
  helm template agents-mainframe-redis . \
    --namespace test-valkey-redis-ns \
    -f values/common-values.yaml \
    -f values/test/test-1-33-values.yaml

helm-diff-test-1-33: helm-dependencies-build
  helm diff upgrade agents-mainframe-redis . \
    --namespace test-valkey-redis-ns \
    --allow-unreleased \
    -f values/common-values.yaml \
    -f values/test/test-1-33-values.yaml

helm-install-test-1-33: helm-dependencies-build
  helm upgrade --install agents-mainframe-redis . \
    --namespace test-valkey-redis-ns \
    --create-namespace \
    --wait \
    --timeout 10m \
    --debug \
    -f values/common-values.yaml \
    -f values/test/test-1-33-values.yaml
Creating the Kubernetes Namespace (even though helm upgrade --install already has --create-namespace):
$ kk create ns test-valkey-redis-ns
Now we need to add our own values – let’s see what’s interesting in the chart itself (see them all in values.yaml):
podAnnotations: here we need to add an annotation for Reloader (see Kubernetes: ConfigMap and Secrets – data auto-reload in pods)commonLabels: need to add our own component label (specific to my project)service: leaving the default values – ClusterIP works fine for us right nowresources: we’ll add some minimal values, then check them out during operation and tune them laterextraValkeySecrets: you can attach additional Kubernetes Secrets here (but the passwords from ESO won’t go here)valkeyConfig: lets you add your own parameters for valkey.conf (aka redis.conf)auth and usersExistingSecret: this is exactly for ESO and user passwordsreplica: enabling master-slave
replicas: we’ll set 2 (plus 1 master)replicationUser: leaving the default for now, can make a dedicated one laterdisklessSync: replication settings – “traditional” RDB (wrote about it in the RDB Persistence), or directly via master mem buffer => network socket => replica mem bufferminReplicasToWrite and minReplicasMaxLag: if the master in the “cluster” has no healthy replicas – new writes get blocked, see Write Safety Configuration (the link points to Cluster Mode, but that’s just a bug in the README – they made the wrong header for the Safety Configuration section)persistence: adding this – needed for replication
valkeyConfig and appendonly/appendfsync in it, but that’s for another time – I need to refresh my memory on how it actually workspersistentVolumeClaimRetentionPolicy: you can set this explicitly, but I have a separate StorageClass with reclaimPolicy: Retaintolerations, nodeAffinity, podAntiAffinity and topologySpreadConstraints: needed for proper fault-tolerance, but for now we’re only using tolerations and nodeAffinity here – so Pods only get scheduled on the right WorkerNodes (see Kubernetes: Pods and WorkerNodes – control the placement of the Pods on the Nodes)podDisruptionBudget: enabling it, must havevalkeyLogLevel: we’ll add this to our values right awaymetrics: enabling metrics, uses the standard oliver006/redis_exporter
serviceMonitor: we’ll enable this, so VictoriaMetrics creates a VMServiceScrapeCreating directories – each one will hold values for a specific environment:
$ mkdir -p helm/redis/values/{dev,staging,prod,test}
Now the whole structure looks like this:
$ tree helm/redis/
helm/redis/
├── Chart.yaml
├── Makefile
└── values
    ├── dev
    ├── prod
    ├── staging
    └── test
In test-1-33-values.yaml we’ll have env-specific parameters for the Testing Env on the v1.33 EKS cluster.
Alright, let’s write the values.
Making a general common-values.yaml file – since for now all the parameters are the same across all environments:
### ALL VALUES:
# https://github.com/valkey-io/valkey-helm/blob/main/valkey/values.yaml

valkey-redis:

  podAnnotations:
    reloader.stakater.com/auto: "true"

  commonLabels:
    component: mainframe

  # TODO
  resources:
    requests:
      cpu: 100m
      memory: 256Mi
    limits:
      memory: 512Mi

  # TODO
  #extraValkeySecrets: []

  # TODO
  #extraValkeyConfigs: []

  # TODO
  # Content for valkey.conf (will be mounted via ConfigMap)
  #valkeyConfig: ""

  # TODO
  auth:
    enabled: false

  replica:
    enabled: true
    # Number of replica instances (total pods = replicas + 1 master)
    replicas: 2
    replicationUser: "default"
    minReplicasToWrite: 1
    minReplicasMaxLag: 10
    # EBS volume configuration
    persistence:
      size: 10Gi
      storageClass: gp3-retain

  tolerations:
    - key: AgentsMainfraimOnly
      operator: Exists
      effect: NoSchedule

  # TODO: enable together with podAntiAffinity when enough EC2 nodes are available.
  #podLabels:
  #  app.kubernetes.io/component: valkey

  # TODO
  affinity:
    nodeAffinity:
      requiredDuringSchedulingIgnoredDuringExecution:
        nodeSelectorTerms:
          - matchExpressions:
              - key: component
                operator: In
                values:
                  - mainframe
    #podAntiAffinity:
    #  requiredDuringSchedulingIgnoredDuringExecution:
    #    - labelSelector:
    #        matchLabels:
    #          app.kubernetes.io/component: valkey
    #      topologyKey: kubernetes.io/hostname
  #topologySpreadConstraints: []

  podDisruptionBudget:
    enabled: true
    # Minimum number of pods that must be available during a disruption
    #minAvailable: 1
    # Maximum number of pods that can be unavailable during a disruption
    maxUnavailable: 1

  valkeyLogLevel: notice

  metrics:
    enabled: true
    serviceMonitor:
      enabled: true
Deploying:
$ make helm-install-test-1-33
Checking the Pods:
$ kk get pod
NAME                                    READY   STATUS    RESTARTS   AGE
agents-mainframe-redis-valkey-redis-0   2/2     Running   0          5m34s
agents-mainframe-redis-valkey-redis-1   2/2     Running   0          5m13s
agents-mainframe-redis-valkey-redis-2   2/2     Running   0          4m7s
And a quick check that everything works.
Connecting to the master Pod:
$ kk exec -ti agents-mainframe-redis-valkey-redis-0 -- redis-cli
Defaulted container "agents-mainframe-redis-valkey-redis" out of: agents-mainframe-redis-valkey-redis, metrics, agents-mainframe-redis-valkey-redis-init (init)
127.0.0.1:6379> keys *
(empty array)
127.0.0.1:6379>
Checking the replication status:
127.0.0.1:6379> info replication
# Replication
role:master
connected_slaves:2
min_slaves_good_slaves:2
slave0:ip=agents-mainframe-redis-valkey-redis-1.agents-mainframe-redis-valkey-redis-headless.test-valkey-redis-ns.svc.cluster.local,port=6379,state=online,offset=630,lag=0,type=replica
slave1:ip=agents-mainframe-redis-valkey-redis-2.agents-mainframe-redis-valkey-redis-headless.test-valkey-redis-ns.svc.cluster.local,port=6379,state=online,offset=630,lag=0,type=replica
replicas_waiting_psync:0
master_failover_state:no-failover
master_replid:69b0ef28b85bca2a0e331fc00ed5254f6b7dd7a5
master_replid2:0000000000000000000000000000000000000000
master_repl_offset:644
second_repl_offset:-1
repl_backlog_active:1
repl_backlog_size:10485760
repl_backlog_first_byte_offset:1
repl_backlog_histlen:644
First, let’s check that Valkey itself is exposing metrics – finding the Service and port:
$ kk get svc | grep metr
agents-mainframe-redis-valkey-redis-metrics    ClusterIP   172.20.189.28    <none>        9121/TCP   10m
Opening up access for ourselves:
$ kk port-forward svc/agents-mainframe-redis-valkey-redis-metrics 9121
Checking the /metrics endpoint:
$ curl -s http://localhost:9121/metrics | grep redis | head
# HELP redis_acl_access_denied_auth_total acl_access_denied_auth_total metric
# TYPE redis_acl_access_denied_auth_total counter
redis_acl_access_denied_auth_total 0
# HELP redis_acl_access_denied_channel_total acl_access_denied_channel_total metric
# TYPE redis_acl_access_denied_channel_total counter
redis_acl_access_denied_channel_total 0
# HELP redis_acl_access_denied_cmd_total acl_access_denied_cmd_total metric
# TYPE redis_acl_access_denied_cmd_total counter
redis_acl_access_denied_cmd_total 0
# HELP redis_acl_access_denied_key_total acl_access_denied_key_total metric
Everything’s there – now checking in VictoriaMetrics.
Our chart’s values create a ServiceMonitor, let’s check it:
$ kk get servicemonitor
NAME                                  AGE
agents-mainframe-redis-valkey-redis   4m11s
In VictoriaMetrics we have the option operator.disable_prometheus_converter="false" set, so VictoriaMetrics created the corresponding VMServiceScrape (see VMServiceScrape from a ServiceMonitor and VictoriaMetrics Prometheus Converter):
$ kk get vmservicescrape -A | grep valkey
test-valkey-redis-ns   agents-mainframe-redis-valkey-redis                      5m23s   operational
Checking the Targets on vmagent:

And the metrics in VictoriaMetrics itself:
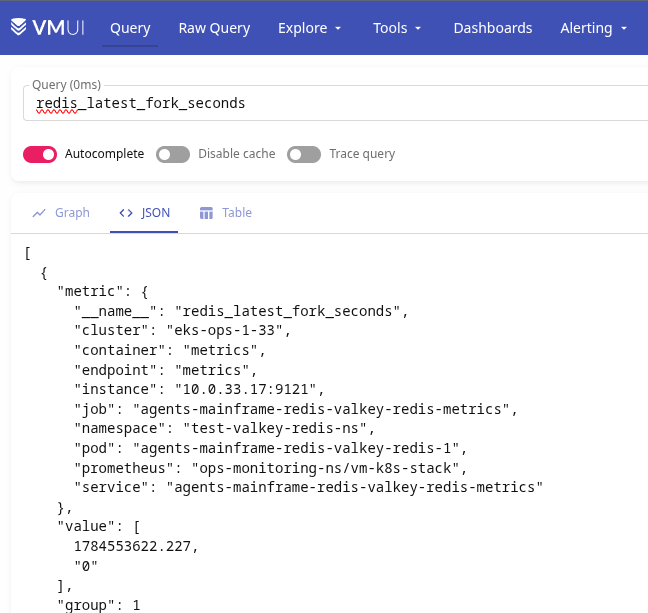 Alerts and Grafana we’ll add later.
Since we might be moving over to AWS managed services in the future – we can go ahead and create a Kubernetes Service of type ExternalName right away, use it in our service’s configs, and later just switch it to the AWS endpoint (see Kubernetes: ClusterIP vs NodePort vs LoadBalancer, Services, and Ingress – an overview with examples).
What we already have as far as Services from the Valkey Helm chart itself:
$ kk get svc
NAME                                           TYPE        CLUSTER-IP       EXTERNAL-IP   PORT(S)    AGE
agents-mainframe-redis-valkey-redis            ClusterIP   172.20.243.142   <none>        6379/TCP   10m
agents-mainframe-redis-valkey-redis-headless   ClusterIP   None             <none>        6379/TCP   10m
agents-mainframe-redis-valkey-redis-metrics    ClusterIP   172.20.189.28    <none>        9121/TCP   10m
agents-mainframe-redis-valkey-redis-read       ClusterIP   172.20.42.50     <none>        6379/TCP   10m
Creating a templates/service-externalname.yaml file, where we dynamically set the Kubernetes Namespace name via {{ .Release.Namespace }} – since dev/staging/prod each have their own Namespaces.
Describing two Services – for master and replica:
apiVersion: v1
kind: Service
metadata:
  name: agents-mainframe-redis
  labels:
    app.kubernetes.io/name: agents-mainframe-redis
    app.kubernetes.io/component: primary
spec:
  type: ExternalName
  externalName: agents-mainframe-redis-valkey-redis.{{ .Release.Namespace }}.svc.cluster.local
  ports:
    - name: tcp
      port: 6379
      protocol: TCP
---
apiVersion: v1
kind: Service
metadata:
  name: agents-mainframe-redis-read
  labels:
    app.kubernetes.io/name: agents-mainframe-redis
    app.kubernetes.io/component: read
spec:
  type: ExternalName
  externalName: agents-mainframe-redis-valkey-redis-read.{{ .Release.Namespace }}.svc.cluster.local
  ports:
    - name: tcp
      port: 6379
      protocol: TCP
And that’s pretty much it – all set here.
Now we have Valkey/Redis with master-slave replication, with metrics and logs in place.
The only thing left now is authentication.
Documentation – Valkey ACL.
For our service we need to create three new users:
In Redis/Valkey, users and permissions are defined through an Access Control List, which determines what each user is allowed to do – similar to how we describe RBAC in Kubernetes. Except in Redis all the access rules are described right in the config – whereas in Kubernetes we have Roles and RoleBindings.
But there’s one pretty significant difference: Kubernetes RBAC has simple, clear syntax that’s easy to read, while Redis ACL is some kind of separate flavor of pain. Maybe it’s just a matter of habit – but it’s described so unintuitively that you have to spend real time just to understand the logic.
There are ACL generators out there, for example – redis-acl-builder.
First – enabling authentication, since it’s disabled in our values above:
valkey-redis:
  auth:
    enabled: true
General ACL syntax:
~: key pattern:
~cache:*@: command category, used together with + or -:
+@read, -@dangerous&: Pub/Sub channel pattern:
&events:*So, if we want to create an ACL for a root user with full permissions – we use:
+@all: all commands~*: on all keys~*&*: on all channelsFor testing purposes – we create a Kubernetes Secret manually, and later ESO will handle it (won’t go into detail here, since I’m not doing that part yet, but I wrote about it in more detail in the LiteLLM: AI Gateway on Kubernetes and Metrics in VictoriaMetrics):
$ kk create secret generic agents-mainframe-valkey-users \
  --namespace test-valkey-redis-ns \
  --from-literal=admin-password='test-admin-password' \
  --from-literal=default-password='test-default-password' \
  --dry-run=client -o yaml |
kk apply -f -
Next, we add usersExistingSecret with the name of this Secret and an ACL with two users:
valkey-redis:
  auth:
    enabled: true
    usersExistingSecret: agents-mainframe-valkey-users

    aclUsers:
      default:
        permissions: "+@all ~* &*"
        passwordKey: default-password
      admin:
        permissions: "+@all ~* &*"
        passwordKey: admin-password
Deploying, connecting to the Pod, checking:
127.0.0.1:6379> ACL GETUSER default
(error) NOAUTH Authentication required.
Won’t let us in – great, authentication is working.
Logging in:
127.0.0.1:6379> AUTH admin test-admin-password
OK
And checking the permissions:
127.0.0.1:6379> ACL GETUSER default
 1) "flags"
 2) 1) "on"
    2) "sanitize-payload"
 3) "passwords"
 4) 1) "7ef4d6abeee6999e26357a968bf5e429a6a050e2c84f08bce69ff5a48dc17755"
 5) "commands"
 6) "+@all"
 7) "keys"
 8) "~*"
 9) "channels"
10) "&*"
11) "databases"
12) "alldbs"
13) "selectors"
14) (empty array)
127.0.0.1:6379> ACL GETUSER admin
 1) "flags"
 2) 1) "on"
    2) "sanitize-payload"
 3) "passwords"
 4) 1) "f7a03f48c0e2aa2d5e55ca186c20032ddbf53b7f5f93fce387d65c3f83433e8d"
 5) "commands"
 6) "+@all"
 7) "keys"
 8) "~*"
 9) "channels"
10) "&*"
11) "databases"
12) "alldbs"
13) "selectors"
14) (empty array)
The ACL for the user of our own service can look like this:
...
      agents-mainframe-test:
        permissions: "+@read +@write +@keyspace +@transaction +@scripting +ping ~agents-mainframe:*"
        passwordKey: application-password
Here:
+@read and +@write: allow read/write commands+@keyspace: TTL, EXPIRE, DEL commands, checking whether keys exist, etc.+@transaction: running MULTI, EXEC, WATCH+@scripting: running Lua/EVAL, often used by libraries (but worth double-checking with the developers)+ping: health check~agents-mainframe:*: access only to keys with this prefixAnd separately – the replica user: it doesn’t need access to application keys (~*) or Pub/Sub (&*), so we cut its permissions down to just a couple of commands:
...

      replication-test:
        permissions: "+psync +replconf +ping"
        passwordKey: replication-password
And we set the username in replica.replicationUser:
...

  replica:
    replicationUser: replication-test
Updating the Secret – adding the replication-password key:
$ kk create secret generic agents-mainframe-valkey-users \
  --namespace test-valkey-redis-ns \
  --from-literal=admin-password='test-admin-password' \
  --from-literal=default-password='test-default-password' \
  --from-literal=application-password='test-application-password' \
  --from-literal=replication-password='test-replication-password' \
  --dry-run=client -o yaml |
kk apply -f -
Deploying, checking that everything works.
And all together now:
valkey-redis:
  auth:
    enabled: true
    usersExistingSecret: agents-mainframe-valkey-users

    aclUsers:

      default:
        # after implementing on the app side, disable all for the 'default':
        # "-@all resetkeys resetchannels"
        permissions: "+@all ~* &*"
        passwordKey: default-password

      admin:
        permissions: "+@all ~* &*"
        passwordKey: admin-password

      agents-mainframe-test:
        # best to limit by:
        # "+@read +@write +@keyspace +@transaction +@scripting +ping ~agents-mainframe:*"
        # or if don't know KEYS yet:
        # "+@read +@write +@keyspace +@transaction +@scripting +ping ~*"
        permissions: "+@all ~* &*"
        passwordKey: application-password

      replication-test:
        permissions: "+psync +replconf +ping"
        passwordKey: replication-password

  replica:
    replicationUser: replication-test
Alright, that’s it for now.
Next up – adding Redis monitoring and deploying MongoDB.

此内容由惯性聚合(RSS阅读器)自动聚合整理,仅供阅读参考。 原文来自 — 版权归原作者所有。