


Countless tutorials and blog posts exist about building VMMs with KVM on Linux x86 systems. I can never make it through any of them. I inevitably get bored by some x86 details and lose interest in tackling all that legacy stuff.
But you can't call yourself "a system guy" unless you have implemented a VMM (or written an OS in Rust). So I decide to start a new VMM project, but not on x86 Linux.
ARM architecture is so much cleaner and more modern than x86. Implementing a VMM on ARM chips is way easier:
- Completely forget about the nightmare of "real mode", "long mode" and "protected mode".
- No variable-length instruction encoding headaches. Every instruction is exactly 32 bits long, period.
- Most system guys are running macOS as their daily drivers. So building a VMM for ARM actually makes practical sense now.
Just like Linux has KVM, macOS gives you the Hypervisor Framework. KVM is a device that you poke with ioctl calls—pretty clunky. The Hypervisor Framework, on the other hand, is just a clean set of C APIs. It gives you exactly what you need to build a VMM: vCPUs, virtual memory, and interrupt. That's it. Nothing less, nothing more.
So in this series of blog posts, I'm going to build a VMM using Apple's Hypervisor Framework, in Rust. The whole point is to keep it educational—I'll strip away all the unnecessary complexity and make things as straightforward as possible. You'll quickly see how clean, elegant, and enjoyable it can be, once you get rid of all the x86 cruft and embrace the future.

Alright, time to get our hands dirty! Actually, scratch that—since we're diving deep into ARM territory, let's get our arms dirty!
The first thing you might think to check is Apple's Documentation of Hypervisor Framework. Hey, don't click that yet, stay with me. You really don't want to dive into that doc at the very beginning. Apple's documentation is honestly pretty terrible. You'll spend half your time guessing what they actually mean. So forget that for now—I'm going to walk you through the framework myself, the way it should be explained.
Workflow
Here's a figure showing how to actually run a virtual machine with the Hypervisor API. It's dead simple:
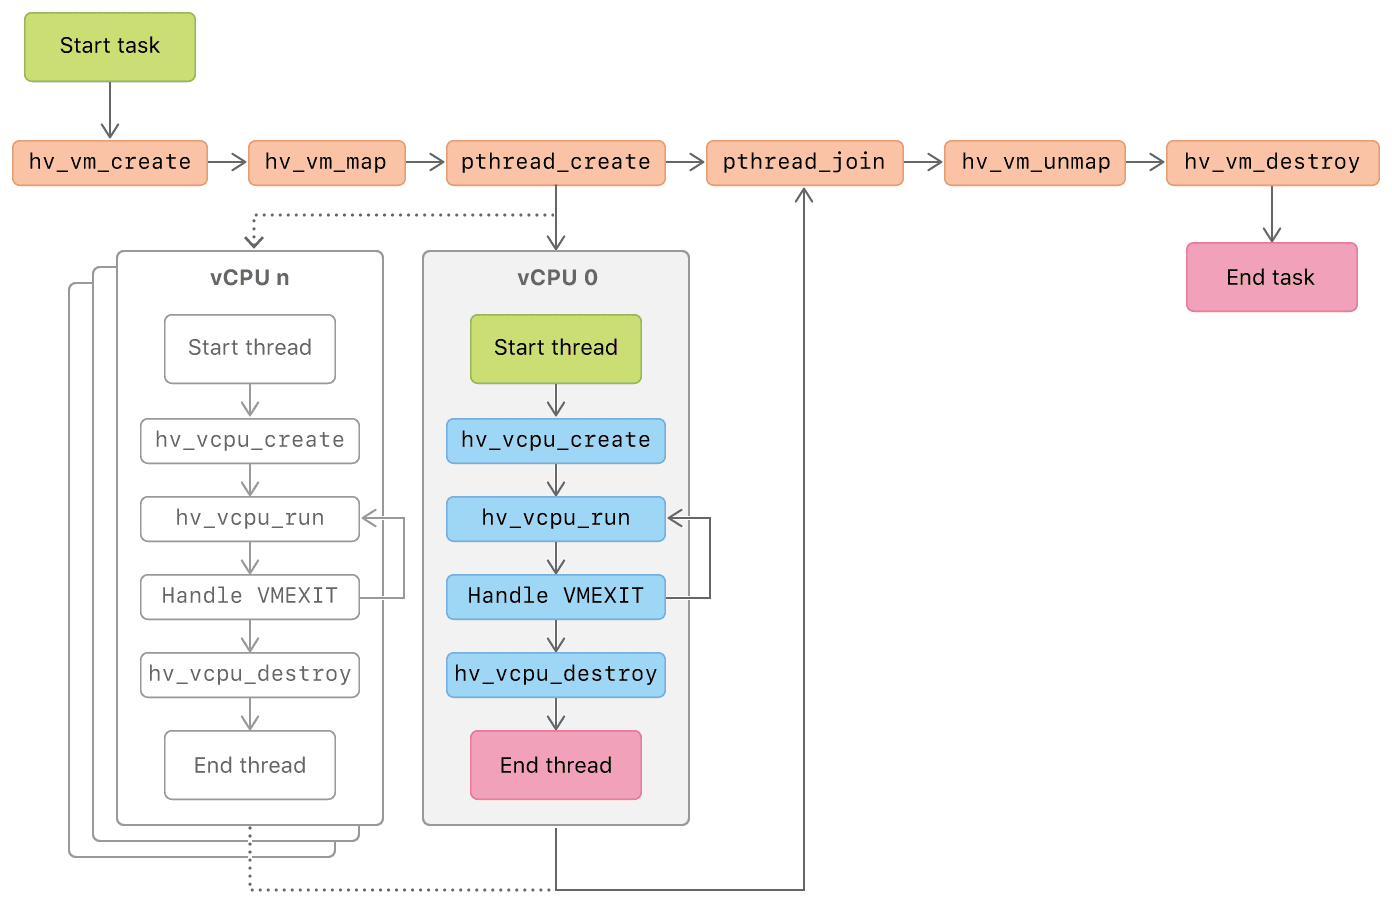
workflow of Hypervisor API Apps
- Start with
hv_vm_createto spin up a VM. - Then
hv_vm_mapto give it some memory to work with. - Apple ties each vCPU to a macOS thread, so you'll need
pthread_createto spawn threads for however many vCPUs you want. - Inside each thread, you call
hv_vcpu_createto set up the vCPU, thenhv_vcpu_runto start it. - Destroy vCPUs, unmap memory, destroy VM.
Actually, that's pretty much all this framework gives you. I didn't mention interrupts, but we're not going to touch those for a while.
Now, how about write some actual code and see how it goes?
Rust Bindings
One more thing before we dive in: the Hypervisor Framework is all C APIs, so we need some Rust bindings. Sure, we could just throw them to bindgen and call it a day, but why reinvent the wheel? There are actually quite a few Rust bindings floating around:
| Project | Description | Apple Silicon Support |
|---|---|---|
| saurvs/hypervisor-rs | Early Rust bindings for Hypervisor Framework | ❌ |
| Impalabs/applevisor | Rust bindings specifically for Apple Silicon | ✅ |
| marysaka/ahv | Another set of Apple Silicon Hypervisor bindings | ✅ |
| RWTH-OS/xhypervisor | Fork of ancient hypervisor-rs, updated for Apple Silicon | ✅ |
| cloud-hypervisor/hypervisor-framework | "High level" Rust bindings (no docs) | ✅ |
At the time of writing, ahv has the most stars, which is as good a metric as any for picking dependencies. I played around with it a bit and it feels pretty solid. So we're going with ahv bindings for this whole project.
Finally, coding time! Here is a minimal example of how to use Hypervisor Framework with ahv bindings.
use ahv::*;
const CODE: hv_ipa_t = 0x20000;

fn main() -> Result<()> {
    let payload = [0x40, 0x00, 0x80, 0xd2]; // mov x0, #2
    let mut vm = VirtualMachine::new(None)?;
    let handle = vm.allocate_from(&payload)?;
    vm.map(handle, CODE, MemoryPermission::EXECUTE)?;

    let mut vcpu = vm.create_vcpu(None)?;
    vcpu.set_register(Register::CPSR, 0x3c4)?; // EL1t
    vcpu.set_register(Register::PC, CODE)?;

    let _ = vcpu.run()?;
    println!("x0 is {}", vcpu.get_register(Register::X0)?);
    Ok(())
}
Here's what's happening: we've got an ARM machine code payload that's just one instruction—mov x0, #2. We map this payload into virtual memory at address 0x20000. Then we point the PC register to the start of our payload so the CPU knows where to begin execution. Hit run, let it do its thing, then peek at the x0 register to see our result. It should prints x0 is 2.
Let's try something a bit more interesting. This time, we want to actually mess around with memory. We've already got one mapped memory region for our payload, but if we want to do any real load/store operations, we need another chunk of memory to play with. So let's create one and map it in. This one doesn't need to be executable—just needs read and write permissions.
const DATA: hv_ipa_t = 0x40000;

// in main function:
let data = vec![0u8; 1024]; // 1KB
let data_handle = vm.allocate_from(&data)?;
vm.map(data_handle, DATA, MemoryPermission::READ_WRITE)?;
Now we can update our payload to do something with this memory:
let payload = [
	0x41, 0x05, 0x80, 0xd2, // mov x1, #42
	0x82, 0x00, 0xa0, 0xd2, // mov x2, #0x40000
	0x41, 0x00, 0x00, 0xf9, // str x1, [x2]
	0x40, 0x00, 0x40, 0xf9, // ldr x0, [x2]
];
Everything else stays the same. This time it should print x0 is 42—we're storing 42 to memory, then loading it right back out. Classic.
Complete code for your reference:
use ahv::*;
const CODE: hv_ipa_t = 0x20000;
const DATA: hv_ipa_t = 0x40000;

fn main() -> Result<()> {
    let payload = [
        0x41, 0x05, 0x80, 0xd2, // mov x1, #42
        0x82, 0x00, 0xa0, 0xd2, // mov x2, #0x40000
        0x41, 0x00, 0x00, 0xf9, // str x1, [x2]
        0x40, 0x00, 0x40, 0xf9, // ldr x0, [x2]
    ];

    let mut vm = VirtualMachine::new(None)?;
    let payload_handle = vm.allocate_from(&payload)?;
    vm.map(payload_handle, CODE, MemoryPermission::EXECUTE)?;

    let data = vec![0u8; 1024]; // 1KB
    let data_handle = vm.allocate_from(&data)?;
    vm.map(data_handle, DATA, MemoryPermission::READ_WRITE)?;

    let mut vcpu = vm.create_vcpu(None)?;
    vcpu.set_register(Register::CPSR, 0x3c4)?; // EL1t
    vcpu.set_register(Register::PC, CODE)?;

    let _ = vcpu.run()?;
    println!("x0 is {}", vcpu.get_register(Register::X0)?);
    Ok(())
}
I'm sure you're itching to write your own code and try this stuff out. But heads up—there's one annoying gotcha: macOS won't let just any random binary use the hypervisor. You need to sign your binary with the com.apple.security.hypervisor entitlement. You'll need an entitlements.plist file—just grab this one and save yourself the hassle. Then sign your binary with codesign:
codesign --sign - --entitlements entitlements.plist ${BINARY_PATH}
The previous examples work like a charm, but you're probably wondering—how the hell did I come up with those payloads? Do I just assemble machine code in my head or something?
Of course not! Well, okay, I could do it—I actually had to for the final exam in a ridiculous embedded development course back in undergrad. But for these examples, I just used this online assembler to generate the payloads. Just make sure you select "AArch64" and you're good to go.
But we definitely don't want to be copy-pasting payloads every single time we want to test something new. That gets old fast. So let me introduce you to my best friend: Keystone. Keystone is a lightweight assembler that can generate payloads for us without all the manual hassle. The best part? You can call it directly from your Rust program. So let's just integrate it right into our VMM and make our lives easier.
use keystone_engine::{Arch, Keystone, Mode};

fn gen_payload() -> Result<Vec<u8>> {
    let engine = Keystone::new(Arch::ARM64, Mode::LITTLE_ENDIAN)?;
    let asm = r#"
        mov x0, #42
        add x0, x0, #3
    "#;
    let result = engine.asm(asm.to_string(), 0)?;
    Ok(result.bytes)
}

fn main() -> Result<()> {
    let payload = gen_payload()?;
    // ... the rest of the code ...
}
To get Keystone compiling within Rust, we need to link against the C++ runtime. It's a bit of a pain, but check out my build.rs to see how to wrangle Cargo into doing it properly.
Our next step is to use this framework to load actual bare-metal programs. In the upcoming series, I will demonstrate how to load the u-boot project. Once we have the bootloader in place, our ultimate goal is to load Linux!
© LICENSED UNDER CC BY-NC-SA 4.0