惯性聚合 高效追踪和阅读你感兴趣的博客、新闻、科技资讯
阅读原文 在惯性聚合中打开

推荐订阅源

Threat Intelligence Blog | Flashpoint
B
Blog RSS Feed
GbyAI
GbyAI
Google DeepMind News
B
Blog
博客园 - 司徒正美
Vercel News
Vercel News
A
About on SuperTechFans
Martin Fowler
Martin Fowler
WordPress大学
WordPress大学
Recent Announcements
S
SegmentFault 最新的问题
博客园_首页
Apple Machine Learning Research
Stack Overflow Blog
Stack Overflow Blog
L
LINUX DO - 热门话题
Y
Y Combinator Blog
F
Full Disclosure
月光博客
月光博客
C
Cyber Attacks, Cyber Crime and Cyber Security
MongoDB | Blog
MongoDB | Blog
The Cloudflare Blog
The Hacker News
The Hacker News
CTFtime.org: upcoming CTF events
A
Arctic Wolf
Scott Helme
Scott Helme
V
Visual Studio Blog
C
Cybersecurity and Infrastructure Security Agency CISA
T
Tor Project blog
P
Privacy International News Feed
Spread Privacy
Spread Privacy
G
GRAHAM CLULEY
Microsoft Security Blog
N
News and Events Feed by Topic
Exploit-DB.com RSS Feed
PCI Perspectives
PCI Perspectives
小众软件
小众软件
博客园 - 【当耐特】
Cloudbric
Cloudbric
S
Secure Thoughts
L
LINUX DO - 最新话题
Google Online Security Blog
T
Troy Hunt's Blog
Cyber Security Advisories - MS-ISAC
W
WeLiveSecurity
V
Vulnerabilities – Threatpost
人人都是产品经理
人人都是产品经理
酷 壳 – CoolShell
酷 壳 – CoolShell
钛媒体:引领未来商业与生活新知
钛媒体:引领未来商业与生活新知
量子位

ThinkAlone

JavaCard 上手 灵车!开创! Step-CA 日常使用教程 灵上加灵:使用 Pico HSM 和 step-ca 自建一个CA 友善 FriendlyELEC NanoPC-T4 CPU跑分测试 CPU Benchmark 常见物品尺寸记录 树莓派5 Raspberry Pi 5 CPU跑分测试 CPU Benchmark 鼎阳 SDS804X HD 示波器带宽与选件升级 OrangePi Zero3 CPU跑分测试 CPU Benchmark Canokey Canary上手 在2024年配置IPv6是什么怎样一种体验 难绷的Zip与中文密码 OrangePi Zero CPU跑分测试 CPU Benchmark 使用 Docker 部署 zhenxun_bot(绪山真寻Bot) 在Docker中运行Klipper 如何优雅的跳过/禁止Steam更新你的游戏 使用 GitHub Actions 自动部署Hexo 使用 Travis CI 自动构建 Hexo 博客 使DockerHub的Autobuild自动构建ARM/其他 架构的镜像 CoffeeMiner:劫持WiFi网络接入设备进行“挖矿”的框架
用 Orange Pi Zero 搭建一台 Stratum 1 的 NTP 服务器
Disappear9 · 2024-07-11 · via ThinkAlone

前言

首先:这个东西有什么用?
答:没有任何用处,但是能让你内网的设备时间精度达到亚毫秒级

time.is

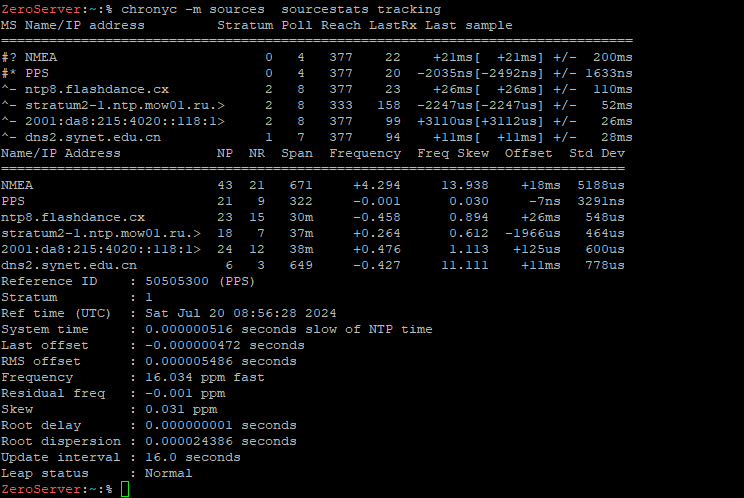
当然,不要以这个网页为参考,实际误差要远远低于显示:

chronyc sources

实际应该是几个微秒的误差。


材料准备

  1. Orange Pi Zero LTS 一个
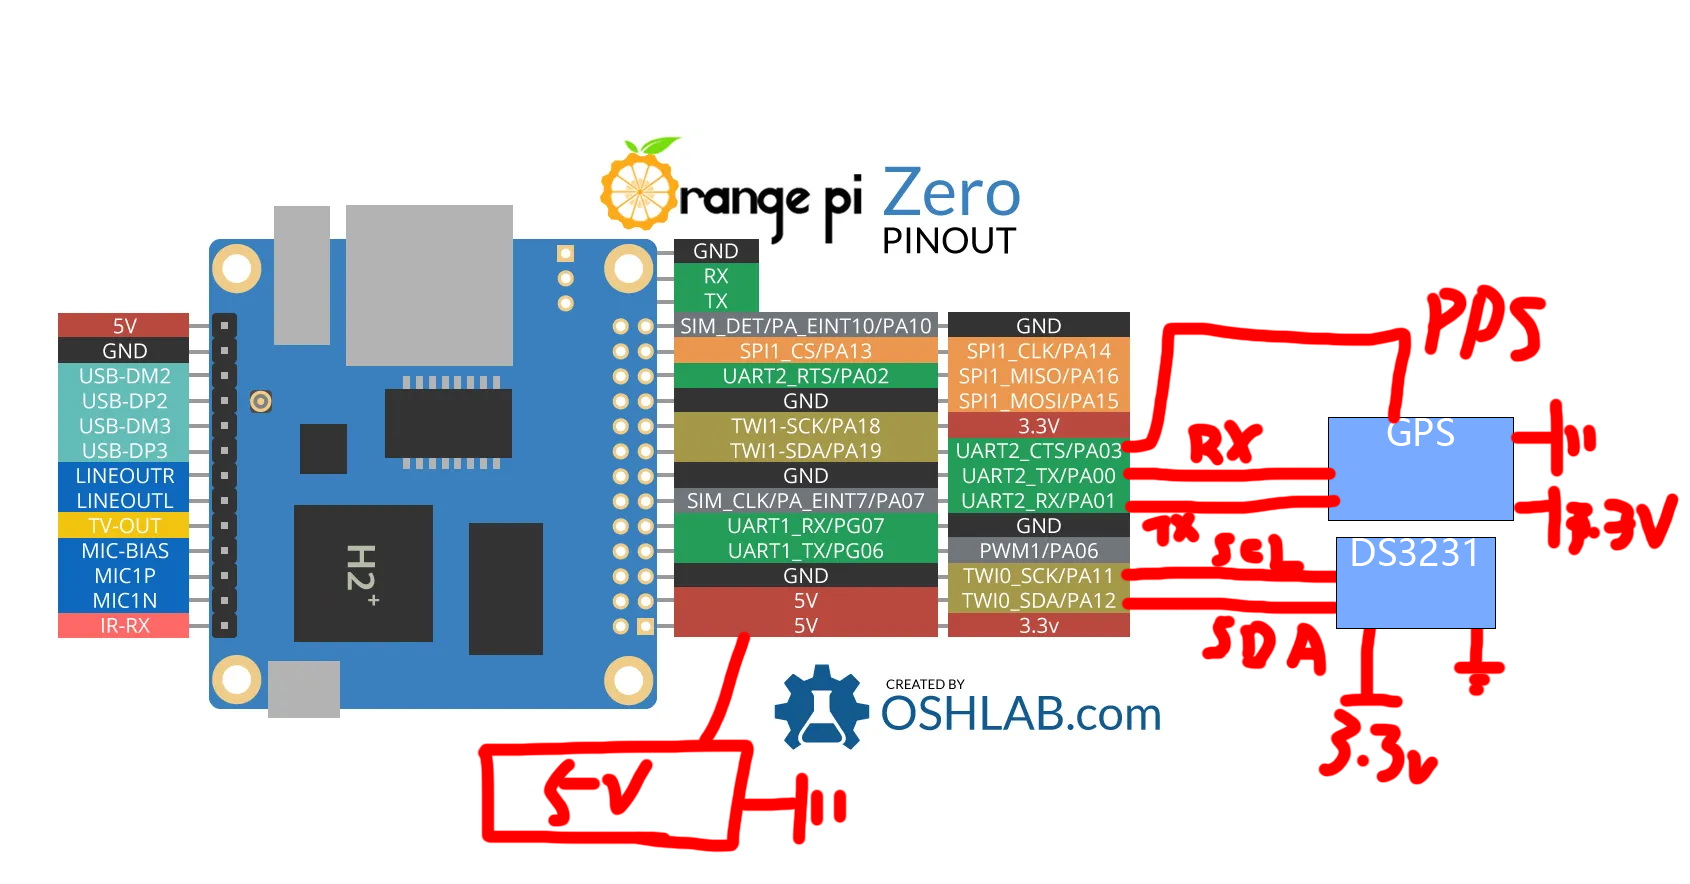
    也就是初代的Orange Pi Zero,理论上Zero2、3也可以,但是需要根据实际接线情况修改配置
  2. ATGM336H GPS模块 一个
    可替换,只要带PPS输出的就行,我选这个型号是因为他是ipex接口可以外接天线
    2.1 GPS天线(3.3v供电) 一个
    2.2 SMA转IPEX射频转接线 一条
  3. DS3231 实时时钟模块 一个
    DS3231M也可以,这里只是用作掉电后的时间备份,精度不太重要
  4. 2*13双排26P 2.54杜邦插头双排端子线 一个
    用于优雅的连接到Orange Pi的26P GPIO接口

其他电子配件不再赘述

硬件配置

GPS模块

使用USB-TTL板将模块连接到电脑,使用对应的工具将GPS模块的串口波特率调整到115200(模块一般默认为9600,过低,时间报文传输时间太长,会导致延迟过高)
我使用的ATGM336H模块可以用GnssToolKit3进行配置
其他模块可以参考手册进行配置

DS3231模块

如果你使用的是同款模块(大概率),使用烙铁拆焊掉这里的电阻以防止VCC倒灌进入电池
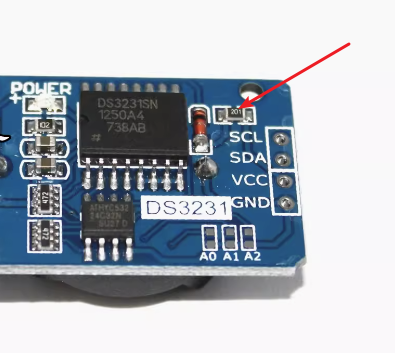
DS3231

接线图

接线图

系统配置

参考:https://github.com/moonbuggy/Orange-Pi-Zero-GPS-NTP
下载对应的armbian系统并将系统安装到TF卡
系统初始化完成后,使用armbian-config工具,进入System => Hardware启用i2c0, pps-gpio, uart2
运行命令

1
sudo sh -c "echo 'param_pps_pin=PA3' >> /boot/armbianEnv.txt"

指定PA3为PPS输入

更新:使用Orange Pi Zero3时,armbian可能没有带pps的dts,可以手动创建一个,和ds3231的dts一样安装:

1
2
3
4
5
6
7
8
9
10
11
12
13
14
15
16
17
18
19
20
21
22
23
24
25
26
27
28
29
30
/dts-v1/;
/plugin/;

/ {
compatible = "allwinner,sun50i-h616";

fragment@0 {
target = <&pio>;
__overlay__ {
pps_pins: pps_pins {
pins = "PC11";
function = "pps";
};
};
};

fragment@1 {
target-path = "/";
__overlay__ {
pps@0 {
compatible = "pps-gpio";
pinctrl-names = "default";
pinctrl-0 = <&pps_pins>;
gpios = <&pio 2 11 0>; /* PC11 */
status = "okay";
};
};
};
};

新建文件ds3231.dts:

1
2
3
4
5
6
7
8
9
10
11
12
13
14
15
16
17
18
19
20
21
22
23
24
25
26
27
/dts-v1/;
/plugin/;

/ {
compatible = "xunlong,orangepi-zero", "allwinner,sun8i-h2-plus";

fragment@0 {
target-path = "/aliases";

__overlay__ {
rtc0 = "/soc/i2c@1c2b400/ds3231";
};
};


fragment@1 {
target-path = "/soc/i2c@1c2b400";

__overlay__ {
ds3231: rtc@68 {
compatible = "maxim,ds3231";
reg = <0x68>;
#clock-cells = <1>;
};
};
};
};

运行命令

1
sudo armbian-add-overlay ds3231.dts

启用DS3231的DTS

软件配置

配置gpsd

安装

1
sudo apt install gpsd gpsd-tools pps-tools i2c-tools

修改配置文件/etc/default/gpsd

1
2
3
4
5
6
7
8
9
10
11
12
# Devices gpsd should connect to at boot time.
# They need to be read/writeable, either by user gpsd or the group dialout.
DEVICES="/dev/ttyS2 /dev/pps0"

# Other options you want to pass to gpsd
GPSD_OPTIONS="-n -s 115200"

# Automatically hot add/remove USB GPS devices via gpsdctl
USBAUTO="true"

/bin/stty -F /dev/ttyS2 115200
/bin/setserial /dev/ttyS2 low_latency

运行命令启动gpsd服务:

1
2
3
sudo systemctl daemon-reload
sudo systemctl enable gpsd
sudo systemctl start gpsd

运行gpsmon查看是否有输出,如配置正确应该可以看到NMEA报文,位置,卫星数等信息
手动调整天线的位置、角度,尽量靠窗,让可见卫星数尽可能的多,使定位误差尽可能的小
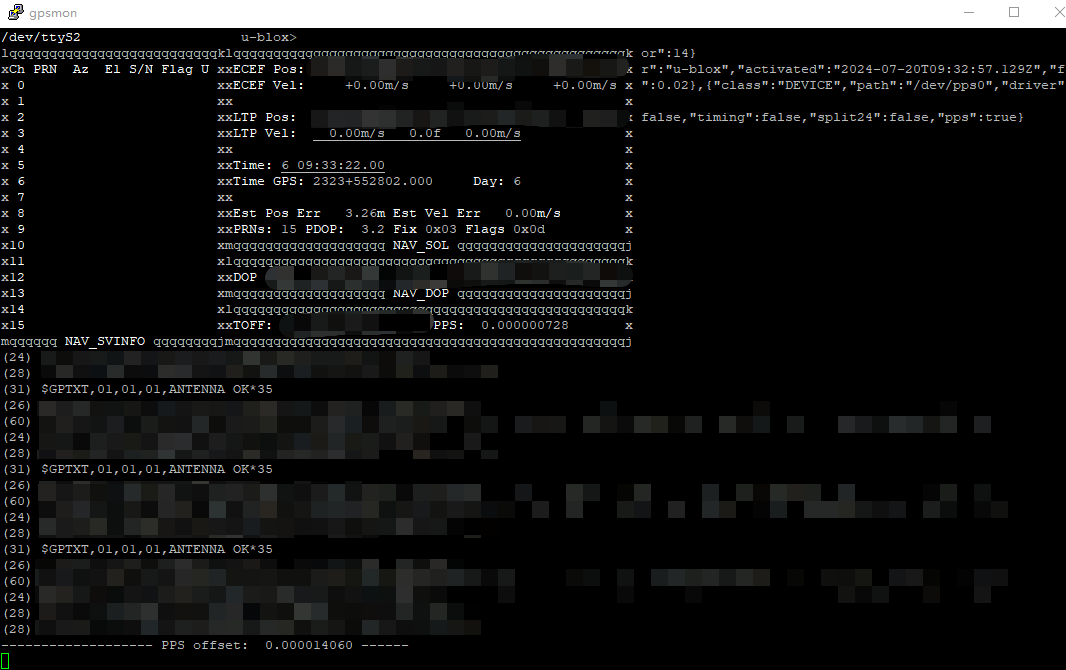
gpsmon

配置chrony

安装:

1
sudo apt install chrony

创建配置文件/etc/chrony/conf.d/gpsd.conf

1
2
refclock SHM 0 precision 1e-1 offset 0.0 delay 0.2 refid NMEA noselect
refclock PPS /dev/pps0 lock NMEA refid PPS maxlockage 32 prefer

修改配置文件/etc/default/chrony

1
2
3
4
5
6
# This is a configuration file for /etc/init.d/chrony and
# /lib/systemd/system/chrony.service; it allows you to pass various options to
# the chrony daemon without editing the init script or service file.

# Options to pass to chrony.
DAEMON_OPTS="-F 1 -r -m -s"

配置DS3231:

1
2
3
4
5
6
7
8
9
10
11
# E̅O̅S̅C̅
i2cset -y 0 0x68 0x0e 0x1c

# OSF
i2cset -y 0 0x68 0x0f 0x08

# 设置时间
sudo hwclock -w -f /dev/rtc

# 读取时间
sudo hwclock -r -f /dev/rtc

杂项与微调

配置上游NTP server

使用就近的NTP server
将配置文件/etc/chrony/chrony.conf中原来的pool/server部分修改如下:

1
2
3
4
server 0.cn.pool.ntp.org iburst
server 1.cn.pool.ntp.org iburst
server 2.cn.pool.ntp.org iburst
server 3.cn.pool.ntp.org iburst

offset整定

前文在配置文件/etc/chrony/conf.d/gpsd.conf中,暂时将offset设置为了0.0,在chrony服务正常运行半小时后,运行命令:

1
chronyc sourcestats

查看NMEA项的Offset部分:

1
2
3
4
5
Name/IP Address            NP  NR  Span  Frequency  Freq Skew  Offset  Std Dev
==============================================================================
NMEA 7 3 95 -134.817 741.206 +4490us 9095us
PPS 39 26 608 -0.000 0.008 -1ns 2553ns
......

Offset的数值转化为秒,填入配置文件中,重启chrony
我的数值已经整定过了,所以只有几毫秒,未整定情况下一般会在±0.2秒。
offset值不应超过±0.45秒。

开启chrony的服务器模式

在配置文件/etc/chrony/chrony.conf末尾,加一行:

1
allow

现在chrony已经可以被局域网内的设备访问到了,将服务器地址设为chrony的IP后同步时间,然后就可以截图去炫耀了。