







Whexy /
February 09, 2025
E‐paper (a.k.a. “E‐Ink”) displays are perfect for low‐power and daylight‐readable applications. In this post, we’ll show how to wire up an 800 × 480 e‐paper display to a Raspberry Pi Pico, then walk through the MicroPython code to display images.
We’ll assume:
- A Waveshare‐style 7.5″ e‐paper module with SPI interface (resolution 800×480).
- A Raspberry Pi Pico 2 running MicroPython.
We need to use the SPI interface of the Pico. The Pico 2 has two SPI interfaces: SPI0 and SPI1. We’ll use SPI0. See the pinout below.
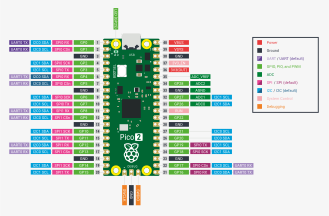
Pico 2 Pinout
Below are my pin connections. The e‐paper typically has the following signals:
| e‐Paper Pin | Description | Pico Pin for SPI0 Example |
|---|---|---|
| VCC | 3.3 V power | 3V3 (e.g. Pin 36) |
| GND | Ground | GND (e.g. Pin 38) |
| DIN | MOSI (SPI TX) | SPI0 TX / GP7 (Pin 10) |
| CLK | SCLK (SPI CLK) | SPI0 SCK / GP6 (Pin 9) |
| CS | SPI CS | SPI0 CSn / GP5 (Pin 7) |
| DC | Data/Command | GP8 (Pin 11) |
| RST | Reset | SPI0 RST / GP9 (Pin 12) |
| BUSY | Busy signal | GP10 (Pin 14) |

Save the following script (e.g. epaper_800x480.py) to your Raspberry Pi Pico via Thonny or any other method. It defines a driver class, initializes the display, and can show an image.
import machine
import time

# -------------------------------------------------------------------------
# 1) Display resolution for 7.5" e-paper (800 x 480)
# -------------------------------------------------------------------------
EPD_WIDTH  = 800
EPD_HEIGHT = 480

# -------------------------------------------------------------------------
# 2) Configure the Pico pins and SPI0
# -------------------------------------------------------------------------
#   GP6  = SCK
#   GP7  = MOSI
#   GP4  = MISO (not used but must assign a pin)
#   GP5  = CS
#   GP8  = DC
#   GP9  = RST
#   GP10 = BUSY
spi = machine.SPI(
    0,
    baudrate=2_000_000,
    polarity=0,
    phase=0,
    sck=machine.Pin(6),
    mosi=machine.Pin(7),
    miso=machine.Pin(4)
)

cs_pin   = machine.Pin(5,  machine.Pin.OUT, value=1)
dc_pin   = machine.Pin(8,  machine.Pin.OUT, value=0)
rst_pin  = machine.Pin(9,  machine.Pin.OUT, value=1)
busy_pin = machine.Pin(10, machine.Pin.IN)

def delay_ms(ms):
    time.sleep_ms(ms)

def digital_write(pin, val):
    pin.value(val)

def digital_read(pin):
    return pin.value()

def spi_write_block(data_block):
    spi.write(data_block)

# -------------------------------------------------------------------------
# 3) E‐Paper Driver Class
# -------------------------------------------------------------------------
class EPD_800x480:
    def __init__(self):
        self.width  = EPD_WIDTH
        self.height = EPD_HEIGHT
        self.reset_pin = rst_pin
        self.dc_pin    = dc_pin
        self.busy_pin  = busy_pin
        self.cs_pin    = cs_pin

    def hardware_reset(self):
        digital_write(self.reset_pin, 1)
        delay_ms(200)
        digital_write(self.reset_pin, 0)
        delay_ms(2)
        digital_write(self.reset_pin, 1)
        delay_ms(200)

    def send_command(self, cmd):
        digital_write(self.dc_pin, 0)  # Command
        digital_write(self.cs_pin, 0)
        spi_write_block(bytes([cmd]))
        digital_write(self.cs_pin, 1)

    def send_data(self, data):
        digital_write(self.dc_pin, 1)  # Data
        digital_write(self.cs_pin, 0)
        spi_write_block(bytes([data]))
        digital_write(self.cs_pin, 1)

    def send_data_block(self, data_block):
        digital_write(self.dc_pin, 1)
        digital_write(self.cs_pin, 0)
        spi_write_block(data_block)
        digital_write(self.cs_pin, 1)

    def read_busy(self):
        while digital_read(self.busy_pin) == 0:
            delay_ms(20)

    def turn_on_display(self):
        # Refresh
        self.send_command(0x12)
        delay_ms(100)
        self.read_busy()

    def init(self):
        """Initialize the display (power on, set registers, etc.).
           Make sure to match your e‐paper’s datasheet or Waveshare example code!
        """
        self.hardware_reset()

        # Example sequence (replace with your display's official sequence):
        #  - POWER SETTING
        #  - PANEL SETTING
        #  - TRES (resolution)
        #  - etc.
        # This is a placeholder; adapt to your hardware:
        self.send_command(0x01)  # POWER SETTING
        self.send_data(0x07)
        self.send_data(0x07)
        self.send_data(0x3f)
        self.send_data(0x3f)

        self.send_command(0x04)  # POWER ON
        delay_ms(100)
        self.read_busy()

        self.send_command(0x00)  # PANEL SETTING
        self.send_data(0x1F)

        # TRES: set resolution 800x480
        self.send_command(0x61)
        self.send_data(0x03)  # 800 >> 8
        self.send_data(0x20)  # 800 & 0xFF
        self.send_data(0x01)  # 480 >> 8
        self.send_data(0xE0)  # 480 & 0xFF

        self.send_command(0x15)
        self.send_data(0x00)

        self.send_command(0x50)
        self.send_data(0x10)
        self.send_data(0x07)

        self.send_command(0x60)
        self.send_data(0x22)

    # -- CHUNKED SENDING to save memory --
    def _send_zeros_in_chunks(self, total_size, chunk_size=512):
        zero_chunk = b'\x00' * chunk_size
        sent = 0
        while sent < total_size:
            remain = total_size - sent
            if remain >= chunk_size:
                self.send_data_block(zero_chunk)
                sent += chunk_size
            else:
                self.send_data_block(b'\x00' * remain)
                sent += remain

    def _send_inverted_data_in_chunks(self, data, chunk_size=512):
        idx = 0
        length = len(data)
        while idx < length:
            end = min(idx + chunk_size, length)
            slice_data = data[idx:end]
            inverted = bytearray(len(slice_data))
            for i, b in enumerate(slice_data):
                inverted[i] = ~b & 0xFF
            self.send_data_block(inverted)
            idx = end

    def display(self, black_buffer):
        """black_buffer is a bytes/bytearray of 48,000 bytes (800x480 // 8).
           We'll invert each byte on the fly, because the hardware often
           expects 1=white and 0=black.
        """
        size = (self.width * self.height) // 8

        # 1) Send old data (all white) in chunks
        self.send_command(0x10)
        self._send_zeros_in_chunks(size)

        # 2) Send new data (inverted)
        self.send_command(0x13)
        self._send_inverted_data_in_chunks(black_buffer)

        self.turn_on_display()

    def clear(self):
        """Clear the screen to white."""
        size = (self.width * self.height) // 8
        self.send_command(0x10)
        self._send_zeros_in_chunks(size)
        self.send_command(0x13)
        self._send_zeros_in_chunks(size)
        self.turn_on_display()

    def sleep(self):
        """Deep sleep / power off the display."""
        self.send_command(0x02)  # POWER OFF
        self.read_busy()
        self.send_command(0x07)  # DEEP_SLEEP
        self.send_data(0xA5)
        delay_ms(2000)

# -------------------------------------------------------------------------
# EXAMPLE USAGE
# -------------------------------------------------------------------------
def main():
    epd = EPD_800x480()
    epd.init()

    # Clear the screen
    epd.clear()

    # Suppose you uploaded an 800x480 BIN file to the Pico (flash),
    # containing 48,000 bytes of 1-bit data:
    with open("image_800x480.bin", "rb") as f:
        image_data = f.read()

    # Display it
    epd.display(image_data)

    # Wait a few seconds, then sleep
    delay_ms(5000)
    epd.sleep()

if __name__ == "__main__":
    main()
You need a 1‐bit (black & white) image of 800×480 pixels. On your desktop (regular Python), you can use Pillow to convert any color image:
#!/usr/bin/env python3
import argparse
from PIL import Image

def main():
    parser = argparse.ArgumentParser()
    parser.add_argument("--input",  "-i", required=True, help="Input image (png/jpg)")
    parser.add_argument("--output", "-o", required=True, help="Output bin file")
    args = parser.parse_args()

    # 1) Open and resize/crop your image to 800x480 if needed
    img = Image.open(args.input).convert("RGB")
    img = img.resize((800, 480))
    # 2) Convert to 1-bit
    bw_img = img.convert("1")  # uses dithering or pass dither=Image.NONE

    pixels = bw_img.load()
    width, height = bw_img.size
    buf = bytearray(width*height//8)

    idx = 0
    for y in range(height):
        for x_block in range(0, width, 8):
            b = 0
            for bitpos in range(8):
                px_val = pixels[x_block+bitpos, y]
                # px_val is 0 (black) or 255 (white) typically
                if px_val >= 128:
                    # White => bit=1
                    b |= (1 << (7 - bitpos))
            buf[idx] = b
            idx += 1

    with open(args.output, "wb") as f:
        f.write(buf)
    print(f"Saved {len(buf)} bytes to {args.output}")

if __name__ == "__main__":
    main()
Run it like:
python image_to_bin.py --input myphoto.png --output image_800x480.bin
Copy image_800x480.bin to the Pico (for example, using Thonny’s View → Files).
- Open Thonny (or your favorite MicroPython IDE).
- Copy
epaper_800x480.pyon your desktop. - Copy
image_800x480.binonto the Pico as well. - Run
epaper_800x480.py. It should initialize the display, clear it, then show your converted image!
If everything works correctly, you’ll see your black‐and‐white image on the e‐paper.
- MemoryError: If you see
MemoryError: memory allocation failed, it usually means you tried to create a massive array. The chunked approach in the code above avoids that. - Inversion: If your display is reversed (white is black, black is white), see if you need to remove or alter the
~b & 0xFFlogic. - Partial Updates: Some e‐paper displays support partial refresh. You’d need a more advanced sequence for partial updates.
- Slowness: E‐paper refresh can take 2–3 seconds or more, especially in large displays. That’s normal.
That’s it! You’ve successfully driven a large 7.5″, 800×480 e‐paper from a Raspberry Pi Pico with MicroPython. The key is to send data in small chunks to save memory and invert bits on the fly if the hardware expects it.
E‐paper offers a gorgeous, low‐power way to show static images, signage, or dashboards. Now that you have the basics, you can expand to draw text, shapes, or partial updates.
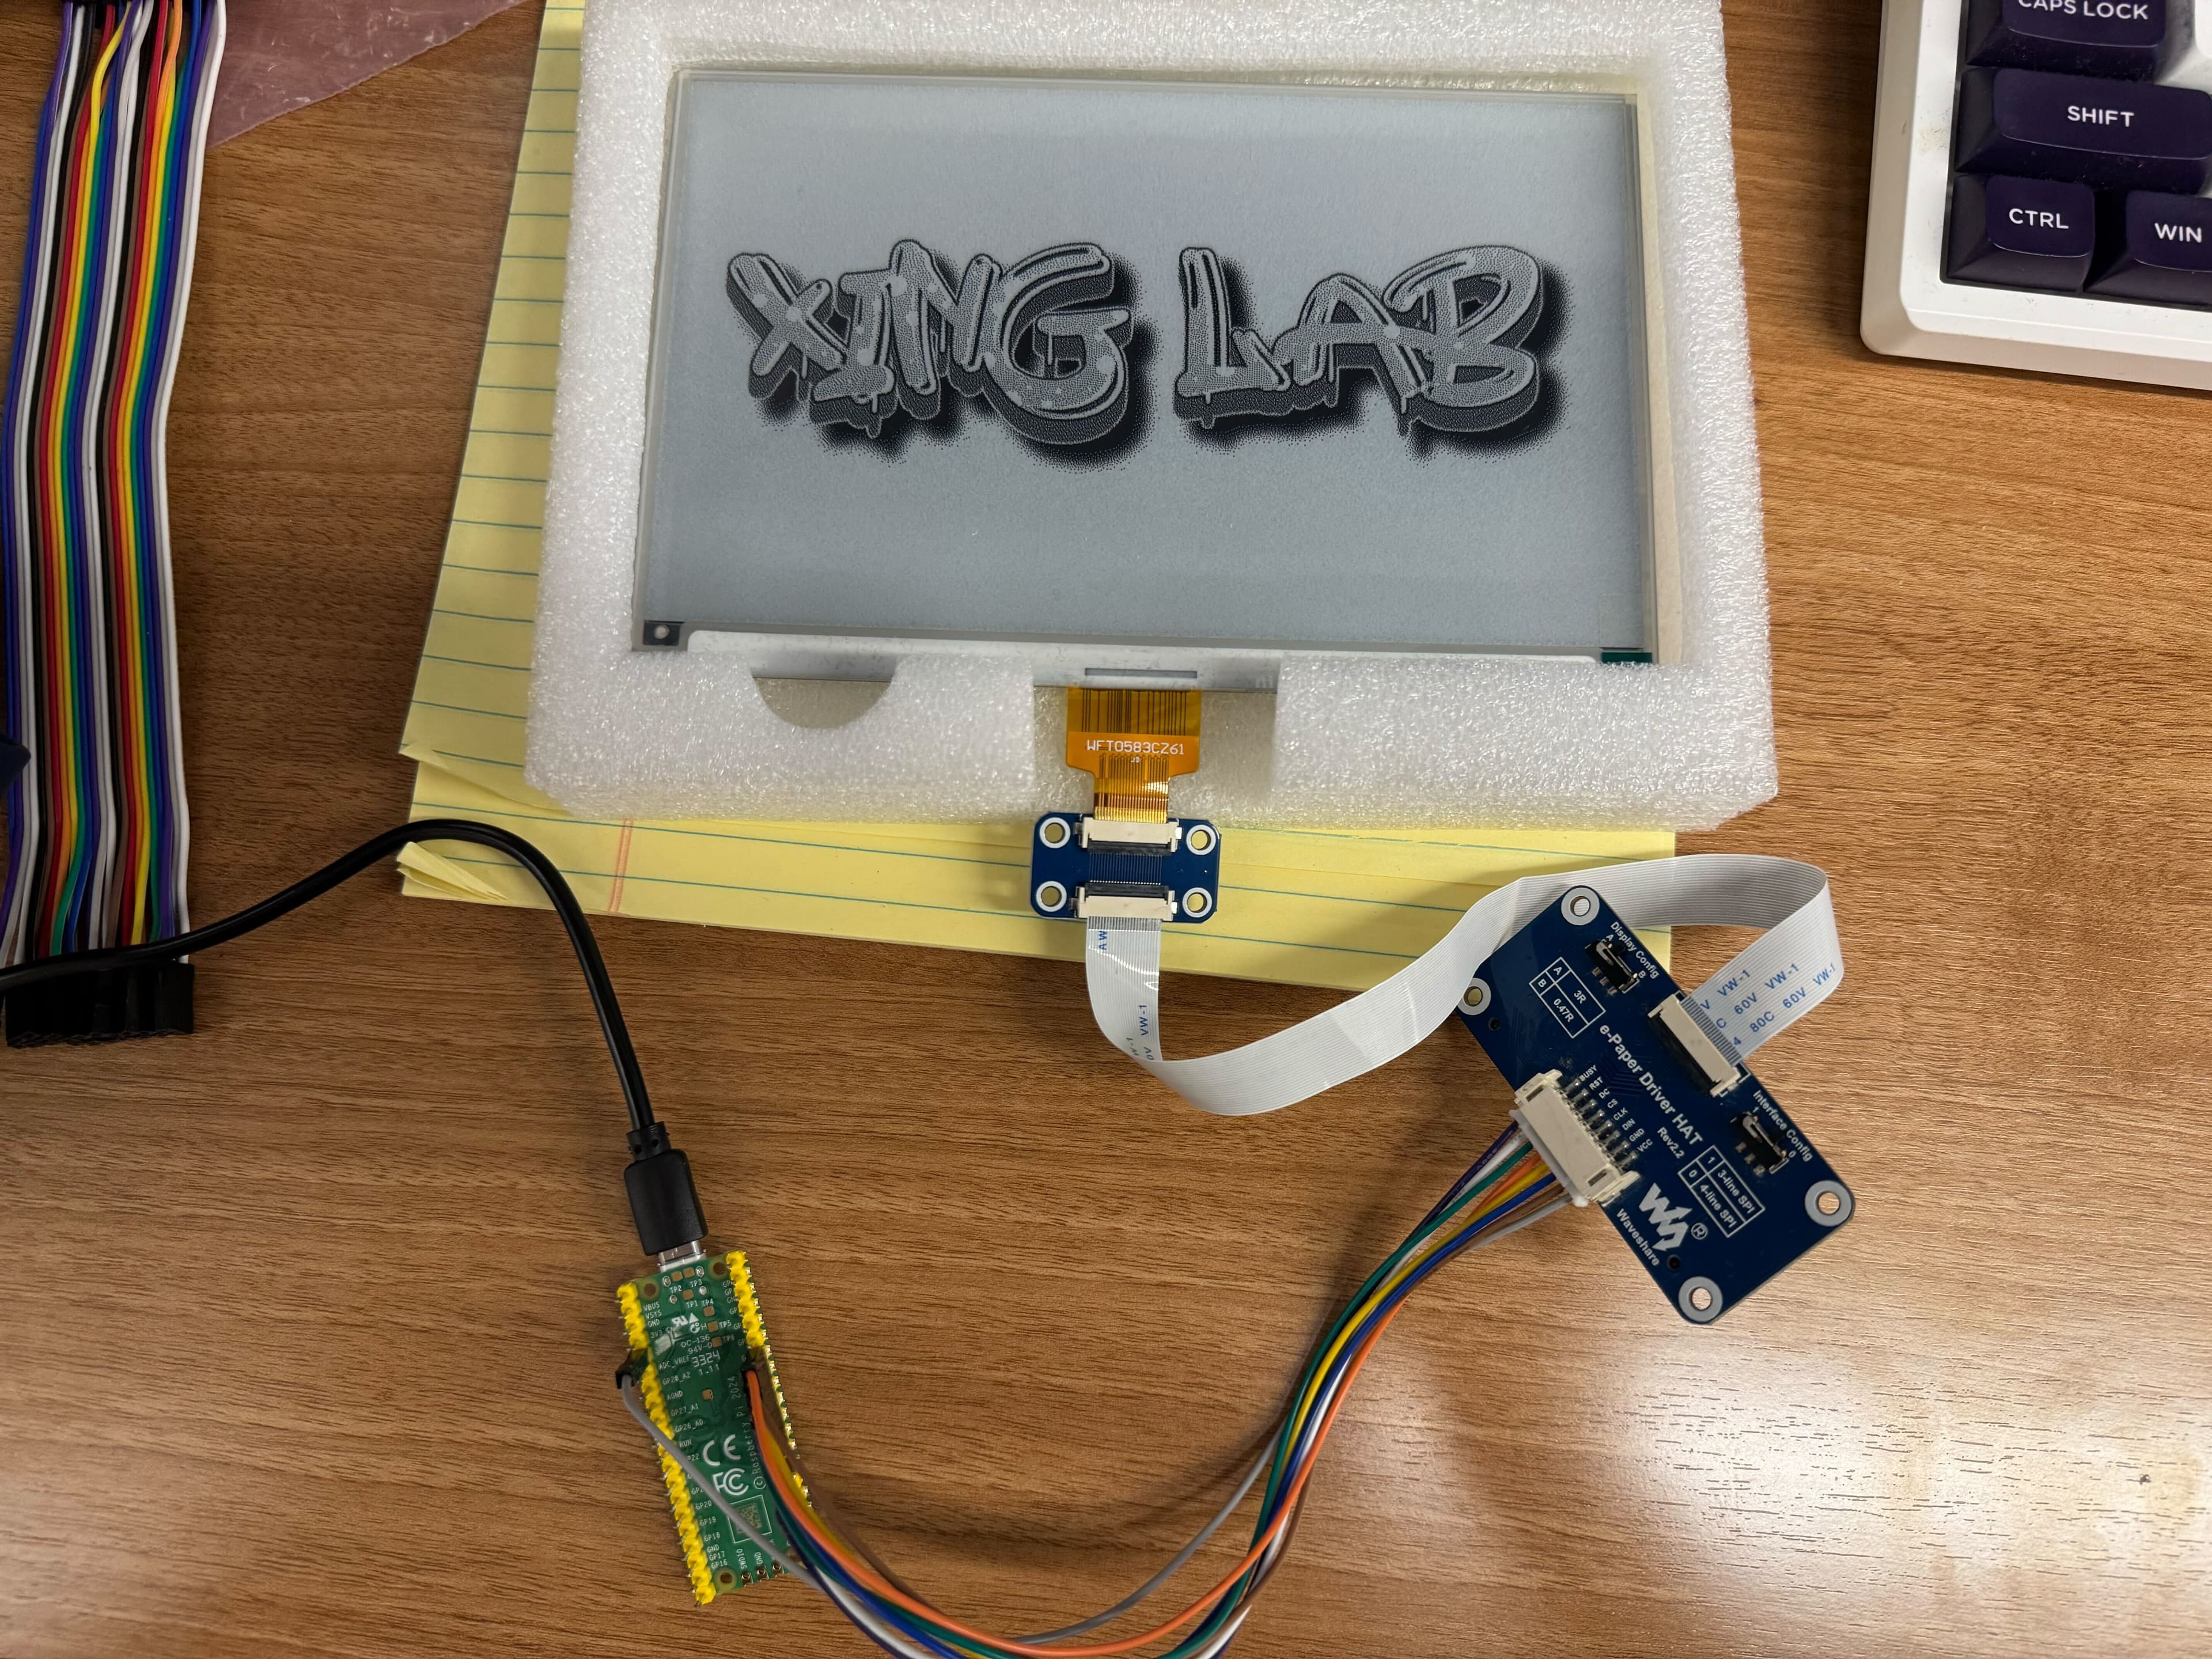
E‐paper display
Happy hacking with e‐paper and Pico!
© LICENSED UNDER CC BY-NC-SA 4.0