Retrieve vCenter Server VMs and NSX VMs resource allocati...
Lakshmikanth Mathur·2026-06-02·via VMware Blogs
Overview
In VMware Cloud Foundation (VCF) environments, vCenter Server and NSX management components are deployed as virtual machines. Administrators often require a streamlined method to monitor the resource allocations—specifically CPU, memory, and storage capacity—of these underlying vCenter Server and NSX management VMs in their entire infrastructure. Within VCF Operations, these configuration details can be efficiently extracted by utilizing the VMware Infrastructure Health (VIH) Adapter objects.
Get allocated system resources for vCenter Server VMs
To get allocated system resources for VMs underpinning vCenter Server application for your entire infrastructure, follow these steps:
Login to the VCF operations user interface with an admin account or with an account that has sufficient privileges to create a view
Create a new List view
In the “Name and Configuration” section, name the list view as “vCenter Server VM – System Resources”. Retain the other default configurations in this section.
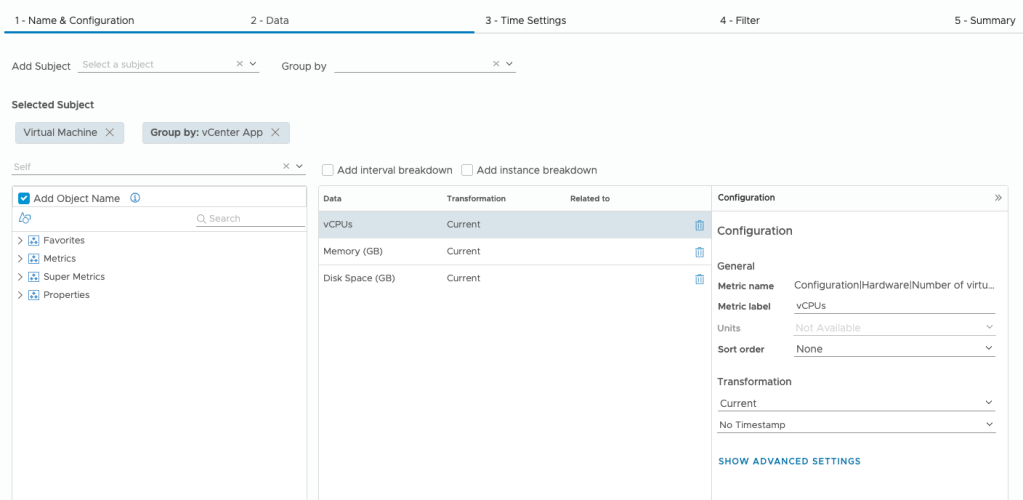
In the “data” settings, add the subject “vCenter -> Virtual Machine” and Group by “VMware Infrastructure Health -> vCenter App”.
In the “data” settings, add the following properties:
Property Name
Metric Label
Units
Transformation
Configuration|Hardware|Number of Virtual CPUs
vCPUs
Not Available (Use the default)
Current
Configuration|Hardware|Memory (KB)
Memory (GB)
GB
Current
Configuration|Hardware|Disk Space (KB)
Disk Space (GB)
GB
Current
The following screenshot shows the “data” settings of the view:
In the “data” settings, select the preview as “vSphere World”.
Retain the default configurations for the Time, Filter, and Summary settings.
Click “Create” to create the new view.
Go to the view results page, ensuring “vSphere World” is set as the preview source. Once the data has loaded, select “Export as csv” from the toolbar.
Open the exported file and remove all entries starting from the “No Group” row through to the end. Save the modified CSV file which now contains a refined list of all VMs supporting vCenter Server and their specific resource allocations.
Get allocated system resources for NSX Manager VMs
To get allocated system resources for VMs underpinning NSX Manager application for your entire infrastructure, follow these steps:
Login to the VCF operations user interface with an admin account or with an account that has sufficient privileges to create a view.
Create a new List view
In the “Name and Configuration” section, name the list view as “NSX Manager VM – System Resources”. Retain the other default configurations in this section.
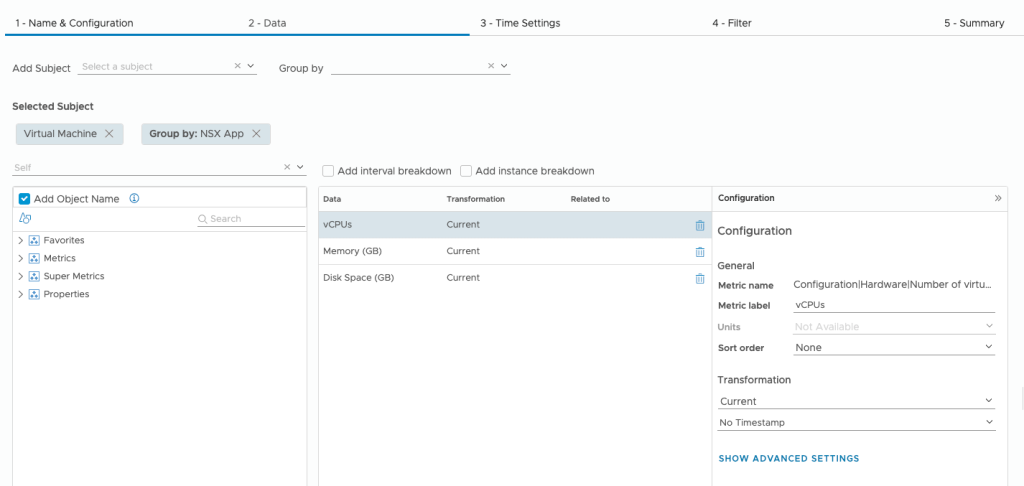
In the “data” section, add the subject “vCenter -> Virtual Machine” and Group by “VMware Infrastructure Health -> NSX App”.
In the “data” settings, add the following properties:
Property Name
Metric Label
Units
Transformation
Configuration|Hardware|Number of Virtual CPUs
vCPUs
Not Available (Use the default)
Current
Configuration|Hardware|Memory (KB)
Memory (GB)
GB
Current
Configuration|Hardware|Disk Space (KB)
Disk Space (GB)
GB
Current
The following screenshot shows the “data” settings of the view:
In the “data” settings, select the preview as “NSX World”.
Retain the default configurations for the Time, Filter, and Summary settings.
Click “Create” to create the new view.
Go to the view results page, ensuring “NSX World” is set as the preview source. Once the data has loaded, select “Export as csv” from the toolbar.
Open the exported file and remove all entries starting from the “No Group” row through to the end. Save the modified CSV file which now contains a refined list of all VMs supporting NSX Manager and their specific resource allocations.
Credits
Thanks to Anna Grigoryan for her valuable inputs in developing these views.
Discover more from VMware Cloud Foundation (VCF) Blog
Subscribe to get the latest posts sent to your email.