






一、 前言
初学WPF经常被Binding搞得苦不堪言,Binding的重用性就不做介绍了,在WPF应用程序开发中Binding是一个非常重要的部分。WPF也是近期才接触,学习WPF也是在网上查资料与微软的MSDN进行学习,写本博客的目为了温故而知新把学习过程记录下来,以备后查。
二、 WPF之Binding
1.) Binding的一般步骤:准备数据源,数据源需要实现INotifyPropertyChanged接口.如下实例
class Student: INotifyPropertyChanged
{
   public event PropertyChangedEventHandler PropertyChanged;
   private string name;
   public string Name
   {
    get { return name; }
    set{name = value;}
   //触发事件
   if (PropertyChanged != null)
     {
      PropertyChanged.Invoke(this, new PropertyChangedEventArgs("Name"));
     }
   }
}
2.) Binding对象
Student p = new Student ("曾小贤");
Binding binding = new Binding();
binding.Source = p;
binding.Path = new PropertyPath("Name");
3.) 用Binding对象将数据源和目标连结 假如在XAML处添加了一个TextBlock目标
<TextBlock x:Name="txtName"></TextBlock>
使用BindingOperations.SetBinding()方法将其进行binding了
BindingOperations.SetBinding(txtName, TextBlock.TextProperty, binding);
也可以使用UI元素的基类FramworkElement封装的SetBinding函数
txtName.SetBinding(TextBlock.TextProperty, binding);
两步结合在一起可以这样写
txtName.SetBinding(TextBlock.TextProperty, new Binding("Name") { Source=p});
三、 WPF对比WinForm实例
做这个例子也是上家公司同事想了解WPF,之前公司项目是用WinForm做His系统的,这个例子主要展示同一个需求用WinForm和WPF分别进行实现,通过这个例子,我们可以看到两者之间的区别和联系,同时也可以对我们的项目选型带来一定的参考作用(原型来自于Josh Smith与Knights Warrior的文章,个人觉得讲得非常不错,所以对原有例子进行了改造,进而有了这个案例)。
下面是WinForms版本与WPF版本的截图:
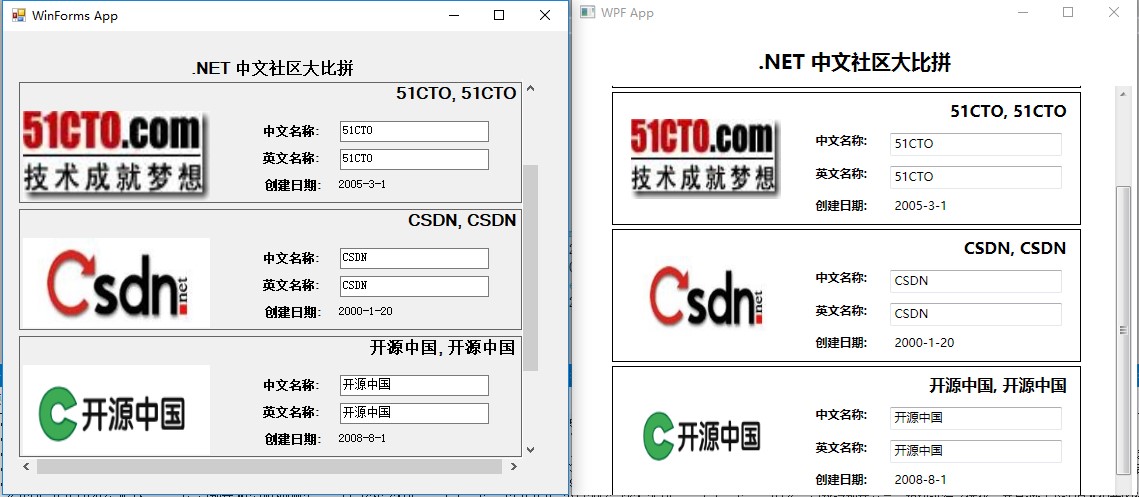
程序简介
这个例子非常简单,需求就是展示三大社区的基本信息,同时你可以在输入框对其进行修改,当焦点切换的时候,你就会看到它会自动进行修改,你把鼠标放在图片上面会提示社区的ID等等。我在这里没有用复杂的逻辑和高深的架构,只是想通过这个例子展示WinForm的WPF的差异和联系,所以在程序处理上可能会有很多漏洞,比如没有对输入进行验证,你可以输入空格和任意字符等。如果你编辑了某个社区的中文名称或者英文名称,然后把焦点移到另外一个地方,这些更改就会通过右上角的全名体现出来,因为他们都是通过绑定到公用字段来实现这些操作的。
这两个应用程序都是使用的BusinessObjects作为逻辑类库,BusinessObjects中的Company对UI所使用的数据进行了Mock。所以他们在需求方面都是一样的,由于比较简单,所以请看下面代码:

  1 using System;
  2 using System.ComponentModel;
  3 using System.IO;
  4 using System.Reflection;
  5
  6 namespace BusinessObjects
  7 {
  8 public class Company : INotifyPropertyChanged
  9 {
 10     #region 创建数据方法
 11
 12     public static Company[] GetCompanys()
 13     {
 14         // 在真正的应用程序中,这可能会调用数据访问层,从数据库中获取记录。
 15         return new Company[]
 16         {
 17             new Company(1, "博客园", "CNBlogs", GetPictureFile(1), new DateTime(2004, 1, 12)),
 18             new Company(2, "51CTO", "51CTO", GetPictureFile(2), new DateTime(2005, 3, 1)),
 19             new Company(3, "CSDN", "CSDN", GetPictureFile(3), new DateTime(2000, 1, 20)),
 20             new Company(4, "开源中国", "开源中国", GetPictureFile(4), new DateTime(2008, 8, 1)),
 21             new Company(5, "ITEYE", "ItEye", GetPictureFile(5), new DateTime(2011, 4, 1)),
 22         };
 23     }
 24
 25     private static string GetPictureFile(int CompanyID)
 26     {
 27         string fileName = String.Format("emp{0}.jpg", CompanyID);
 28         string folder = Path.GetDirectoryName(Assembly.GetExecutingAssembly().Location);
 29         folder = Path.Combine(folder, "Images");
 30         return Path.Combine(folder, fileName);
 31     }
 32
 33     private Company(int id, string chineseName, string EnglishName, string pictureFile, DateTime startDate)
 34     {
 35         this.ID = id;
 36         this.chineseName = chineseName;
 37         this.EnglishName = EnglishName;
 38         this.PictureFile = pictureFile;
 39         this.StartDate = startDate;
 40     }
 41
 42     #endregion // 创建数据方法
 43
 44     #region 实体属性
 45
 46     public int ID { get; private set; }
 47
 48     string _chineseName;
 49     public string chineseName//中文名称
 50     {
 51         get { return _chineseName; }
 52         set
 53         {
 54             if (value == _chineseName)
 55                 return;
 56
 57             _chineseName = value;
 58
 59             this.OnPropertyChanged("chineseName");
 60             this.OnPropertyChanged("FullName");
 61         }
 62     }
 63
 64     string _EnglishName;
 65     public string EnglishName//英文名称
 66     {
 67         get { return _EnglishName; }
 68         set
 69         {
 70             if (value == _EnglishName)
 71                 return;
 72
 73             _EnglishName = value;
 74
 75             this.OnPropertyChanged("EnglishName");
 76             this.OnPropertyChanged("FullName");
 77         }
 78     }
 79
 80     public string FullName
 81     {
 82         get { return String.Format("{0}, {1}", this.EnglishName, this.chineseName); }
 83     }
 84
 85     public string PictureFile { get; private set; }//图片文件地址
 86     public DateTime StartDate { get; private set; }//开始时间
 87
 88     #endregion // 实体属性
 89
 90     #region INotifyPropertyChanged 接口
 91
 92     public event PropertyChangedEventHandler PropertyChanged;
 93
 94     protected virtual void OnPropertyChanged(string propertyName)//属性变更通知
 95         {
 96         PropertyChangedEventHandler handler = this.PropertyChanged;
 97         if (handler != null)
 98             handler(this, new PropertyChangedEventArgs(propertyName));
 99     }
100
101     #endregion
102 }
103 }
View Code
上面这段代码没有什么不寻常的地方,大家写WinForm和Asp.Net也会写这样的逻辑类,只是要注意Company 实现了INotifyPropertyChanged 接口,大家看到这个接口只有一个OnPropertyChanged的方法,这个方法就是我们要说的属性变更通知方法,就是说当一个属性改变了,我们需要做些什么来响应这些改变。
WPF版本我这里就做得很简单了,由于开发WPF程序提供了很多模板和工具,所以我这里基本没写什么代码,全部的代码都是通过XAML实现,并且大部分都是自动生成的,只是我们要根据项目具体情况做一些修改就行。
这个WPF项目同样有一个Window和一个customUserControl, 和 WinForms 版本基本一样. 只是WinForms中用FlowLayoutPanel来承载EmployeeControl控件, 而WPF 用的是ItemsControl来承载这个用户控件.更加可喜的是,WPF通过模板来进行定制,所以我们就不需要像WinForms那样写循环加载控件的代码,下面就是WPF用XAML实现的窗体代码:
 1 <Window
 2   x:Class="WpfApp.Window1"
 3   xmlns="http://schemas.microsoft.com/winfx/2006/xaml/presentation"
 4   xmlns:x="http://schemas.microsoft.com/winfx/2006/xaml"
 5   xmlns:local="clr-namespace:WpfApp"
 6   xmlns:model="clr-namespace:BusinessObjects;assembly=BusinessObjects"
 7   Title="WPF App" Height="500" Width="560"
 8   WindowStartupLocation="CenterScreen"
 9   >
10   <Window.DataContext>
11     <ObjectDataProvider ObjectType="{x:Type model:Company}" MethodName="GetCompanys" />
12   </Window.DataContext>
13   <Grid Width="500">
14     <Label  Name="label1" HorizontalContentAlignment="Center" VerticalAlignment="Top" FontSize="20" FontWeight="Bold" Height="36.6" Margin="0,16,0,0">
15        .NET 中文社区大比拼
16     </Label>
17         <WrapPanel Margin="0,57.6,0,0">
18             <ScrollViewer VerticalScrollBarVisibility="Auto" Height="536" Width="500" >
19                 <ItemsControl  ItemsSource="{Binding}" HorizontalContentAlignment="Center"  Focusable="False" Height="783">
20                     <ItemsControl.ItemTemplate>
21                         <DataTemplate>
22                             <local:CompanyControl />
23                         </DataTemplate>
24                     </ItemsControl.ItemTemplate>
25                 </ItemsControl>
26             </ScrollViewer>
27         </WrapPanel>
28     </Grid>
29 </Window>
View Code
在如下的XAML代码中,这里有几点需要注意,。Window的DataContext赋予了一个ObjectDataProvider的对象,而ObjectDataProvider又会调用GetEmployees这个方法。所以一旦把DataContext设置到Company 对象,并且把ItemsControl的ItemsSource设置为“{Binding}” 就意味着该控件里面会自动显示Company 对象的所有数据。
这里我们并不需要像WinForm一样用循环的方式创建CompanyControl的实例。这是因为ItemsControl中的ItemTemplate属性设置为了一个DataTemplate,同时ItemsControl中的ItemsSource绑定到了Company 的对象数组,那么ItemTemplate就会知道如何创建一个CompanyControl,所以大家看到这里写的代码就相对变少了,这也是XAML的一个优点之一。
该CompanyControl的后台CS文件也是空的(除了必须的InitializeComponent),所以它不像的WinForms应用程序那么累赘,界面和逻辑紧密的耦合在了一起。下面就是CompanyControl的XAML代码, 这个代码相对来说就比较简单了。
 1 <UserControl x:Class="WpfApp.CompanyControl"
 2     xmlns="http://schemas.microsoft.com/winfx/2006/xaml/presentation"
 3     xmlns:x="http://schemas.microsoft.com/winfx/2006/xaml"
 4     Height="137" Width="481">
 5   <Border BorderBrush="Black"  BorderThickness="1" Margin="2" SnapsToDevicePixels="True" Width="469">
 6     <Grid Height="129" Width="451">
 7       <Image Source="{Binding PictureFile}"  Margin="10" Name="image1" Stretch="Fill"  Width="150" Height="80" HorizontalAlignment="Left" >
 8         <Image.ToolTip>
 9           <TextBlock>
10             <Run TextBlock.FontWeight="Bold">Company ID:</Run>
11             <TextBlock Margin="4,0,0,0" Text="{Binding ID}" />
12           </TextBlock>
13         </Image.ToolTip>
14       </Image>
15         <Label  Content="{Binding FullName}"  Height="34" Margin="99,2,0,0" Name="中英文名称" VerticalAlignment="Top"  HorizontalContentAlignment="Right" FontSize="16" FontWeight="Bold" />
16         <Label Margin="190,34,0,0" Name="chineseNameLabel" FontWeight="Bold" Height="28"  VerticalAlignment="Top" HorizontalAlignment="Left" Width="73">中文名称:</Label>
17       <TextBox  Text="{Binding chineseName}"  HorizontalAlignment="Right" Margin="0,39,10,0"  Name="textBox1" Width="172" Height="23"  VerticalAlignment="Top" TextDecorations="None" />
18
19       <Label FontWeight="Bold" Height="28" Margin="190,0,0,34"   Name="EnglishNameLabel" VerticalAlignment="Bottom"  HorizontalAlignment="Left" Width="73">英文名称:</Label>
20       <TextBox   Text="{Binding EnglishName}" Height="23" Margin="0,0,10,34" Name="textBox2"  VerticalAlignment="Bottom" HorizontalAlignment="Right" Width="172" />
21
22       <Label Height="28" Margin="190,0,185,2"  Name="startDateLabel" VerticalAlignment="Bottom"  FontWeight="Bold">创建日期:</Label>
23       <Label  Content="{Binding StartDate}" Height="28" HorizontalAlignment="Right" Margin="0,0,10,2"  Name="startDateValueLabel" VerticalAlignment="Bottom"  Width="172" />
24     </Grid>
25   </Border>
26 </UserControl>
View Code
如上面的代码所示,UI上的很多元素我们都可以通过拖控件进行实现,有个功能需要自己简单的写一写代码,UI上面有一个功能就是你把鼠标放在图片上的时候会提示CompanyID,这个功能通过ToolTip属性进行实现的。ToolTip属性是WPF所有元素的基类FrameworkElement的一个属性,所以我们可以在这些子元素当中直接使用。
那么大家注意到,这个小功能在WinForm中我们要写一些代码,而在WPF就可以直接通过属性定制,所以在很多方面WPF对这些方面都做了封装和简化,也提高了我们的开发效率。
WinForms版本就包含一个Form 和一个展示社区信息的custom UserControl, 这个Form 包含了一个FlowLayoutPanel控件, 它主要的作用就是用来承载每个社区的实例. 那么代码就如下所示:
 1 using System;
 2 using System.Collections.Generic;
 3 using System.ComponentModel;
 4 using System.Data;
 5 using System.Drawing;
 6 using System.Linq;
 7 using System.Text;
 8 using System.Windows.Forms;
 9 using BusinessObjects;
10
11 namespace WinFormsApp
12 {
13     public partial class Form1 : Form
14     {
15         public Form1()
16         {
17             InitializeComponent();
18
19             // 创建并初始化用户控件
20             foreach (Company com in Company.GetCompanys())
21             {
22                 CompanyControl comCtrl = new CompanyControl();
23                 comCtrl.Company = com;
24                 this.flowLayoutPanel.Controls.Add(comCtrl);
25             }
26         }
27     }
28 }
View Code
CompanyControl是我们创建的一个UserControl,由于每个CompanyControl都要显示一个Company对象的属性值,我在这里使用了BindingSource控件来进行绑定,这样做也是为了和WPF更接近考虑(增强对比性,呵呵)。具体如下截图:
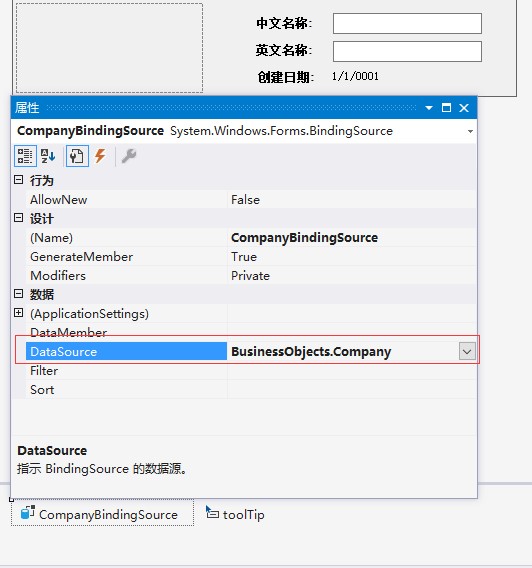
如上图所示,我们用了BindingSource来获取数据,但有一个属性除外,那就是Company ID,请看下面代码:
 1 using System.Drawing;
 2 using System.Windows.Forms;
 3 using BusinessObjects;
 4
 5 namespace WinFormsApp
 6 {
 7     /// <summary>
 8     /// 显示社区对象的WinForms控件
 9     /// </summary>
10     public partial class CompanyControl : UserControl
11     {
12         public CompanyControl()
13         {
14             InitializeComponent();
15
16             // 将图片文件路径转换为位图。
17             Binding binding = this.CompanyPicture.DataBindings[0];
18             binding.Format += this.ConvertFilePathToBitmap;
19         }
20
21         void ConvertFilePathToBitmap(object sender, ConvertEventArgs e)
22         {
23             e.Value = Bitmap.FromFile(e.Value as string);
24         }
25
26         public Company Company
27         {
28             get { return this.CompanyBindingSource.DataSource as Company; }
29             set
30             {
31                 this.CompanyBindingSource.DataSource = value;
32
33                 // 该社区的图片显示ID提示。
34                 if (value != null)
35                 {
36                     string msg = "Company ID:  " + value.ID;
37                     this.toolTip.SetToolTip(this.CompanyPicture, msg);
38                 }
39             }
40         }
41     }
42 }
View Code
这里有几点需要注意.在绑定的时候,我们对PictureFile 字段进行了转换,这个是必须做的. 如果不那样做, 这个图片会绑定失败,因为在绑定的时候它不能自动把string类型直接转化为Image类型.
现在我们已经把Company绑定到了我们的控件上, 这里我需要给PictureBox一个tooltip的效果. 这个tooltip将显示 Company ID, 前缀显示为 "Company ID:". 现在这个是在代码里面写的,没有在窗体中发现有WPF ToolTip等类似的工具,不知道大家用到过没有?
总的来说, 这是一个很简单的例子,我们的大部分功能也是用代码没有写代码,是通过visual designer进行实现的.然后通过一部分代码把它衔接起来, 我们看到Windows Forms是一个非常快速和实用的开发平台.
例子是用Visual Studio 2017编写的,所以大家可以下载下来进行查看.
Demo下载:WinFormsAndWPFCompare.rar
此内容由惯性聚合(RSS阅读器)自动聚合整理,仅供阅读参考。 原文来自 — 版权归原作者所有。