








As I'm continuously working on sharpening my skills for creating beautiful and interactive 3D experiences on the web, I get constantly exposed to new tools and techniques, from the diverse React Three Fiber scenes to gorgeous shader materials. However, there's one Three.js tool that's often a common denominator to all these fascinating projects that I keep running into: Render Targets.
This term may seem scary, boring, or a bit opaque at first, but once you get familiar with it, it becomes one of the most versatile tools for achieving greatness in any 3D scene! You may have already seen render targets mentioned or used in some of my writing/projects for a large range of use cases, such as making a transparent shader materials or rendering 100's of thousands of particles without your computer breaking a sweat. There's, however, a lot more they can do, and since learning about render targets, I've used them in countless other scenes to create truly beautiful ✨ yet mind-bending 🌀 effects.
In this article, I want to share some of my favorite use cases for render targets. Whether it's for building infinity mirrors, portals to other scenes, optical illusions, and post-processing/transition effects, you'll learn how to leverage this amazing tool to push your React Three projects above and beyond. 🪄
Before we jump into some of those mind-bending 3D scenes I mentioned above, let's get us up to speed on what a render target or WebGLRenderTarget is:
A tool to render a scene into an offscreen buffer.
That is the simplest definition I could come up with 😅. In a nutshell, it lets you take a snapshot of a scene by rendering it and gives you access to its pixel content as a texture for later use. Here are some of the use cases where you may encounter render targets:
Post-processing effects: we can modify that texture using a shader material and GLSL's texture2D function.
Apply scenes as textures: we can take a snapshot of a 3D scene and render it as a texture on a mesh. That lets us create different kinds of effects like the transparency of glass or a portal to another world.
Store data: we can store anything in a render target, even if not necessarily meant to be "rendered" visually on the screen. For example, in particle-based scenes, we can use a render target to store the position of an entire set of particles that require large amounts of computation, as it's been showcased in The magical world of Particles with React Three Fiber and Shaders.
Whether it's for a Three.js or React Three Fiber, creating a render target is straightforward: all you need to use is the WebGLRenderTarget class.
1
const renderTarget = new THREE.WebGLRenderTarget();
However, if you use the @react-three/drei library in combination with React Three Fiber, you also get a hook named useFBO that gives you a more concise way to create a WebGLRenderTarget, with things like a better interface, smart defaults, and memoization set up out of the box. All the demos and code snippets throughout this article will feature this hook.
Now, when it comes to using render targets in a React Three Fiber scene, it's luckily pretty simple. Once instantiated, every render target-related manipulation will be done within the useFrame hook i.e. the render loop.
Using a render target within the useFrame hook
1
const mainRenderTarget = useFBO();
4
const { gl, scene, camera } = state;
6
gl.setRenderTarget(mainRenderTarget);
7
gl.render(scene, camera);
9
mesh.current.material.map = mainRenderTarget.texture;
11
gl.setRenderTarget(null);
This first code snippet features four main steps to set up and use our first render target:
We create our render target with useFBO.
We set the render target to mainRenderTarget.
We render our scene with the current camera onto the render target.
We map the content of the render target as a texture on a plane.
We set the render target back to null, the default render target.
The code playground below showcases what a scene using the code snippet above would look like:
After seeing this first example you might ask yourself Why is our scene mapped onto the plane moving along as we rotate the camera? or Why do we see an empty plane inside the mapped texture?. Here's a diagram that explains it all:
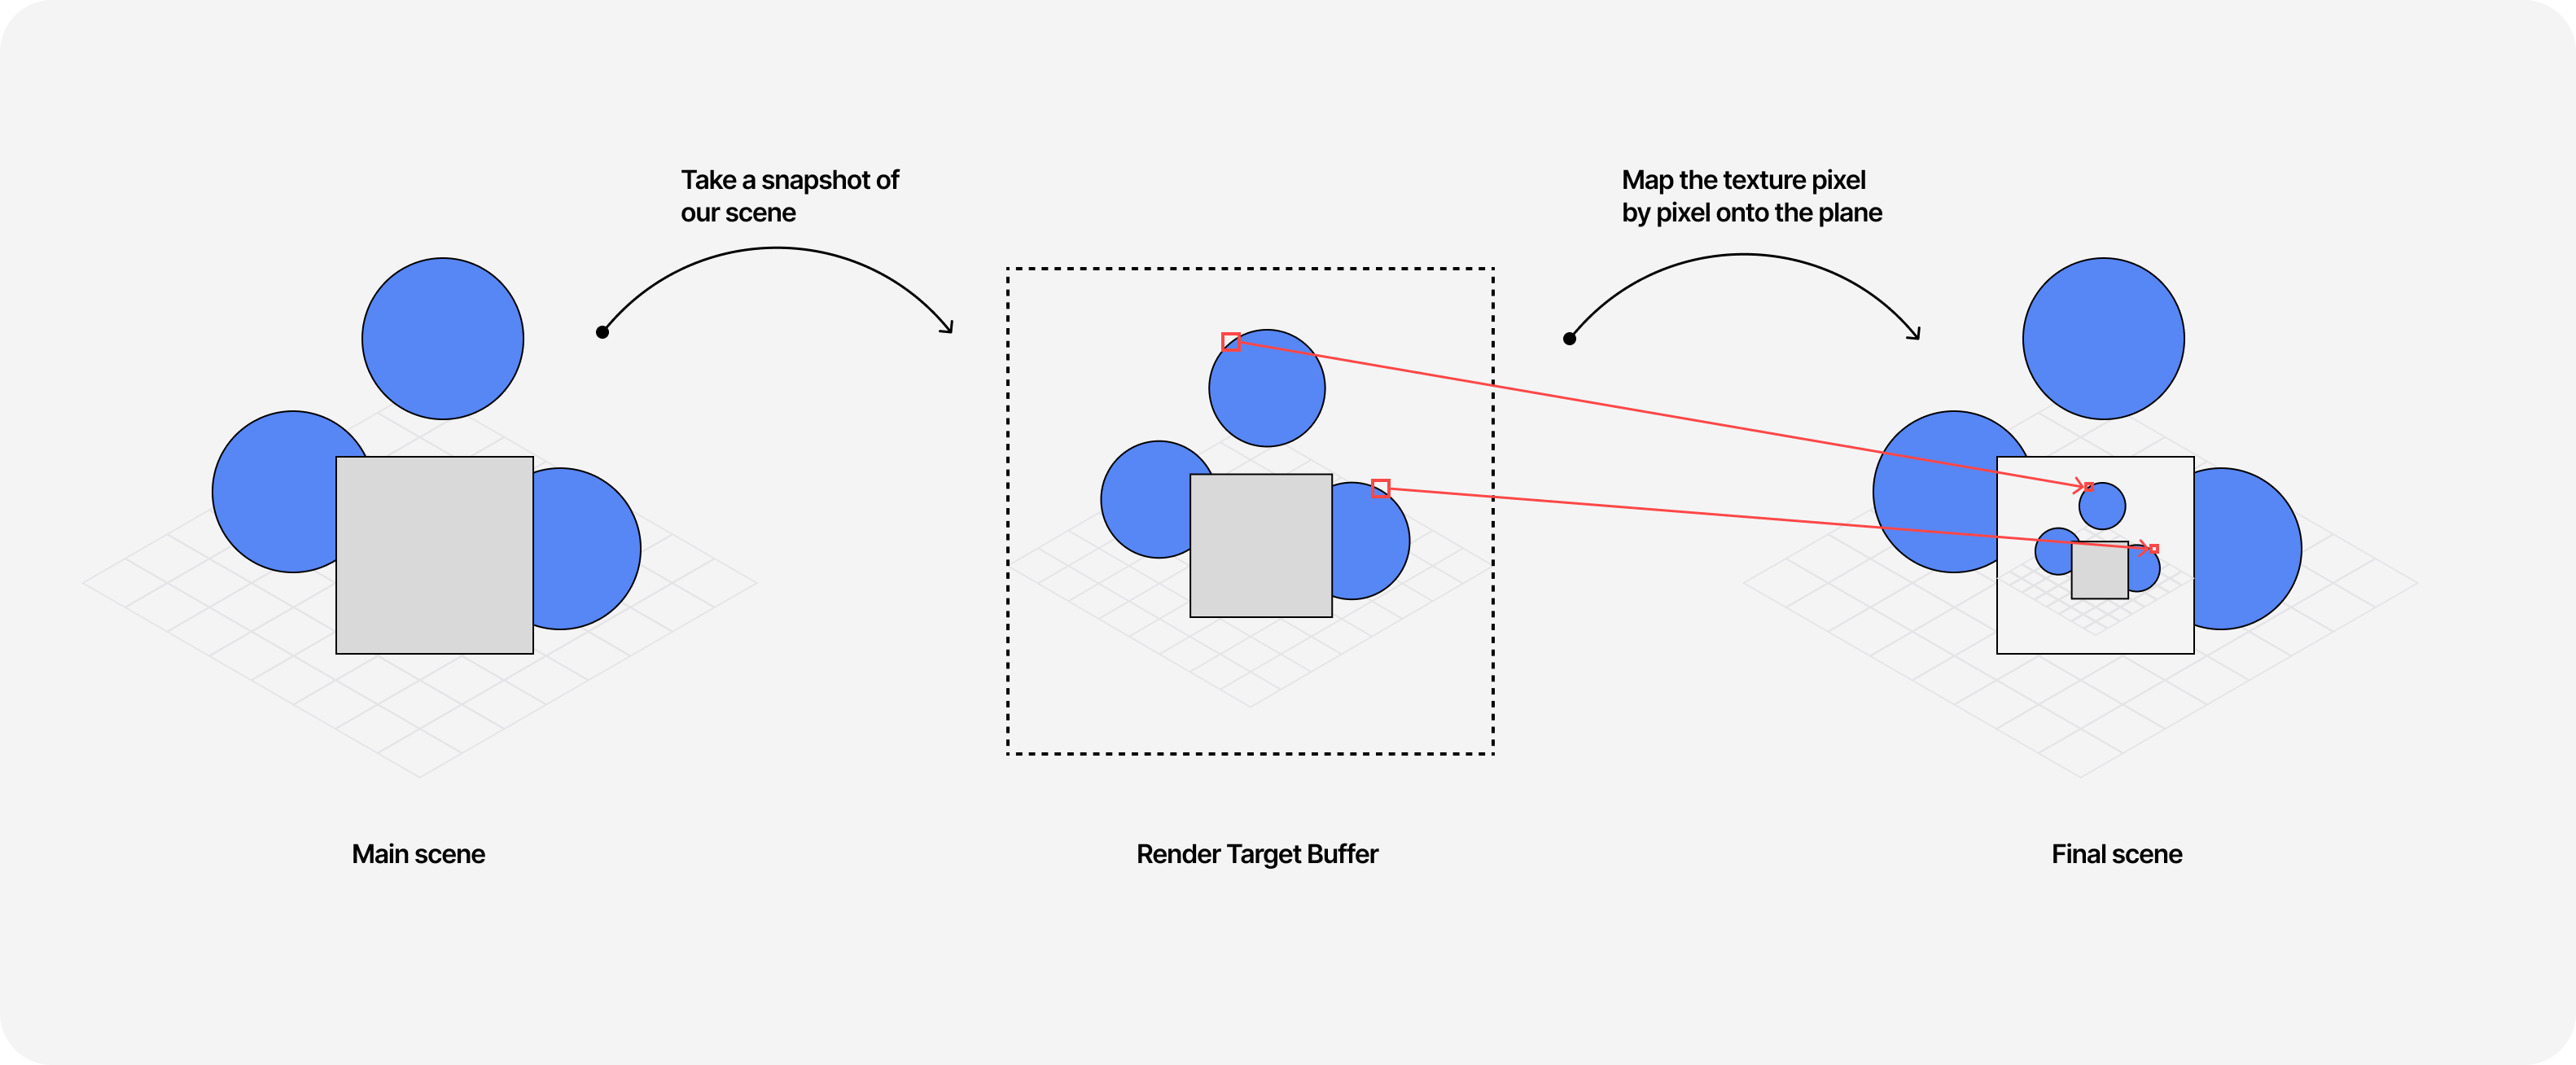
We set our render target.
We first take a snapshot of our scene including the empty plane with its default camera.
We map the render target's texture, pixel by pixel, onto the plane. Notice that we have a snapshot of the scene before we filled the plane with our texture, hence why it appears empty.
We do that for every frame 🤯 60 times per second (or 120 if you have a top-of-the-line display).
That means that any updates to the scene, like the position of the camera, will be taken into account and reproduced onto the plane since we run this loop of taking a snapshot and mapping it continuously.
Now, what if we wanted to fix the empty plane issue? There's actually an easy fix to this! We just need to introduce a second render target that takes a snapshot of the first one and maps the resulting texture of this up-to-date snapshot onto the plane. The result is an infinite mirror of the scene rendering itself over and over again inside itself ✨.
We now know how to use render targets to take snapshots of the current scene and use the result as a texture. If we leverage this technique with the very neat createPortal utility function from @react-three/fiber, we can start creating some effects that are close to magic 🪄!
Much like its counterpart in React that lets you render components into a different part of the DOM, with @react-three/fiber's createPortal, we can render 3D objects into another scene.
Example usage of the createPortal function
1
import { Canvas, createPortal } from '@react-three/fiber';
2
import * as THREE from 'three';
5
const otherScene = new THREE.Scene();
10
<planeGeometry args={[2, 2]} />
15
<sphereGeometry args={[1, 64]} />
With the code snippet above, we render a sphere in a dedicated scene object called otherScene within createPortal. This scene is rendered offscreen and thus will not be visible in the final render of this component. This has many potential applications, like rendering HUDs or rendering different views angles of the same scene.
You may be wondering why createPortal has anything to do with render targets. We can use them together to render any portalled/offscreen scene to get its texture without even having it visible on the screen in the first place! With this combination, we can achieve one of the first mind-bending use cases (or at least it was to me when I first encountered it 😅) of render targets: render a scene, within a scene.
Using createPortal in combination with render targets
3
const otherCamera = useRef();
4
const otherScene = new THREE.Scene();
6
const renderTarget = useFBO();
11
gl.setRenderTarget(renderTarget);
12
gl.render(otherScene, otherCamera.current);
14
mesh.current.material.map = renderTarget.texture;
16
gl.setRenderTarget(null);
21
<PerspectiveCamera manual ref={otherCamera} aspect={1.5 / 1} />
23
<planeGeometry args={[3, 2]} />
28
<sphereGeometry args={[1, 64]} />
There's only one change in the render loop of this example compared to the first one: instead of calling gl.render(scene, camera), we called gl.render(otherScene, otherCamera). Thus the resulting texture of this render target is of the portalled scene and its custom camera!
This code playground uses the same combination of render target and createPortal we just saw. You will also notice that if you drag the scene left or right, we notice a little parallax effect that gives a sense of depth to our portal.
This is a nice trick I discovered looking at some of @0xca0a's demos that only requires a single line of code:
1
otherCamera.current.matrixWorldInverse.copy(camera.matrixWorldInverse);
Here, we copy the matrix representing the position and orientation of our default camera onto our portalled camera. That has the result of mimicking any camera movement of the default scene in the portalled scene while having the ability to have a custom camera with different settings.
In all the examples we've seen so far, we used meshBasicMaterial's map prop to map our render target's texture onto a mesh for simplicity. However, there are some use cases where you'd want to have more control over how to map this texture (we'll see some examples for that in the last part of this article), and for that, knowing the shaderMaterial equivalent can be handy.
The only thing that this map prop is doing is mapping each pixel of the 2D render target's texture onto our 3D mesh which is what we generally refer to as UV mapping.
The GLSL code to do that is luckily concise and can serve as a base for many shader materials requiring mapping a scene as a texture:
Simple fragment shader to sample a texture with uv mapping
2
uniform sample2D uTexture;
7
vec4 color = texture2D(uTexture, uv);
Now that we've seen the manual way of achieving this effect, I can actually tell you a secret: there's a shorter/faster way to do all this using @react-three/drei's RenderTexture component.
Using RenderTexture to map a portalled scene onto a mesh
6
<RenderTexture attach="map">
7
<PerspectiveCamera makeDefault manual aspect={1.5 / 1} />
9
<sphereGeometry args={[1, 64]} />
I know we could have taken this route from the get-go, but at least now, you can tell that you know the inner workings of this very well-designed component 😛.
So far, we only looked at examples using render targets for applying textures to a 3D object using UV mapping, i.e. mapping all the pixels of the portalled scene onto a mesh. Moreover, if you visualized the last code playground with the renderBox options turned on, you probably noticed that the portalled scene was rendered on each face of the cube: our mapping was following the UV coordinates of that specific geometry.
We may have use cases where we don't want those effects, and that's where using screen coordinates instead of uv coordinates comes into play.
To illustrate the nuance between these two, let's take a look at the diagram below:
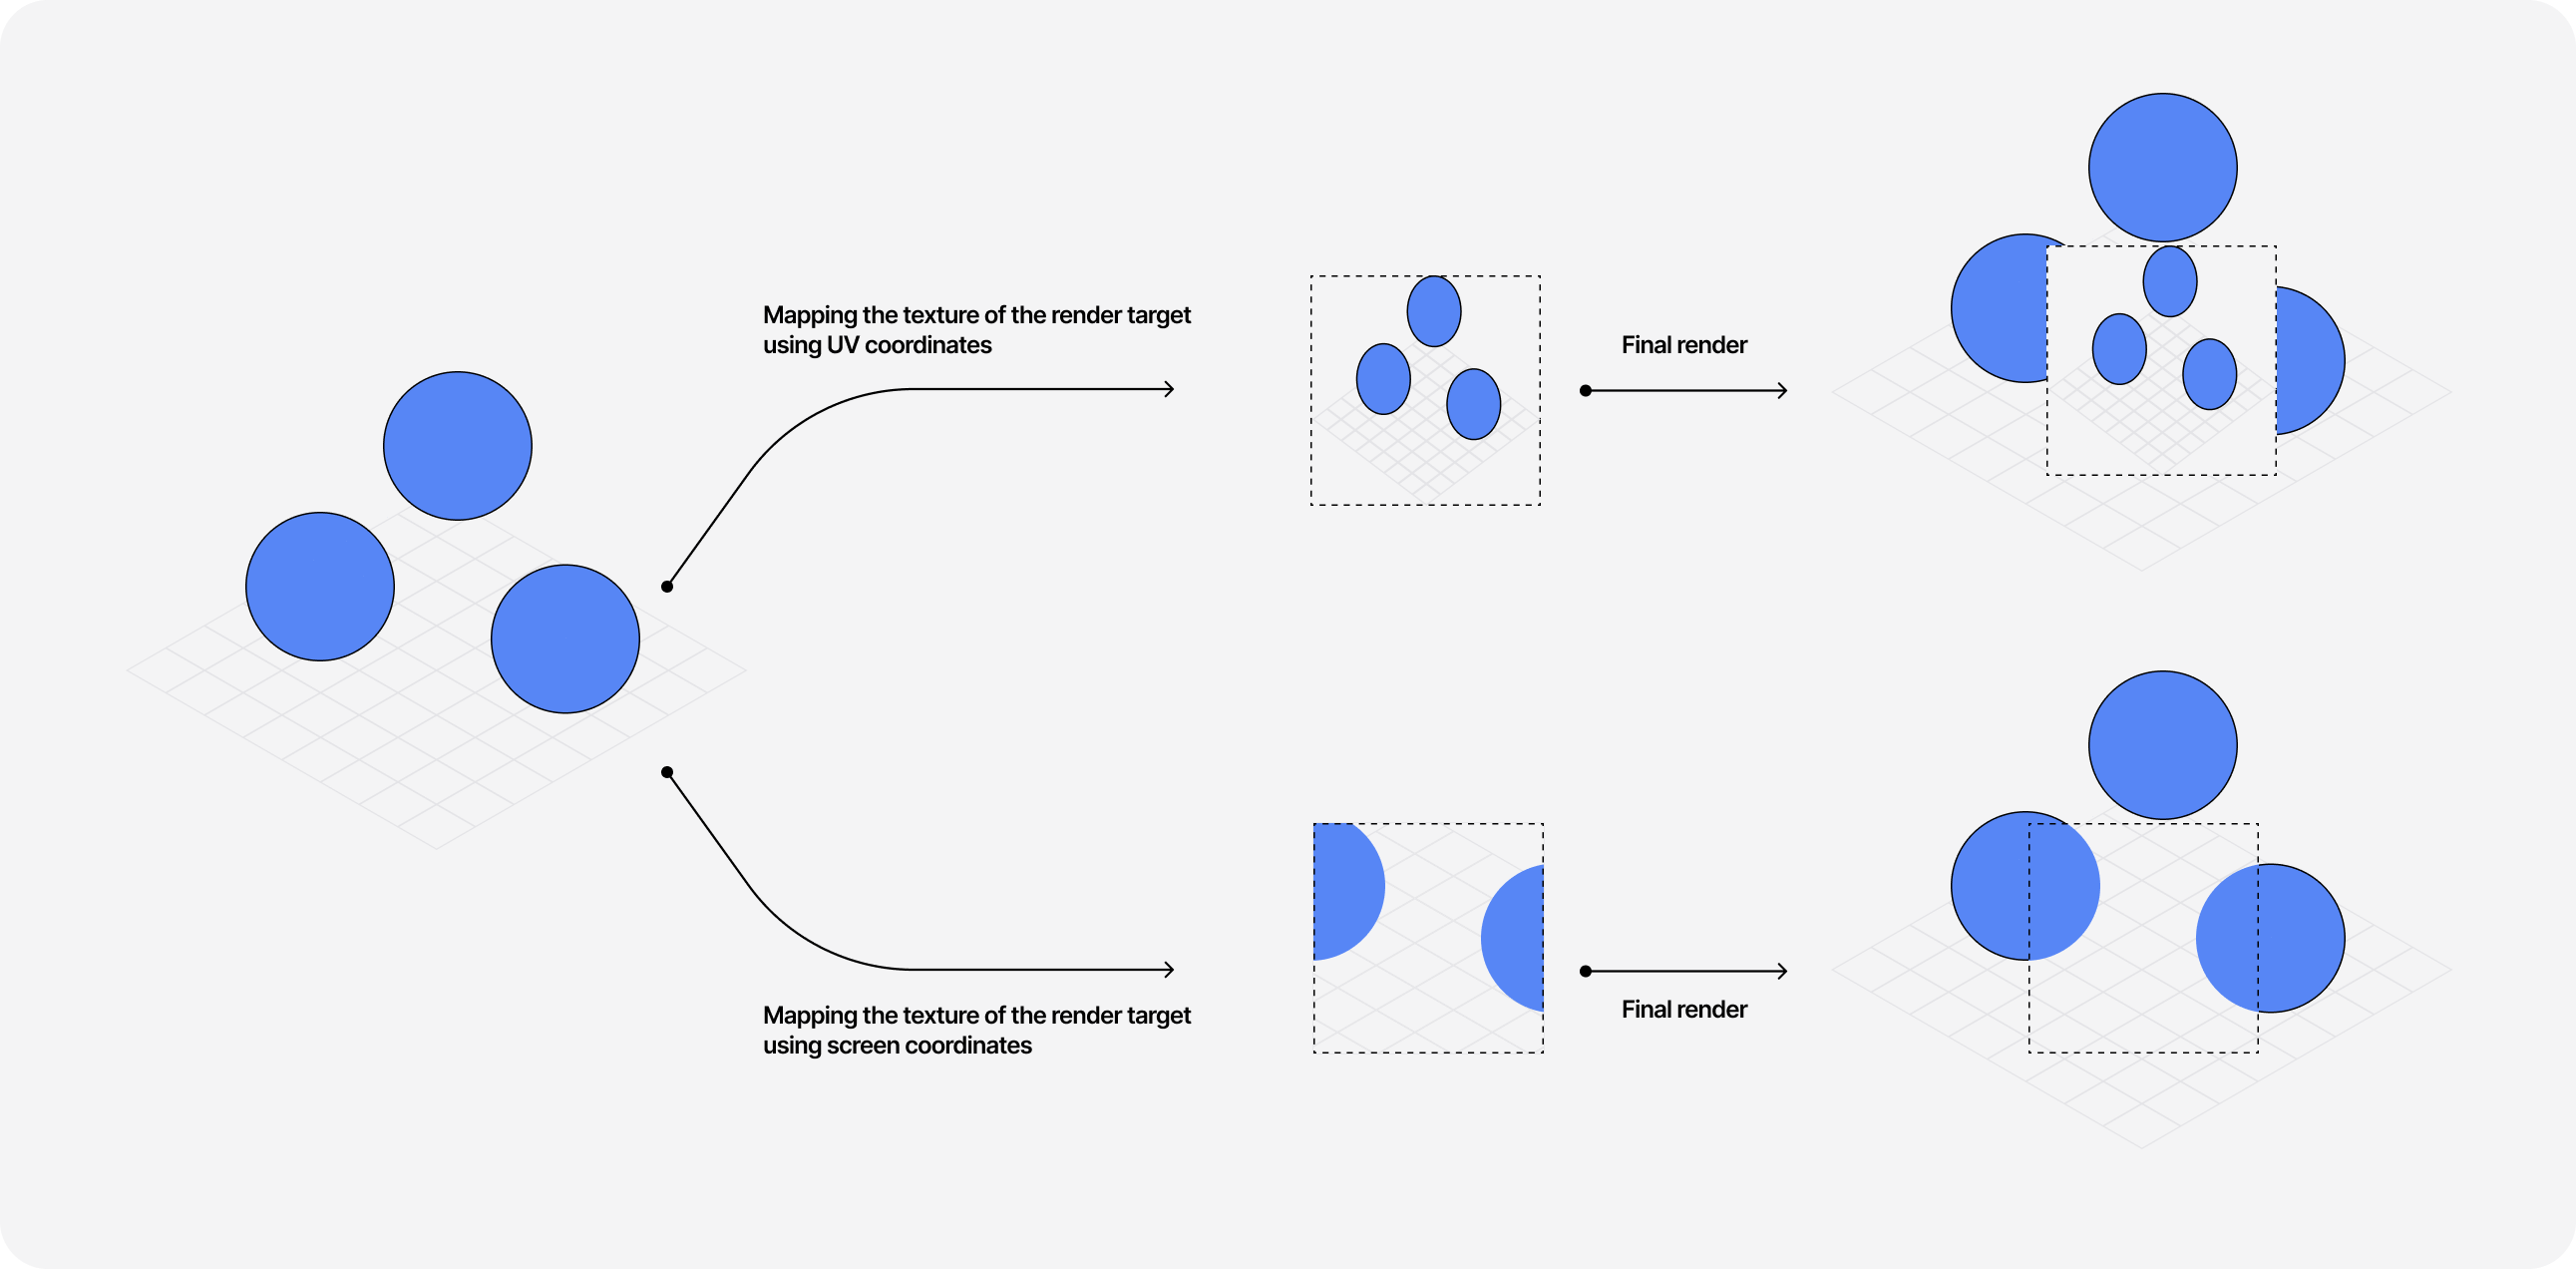
You can see that the main difference here lies in how we're sampling our texture onto our 3D object: instead of making the entire scene fit within the mesh, we render it "in place" as if the mesh was some "mask" revealing another scene behind the scene. Code-wise, there's only two lines to modify in our shader to use screen coordinates:
Simple fragment shader to sample a texture using screen coordinates
2
uniform vec2 winResolution;
3
uniform sampler2D uTexture;
6
vec2 uv = gl_FragCoord.xy / winResolution.xy;
7
vec4 color = texture2D(uTexture, uv);
which yields the following result if we update our last example with this change:
If you've read my article Refraction, dispersion, and other shader light effects this is the technique I used to make a mesh transparent: by mapping the scene surrounding the mesh onto it as a texture with screen coordinates.
Now you may wonder what are other applications for using screen coordinates with render targets 👀; that's why the following two parts feature two of my favorite scenes to show you what can be achieved when combining these two concepts!
Since all our render target magic happens within the useFrame hook that executes its callback on every frame, it's easy to swap materials or even geometries between render targets to create optical illusions for the viewer.
The code snippet bellow details how you can achieve this effect:
Hidding/showing mesh and swapping materials in the render loop
8
const renderTarget = useFBO();
13
const oldMaterialMesh3 = mesh3.current.material;
14
const oldMaterialMesh4 = mesh4.current.material;
17
mesh1.current.visible = false;
19
mesh2.current.visible = true;
22
mesh3.current.material = new THREE.MeshBasicMaterial();
23
mesh3.current.material.color = new THREE.Color('#000000');
24
mesh3.current.material.wireframe = true;
26
mesh4.current.material = new THREE.MeshBasicMaterial();
27
mesh4.current.material.color = new THREE.Color('#000000');
28
mesh4.current.material.wireframe = true;
30
gl.setRenderTarget(renderTarget);
31
gl.render(scene, camera);
34
lens.current.material.uniforms.uTexture.value = renderTarget.texture;
37
mesh1.current.visible = true;
39
mesh2.current.visible = false;
42
mesh3.current.material = oldMaterialMesh3;
43
mesh3.current.material.wireframe = false;
45
mesh4.current.material = oldMaterialMesh4;
46
mesh4.current.material.wireframe = false;
48
gl.setRenderTarget(null);
There are four meshes in this scene: one dodecahedron (mesh1), one torus (mesh2), and two spheres (mesh3 and mesh4).
At the beginning of the render loop, we hide mesh1 and set the material of mesh3 and mesh4 to render as a wireframe
We take a snapshot of that scene in our render target.
We pass the texture of the render target to another mesh called lens.
We then show mesh1, hide mesh2, and restore the material of mesh3 and mesh4.
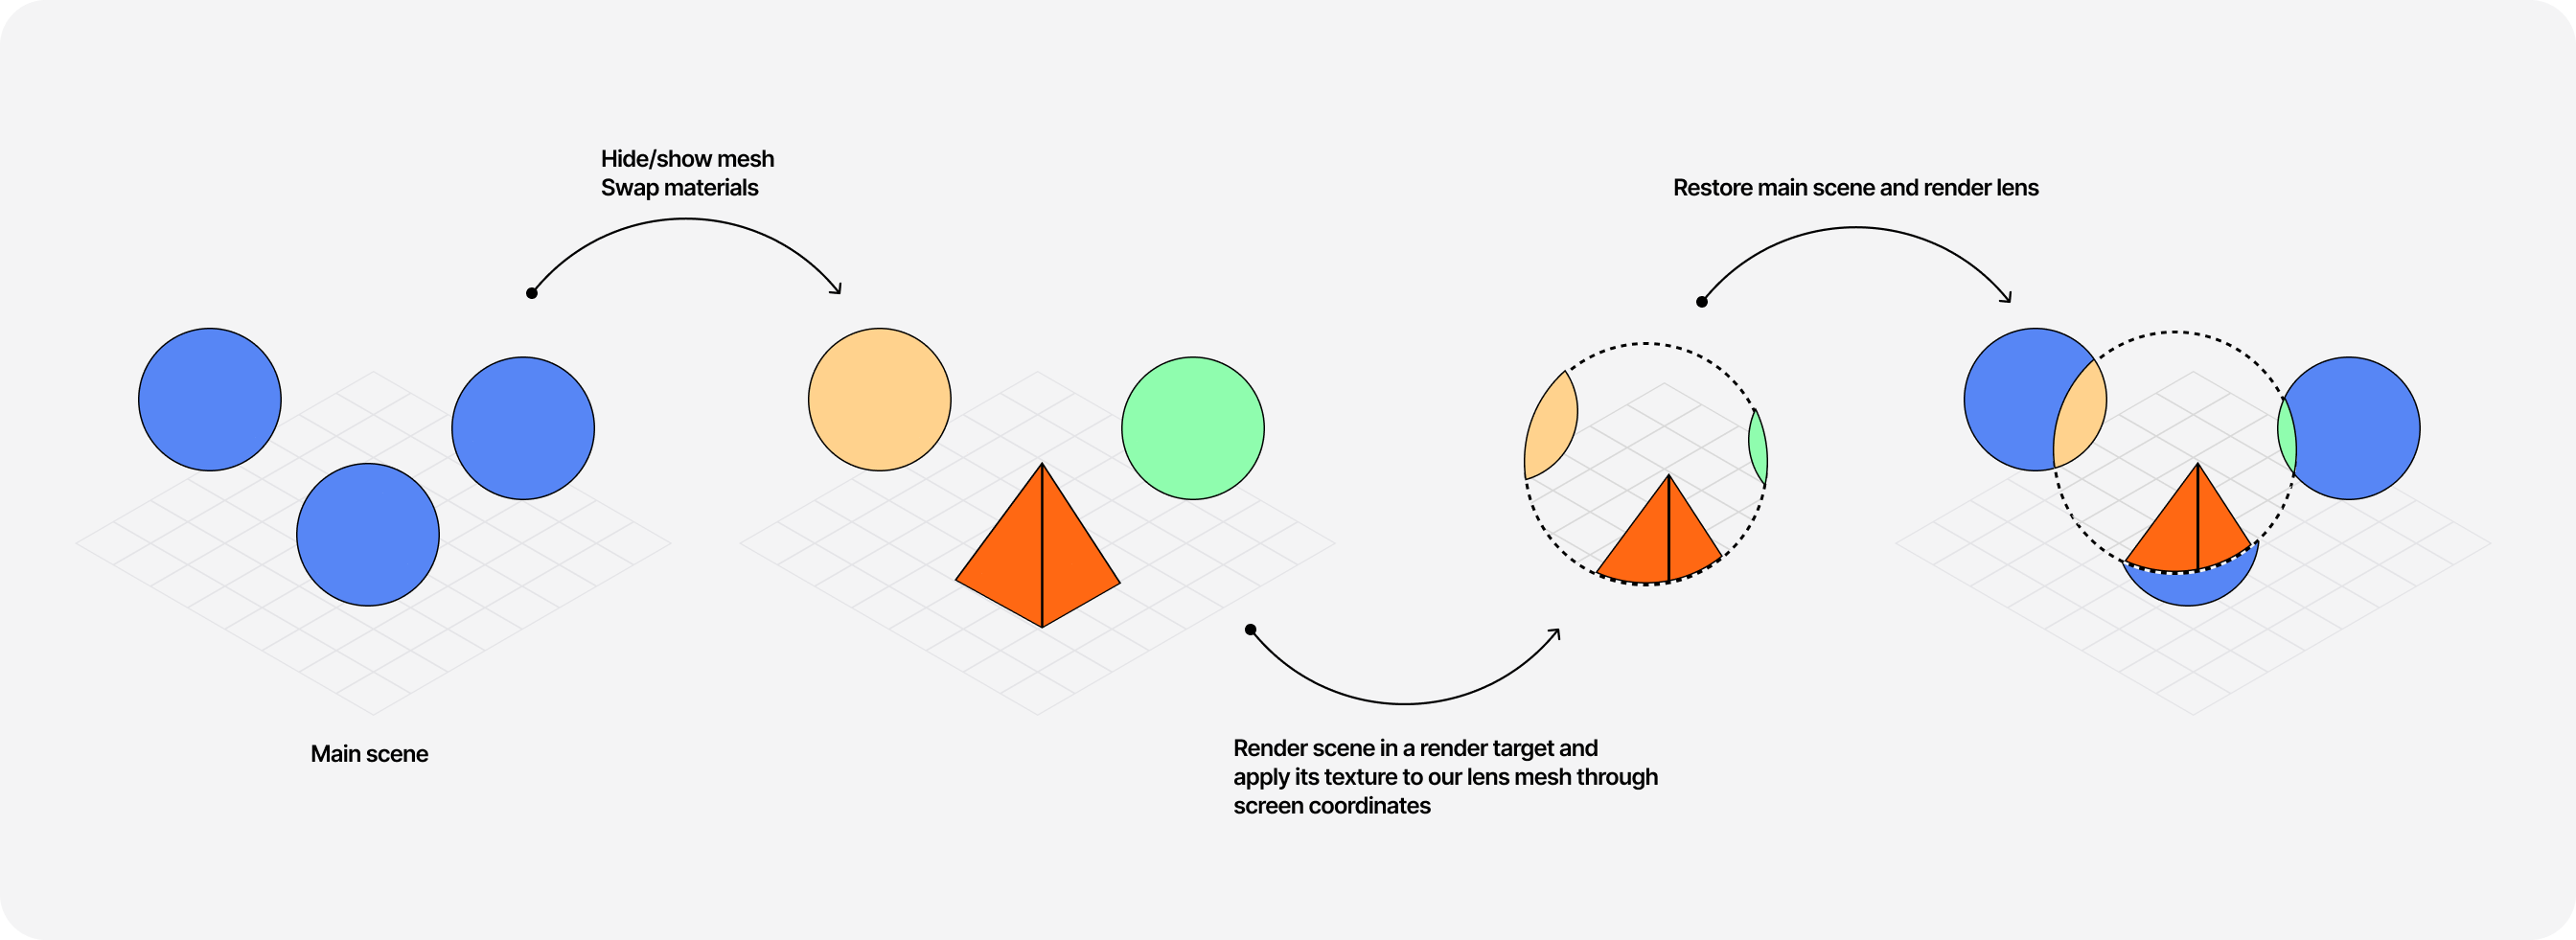
If we use this render loop and add a few lines of code to make the lens follow the viewer's cursor, we get a pretty sweet optical illusion: through the lens we can see an alternative version of our scene 🤯.
I absolutely love this example of using render targets:
it's clever.
it doesn't introduce a lot of code.
it is not very complicated if you are familiar with the basics we've covered early.
This scene is originally inspired by the stunning website of Monopo London, which has been sitting in my "inspiration bookmarks" for over a year now. I can't confirm they used this technique, but by adjusting our demo to use @react-three/drei's MeshTransmissionMaterial we can get pretty close to the original effect 👀:
Yet another portal! I know, I'm not very original with my examples in this article, but bear with me... this one is pretty magical 🪄. A few months ago @jesper*vos came up with a scene where a mesh moves through a frame and comes out on the other side with a completely different geometry! It looked as if the mesh transformed itself while going through this "portal":
Of course, I immediately got obsessed with this so I had to give it a try to reproduce it. The diagram below showcases how we can achieve this scene by using what we learned so far about render targets and screen coordinates:
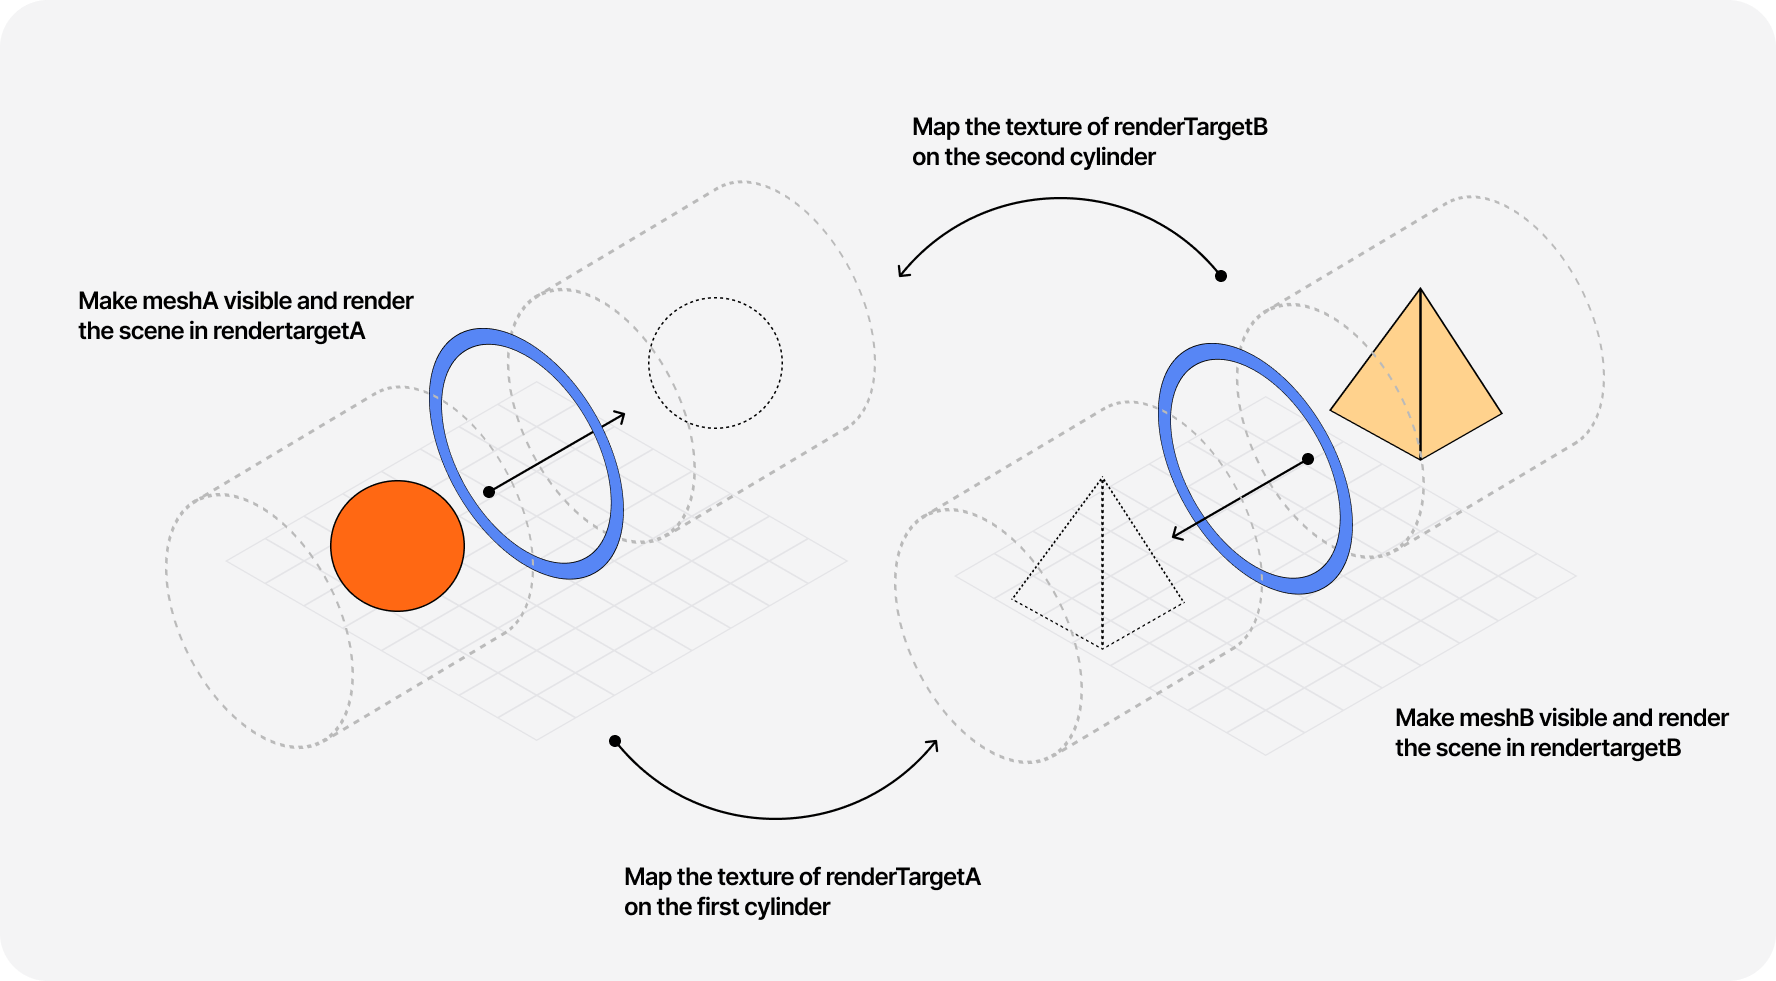
You can see the result in the code playground below👇. I'll let you explore this one on your own time 😄
This part focuses on a peculiar use case (or at least it was to me the first time I encountered it) for render targets: using them to build a simple post-processing effect pipeline.
I first encountered render targets in the wild through this use case, perhaps not the best way to get started with them 😅, in @pschroen's beautiful hologram scene. In it, he uses a series of layers, render targets, and custom shader materials in the render loop to create a post-processing effect pipeline. I reached out to ask why would one use that rather than the standard EffectComposer and among the reasons were:
it can be easier to understand
some render passes when using EffectComposer may have unnecessary bloat, thus you may see some performance improvements by using render targets instead
As for the implementation of such pipeline, it works as follows:
Post-processing pipeline using render targets and custom materials
1
const PostProcessing = () => {
2
const screenMesh = useRef();
3
const screenCamera = useRef();
4
const MaterialWithEffect1Ref = useRef();
5
const MaterialWithEffect2Ref = useRef();
6
const magicScene = new THREE.Scene();
8
const renderTargetA = useFBO();
9
const renderTargetB = useFBO();
12
const { gl, scene, camera, clock } = state;
15
gl.setRenderTarget(renderTargetA);
16
gl.render(magicScene, camera);
18
MaterialWithEffect1Ref.current.uniforms.uTexture.value =
19
renderTargetA.texture;
20
screenMesh.current.material = MaterialWithEffect1Ref.current;
23
gl.setRenderTarget(renderTargetB);
24
gl.render(screenMesh.current, camera);
26
MaterialWithEffect2Ref.current.uniforms.uTexture.value =
27
renderTargetB.texture;
28
screenMesh.current.material = MaterialWithEffect2Ref.current;
30
gl.setRenderTarget(null);
36
<mesh ref={sphere} position={[2, 0, 0]}>
37
<sphereGeometry args={[1, 64]} />
42
<OrthographicCamera ref={screenCamera} args={[-1, 1, 1, -1, 0, 1]} />
43
<MaterialWithEffect1 ref={MaterialWithEffect1Ref} />
44
<MaterialWithEffect2 ref={MaterialWithEffect2Ref} />
47
geometry={getFullscreenTriangle()}
We render our main scene in a portal.
The default scene only contains a fullscreen triangle (screenMesh) and an orthographic camera with specific settings to ensure this triangle fills the screen.
We render our main scene in a render target and then use its texture onto the fullscreen triangle.
We apply a series of post-processing effects by using a dedicated render target for each of them and rendering only the fullscreen triangle mesh to that render target.
For the fullscreen triangle, we can use a BufferGeometry and manually add the position attributes and uv coordinates to achieve the desired geometry.
Function returning a triangle geometry
1
import { BufferGeometry, Float32BufferAttribute } from 'three';
3
const getFullscreenTriangle = () => {
4
const geometry = new BufferGeometry();
7
new Float32BufferAttribute([-1, -1, 3, -1, -1, 3], 2)
11
new Float32BufferAttribute([0, 0, 2, 0, 0, 2], 2)
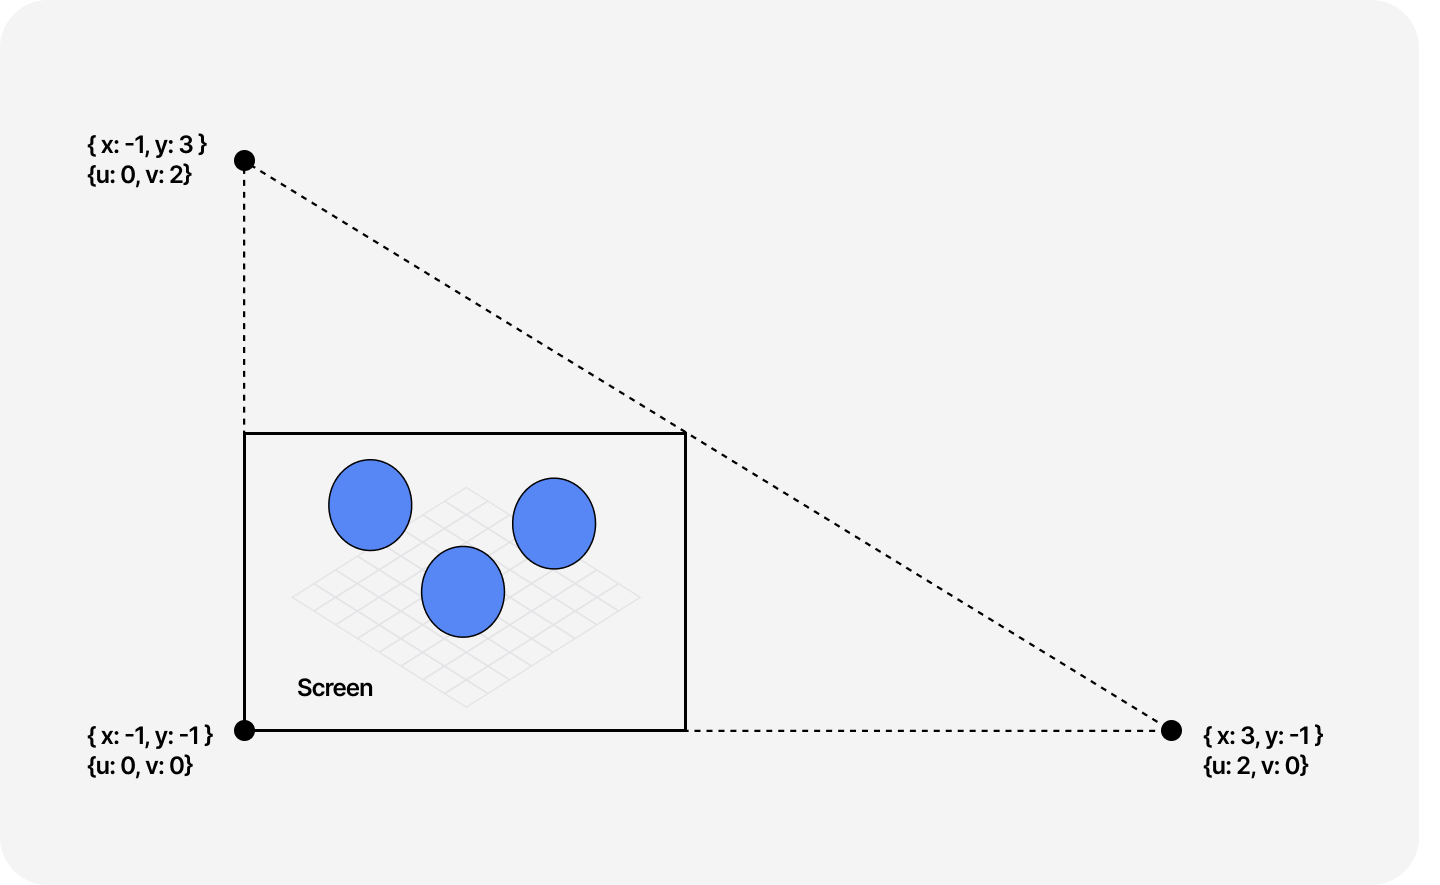
The code playground below showcases an implementation of a small post-processing pipeline using this technique:
We first apply a Chromatic Aberration pass on the scene.
We then add a "Video Glitch" effect before displaying the final render.
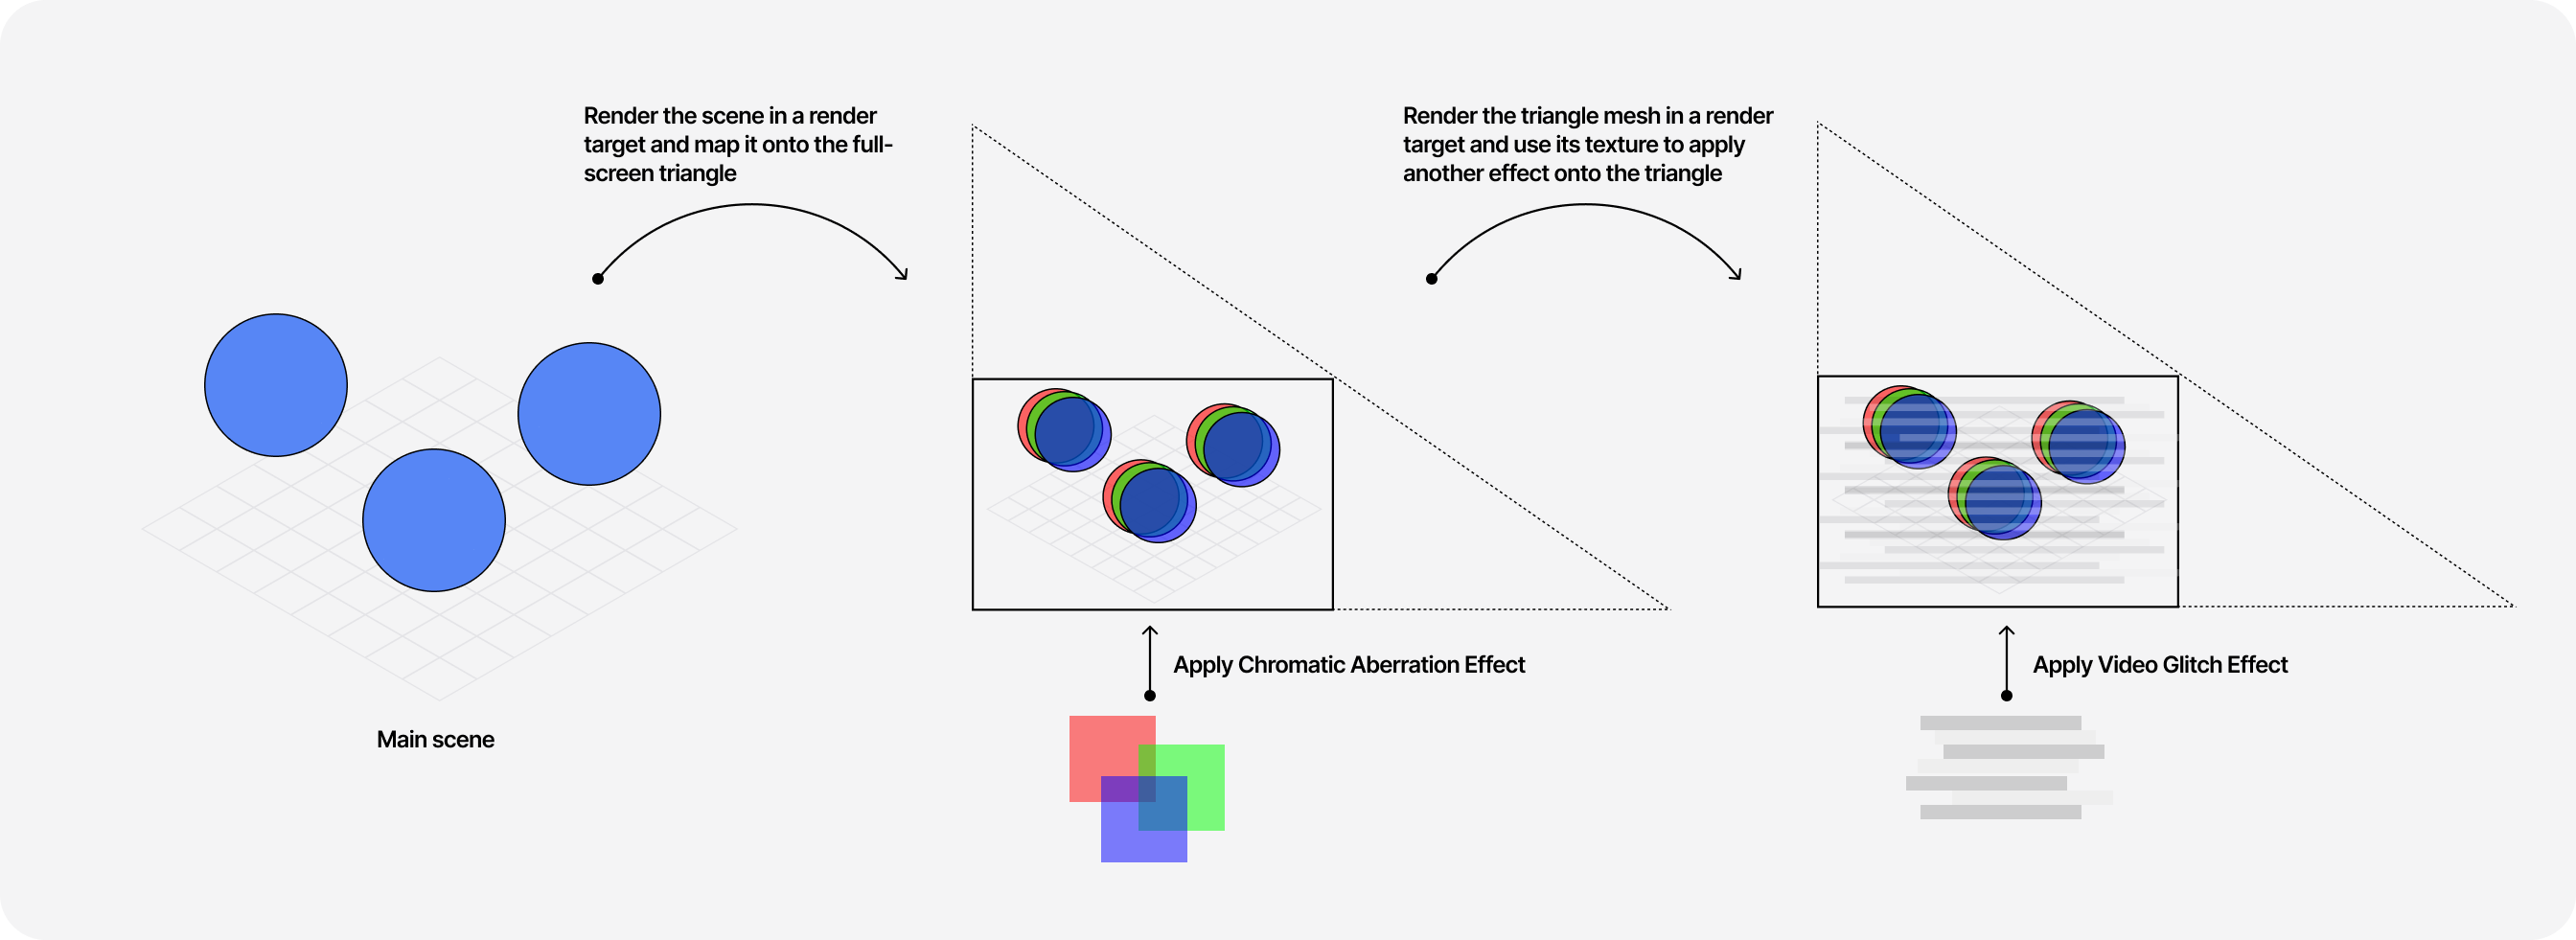
As you can see, the result is indistinguishable from an equivalent scene that would use EffectComposer 👀.
This part is a last-minute addition to this article. I was reading the case study of one of my favorite Three.js-based websites ✨ Atmos ✨ and in it, there's a section dedicated to the transition effect that occurs towards the bottom of the website: a smooth, noisy reveal of a different scene.
Implementation-wise, the author mentions the following:
You can really go crazy with transitions, but in order to not break the calm and slow pace of the experience, we wanted something smooth and gradual. We ended up with a rather simple transition, achieved by mixing 2 render passes together using a good ol’ Perlin 2D noise.
Lucky us, we know how to do all this now thanks to our newly acquired render target knowledge and shader skills ⚡! So I thought this would be a great addition as a last examples to all the amazing use cases we've seen so far!
Let's first break down the problem. To achieve this kind of transition we need to:
Build two portalled scenes: the original one sceneA and the target one sceneB.
Declare two render targets, one for each scene.
In our useFrame loop, we render each scene in its respective render target.
We can pass both render targets' textures to the shader material of a full-screen triangle (identical to the one we used in our post-processing examples) along with a uProgress uniform representing the progress of the transition: towards -1 we render sceneA, whereas towards 1 we rendersceneB.
The shader code itself is actually not that complicated (which was a surprise to me at first, not going to lie). The only line we should really pay attention to here is line 17 where we mix our textures based on the value of noise. That value depends on the Perlin noise we applied to the UV coordinates and also the uProgress uniform along with some other tweaks:
Fragment shader mixing 2 textures
3
uniform sampler2D textureA;
4
uniform sampler2D textureB;
5
uniform float uProgress;
11
vec4 colorA = texture2D(textureA, uv);
12
vec4 colorB = texture2D(textureB, uv);
15
float noise = clamp(cnoise(vUv * 2.5) + uProgress * 2.0, 0.0, 1.0);
17
vec4 color = mix(colorA, colorB, noise);
Once we stitch everything together in the scene, we achieve a similar transition to the one the author of Atmos built on their project. It did not require any insane amount of codes or obscure shader knowledge, just a few render target manipulations in the render loop and some beautiful Peril noise 🪄
You now know pretty much everything I know about render targets, my favorite tool to create beautiful and mind-bending scenes with React Three Fiber! There are obviously many other use cases for them, but the ones we saw through the many examples featured in this blog post are the ones that I felt represented the best what is possible to achieve with them.
When used in combination with useFrame and createPortal a new world of possibilities opens up for your scenes, which lets you create and experiment with new interactions or new ways to implement some stunning shader materials and post-processing effects ✨.
Render targets have been challenging to learn for me at first, but since understanding how they work, they have been the secret tool behind some of my favorite creations, and I have had a lot of fun working with them so far. I really hope this article will make these concepts click for you to enable you to push your next React Three Fiber/Three.js project even further.
此内容由惯性聚合(RSS阅读器)自动聚合整理,仅供阅读参考。 原文来自 — 版权归原作者所有。
