








You've probably noticed if you've been following me for a while that I'm a ✨ big fan ✨ of automation. I wrote about automated CI/CD a year ago and also talked a lot about the concepts surrounding this subject, but never really touched upon the tools I use for my CI jobs and how I use them. One such tool that has really worked for me, especially as a frontend engineer, is GitHub CI.
For over a year now, it's been my service of choice for automated CI/CD pipelines. The workflow syntax is easy to get started with, and has an extended set of features to help you craft your CI experience the way you and your team may want it.
However, even after a year, there still is a lot that I'm learning about this tool every day. When I got started with it, there was no set rule on how to properly architect your workflows, and there's a lot of tips, tricks I discovered along the way to build what I would qualify as "the perfect GitHub CI workflow" (at least to my eyes 😄). This article aims to gather those tips and good practices I've been using for personal projects and at work and show you how you can use all of those in a single workflow to power the CI/CD pipeline of your frontend team.
I'm going to throw my best "engineer response" at this question: it depends! Your team might have specific needs or objectives that would make some of my tips not as useful to you as they could be. However, for this article, we need some guidelines that I think would be universal when it comes to building efficient GitHub workflows, such as:
cost-saving: bring the "build minutes" down to the lowest possible value to not have a massive bill at the end of the month.
efficient: your team's time is precious, the workflow should be as fast as possible, but also fast to fail if something were to go wrong
well-architected: each step has a purpose, and might depend on other steps. This also means not running "useless steps".
Now that we've established those guidelines, let's take a look at one of the most important tips of this article.
Let's consider a typical set of tasks a frontend team would run on every PR:
Lint
Formatting
Type checking
Unit test
Build
End-to-end tests, maybe on different browsers
Running those in separate workflows might look like the most straightforward way to architect those tasks. However, if something as simple as the lint task fails, there's no way you can stop your expensive tasks like build or your end-to-end tests from running. And that, my friends, is not very efficient.
Workflows run in parallel, and there's no way for them to interact with one another. Thus, you can't cancel a workflow due to another workflow's failed state. You're stuck running all the workflows in every PR.
To address this, I chose to combine all my workflows into one. All the tasks that were independent workflows before became part of the same unique workflow, but this time, as jobs.
Excerpt of a Github CI workflow job.
11
- name: Checkout Commit
12
uses: actions/checkout@v2
13
- name: Use Node.js ${{ matrix.node }}
14
uses: actions/setup-node@v1
16
node-version: ${{ matrix.node }}
The cool thing about jobs is that you can run them sequentially or parallel as you please! GitHub provides a handy keyword called needs that lets you set one or several jobs as dependencies, thus preventing a given job to start unless the dependent jobs have successfully run. This allows us to:
Fail the workflow fast. If a key job fails, the workflow is marked as failed on your PR as soon as possible
Avoid running useless expensive tasks on a "doomed to fail" workflow run
Example of jobs running in parallel and sequentially
13
- name: Checkout Commit
14
uses: actions/checkout@v2
15
- name: Use Node.js ${{ matrix.node }}
16
uses: actions/setup-node@v1
18
node-version: ${{ matrix.node }}
23
runs-on: ubuntu-latest
28
- name: Checkout Commit
29
uses: actions/checkout@v2
30
- name: Use Node.js ${{ matrix.node }}
31
uses: actions/setup-node@v1
33
node-version: ${{ matrix.node }}
38
runs-on: ubuntu-latest
42
needs: [type-check, unit-test]
44
- name: Checkout Commit
45
uses: actions/checkout@v2
46
- name: Use Node.js ${{ matrix.node }}
47
uses: actions/setup-node@v1
49
node-version: ${{ matrix.node }}
You may be wondering: what job should be run in parallel and what job needs to be run sequentially? That will depend on the needs of your team.
On my end, I tend to parallelize unit testing, linting, and type-checking for example. These steps are generally fast and inexpensive to run thus I do not feel they need to depend on each other in most cases. However, I'd require a job such as build to only run if those three jobs above are successful, i.e. run it sequentially.
The screenshot below features the GitHub Workflow powering the CI for this blog. Yours will probably end up sharing some similarities:
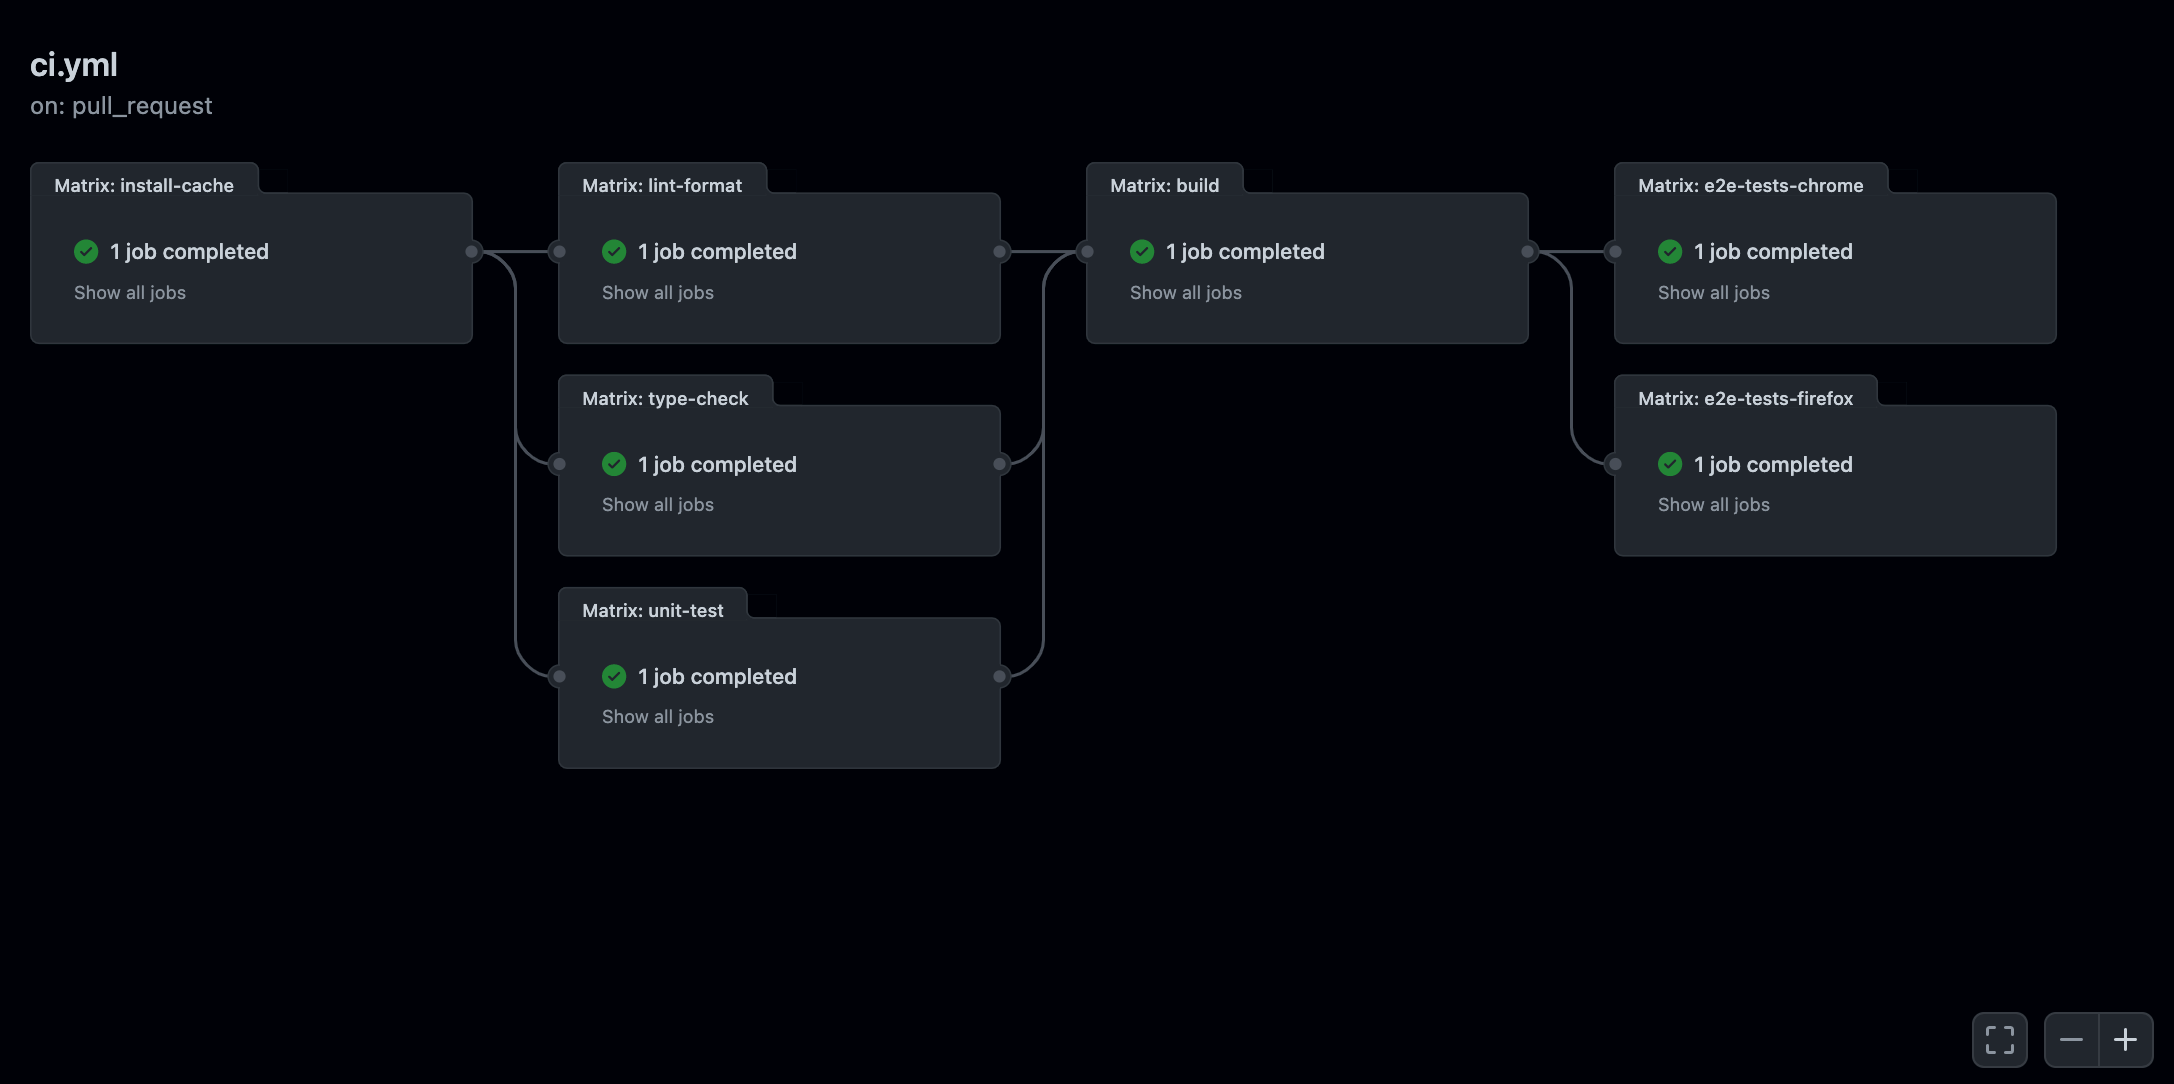
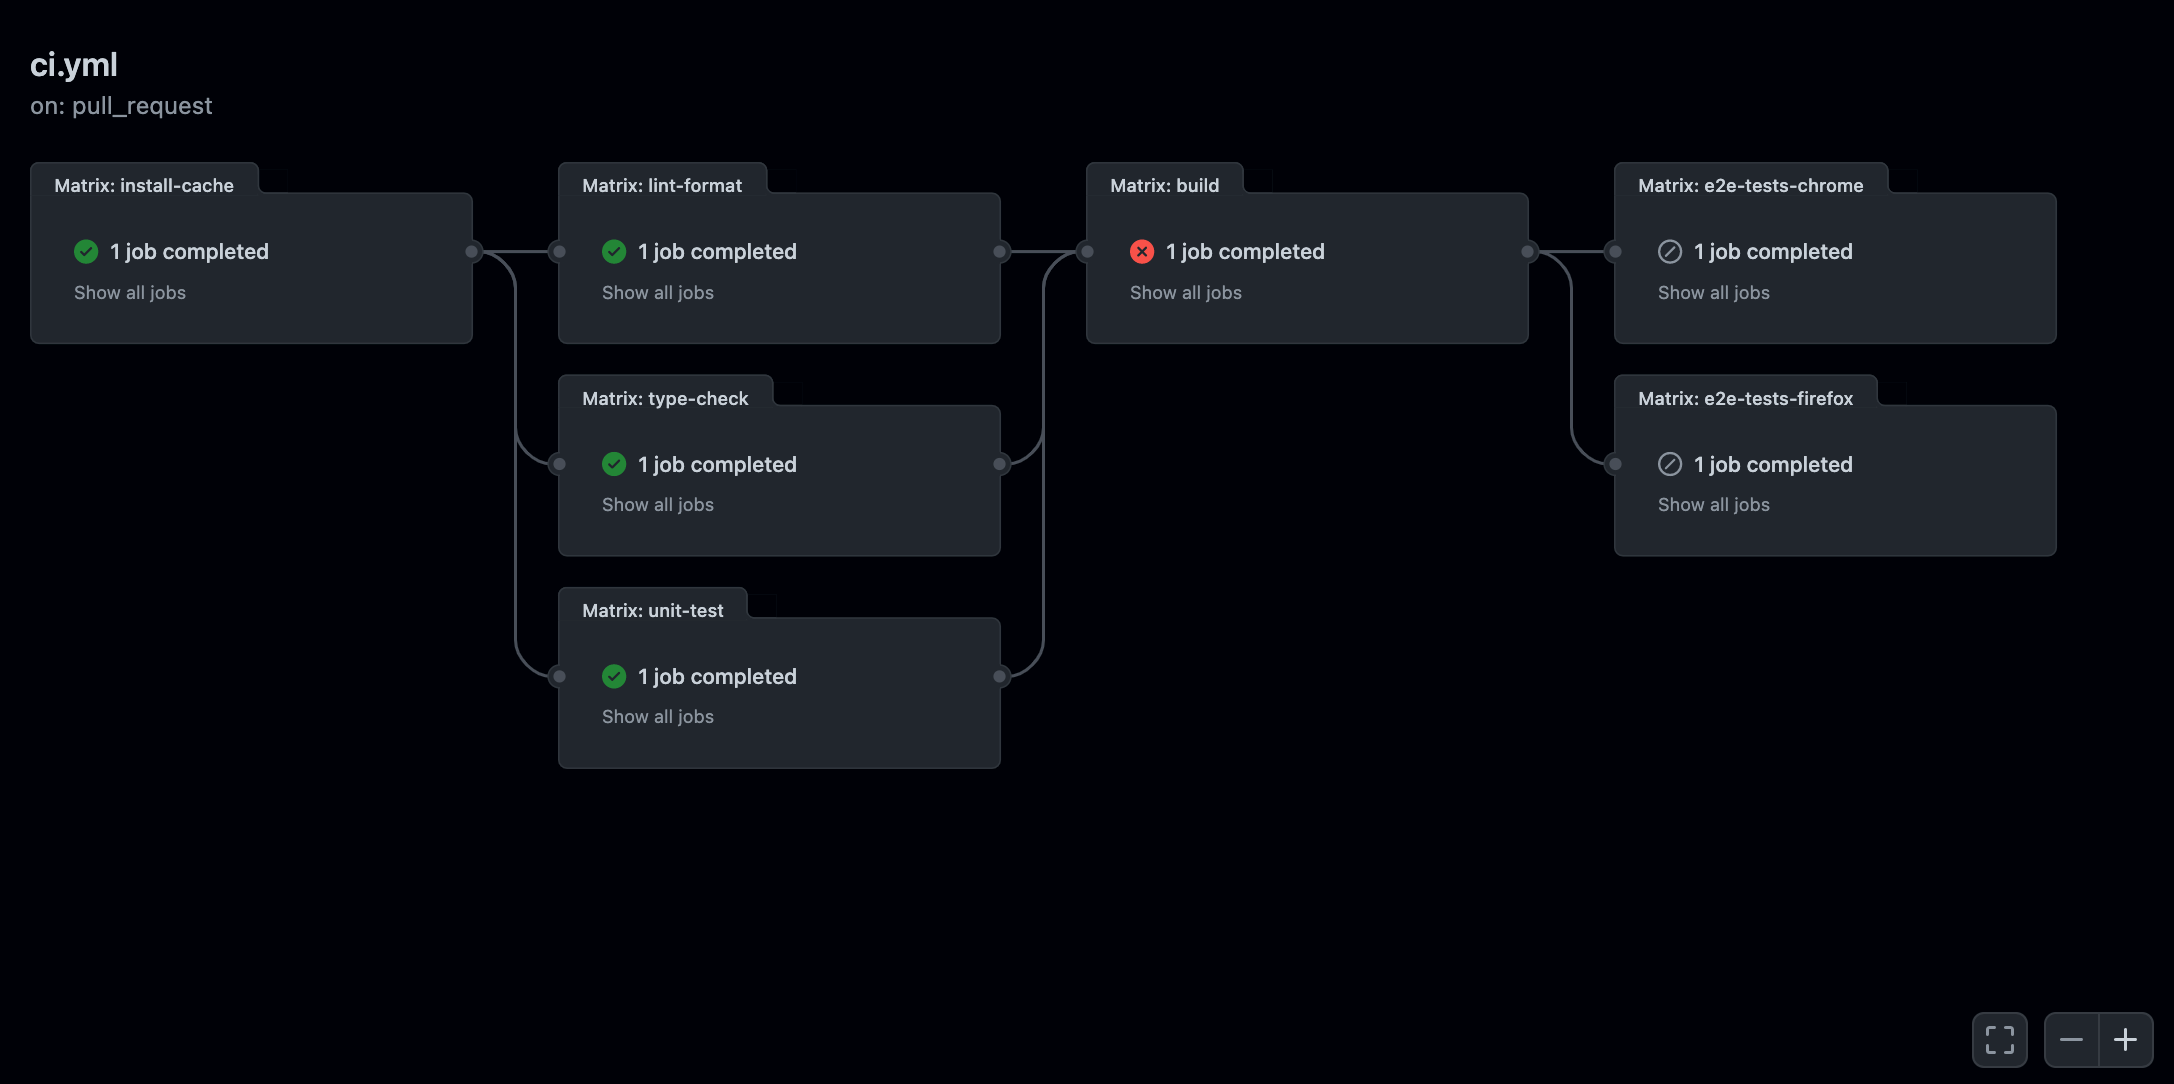
As you can see, by combining all our workflows into one, and carefully choosing which job to parallelize or run sequentially, we end up having better visibility on how our CI pipeline functions and the dependencies between each of its steps.
My last tip, and perhaps my favorite due to its simplicity is terminating duplicate workflow runs.
It happens to me very often: I'm done with a current branch and decide to push my code and open a PR, thus triggering a workflow run. Then a few seconds later noticed I forgot to run that one console.log or made a typo somewhere and need to push an extra change, thus triggering yet another workflow run.
By default, there's nothing that will stop the first workflow to run, it will continue until it's finished, thus wasting precious billing minutes that could have had a better use.
To prevent such a thing from happening, GitHub recently introduced the notion of workflow concurrency.
With the concurrency keyword you can create a concurrency group for your workflow (or a job). This will mark any workflow run from that same concurrency group as "pending" if any run is currently in progress. You can also decide to cancel any in-progress workflow of the same concurrency group whenever a new workflow is added to the queue.
Example of GitHub workflow using concurrency groups
10
group: ${{ github.head_ref }}
13
cancel-in-progress: true
Doing this at the workflow level will ensure that any old or outdated workflows that are in progress will get canceled when we push a new change and triggering a new workflow thus saving your team's precious time and money.
So now that we went through all the tips to build the perfect Github CI workflow to power the CI needs of a frontend team, let's take a look at how they hold up against the guidelines we've established earlier:
Is it cost-saving?
Yes! We made sure to share the output of expensive steps such as build and to cache repetitive steps that we would have needed to run throughout the workflow like installing our dependencies.
Is it efficient?
More efficient than running every job in a separate workflow for sure! Not only we are parallelizing independent jobs like e2e-tests-firefox and e2e-tests-chrome, we're also making sure to cancel any duplicate workflows thanks to the use of concurrency groups.
Is it well architected?
As we saw in the screenshot showcased earlier in this blog post, it's now easy to visualize all the steps and their dependencies. Combining every task into one workflow and architecting those jobs using the needs keyword made the whole CI pipeline way easier to understand.
Need a full example? Don't you worry, I got you covered 🙌! You can find my Github CI workflow featuring all the tips and examples of this article on the GitHub repository of this blog. It's fairly dense and long, thus why I did not directly integrate it here directly as it might have been distracting.
I hope some of the tips I introduced in this blog post will help you and your team perfect your own GitHub workflows and thus achieve a fast and reliable CI pipeline for your favorite frontend projects! Are there any other tips that you wish I had introduced in this article? Other GitHub CI secrets that empowered your team worth mentioning? As always, do not hesitate to reach out! I'd love learn more about what worked for you and test them out to further improve this article!
此内容由惯性聚合(RSS阅读器)自动聚合整理,仅供阅读参考。 原文来自 — 版权归原作者所有。