惯性聚合 高效追踪和阅读你感兴趣的博客、新闻、科技资讯
阅读原文 在惯性聚合中打开

推荐订阅源

让小产品的独立变现更简单 - ezindie.com
L
LangChain Blog
雷峰网
雷峰网
罗磊的独立博客
Hugging Face - Blog
Hugging Face - Blog
T
Tailwind CSS Blog
V
Visual Studio Blog
博客园_首页
Apple Machine Learning Research
Last Week in AI
Last Week in AI
OSCHINA 社区最新新闻
OSCHINA 社区最新新闻
博客园 - 司徒正美
有赞技术团队
有赞技术团队
J
Java Code Geeks
酷 壳 – CoolShell
酷 壳 – CoolShell
大猫的无限游戏
大猫的无限游戏
Engineering at Meta
Engineering at Meta
B
Blog
Recent Announcements
C
Check Point Blog
MongoDB | Blog
MongoDB | Blog
GbyAI
GbyAI
奇客Solidot–传递最新科技情报
奇客Solidot–传递最新科技情报
F
Full Disclosure
Microsoft Security Blog
N
Netflix TechBlog - Medium
I
InfoQ
云风的 BLOG
云风的 BLOG
量子位
D
Docker
D
DataBreaches.Net
Vercel News
Vercel News
Blog — PlanetScale
Blog — PlanetScale
宝玉的分享
宝玉的分享
V
V2EX
Cyber Security Advisories - MS-ISAC
Y
Y Combinator Blog
美团技术团队
小众软件
小众软件
阮一峰的网络日志
阮一峰的网络日志
博客园 - 聂微东
B
Blog RSS Feed
MyScale Blog
MyScale Blog
月光博客
月光博客
T
The Blog of Author Tim Ferriss
WordPress大学
WordPress大学
aimingoo的专栏
aimingoo的专栏
M
MIT News - Artificial intelligence
U
Unit 42
Google DeepMind News

短巷与雨

用免费域名,搭建一个自己的临时邮箱服务保护您的真实邮箱地址 PakePlus打包程序的使用体验 备案 Vercel & Cloudflare 项目分享 Linux日志查找 IPV6.ARPA域名申请并托管到Cloudflare 再见,普莫雍措 CNB迁移和UI定制 ZFile工具 CNB刷新EO缓存和插件化 CNB远程部署和EdgeOne Pages 备案 CNB创建知识库 小工具 备案 备案 备案 UV和Mamba包管理工具 消息摘要(Message Digest)
SSH免密登录
Hudi(唱唱反调) · 2025-06-03 · via 短巷与雨

一、前置条件

​ 需要使用两台虚拟机,并且在同一个网段下,才能实现免密登录。实验使用192.168.254.X网段,为两台虚拟机分别配置静态IP为192.168.254.28和192.168.254.29。分别使用主机名test001和test002。配置步骤如下。

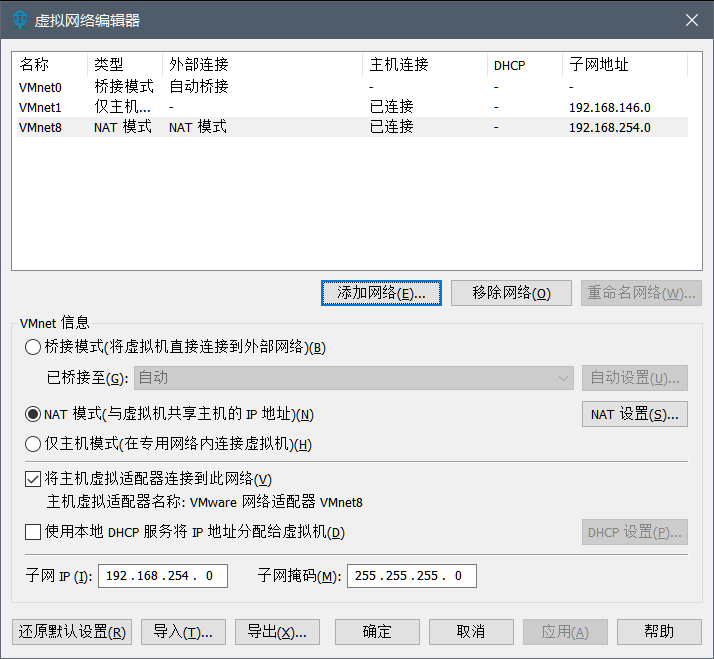
1、在修改虚拟机的网络配置信息时需要配置前,需要查看VM虚拟网络编辑器,编辑->虚拟网络编辑器->VMnet8。当然也可以自行选择虚拟网卡,或者是直接添加一个虚拟网络。我的虚拟机VMnet8信息如下

image-20250603190718977

确保虚拟机能够使用虚拟网卡即可。

2、修改虚拟机的为静态IP

1
vim /etc/sysconfig/network-scripts/ifcfg-ens33

以其中一台主机为例修改信息如下:

1
2
3
4
5
6
7
8
9
10
11
TYPE=Ethernet
PROXY_METHOD=none
BROWSER_ONLY=yes
BOOTPROTO=static #修改为静态IP
DEFROUTE=yes
IPV4_FAILURE_FATAL=no
NAME=ens33
DEVICE=ens33
ONBOOT=yes
IPADDR=192.168.254.29 #自行分配一个IP。控制好IP的范围即可
GATEWAY=192.168.254.1

3、修改虚拟机的主机名

1
2
3
4
hostnamectl --static set-hostname 主机名
#例如:hostnamectl --static set-hostname test002
或者是在/etc/hostname文件中添加
test002

4、配置其他虚拟机主机名称映射hosts文件,在/etc/hosts文件中添加以下信息

1
2
192.168.254.28 test001
192.168.254.29 test002

192.168.254.28这台虚拟机也是相同的配置,只需要注意主机名应该是test001。/etc/hosts的IP和主机名需要对应配置。

二、免密登录

1、基本语法

1
2
ssh 另一台虚拟机的IP或者是主机名
#例如在192.168.254.28虚拟机上登录192.168.254.29

输入ssh 192.168.254.29或者是ssh test002以后出现一下信息,在输入yes和密码后显示登录成功。

1
2
3
4
5
6
7
8
9
(base) [root@test001 ~]# ssh test002
The authenticity of host 'test002 (192.168.254.29)' can't be established.
ECDSA key fingerprint is SHA256:rRiA8fosNYtYf/JZ4nzkKcgvxBVtQqJkjeyjiyxJutg.
ECDSA key fingerprint is MD5:ae:e6:d2:fd:f7:31:d2:7e:c7:61:87:c2:83:93:9c:63.
Are you sure you want to continue connecting (yes/no)? yes
Warning: Permanently added 'test002,192.168.254.29' (ECDSA) to the list of known hosts.
root@test002's password:
Last login: Tue Jun 3 07:21:35 2025 from 192.168.254.2
(base) [root@test002 ~]#

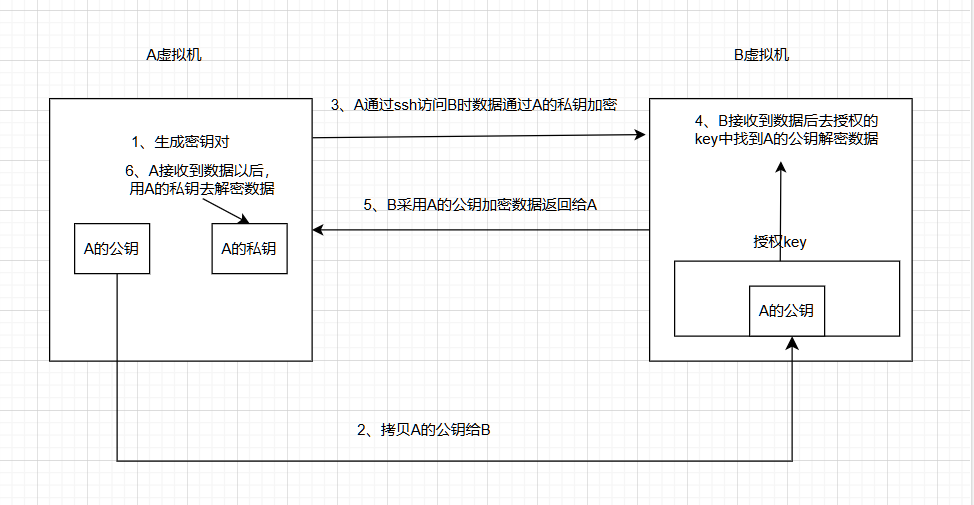
2、免密登录原理

  • 在A虚拟机使用ssh-key-gen生成秘钥对即公钥和私钥。

  • 将A虚拟机生成的公钥拷贝给B虚拟机。

  • A虚拟机通过ssh访问B虚拟机的时候,数据使用A的私钥加密。

  • B虚拟机收到数据以后,去授权的key中找到A的公钥,对数据解密。

  • B虚拟机使用A的公钥加密数据返回给A虚拟机。

  • A虚拟机接受到数据后,用A虚拟机的私钥解密数据。

通过以上步骤就可以使通信双方确认身份,也就可以实现免密登录了。

image-20250603200905606

3、生成公钥私钥

1
ssh-keygen -t rsa

连续敲三次回车即可,就会生成公钥和私钥了。id_rsa(私钥),id_rsa.pub(公钥)。

1
2
3
4
5
6
7
8
9
10
11
12
13
14
15
16
17
18
19
20
Generating public/private rsa key pair.
Enter file in which to save the key (/root/.ssh/id_rsa):
Enter passphrase (empty for no passphrase):
Enter same passphrase again:
Your identification has been saved in /root/.ssh/id_rsa.
Your public key has been saved in /root/.ssh/id_rsa.pub.
The key fingerprint is:
SHA256:AWsqE9PU19WrU09tDR6I+qBOCfNwFHcCQaFNBpEpPh4 root@test001
The key's randomart image is:
+---[RSA 2048]----+
| +BX=o..o.o |
| .oo=o+.oo . + |
| .o.o.+... . +o|
| Eo+o. o. + =|
| .oo.* oSo o + |
| .o = . o .|
| o . |
| . |
| |
+----[SHA256]-----+

生成的公钥和私钥是在/root/.ssh目录下如下

(base) [root@test001 ~]# cd .ssh
(base) [root@test001 .ssh]# ls
id_rsa id_rsa.pub known_hosts

4、拷贝公钥到test002虚拟机上

1
ssh-copy-id test002

拷贝时需要输入test002的密码,输入即可如下:

1
2
3
4
5
6
7
8
9
(base) [root@test001 .ssh]# ssh-copy-id test002
/usr/bin/ssh-copy-id: INFO: Source of key(s) to be installed: "/root/.ssh/id_rsa.pub"
/usr/bin/ssh-copy-id: INFO: attempting to log in with the new key(s), to filter out any that are already installed
/usr/bin/ssh-copy-id: INFO: 1 key(s) remain to be installed -- if you are prompted now it is to install the new keys
root@test002's password:

Number of key(s) added: 1
Now try logging into the machine, with: "ssh 'test002'"
and check to make sure that only the key(s) you wanted were added.

5、.ssh文件夹下子文件介绍

文件名称 含义
id_rsa 生成的私钥
id_rsa.pub 生成的公钥
authorized_keys 存放授权过的无密登录主机的公钥
known_hosts 记录ssh访问过主机的公钥(public key)

6、然后使用ssh test002就可以免密登录了

版权声明: 本博客所有文章除特别声明外,均采用 CC BY-NC-SA 4.0 许可协议。转载请注明来源 短巷与雨