





当心:前方有龙。
由于我们是直接在内存中渲染图形并喂给 FFmpeg 进行编码的,我们需要自行控制编码器、编码流和容器写出。FFmpeg 原生提供的用于操作文件的帮助函数我们的使用就相对少一些。
查找系统中可用的编码器
上一篇中我们注意到了虽然 FFmpeg 输出它支持的编码器很多,但系统上并不是所有的编码器都装了的。现在,我们需要筛选出实际可以用的编码器。具体的,我们关心系统上是否存在一个可以进行 H.264 编码的编码器:
extern "C" {
#include "libavformat/avformat.h"
#include "libavcodec/avcodec.h"
#include "libavutil/opt.h"
}

#include "spdlog/spdlog.h"

bool select_video_encoder(char* buffer, size_t buffer_size) {
    const AVCodec* codec;
    void* handle = nullptr;

    while ((codec = av_codec_iterate(&handle))) {
        if (!av_codec_is_encoder(codec) || codec->type != AVMEDIA_TYPE_VIDEO) {
            continue;
        }

        spdlog::debug(
            "known video codec: {} ({})", codec->name, codec->long_name);

        // find h264
        if (strstr(codec->long_name, "H.264") || strstr(codec->name, "h264")) {
            spdlog::info(
                "selected video codec: {} ({})", codec->name, codec->long_name);
            strncpy(buffer, codec->name, buffer_size);
            return true;
        }
    }

    spdlog::warn("no suitable video encoder found");
    return false;
}
你的系统可能这个函数确实会返回 false. 但是没关系,可以仿照查找 H.264 编码器的方法继续查找其他编码器(如 mpeg4, vp9 或者 av1)。如果确实是一个都找不着……那可能确实需要开一些 GPL 库才可以。
在 macOS 下,h264 编码由 h264_videotoolbox 实现。这个编码器是默认 FFmpeg 配置下就可用的。
还有一个方法是使用 avcodec_find_encoder 方法来查找注册到系统中的编码器,比如:
const auto* codec = avcodec_find_encoder(AV_CODEC_ID_H264);
如果对应的 ID 下没有可用的编码器,则该函数返回 nullptr. 我们可以通过传入可接受的 AV_CODEC_ID_* 来逐个查找系统中可能的编码器实现,此处不再赘述。
后文中,我将假定所使用的编码器实现 H.264 编码格式,或者至少支持 YUV420 格式输入。
启动编码器
首先,根据查找到的可用编码器名,召唤对应的编码器实现:
// include 和函数签名略,就当我们在 main 函数里
int err = 0;
char codecName[64];
if (!select_video_encoder(codecName, sizeof(codecName))) {
    spdlog::error("no codec available");
    return -1;
}

const auto* codec = avcodec_find_encoder_by_name(codecName);
if (!codec) {
    spdlog::error("cannot find codec `{}`", codecName);
    return -2;
}
接下来需要申请一个编码器上下文:
auto* context = avcodec_alloc_context3(codec);
if (!context) {
    spdlog::error("failed to allocate codec context");
    return -3;
}
编码器上下文用于保存编码器配置,比如比特率、帧率等等信息。假设我们需要输出的视频文件尺寸为 640x480@60fps, 码率为 10Mbps, 则可以这样设置编码器上下文:
context->bit_rate = 10000000;
context->width = 640;
context->height = 480;
context->time_base = (AVRational){1, 60};
context->framerate = (AVRational){60, 1};
一般来说,大部分编码器都需要 YUV420 格式、逐行扫描的输入:
context->pix_fmt = AV_PIX_FMT_YUV420P;
对于 H.264 这种带有帧间压缩的编码,则同样需要指定帧间压缩参数。比如我们需要每 10 帧生成一个 I 帧,则可以这样配置:
context->gop_size = 10;
以及,关闭 B 帧生成。这主要是因为如果有 B 帧,后续将 H.264 码流导入视频容器时会需要处理各种比较棘手的情况。
context->max_b_frames = 0;
对于 H.264 编码,我们还可以设置其使用高质量(缓慢)编码预设:
if (codec->id == AV_CODEC_ID_H264) {
    av_opt_set(context->priv_data, "preset", "slow", 0);
}
完成上述设置之后,我们就可以尝试启动编码器了:
err = avcodec_open2(context, codec, nullptr);
if (err < 0) {
    spdlog::error("failed to open the codec: {}", err);
    return -4;
}
设置基本数据结构
创建一个用于承载视频信息的帧:
auto* frame = av_frame_alloc();
if (!frame) {
    spdlog::error("failed to allocate a frame");
    avcodec_free_context(&context);
    return -5;
}
以及一个用于承载编码信息的包:
auto* packet = av_packet_alloc();
if (!packet) {
    spdlog::error("failed to allocate a packet");
    avcodec_free_context(&context);
    av_frame_free(&frame);
    return -6;
}
这两个数据结构在整个编码循环中都可以重复使用,并不需要每个视频帧或者每次编码都创建。
另一个有趣的地方是 FFmpeg 的许多清理函数都是传入 T** 而非 T* 的。在对应的变量被清理后,FFmpeg 会自动将其内容设置为 nullptr.
我们同样需要设置帧的大小信息,复用之前的视频信息配置即可:
frame->format = context->pix_fmt;
frame->width = context->width;
frame->height = context->height;
之后,即可分配帧所需要使用的缓冲区了:
err = av_frame_get_buffer(frame, 0);
if (err < 0) {
    spdlog::error("failed to allocate frame buffer: {}", err);
    avcodec_free_context(&context);
    av_frame_free(&frame);
    av_packet_free(&packet);
    return -7;
}
当然,我们会需要保存编码结果。目前我们先打开一个文件用于保存编码结果:
FILE *fp = fopen("output.h264", "wb");
// 错误处理从略
编码循环
接下来,我们将生成 300 帧(5 秒钟)的视频数据并编码。
for (int i = 0; i < 300; i++) {
    // 接下来标记为 in for-loop 的代码发生在这里
}
首先,和其他图形操作一样,我们需要先让帧缓冲区进入可写状态:
// in for-loop
err = av_frame_make_writable(frame);
if (err < 0) {
    spdlog::error("cannot make frame writable: {}", err);
    break;
}
之后,我们就可以操作帧缓冲区中的数据了。如果我们已经有生成好的图形数据,就是在这个步骤填入的。
YUV420 是一种平坦格式,即它的数据是按 YYYY...CbCbCbCb...CrCrCrCr... 的顺序存储的。相比而言,RGB888 则是一种交错格式,即它的数据是按 RGBRGBRGBRGB... 的顺序存储的。
我们在这里先生成一些测试用的数据:
// in for-loop
// Y 分量的数据
for (int y = 0; y < context->height; y++) {
    for (int x = 0; x < context->width; x++) {
        frame->data[0][y * frame->linesize[0] + x] = (x + y + i * 3) & 0xff;
    }
}

// CbCr 分量的数据
// 注意到 YUV420 中,色度数据量是明度数据量的一半
for (int y = 0; y < context->height / 2; y++) {
    for (int x = 0; x < context->width / 2; x++) {
        frame->data[1][y * frame->linesize[1] + x] = (128 + y + i * 2) & 0xff;
        frame->data[2][y * frame->linesize[2] + x] = (64 + x + i * 5) & 0xff;
    }
}

// 指定这个是第几帧
frame->pts = i;
完成帧数据的填充后,就可以提交到编码器进行编码了:
// in for-loop
err = avcodec_send_frame(context, frame);
if (err < 0) {
    spdlog::error("failed to send the frame to encoder: {}", err);
    break;
}
提交到编码器后,就可以从编码器中取出编码数据并写出文件:
// in for-loop
while (err >= 0) {
    err = avcodec_receive_packet(context, packet);
    if (err == AVERROR(EAGAIN) || err == AVERROR_EOF) {
        // 继续编码下一帧
        break;
    }

    if (err < 0) {
        spdlog::error("failed to get packet from encoder: {}", err);
        break;
    }

    fwrite(packet->data, 1, packet->size, fp);
    // 包数据操作完成,释放包内的数据引用
    av_packet_unref(packet);
}
结束编码
完成所有的视频信息编码后,我们还需要清理一下编码器的状态,并写出编码结尾:
err = avcodec_send_frame(context, nullptr);
if (err) {
    // 错误处理从略
}

while (err >= 0) {
    err = avcodec_receive_packet(context, packet);
    if (err == AVERROR(EAGAIN) || err == AVERROR_EOF) {
        // 继续编码下一帧
        break;
    }

    if (err < 0) {
        spdlog::error("failed to get packet from encoder: {}", err);
        break;
    }

    fwrite(packet->data, 1, packet->size, fp);
    // 包数据操作完成,释放包内的数据引用
    av_packet_unref(packet);
}
然后关闭文件和各个使用到的数据结构:
fclose(fp);
avcodec_free_context(&context);
av_frame_free(&frame);
av_packet_free(&packet);
成果展示……?
真是绕了好大一圈啊!但你可能发现,我们输出的文件名并不是 output.mp4, 而是 output.h264. 输出的文件似乎也没法直接双击播放。如果使用 file 命令查看文件类型的话,会发现它并不是我们熟悉的文件格式:
output.h264: JVT NAL sequence, H.264 video @ L 30
通过 ffplay 程序,我们还是可以把图像放出来的。执行 ffplay output.h264, 可以看到形似图 1 的画面:

图 1 output.h264
但是 ffplay 输出的是 25 帧,和我们指定的 60 帧并不一样。
要解决这个问题,我们需要将编码器的输出灌到一个视频容器中。
创建容器对象
在启动编码器之前,我们需要先准备好操作视频容器所需要的数据结构。
这里我们使用 Matroska 容器作为视频容器对象:
AVFormatContext* format = nullptr;
err = avformat_alloc_output_context2(&format, nullptr, "matroska", nullptr);
if (err < 0) {
    spdlog::error("failed to allocate output context: {}", err);
    // ...
    return -10;
}
一个视频容器中,各个组成部分的数据由对应的流表示。我们创建一个流用于承载视频流信息:
auto* stream = avformat_new_stream(format, nullptr);
if (!stream) {
    spdlog::error("failed to allocate stream");
    // ...
    return -11;
}

stream->id = static_cast<int>(format->nb_streams - 1);
有了视频容器和流之后,我们就可以先打开文件了:
err = avio_open(&format->pb, "output.mkv", AVIO_FLAG_WRITE);
if (err < 0) {
    spdlog::error("failed to open output file: {}", err);
    // ...
    return -12;
}
由于 Matroska 需要从编码器中读取数据,我们需要给编码器头设置 AV_CODEC_FLAG_GLOBAL_HEADER 以便元数据可可以取到:
context->flags |= AV_CODEC_FLAG_GLOBAL_HEADER;
err = avcodec_open2(context, codec, nullptr);
if (err < 0) {
    spdlog::error("failed to open the codec: {}", err);
    return -4;
}
启动编码器后,我们将编码器信息复制给流,以便它能正确地写出对应的元信息:
err = avcodec_parameters_from_context(stream->codecpar, context);
if (err < 0) {
    spdlog::error("failed to copy codec context: {}", err);
    return -13;
}
完成上述设置之后,即可先写出视频容器的头信息:
err = avformat_write_header(format, nullptr);
if (err < 0) {
    spdlog::error("failed to write header: {}", err);
    return -14;
}
在编码循环和结尾中,写文件操作现在由写流替换:
av_packet_rescale_ts(packet, context->time_base, stream->time_base);
packet->stream_index = stream->index;
av_interleaved_write_frame(format, packet);
av_packet_unref(packet);
结尾也要让视频容器写出尾部信息:
av_write_trailer(format);
avformat_flush(format);
并加入对应数据结构的清理:
avio_close(format->pb);
avformat_free_context(format);
完整的代码可以在这里获取。
成果展示!
这回生成的 output.mkv 文件终于是可以正常播放了:
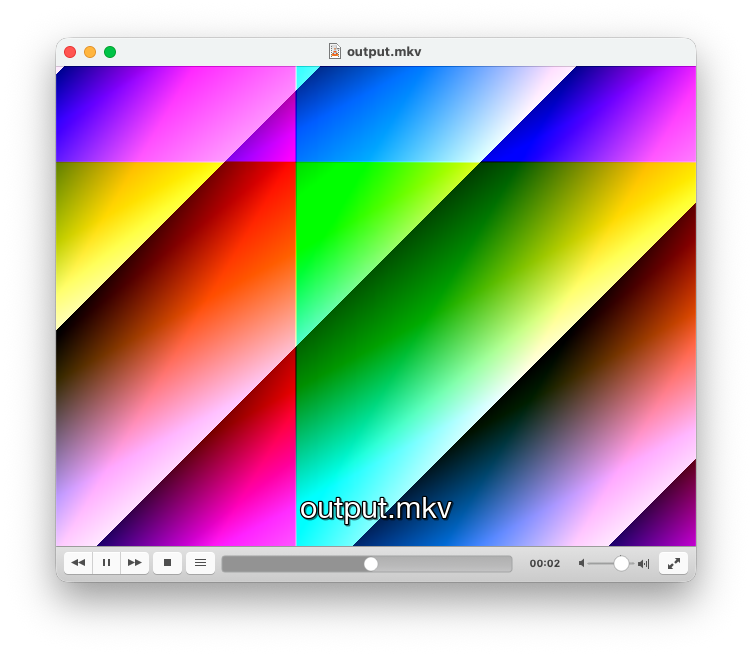
图 2 output.mkv
更多的问题
你可能注意控制台会输出一行并不来自我们的警告:
[h264_videotoolbox @ 0x715010000] Color range not set for yuv420p. Using MPEG range.
以及,我们如果用程序生成图像的话,一般使用的是 RGB 格式;但现在写视频帧却需要使用 YUV420 格式。这个格式转换需要我们手动进行么?
今天已经烧够好多个三分钟了,这些问题之后再考虑吧!