








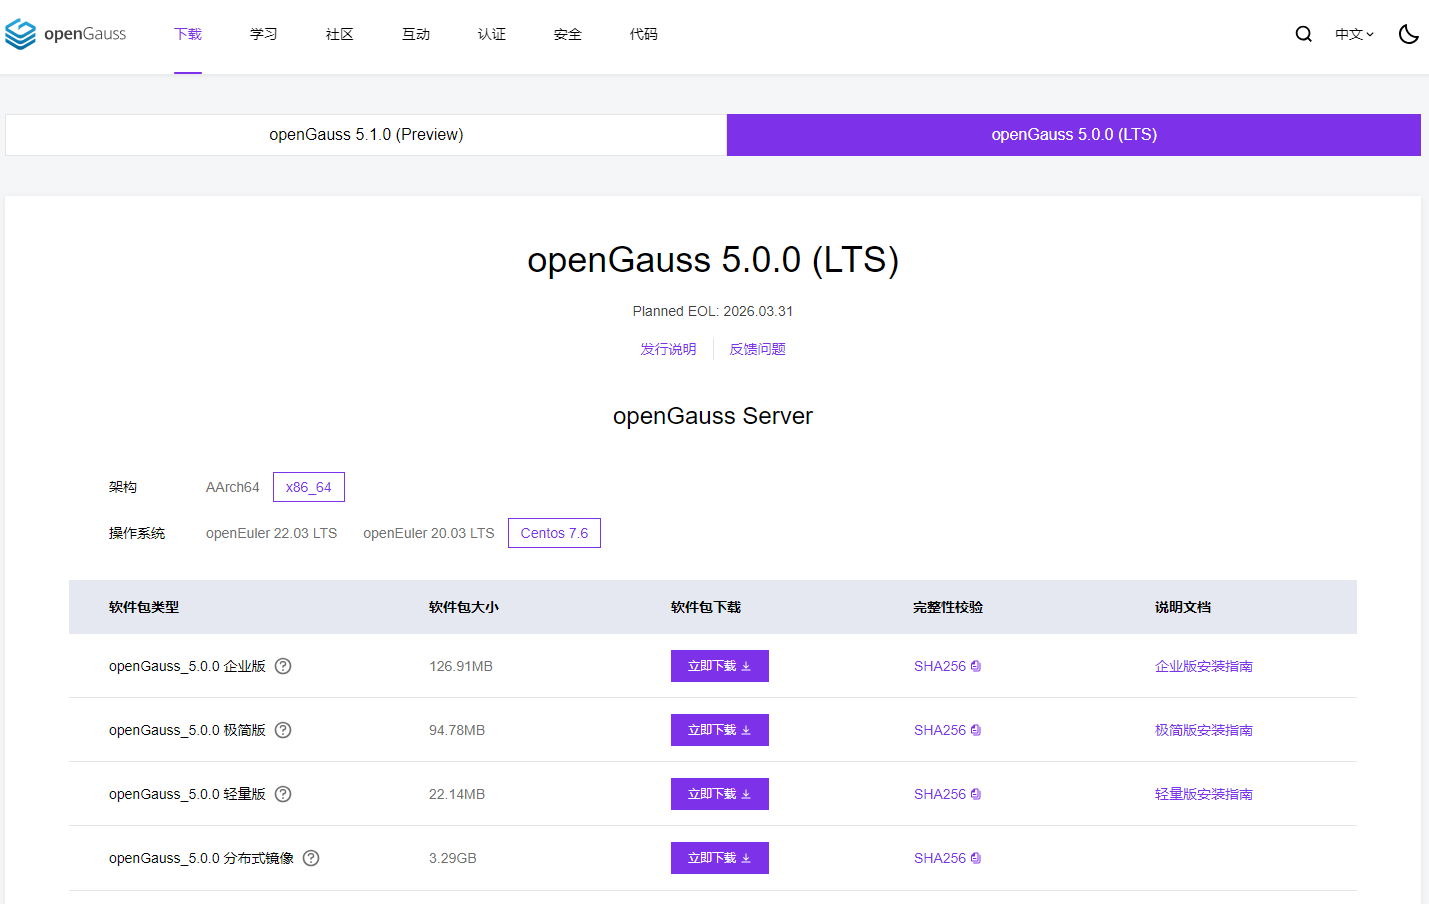
openGauss下载地址:
https://opengauss.org/zh/download (选择企业版下载)
1.1首先检查THP的启用状态 ,如果两个输出都是madvise never 则忽略1.2,否则需要进行1.2设置
#> cat /sys/kernel/mm/transparent_hugepage/defrag
[always] madvise never
#> cat /sys/kernel/mm/transparent_hugepage/enabled
[always] madvise never
#> vim /etc/selinux/config
1.2在运行时禁用THP(Transparent HugePages)
#> echo never > /sys/kernel/mm/transparent_hugepage/enabled
#> echo never > /sys/kernel/mm/transparent_hugepage/defrag
1.3 关闭 SELINUX ,修改/etc/selinux/config 文件中的“SELINUX”值为“disabled"。
#> vim /etc/selinux/config
#> SELINUX=disabled
1.4 关闭 firewalld 防火墙
#> systemctl status firewalld
#> systemctl stop firewalld.service// 关闭防火墙
#> systemctl disable firewalld.service //禁止防火墙开机重启
1.5 操作系统参数设置
#> echo net.ipv4.tcp_retries1 = 5 >>/etc/sysctl.conf
#> echo net.ipv4.tcp_syn_retries = 5 >>/etc/sysctl.conf
#> sysctl -p // 使参数生效
#> echo "* soft nofile1000000" >>/etc/security/limits.conf
#> echo "* hard nofile 1000000" >>/etc/security/limits.conf
1.6 设置字符集参数
#> echo "LANG=en_US.UTF-8" >> /etc/profile
#> source /etc/profile // 使参数生效
#> echo $LANG
1.7 设置时区和时间 (如果时间是正确时间,则忽略此步骤)
#> lI /etc/localtime
#> cp /usr/share/zoneinfo/Asia/Shanghai /etc/localtime
#> date -s "2023/11/06 19:39:20"
1.8 设置网卡 MTU 值
#> ifconfig
#> ifconfig ens33 mtu 8192 //临时生效
#> vi /etc/sysconfig/network-scripts/ifcfg-eth0 // 在文末追加MTU="8192",重启生效(永久生效)
1.9 关闭 RemovelPC
#> vim /etc/systemd/logind.conf
#> RemovelPC=no // 修改“RemovelPC"值为“no”
#> vim /usr/lib/systemd/system/systemd-logind.service
#> RemovelPC=no // 修改"RemovelPC"值为“no”,文件中没有配置参数,追加到文件的末尾即可
**重新加载配置参数
#> systemctl daemon-reload
#> systemctl restart systemd-logind
1.10设置 root用户远程登录
在openGauss 安装时需要root帐户远程登录访问权限
#> vim /etc/ssh/sshd_config
#> PermitRootLogin yes // 将“PermitRootLogin"改为“yes”。
#> #Banner XXXX // 注释掉“Banner"所在的行。
#> systemctl restart sshd.service // 保存后重启sshd
1.11 关闭HISTORY记录(为避免指令历史记录安全隐患,需关闭各主机的history指令。)
#> vim /etc/profile   //系统中HISTSIZE默认值为1000,将其修改为0。
#> source /etc/profile  //设置/etc/profile生效。
1.12 关闭virbr0网卡
#> ifconfig virbr0 down
#> systemctl disable libvirtd.service
1.13 在各数据库节点上,关闭RemoveIPC (CentOS操作系统无该参数,可以跳过该步骤)
#> sed -i '/^RemoveIPC/d' /etc/systemd/logind.conf
#> sed -i '/^RemoveIPC/d' /usr/lib/systemd/system/systemd-logind.service
#> echo "RemoveIPC=no"  >> /etc/systemd/logind.conf
#> echo "RemoveIPC=no"  >> /usr/lib/systemd/system/systemd-logind.service
#> systemctl daemon-reload
#> systemctl restart systemd-logind
#> loginctl show-session | grep RemoveIPC
#> systemctl show systemd-logind | grep RemoveIPC
1.14 修改主机名
#> hostnamectl set-hostname master01
1.15 设置/etc/hosts
#> vim /etc/hosts // 把自己的主机ip添加进去 例如:192.168.0.126 master01

1.16 修改主机名后需要重启服务器
2 更换yum源 (记得自己备份原有yum源)
#> cd /etc/yum.repos.d/
#> wget -O /etc/yum.repos.d/CentOS-Base.repo https://repo.huaweicloud.com/repository/conf/CentOS-7-reg.repo
#> yum clean all
#> yum repolist
3.安装准备
3.1 安装基础支持软件
#> yum install -y libaio-devel flex bison ncurses-devel glibc-devel patch redhat-Ilsb- core readline-devel
3.2 安装 python3
3.3 安装压缩软件
4 将下载的openGauss上传到/root 目录中

4.1 创建文件夹
#> cd /root
#> mkdir /opt/software/openGauss/
4.2 赋予权限
chmod 777 -R /opt/software
4.3 解压安装包
#> cd /root
#> tar -zxvf openGauss-5.0.0-CentOS-64bit-all.tar.gz -C /opt/software/openGauss/
#> cd /opt/software/openGauss/
#> tar -zxvf openGauss-5.0.0-CentOS-64bit-om.tar.gz
4.4 创建配置文件
vim /opt/software/open.xml
4.5 配置 open.xml内容并保存
<?xml version="1.0" encoding="UTF-8"?>
<ROOT>
    <!-- openGauss整体信息 -->
    <CLUSTER>
        <!-- 数据库名称 -->
        <PARAM name="clusterName" value="dbCluster" />
        <!-- 数据库节点名称(hostname) -->
        <PARAM name="nodeNames" value="master01" />
        <!-- 数据库安装目录-->
        <PARAM name="gaussdbAppPath" value="/opt/software/install/app" />
        <!-- 日志目录-->
        <PARAM name="gaussdbLogPath" value="/opt/software/log/omm" />
        <!-- 临时文件目录-->
        <PARAM name="tmpMppdbPath" value="/opt/software/tmp" />
        <!-- 数据库工具目录-->
        <PARAM name="gaussdbToolPath" value="/opt/software/om" />
        <!-- 数据库core文件目录-->
        <PARAM name="corePath" value="/opt/software/corefile" />
        <!-- 节点IP,与数据库节点名称列表一一对应 -->
        <PARAM name="backIp1s" value="192.168.0.126"/>
    </CLUSTER>
    <!-- 每台服务器上的节点部署信息 -->
    <DEVICELIST>
        <!-- 节点1上的部署信息 -->
        <DEVICE sn="node1_hostname">
            <!-- 节点1的主机名称 -->
            <PARAM name="name" value="master01"/>
            <!-- 节点1所在的AZ及AZ优先级 -->
            <PARAM name="azName" value="AZ1"/>
            <PARAM name="azPriority" value="1"/>
            <!-- 节点1的IP,如果服务器只有一个网卡可用,将backIP1和sshIP1配置成同一个IP -->
            <PARAM name="backIp1" value="192.168.0.126"/>
            <PARAM name="sshIp1" value="192.168.0.126"/>

    <!--dbnode-->
    <PARAM name="dataNum" value="1"/>
    <PARAM name="dataPortBase" value="15400"/>
    <PARAM name="dataNode1" value="/opt/software/install/data/dn"/>
            <PARAM name="dataNode1_syncNum" value="0"/>
        </DEVICE>
    </DEVICELIST>
</ROOT>
4.6 执行预安装脚本
#> cd /opt/software/openGauss/script
#> ./gs_preinstall -U omm -G dbgrp -X /opt/software/open.xml
4.7 查系统环境
/opt/software/openGauss/script/gs_checkos -i A -h master01 --detail
5 开始安装数据库
5.1 切换用户(必须使用预安装指定的用户进行安装)
5.2 开始安装(使用XML配置文件)
#> gs_install -X /opt/software/open.xml
以下输出表示安装成功
su - omm
gs_install -X /opt/software/open.xml

Parsing the configuration file.
Check preinstall on every node.
Successfully checked preinstall on every node.
Creating the backup directory.
Last time end with Start cluster.
Continue this step.
Successfully created the backup directory.
begin deploy..
Successfully started cluster.
Successfully installed application.
end deploy..
6 验证
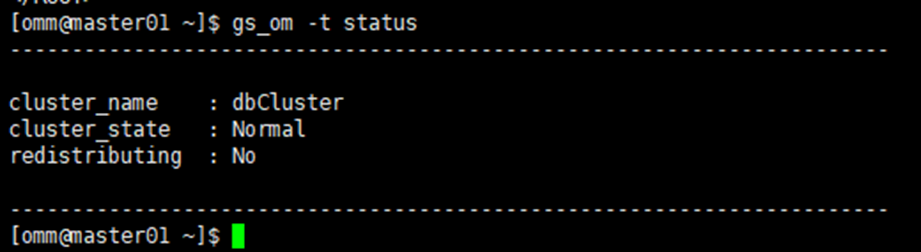
#> su - omm
#> gs_om -t status
7 登陆数据库
#> gsql -d postgres -p 15400
其他常用命令
gs_om -t stop  // 关闭数据库服务
gs_om -t start //启动数据库服务
参考文献
手把手教你安装openGauss 视频
https://www.bilibili.com/video/BV1HW4y147yE/?spm_id_from=333.337.search-card.all.click&vd_source=8aea3914670257c378a13ba98c7df723
手把手教你安装openGauss 文档
https://www.modb.pro/db/545504
openEuler22.03系统上openGauss数据库的配置及DataStudio连接
https://www.bilibili.com/video/BV1Y8411i7ZS/?spm_id_from=autoNext&vd_source=8aea3914670257c378a13ba98c7df723
体验openGauss 5.0.0 单机极简版安装指南
https://ost.51cto.com/posts/26121
openGauss数据库连接问题
https://blog.csdn.net/mm8413/article/details/125826973
SQLSugar连接openGauss 出现Received AuthenticationSASL message
https://www.donet5.com/Ask/9/21149
此内容由惯性聚合(RSS阅读器)自动聚合整理,仅供阅读参考。 原文来自 — 版权归原作者所有。