







Earlier this year, I've been fortunate enough to get access to the beta of the OpenAI GPT-3 API. I saw many people throughout 2020 and early 2021 starting pretty impressive projects and even companies around this API, so it's a euphemism to say that it piqued my interest. I wanted to get my hands on it ASAP and start experimenting and building things like some of the cool people on Twitter.
The problem, however, is that I didn't know where to start, or even what to do with GPT-3. When I logged into the playground the first time, I was just presented with a barebone text input and a toolbar filled with sliders, that was it 😅! Thus, I figured this was yet another perfect opportunity to write the guide I wished I had when I got started and share the steps I took to achieve my goals and everthing I learned along the way.
In this article, we'll take a look together at the fundamentals of GPT-3 illustrated through some interactive widgets ⚡️, and most importantly at my attempts to build my own custom summarization model! In the end, I'll also guide you on how to use the API beyond the playground, so you'll have all the tools to start building amazing AI-powered apps 🚀.
GPT-3 which stands for Generative Pre-trained Transformer 3 is a "text-in, text-out" API built by OpenAI that has been pre-trained on an immense and diverse set of text from the internet. It can return a relevant text output to any text input you may provide and its API is so simple to use that it makes it very easy for developers to build cool AI-powered apps 🤖 without necessarily the need for an AI or Machine Learning background.
If like me, you took Machine Learning classes, or read a few articles about it, you might be confused when you start using GPT-3 and ask yourselves how to "train" it.
hey friends what's the go-to resource to get started with GPT-3? I'd like to know how I'm supposed to "train" a model to build a preset that can do a specific task. I used the playground but pretty sure I don't understand everything so I have tons of questions! Any pointers?🙏
The short answer to this is that you can't train GPT-3 (it has "pre-trained" in its name for a reason). To "tell" GPT-3 what output you want, you have to use what is referred to by the OpenAI team as the few-shot learning technique where you provide just a few examples of what response you expect for a given input. There are other ways to "guide" GPT-3 into being more specific with its output by using fine-tuning.
Don't worry if you feel confused right now! We're going to analyze both these techniques through some examples below!
The first time you'll log into OpenAI, it will feel like you've been thrown to the wolves without much guidance. You'll only have a big text box and some dials on the side to tweak.
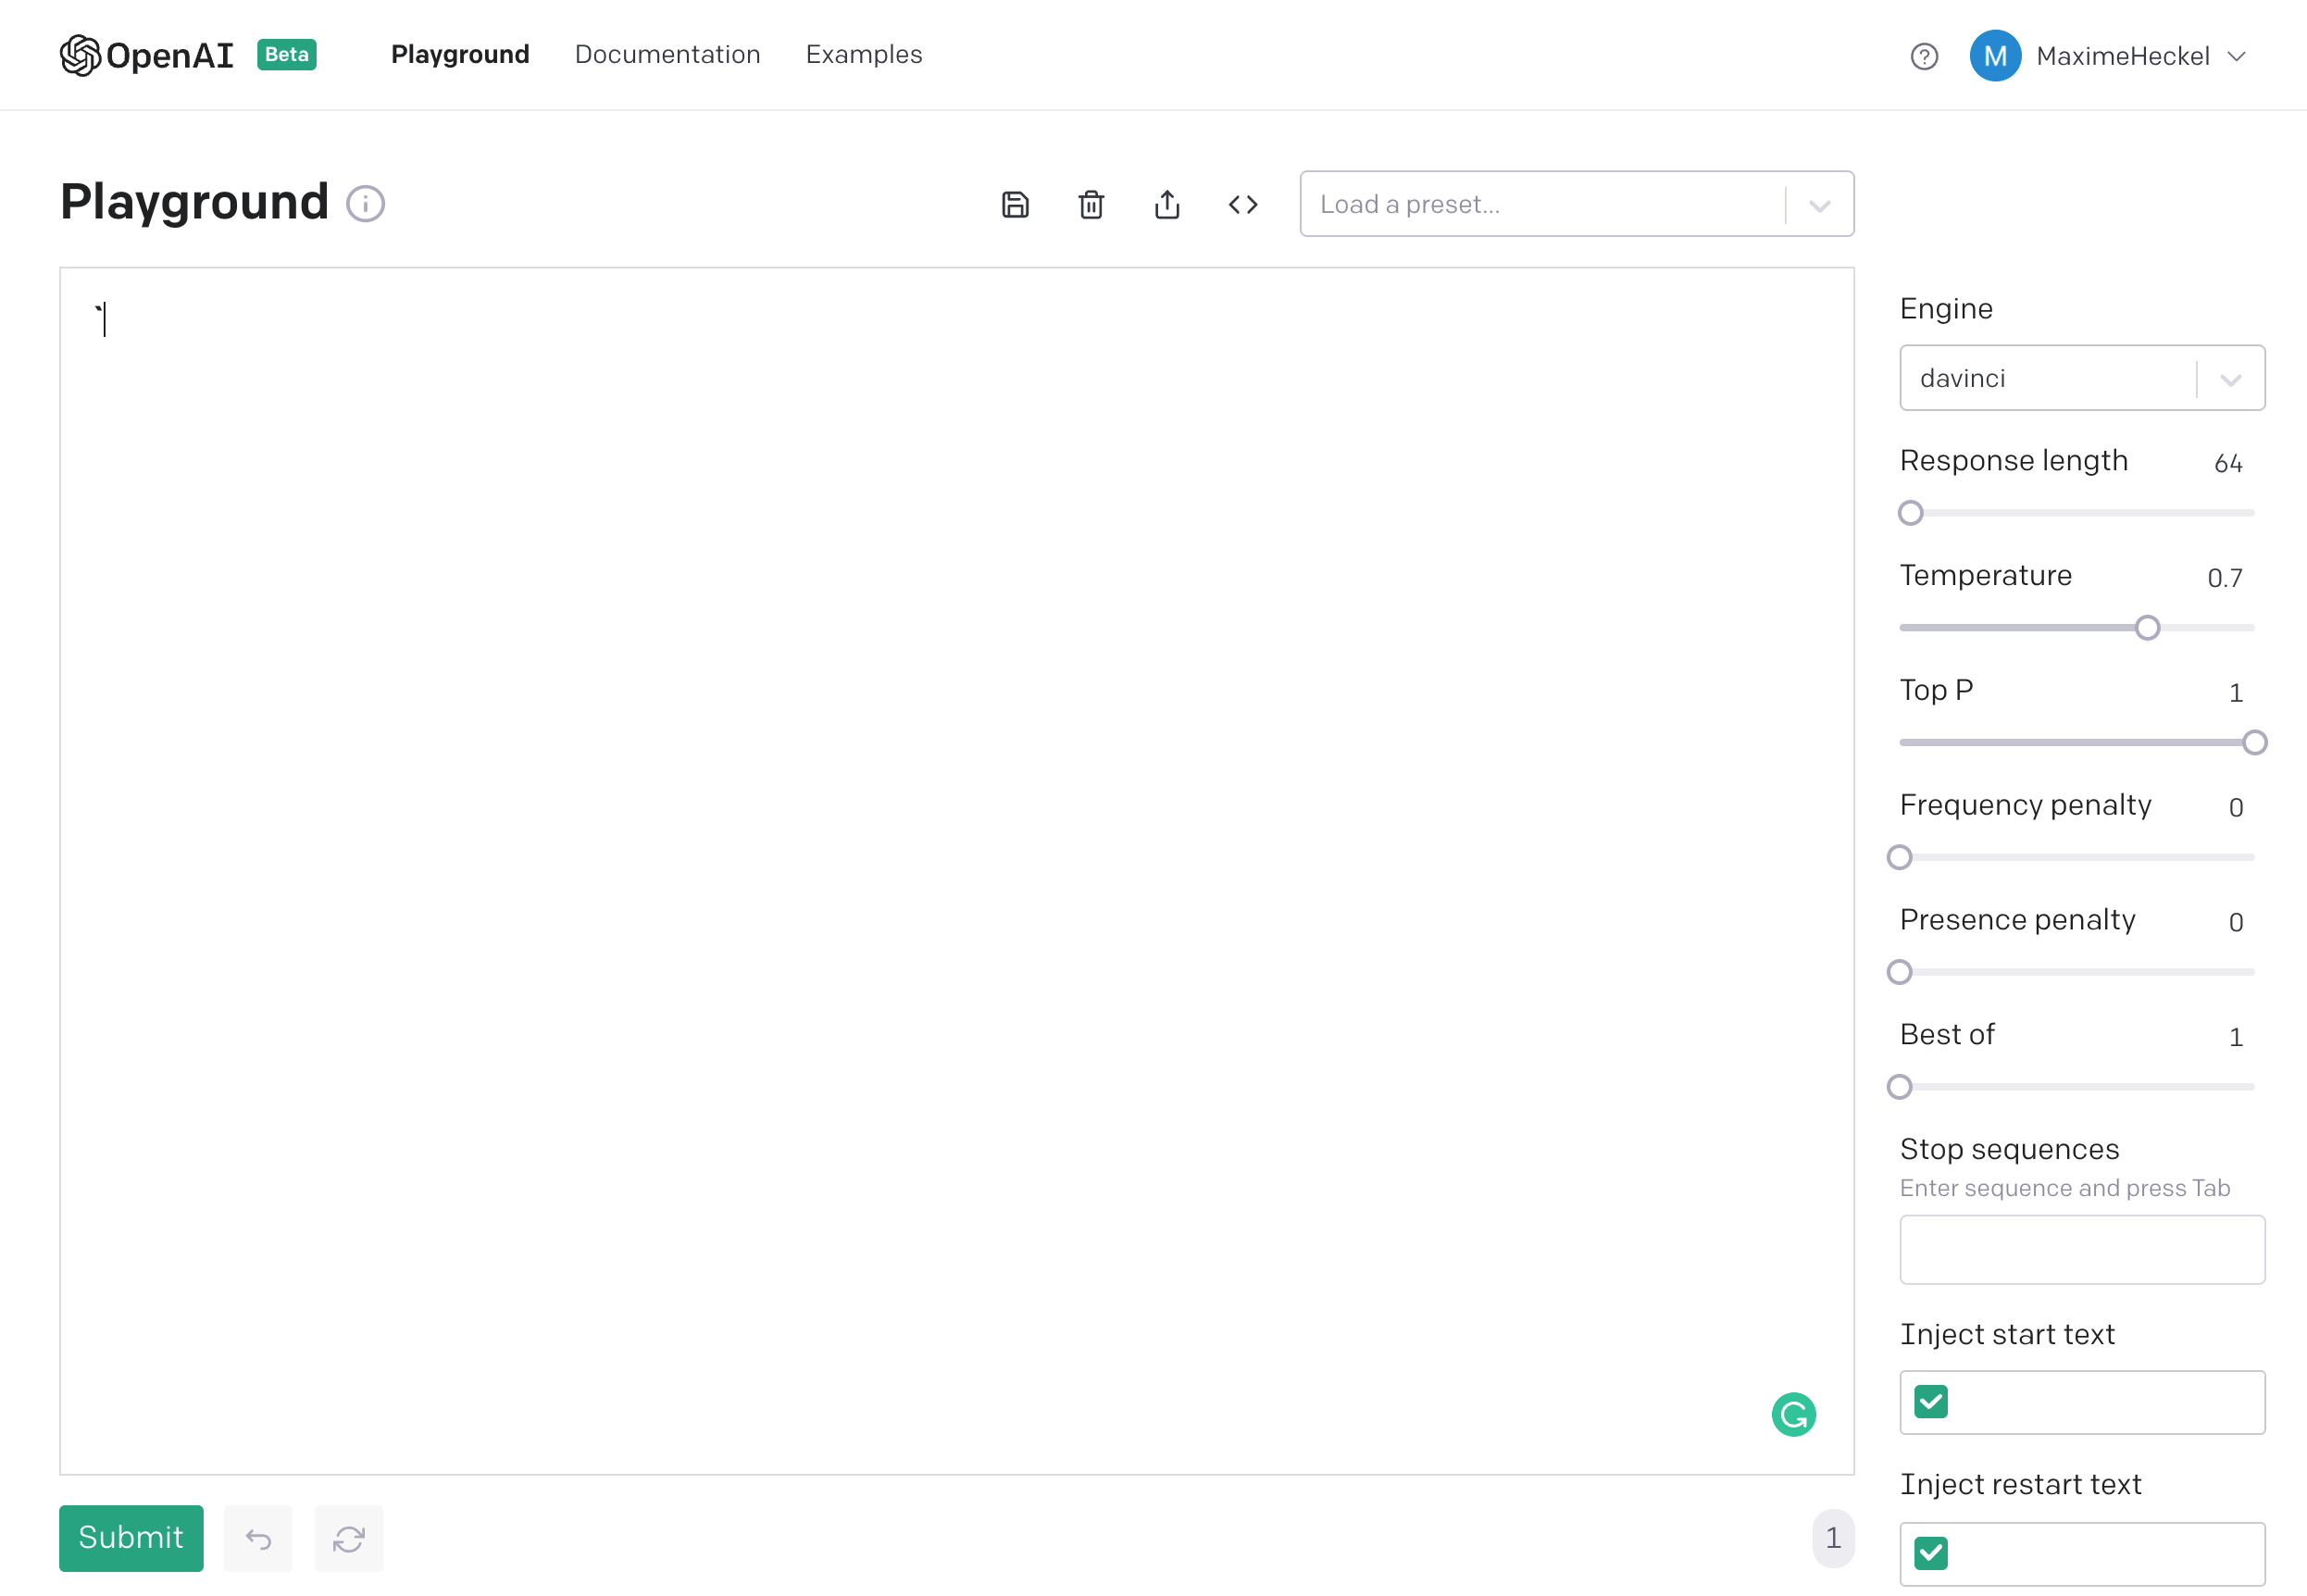
That text box is referred to as the prompt. This is where you'll provide your inputs, and also see the outputs generated by GPT-3. The options in the sidebar let you tweak the output as you wish:
Temperature and Top P influence the "randomness" of your output, 0 being the most deterministic, 1 being the most ... let's say "creative" 😅 (set it to 1 if you like to live dangerously)
Response Length lets you set how many "tokens" or characters you wish to have in your output
For now, that's all we need to know to get started!
As mentioned in the previous part, the key with GPT-3 is to provide examples of outputs to guide it to generate something we want. To illustrate that, the little widget below is a simplified version of the playground, where we want GPT-3 to generate a list of animal emojis.
First, we only provide one example 1. 🦁\n which is far from enough for the API to know what to do with this input. Try to hit the Submit button and you'll see that we are far from getting what we want. Then click on the toggle and hit Submit again to see what happens when you add more examples.
Prompt
Toggle on to add more examples!
You can see that when we provide just a few examples such as 1. 🦁\n2. 🐢\n3. 🦄\n4. 🐶\n5. 🐰 as an input, we get a more accurate output. This is the strength of the GPT-3 API. No training is needed from the user side, just a few examples and you can get some really impressive results.
On top of that, you can also tweak this output to your liking by changing some of the settings of the playground. In the video below you can see that when I tweak the temperature setting on the same example, the higher the temperature the more unexpected the result becomes.
In the examples we just saw, the outputs generated by GPT-3 were indeed promising, yet felt a bit uncontrollable: the generation only stopped once we reached maximum response length. That means that GPT-3 might stop generating an output in the middle of a sentence which can be problematic when working with text corpuses.
My initial goal with GPT-3 was to build a summarization model, where I could pass text from my own blog posts as input and get a summarized one-line sentence. So, little to say that having it stopping the generation in the middle of a sentence is ... annoying 😅.
This is where prompt design comes into the picture!
To design a prompt, you may need to consider adding prefixes to your input and outputs to help GPT-3 to tell them apart. For my summarization model, I chose to prefix my input text (the paragraph of my blog post I wish to summarize) with input: and the resulting summarized output with summary:.
The prompt design I chose for my summarization model
1
input: Something that originally caught my attention with Gatsby was its use
2
of GraphQL. It became more of a curiosity over time honestly. While I'm sure
3
it makes sense for many sites at scale (e-commerce, bigger and more complex
4
publications), at least to me the GraphQL felt like an extra level of complexity
5
that felt unnecessary. The more I iterated on my blog, the more the technical
6
choice of GraphQL felt unjustified (for my use-case at least), building data
7
sources felt way more complicated than it should have been.
On top of that, the playground offers you settings to take these prefixes into account when generating an output:
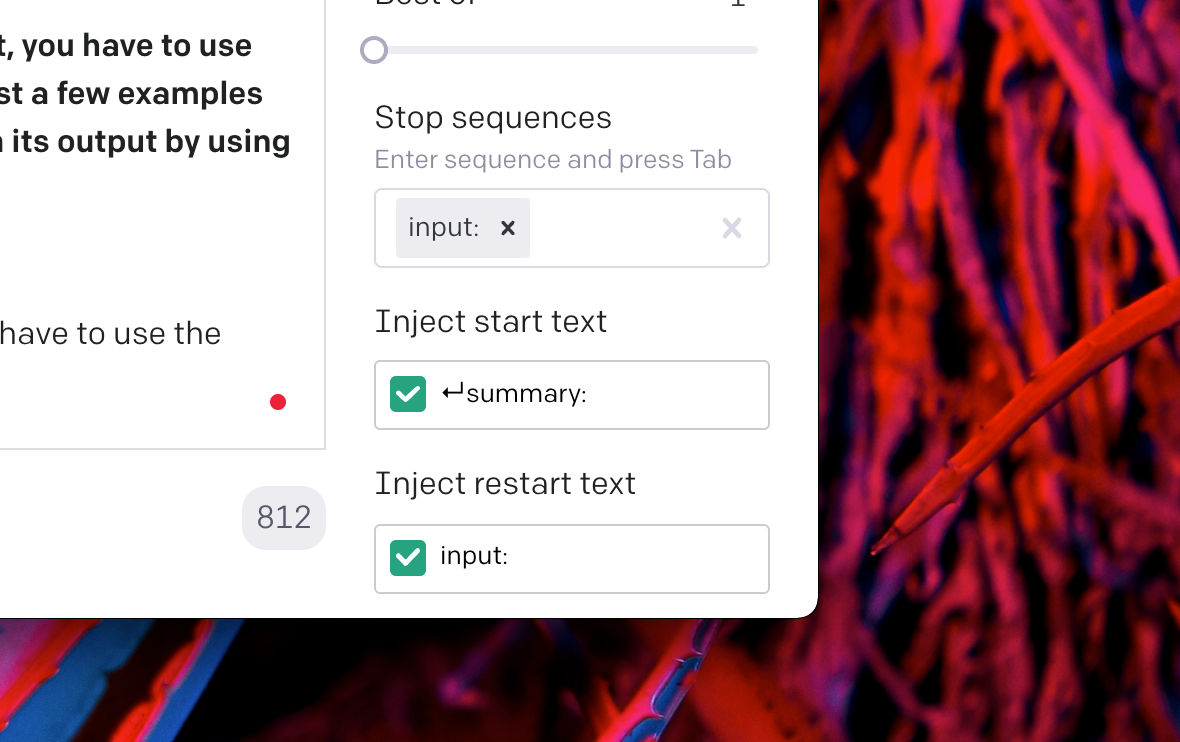
Adding a Stop Sequence to stop the generation once GPT-3 encounters a given string or set of strings. I set it here as input:.
Setting the Start Text option. In my case, I added ↵summary, thus every time we submit our prompt, the first thing that will appear in our prompt will be this string, and then our summarized output will follow.
Setting the Restart Text option. Once the generation has finished, we automatically append this string to be ready for the next summarization request. For this experiment, I set it as input: as this is the prefix for the text that will be summarized.
In the widget below, hit Submit to see what kind of summary we get without any prompt design. Then, just click on the toggle to try the same but with a proper prompt design.
Prompt
Toggle on to enable prompt design with the settings detailed above!
You can see that:
without a proper prompt design GPT-3 stops generating outputs in the middle of a sentence, and even sometimes includes words of previous examples into the output which is incorrect.
with a proper prompt design we're getting some "satisfying" one-line sentence text summaries!
This is rather impressive when you consider that so little was needed to get a decent output. It almost feels like magic! ✨ All it took was a few examples provided as input and a proper prompt design.
As satisfying as it is to see this summarization prompt work, there is yet another problem 😬: it needs a lot of examples, for each request, to perform well. That, my friend, costs a lot of money at scale, especially when you take into account OpenAI's per token pricing model.
We've seen in the previous examples that there are use cases where we'd need it to push few-shot learning one step further like:
the necessity for high-quality results, thus more examples, making requests expensive to run, especially at scale.
the need for faster results, i.e. lower latency requests
Thanks to the new fine-tuning capabilities, we can get an improved version of the technique we learned so far so we do not need to provide GPT-3 with examples for each request. Instead, we'll provide the API with examples beforehand (and lots of them)!
There are 3 main steps to this fine-tuning process:
Build the dataset: that dataset needs to have a lot of examples to perform well. We can provide these examples in a CSV file, containing a prompt (our inputs) column with a corresponding completion column for example.
Prepare the dataset: the file containing the examples we just created needs to be cleaned up. The OpenAI CLI provides a command to do just that and that also gives you suggestions on how to format the data for a better result.
Create the fine-tuned model: this is as easy as running one CLI command against the file that's been generated by the previous step. Once the creation is complete, the fine-tuned model will appear on the playground and be ready to be used!
"We recommend having at least a couple hundred examples. In general, we've found that each doubling of the dataset size leads to a linear increase in model quality" – OpenAI Fine-Tuning documentation
Regarding the summarization model we looked at in the previous part, the first thing we need for its fine-tuned version is data! When I worked on this, I found a lot of high quality on Kaggle and mixed those with some of my own summaries, like the ones I featured earlier in the widget showcasing prompt design. I didn't spend enough time on it so the resulting data set is fairly short compared to what's recommended. You can find it here.
I ran the commands below to prepare my dataset, and create the fine-tuned model:
The set of CLI commands for fine-tuning
1
# Make sure your OpenAI API key is set in your environment
2
export OPENAI_API_KEY="<YOUR_OPENAI_API_KEY>"
4
# Preparing the dataset file: here it will take the CSV file I prepared and output a .jsonl file
5
openai tools fine_tunes.prepare_data -f gpt-3-summaries-dataset.csv
7
# Create the fine-tuned model from the .jsonl dataset file
8
openai api fine_tunes.create -t "gpt-3-summaries-dataset_prepared.jsonl" --no_packing
A few minutes later, the fine-tuned model was ready, and it was time to give it a try:
Impressive, right! ✨ We get an output that's pretty similar to what we got with few-shot learning earlier, but this time, without the need to provide any examples in our prompt.
However, when playing with this model a couple of times, I quickly noticed a few things that were not yet entirely perfect:
We sometimes get some strange artifacts like a second or a non-capitalized sentence in the completions. I'm still unclear where those come from, but I suspect this is due to a formatting issue in my original dataset.
The model does not perform as well as few-shot learning (yet): the sentences generated are pretty simple, too simple in my opinion. That's mostly due to my dataset being fairly short. To fix this, I need to provide more examples (more than double the current amount).
There's a huge opportunity to experiment with new ideas with this API. Its simple design makes it so accessible that any developer could build a working prototype for an AI-powered app in just a few hours.
Creating UIs on top of @OpenAI is one of the biggest opportunities for founders right now. Endless possibilities, and the results can feel like magic to end users.
We already saw and felt the magic of GPT-3 in the previous parts, so it's now time to look at all the tools you need to integrate GPT-3 into your frontend project so you can show it to others. The cool thing here, is that it's very easy to add GPT-3 to any app.
It's no secret that I'm a big fan of Next.js and its serverless capabilities, so I wanted to leverage those for my first off-playground experiment.
For that I followed a few simple steps after creating my Next.js project:
Create an API endpoint file under pages/api called openai.ts
Write the code for my API endpoint (see the code below)
1
import type { NextApiRequest, NextApiResponse } from 'next';
2
import OpenAI from 'openai-api';
4
const handler = async (req: NextApiRequest, res: NextApiResponse) => {
5
if (!process.env.OPENAI_API_KEY) {
8
'OPENAI_API_KEY not set. Please set the key in your environment and redeploy the app to use this endpoint',
13
const openai = new OpenAI(process.env.OPENAI_API_KEY);
18
const gptResponse = await openai.complete({
23
engine: 'curie:ft-tango-2021-08-21-23-57-42',
24
prompt: req.body.prompt,
38
res.status(200).json({ text: `${gptResponse.data.choices[0].text}` });
41
export default handler;
We now have a queryable API endpoint (/api/openai) to run GPT-3 completions using our own fine-tuned model with just a few lines of code! How cool is that 🎉!
Our endpoint works, but nothing is blocking our users to potentially spam it continuously, leaving us with a crazy bill at the end of the month. One efficient way to protect ourselves from that kind of risk is to introduce a rate-limit mechanism for this endpoint.
"Rate-limiting end-users’ access to your application is always recommended to prevent automated usage, and to control your costs" – OpenAI's guidelines documentation
Lucky us, @leerob added an API routes rate-limiting example for Next.js earlier this year.
When it comes to the implementation itself, I took the /utils/rate-limit.js function that Lee wrote, made sure I understood it (very important!), and put it in my own project. From there, I just had to use that utility function in our endpoint code in openai.ts. Here's my implementation where I chose to rate-limit by IP address:
Rate-limited OpenAI API endpoint
1
import type { NextApiRequest, NextApiResponse } from 'next';
2
import OpenAI from 'openai-api';
3
import rateLimit from '../../lib/rate-limit';
5
const MAX_REQUEST_PER_MINUTE_PER_USER = 3;
6
const MAX_CONCURRENT_USER = 500;
7
const MIN_RATE_LIMIT_INTERVAL = 60 * 1000;
9
const limiter = rateLimit({
10
interval: MIN_RATE_LIMIT_INTERVAL,
11
uniqueTokenPerInterval: MAX_CONCURRENT_USER,
14
const handler = async (req: NextApiRequest, res: NextApiResponse) => {
15
if (!process.env.OPENAI_API_KEY) {
16
res.status(500).json({
18
'OPENAI_API_KEY not set. Please set the key in your environment and redeploy the app to use this endpoint',
23
const openai = new OpenAI(process.env.OPENAI_API_KEY);
32
MAX_REQUEST_PER_MINUTE_PER_USER,
33
req.socket.remoteAddress!
36
const gptResponse = await openai.complete({
37
engine: 'curie:ft-tango-2021-08-21-23-57-42',
38
prompt: req.body.prompt,
49
res.status(200).json({ text: `${gptResponse.data.choices[0].text}` });
54
res.status(429).json({ error: 'Rate limit exceeded' });
58
export default handler;
With a setup like the one featured just above, you should see that querying the /api/openai endpoint from the UI code of your Next.js app will only resolve 3 times per minute. Attempting more than 3 requests will result in a request failing with a 429 status code.
We now have all the knowledge and the tools we need to start building some amazing AI-powered apps! We know how to use the playground and leverage the few-shot learning technique with well-crafted prompt designs to enable us to experiment with GPT-3's capabilities. On top of that, with fine-tuning and the ability to quickly spin up a serverless endpoint in combination with the openai-api package, we can quickly iterate on and build our ideas!
I hope you liked this write-up 😄! I did not know anything about OpenAI and GPT-3 a few months ago, so let me know if I forgot about some important talking points and I'll make sure to add them up to this post later.
Did you come up with a cool app after going through this guide?
Please do share with me! I love seeing whatever you'll come up with!
What should you check out next?
I highly recommend looking at the other use cases for GPT-3 beyond completion such as search and classification. On top of that, you should check out Codex, the model that powers Github Copilot. I already started experimenting with it 🧑💻.
此内容由惯性聚合(RSS阅读器)自动聚合整理,仅供阅读参考。 原文来自 — 版权归原作者所有。
