






We recently released a new source plugin that makes it easy to use Sanity as a headless CMS for a JAMstack website built with Gatsby.js. It's pretty easy to install and integrate with exciting projects on Gatsby. If you're new to the static site generator, or want to test the plugin out, we made a full company website and a headless CMS example, with people, projects, a blog, and some info pages. In this tutorial we'll show how to set it up, and how to run Gatsby in development mode on a web server, to get a real-time online preview of content changes.
The example is a monorepo, containing both the configuration for Sanity Studio, where you'll be editing content, and the Gatsby built website. It's also configured to be deployed straight onto Netlify or Now. You can create a new free Sanity project within it, and be up and running in minutes. Web development in the age of JAMstack is truly fantastic!
We feel safe that you can take our company website example, and make it your own.
Go to the example repository on GitHub and clone, or fork it from there. You can also run this in your terminal in the folder you keep your web-projects (replace the URL with your own if you forked the project):
It's convenient to have the Sanity CLI when working with projects like this, and it doesn't take long to install. Run the following npm command in the command line:
This example use node package manager (npm) for dependencies, you can also use yarn if you prefer that:
Run this command after the install script is finished. Follow the CLI’s instructions to create a Sanity.io project for the website. We recommend setting the dataset to public (you can change it to private afterward if you prefer). A dataset is where all you store all your content, kind of like a database. You can have more than one dataset. For example if you want a content test bed for development.
The npm run init command also deploys a GraphQL API for your Sanity project (Sanity supports both GROQ and GraphQL). The Gatsby source plugin for Sanity uses the GraphQL schema definition to prevent types and fields missing from Gatsby’s templating API. As far as we know, this is the only plugin that helps you with that – it's pretty practical!
In your project folder you have two folders: studio and web.
The studio folder is where you'll find the configuration files for the Sanity Studio, which is an open source editor for your content, built with JavaScript and React. It connects to the hosted API and is real-time, like you have in Google Docs. You can host the Studio anywhere you can host an HTML-file. In the studio/schema folder you'll find the configuration files for all the types and fields. You can tweak and change these later if you want to, but we'll let them be for now.
The web folder holds a Gatsby website, with everything you need set up to render the content managed with Sanity. If you're new to Gatsby, we recommend their comprehensive documentation to learn the basic ideas.
You can start both development servers for the Studio and the Gatsby frontend with a single command:
The studio runs on localhost:3333, and the website on localhost:8000. If you open the website you'll be met with an error message. That's because it needs some content to build. So start by opening the studio and log in.

Go to Site Settings and Company Settings and fill in at least the names. Make a blog post (just some mock content is fine), a project, and some of the other stuff as well. You should give both your blog- and project entries a title, a slug and preferably a Published at date (in the past). Remember to publish the changes (the blue button down left). Although all changes instantly sync with the hosted backend, they won't appear in the public API without being published.
Now you probably need to restart the development server, to get Gatsby to build with the new changes. ctrl + C will quit the current process, and npm start to start it again.
If you look at the file called gatsby-config.js, you'll see the following entry in the plugins section:
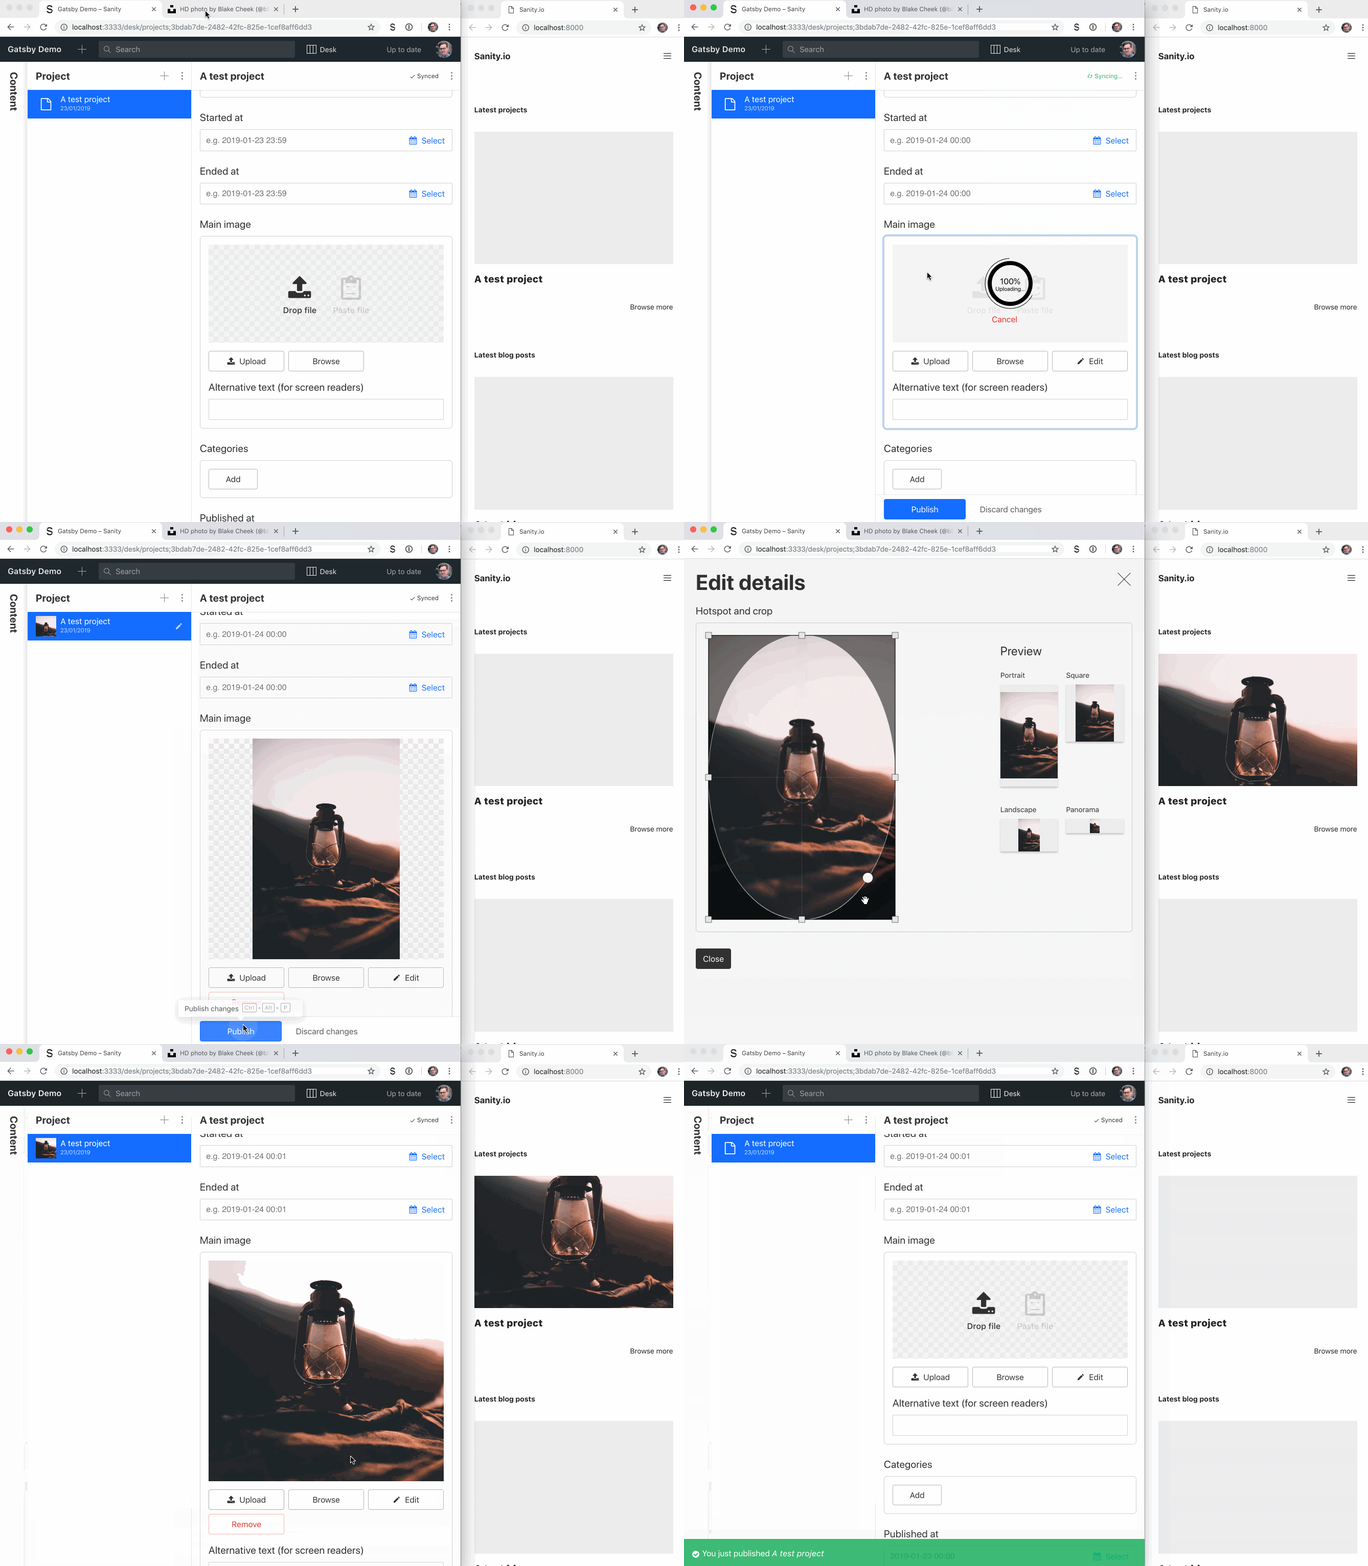
We have enabled watchMode, which means that Gatsby injects content changes on the fly, without you having to reload the development server, or refresh the browser. Few other source plugins do this. What's even cooler, is that other people can sit in the same studio, and edit content, and that too is instantly reflected on the frontend development server. The plugin only get access to published changes by default, but try editing something (maybe add an image to the first blog post), push Publish and see if it updates in the frontend.
In the plugin, you maybe noticed token: process.env.SANITY_TOKEN and overlayDrafts: true. With a token with read privileges you give Gatsby access to unpublished documents, such as drafts. When overlayDrafts is set to true, Gatsby will use the draft version of a document if it has access to it. You'll need to save a read token in a file called .env in the web folder to enable this:
Now you can go to https://manage.sanity.io/projects/<YourProjectId>/settings/api (Manage -> Settings -> API), and Add New Token. Give it a nice descriptive label, and only read rights. Copy it, and paste it in the .env file:
To load the token into Gatsby, you'll need to restart the local development server again. It will be worth it though.

Maybe you want to tweak the frontend a bit, change the CSS, or make some adjustments. At some point you want to share it with the world though. We recommend that you put your project on GitHub. If you forked it, commit and push your changes. If you cloned it from us, follow these instructions on how to get a local git repo on GitHub.
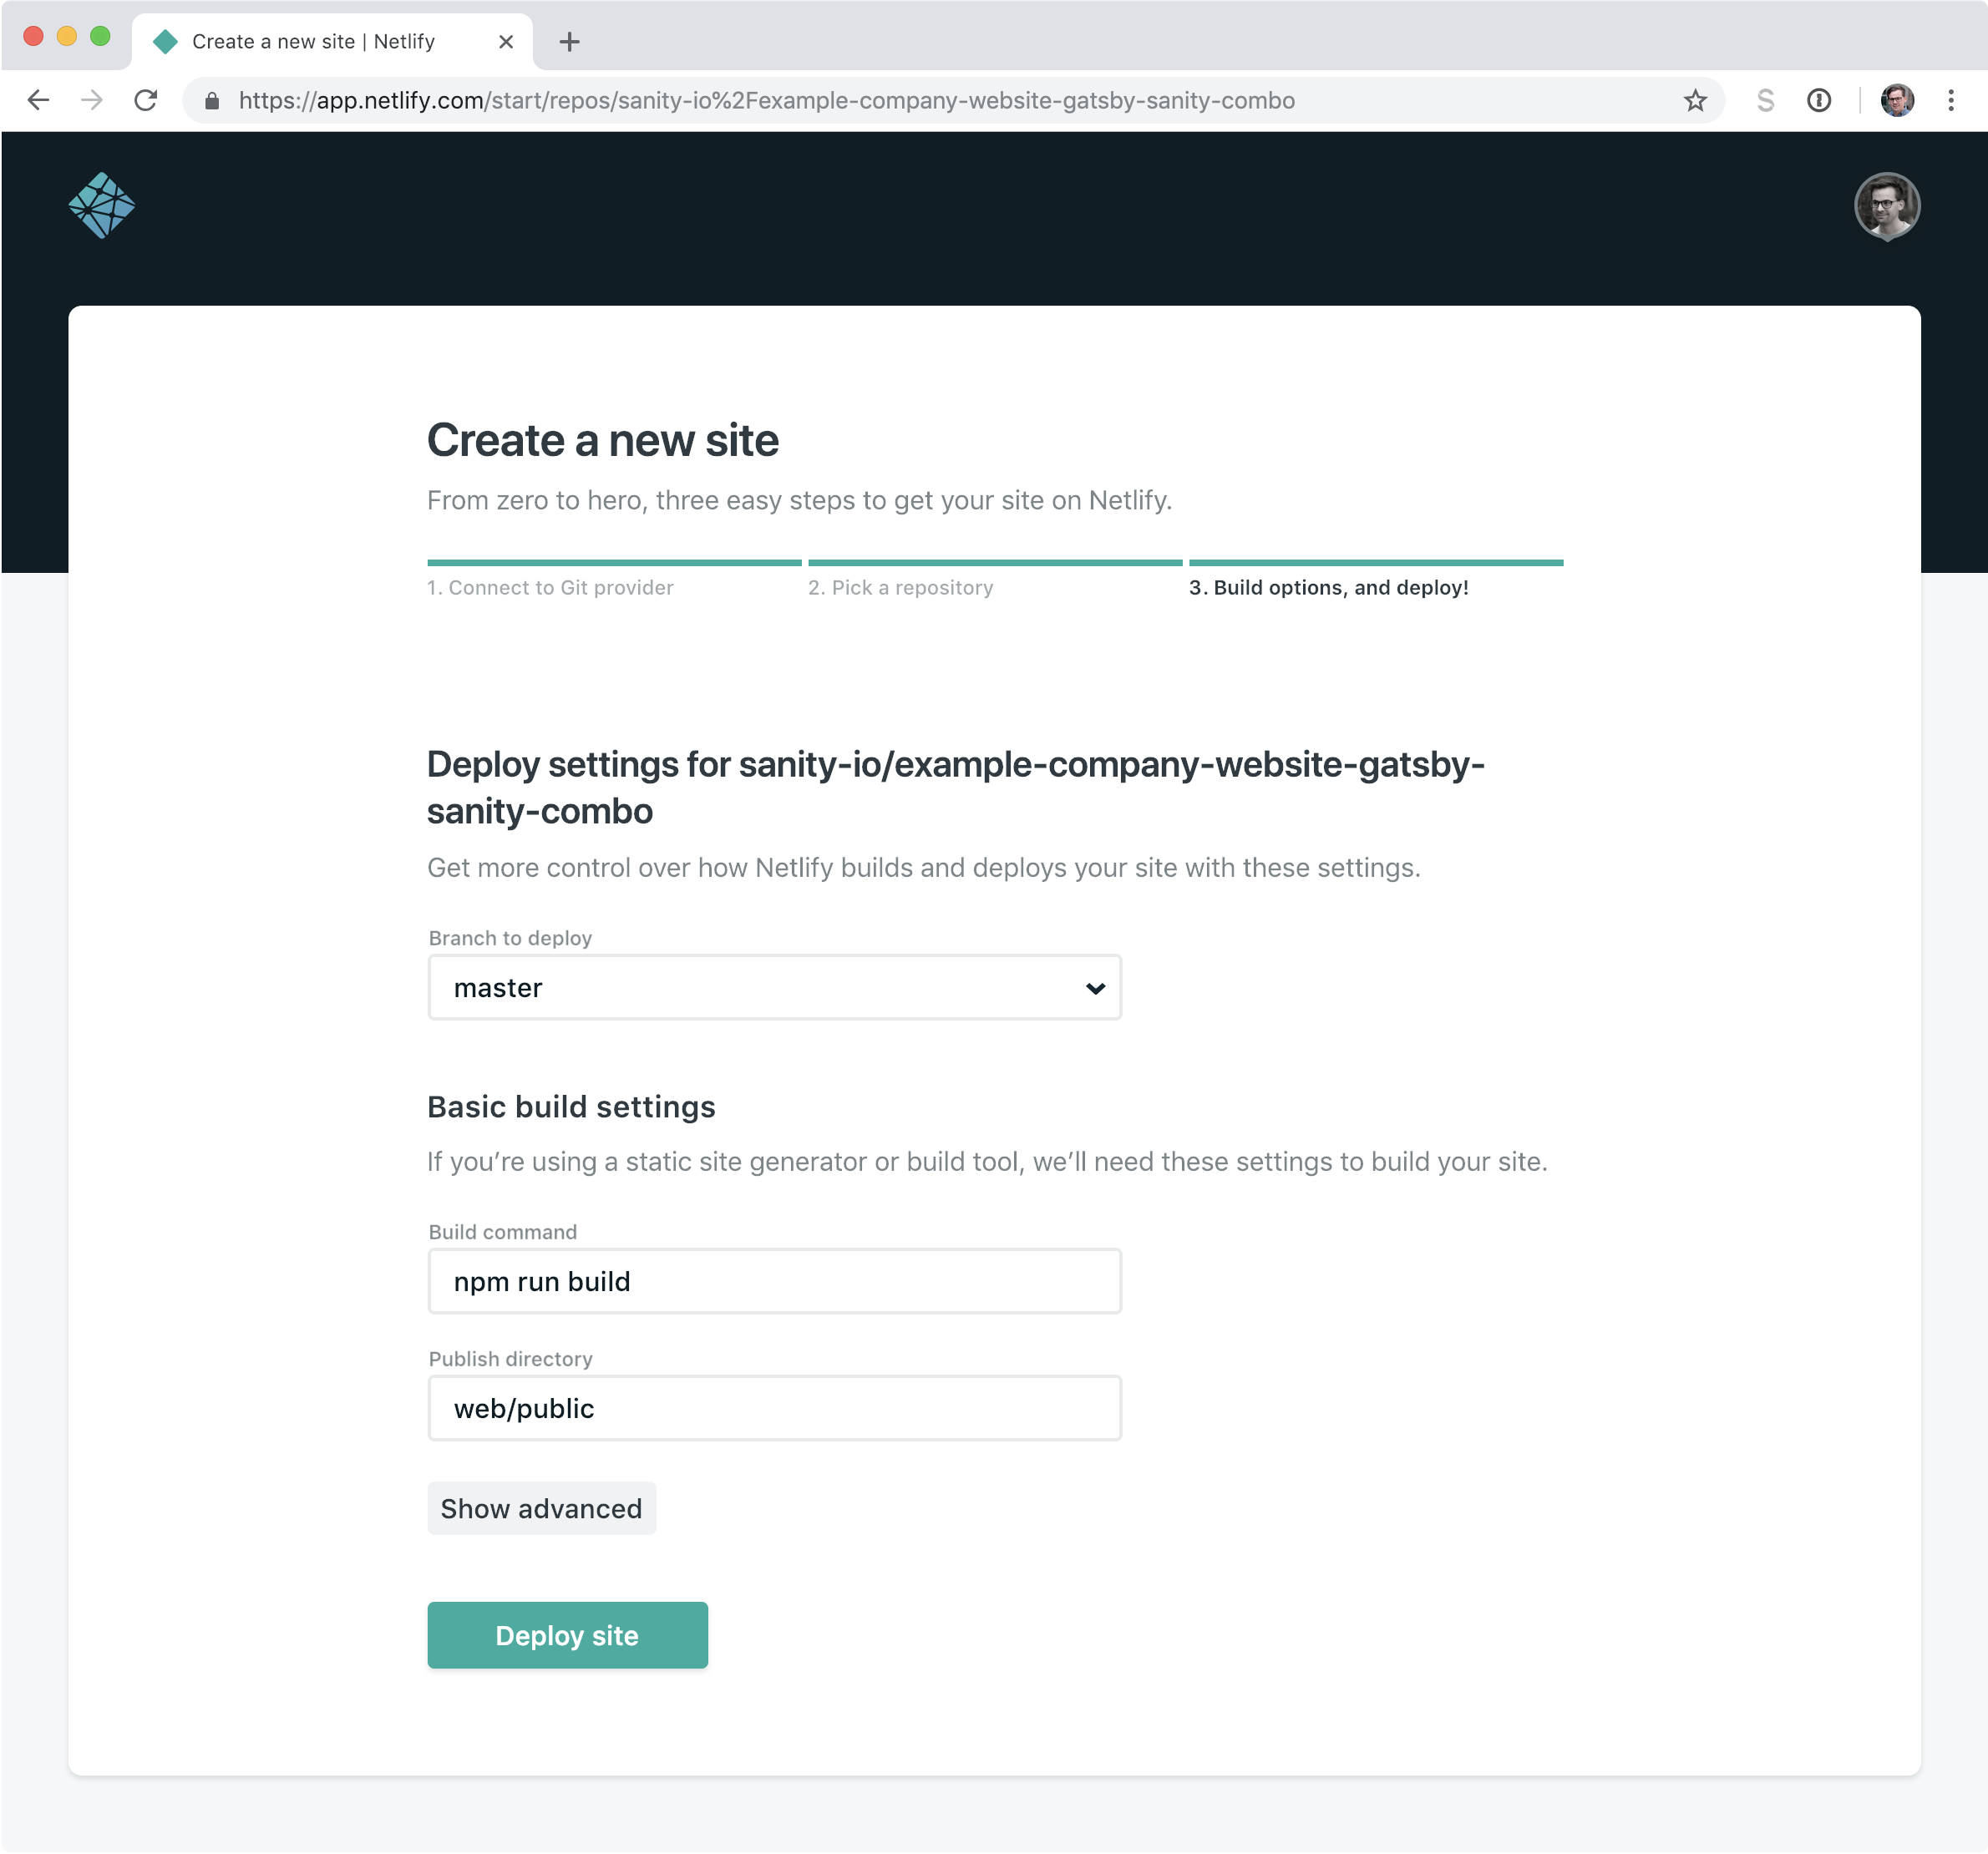
When it's on GitHub, head over to Netlify and sign up or log in. If you choose New site from Git and find the repository you just updated, everything is set up and ready, thanks to the netlify.toml file in the project. Likewise, if you prefer Zeit’s now (or want to use both for ultimate redundancy), you can run npm run now-deploy in the root folder of the project.
To quickly deploy the Sanity studio, run sanity deploy in the studio folder and choose a hostname. Now you can invite two additional users for free on the forever-free developer plan. If you need more, it's $10 per user on the pay-as-you-go on the same plan. Gatsby only uses 2 API request to build the whole site. One for all your content, and one for the schema. So you will get great mileage with our free plan with a Gatsby website. We dig it!
Netlify triggers new builds when you push commits to a branch that it monitors. The content, however, is not committed to Git. Fortunately, there are other ways of triggering builds, one of them is using webhooks.
If you host your site on Netlify, you can go into Settings -> Build & Deploy and scroll down to Build Hooks. Choose Add build hook, give it a name, and point to the branch you want to build from. Copy the URL, and return to the terminal:
Now Netlify triggers a new deploy of your site everytime you publish some new content edits.
This helpful tutorial by Andreas Keller popped up in our feed. He has figured a way to run Gatsby on a development server on Heroku, hence making it possible to get that watch mode with live previews experience on the web. Which is nice if you have editors that can't be expected to run a local development server in the terminal. Let's set it up with the Sanity source plugin to get an unparalleled preview experience!
Follow these instructions to install the Heroku CLI. Run heroku login and log in or sign up.
To get Heroku to play nice with the monorepo (it likes its apps in the root folder), we must install the gatsby-cli as a dev dependency in the root folder:
There are also other ways of doing it where you push the web folder, but then you have to put in the projectId and dataset manually in gatsby-config.js, as these variables are imported from sanity.json in the studio folder.
Once you're set, you should do the following:
This app runs on a free dyno that sleep after a time of inactivity, and it can take some minutes to start up again. You can of course run it on a paid dyno which gives you full uptime. We cannot guarantee that it will be very stable, since the development server isn't built to actually host a website on the web. If it crashes, you can restart it with heroku restart.
It's pretty cool nonetheless, and undoubtedly useful when you want to give your web editors a way to preview their changes instantly, without having to wait for rebuilds.
此内容由惯性聚合(RSS阅读器)自动聚合整理,仅供阅读参考。 原文来自 — 版权归原作者所有。