Already used Claude Code a bit? Skip the install section below.
Claude Code is Anthropic’s AI coding assistant. You tell it what you want in plain English, it does the work, and it shows you what it changed. You approve or redirect. There are two ways to use it:
Go through Anthropic’s Claude Code quickstart (10 to 15 minutes) before continuing. You’re aiming to install it, log in, and see the welcome screen. Never used a terminal? Their terminal guide for new users covers that part. Come back here once you’re in.
Four things. If you’ve used Claude Code or Cursor before, you probably have most of these already.
If anything in this guide goes sideways, describe the error to Claude Code and ask it to fix it. That’s the advantage of working through an AI coding tool instead of writing code yourself. You don’t have to know what the error means, you just have to be able to copy and paste it.
A quick note before the work begins. Claude Code lets you pick which Claude model to use and how hard it thinks before acting. Both affect speed, quality, and cost.
Models. Type /model inside Claude Code to see your options and switch. As a rule of thumb:
Effort. Claude Code shows the current effort level in its status line (look for something like ● high · /effort). The default is fine for everything in this guide. You don’t need to adjust it.
Cost. Token costs accrue as you prompt. Run /cost inside Claude Code at any time to see usage so far. There’s a “what this cost” section at the end of the guide with real numbers from a run-through, so you’ll know what to expect.
If you want a hard ceiling, set a usage limit in your Anthropic console before you start.
This setup takes about 15 minutes across six small steps. The pacing:
Heads up about approval prompts. Claude Code pauses and asks permission before doing things like writing files, running terminal commands, or calling Sanity tools. The prompt looks something like this:
The wording varies by action type. Bash commands show the command and a short description. MCP tool calls show the tool name and the folder, like “Yes, and don’t ask again for Sanity - list_sanity_rules commands in your project folder.” Same three choices in all cases.
For everything in this guide, option 2 (“Yes, and don’t ask again”) is the right pick. It’s scoped to the specific tool or command pattern in your project folder, so you’re not granting blanket permission across your whole machine. You’ll cut through dozens of approvals this way and keep the flow moving.
Two shortcuts worth knowing: Esc cancels the prompt, and Ctrl+E asks Claude Code to explain what the command does before you decide. Use Ctrl+E any time you’re not sure what’s about to happen. If something still looks off after the explanation, pick No and tell Claude what you’d rather it do.
One more thing. Claude Code will sometimes offer to fix small things you didn’t explicitly ask about: a deprecation warning, a version mismatch, a config tweak it spotted along the way. That’s normal and usually helpful. The approval prompt always tells you what’s about to change, so you’re never out of the loop. When the reason in the explanation makes sense, approve. When it doesn’t, say no and ask Claude to focus on the task at hand.
Pick a place on your computer where you keep code projects. If you don’t have one, your home folder is fine. Avoid folders that sync to the cloud (iCloud Drive, OneDrive, Dropbox) because they can interfere with how Node.js writes files.
Open your terminal. You’ll see a prompt that looks something like you@your-mac ~ % or PS C:\Users\You>. That’s the terminal waiting for input.
Create a folder and move into it:
mkdir makes a directory (a folder). cd means “change directory,” which is the terminal’s way of saying “open this folder.” After running cd my-prototype, every command you run will happen inside that folder until you cd somewhere else or close the terminal.
To check you’re in the right place, run pwd (Mac/Linux) or cd with no arguments (Windows PowerShell). You should see the path ending in /my-prototype.
From the same terminal, launch Claude Code:
You’ll see Claude Code’s welcome screen. From here on, when this guide says “tell Claude Code…” it means type into this session and press Enter. When it says “in your terminal,” it means you’ll need a separate terminal window. We’ll get to that later.
Tip: On Mac you can open a new terminal window with Cmd+N or a new tab with Cmd+T. On Windows PowerShell, click the dropdown arrow at the top of the window for a new tab.
Claude Code reads a file called CLAUDE.md from your project folder before every task it does in that folder. Anything you put in CLAUDE.md shapes the work that follows. Writing it is your first useful prompt.
In the Claude Code session you just started, copy-paste this (edit to make it yours if you want to):
Claude Code might ask you some follow up questions and then write the file and show you the result. Confirm if it asks. That’s your first milestone!
Swap the brief content for whatever matches your project. The specifics matter: “a sales team of five non-technical people” produces different output than “a development team that publishes API documentation.”
Prefer to write the file by hand? Open your project folder in VS Code (or any text editor), create a file named CLAUDE.md, and paste the brief into it. Claude Code will pick it up the next time you ask it to do something.
The Sanity MCP server gives Claude Code direct access to Sanity’s infrastructure. With it installed, Claude can create projects, read schemas, and write content directly to your Sanity Content Lake. Without it, Claude is writing Sanity code from memory, so you get schemas that technically work but feel half-finished. No field descriptions, no validation messages, no useful previews. An editor opening that Studio sees a blank form with no guidance.
Quit the Claude Code session for a moment by typing /exit and pressing Enter (or pressing Ctrl+C twice). When it exits, your terminal will print a couple of lines that look something like:
That long string is your session ID. Copy the whole claude --resume ... line straight from your terminal and paste it somewhere safe (a sticky note, a scratch text file, anywhere). You’ll use it in a moment so Claude Code remembers the work you did in Step 3 instead of starting fresh.
Now, from your terminal (not from inside a Claude Code session), run:
You should see something like:
The MCP server is registered with Claude Code. Resume your previous session with the claude --resume ... line you copied a moment ago.
You’re back inside Claude Code. The next step authenticates the MCP and adds Sanity’s expertise.
Two things to do here, both from inside the running Claude Code session.
The MCP is registered but not authenticated yet. Type /mcp in your Claude Code session and press Enter. Use the arrow keys to highlight Sanity in the list of MCP servers, then press Enter to open it. You’ll see a screen like this:
Press Enter on Authenticate. Claude Code opens a browser tab and asks you to sign in to Sanity and approve the connection. After you approve, the browser tab will say you can close it. Come back to the terminal. If it worked, you’ll see something like:
That’s the green light. The MCP server is wired up and Claude Code can now read and write your Sanity project.
The MCP gives Claude Code the ability to talk to Sanity. Skills give Claude Code domain-specific knowledge you compose for the work ahead: schema design, GROQ patterns, Visual Editing, SEO, localization, framework integrations, and frontend craft. They're plain-text instructions that Claude reads before each relevant task, the same way it reads your CLAUDE.md.
You'll install two skill sets here: Sanity's agent toolkit for content modeling and structured content patterns, and Anthropic's frontend-design skill for polished, production-quality UI output. Together they cover the full stack of this prototype.
You can install them by running npx commands yourself, but a more elegant move (and a useful pattern for the rest of this guide) is to ask Claude Code to do it for you. Tell Claude Code:
The --yes flag matters: without it, the installer asks an interactive question that Claude Code can’t answer. With it, the install runs straight through.
Claude Code will show you the command before running it and ask for permission. Approve. It downloads and installs the Sanity Agent Toolkit. When it finishes, you’ll see something like:
Each skill is a folder of plain-text guidance Claude Code reads before relevant tasks. content-modeling-best-practices shapes how it designs schemas. seo-aeo-best-practices covers structured content for search and AI search visibility. The two portable-text-* skills handle Sanity’s rich text format, which is one of the things AI tools tend to get wrong without guidance. The toolkit also drops an AGENTS.md file into your project that points Claude to the right skill for whatever task you ask about.
Now add Anthropic's frontend-design skill. It encodes the same craft principles a senior frontend engineer applies by default: color contrast, interactive states, spacing, and component hierarchy. With it loaded, Claude Code's UI output starts from a higher baseline, and you won't need to prompt for the basics.
Run this command in Claude Code:
And then you can install the frontend design skill with this command in Claude Code:
The install takes about 60 seconds. When it finishes, you'll see a confirmation that the skill is installed and registered. That's your full stack: Sanity's content expertise plus Anthropic's frontend craft, both loaded and ready.
You can go to skills.sh to find more skills. Remember that installing and using skills is like letting someone else add their context to your prompts so evaluate its popularity, start with skills from known companies etc.
Skills load when Claude Code starts up. The running session doesn’t pick up new ones mid-conversation. You can verify this by typing /skills right now: it’ll say No skills found, which is misleading but expected.
Restart the session. Type /exit and press Enter, then run claude (or paste in the new claude --resume ... line if you want to keep the conversation history).
Once you're back inside Claude Code, type /skills. You should see the six Sanity skills plus the frontend-design skill listed there. That's your confirmation that both toolkits are loaded and ready.
Tip: If you lose the resume command, runningclaudeon its own starts a fresh session in the same folder. It’ll still read yourCLAUDE.mdand any installed skills, so you won’t lose the brief, only the in-progress conversation. You can also scroll up in your terminal to find the resume line again.
Now for the big one. This single prompt does a lot of work: it creates your Sanity project, builds a Studio with a schema based on your CLAUDE.md, and scaffolds a Next.js frontend that already knows how to read from the project. You won’t be writing more setup prompts after this. You’ll inspect, deploy, and run what got built.
Tell Claude Code:
This is the heaviest step in the guide. Claude Code will generate a wave of approvals as it creates the project, runs dependency installs, writes schema files, scaffolds the Next.js app, and configures the data layer. Option 2 (“Yes, and don’t ask again for: …”) is the right pick for almost everything here. Expect to spend roughly five to 10 minutes watching files appear.
If you haven’t authenticated with Sanity before, Claude Code will prompt you through that flow in your browser too.
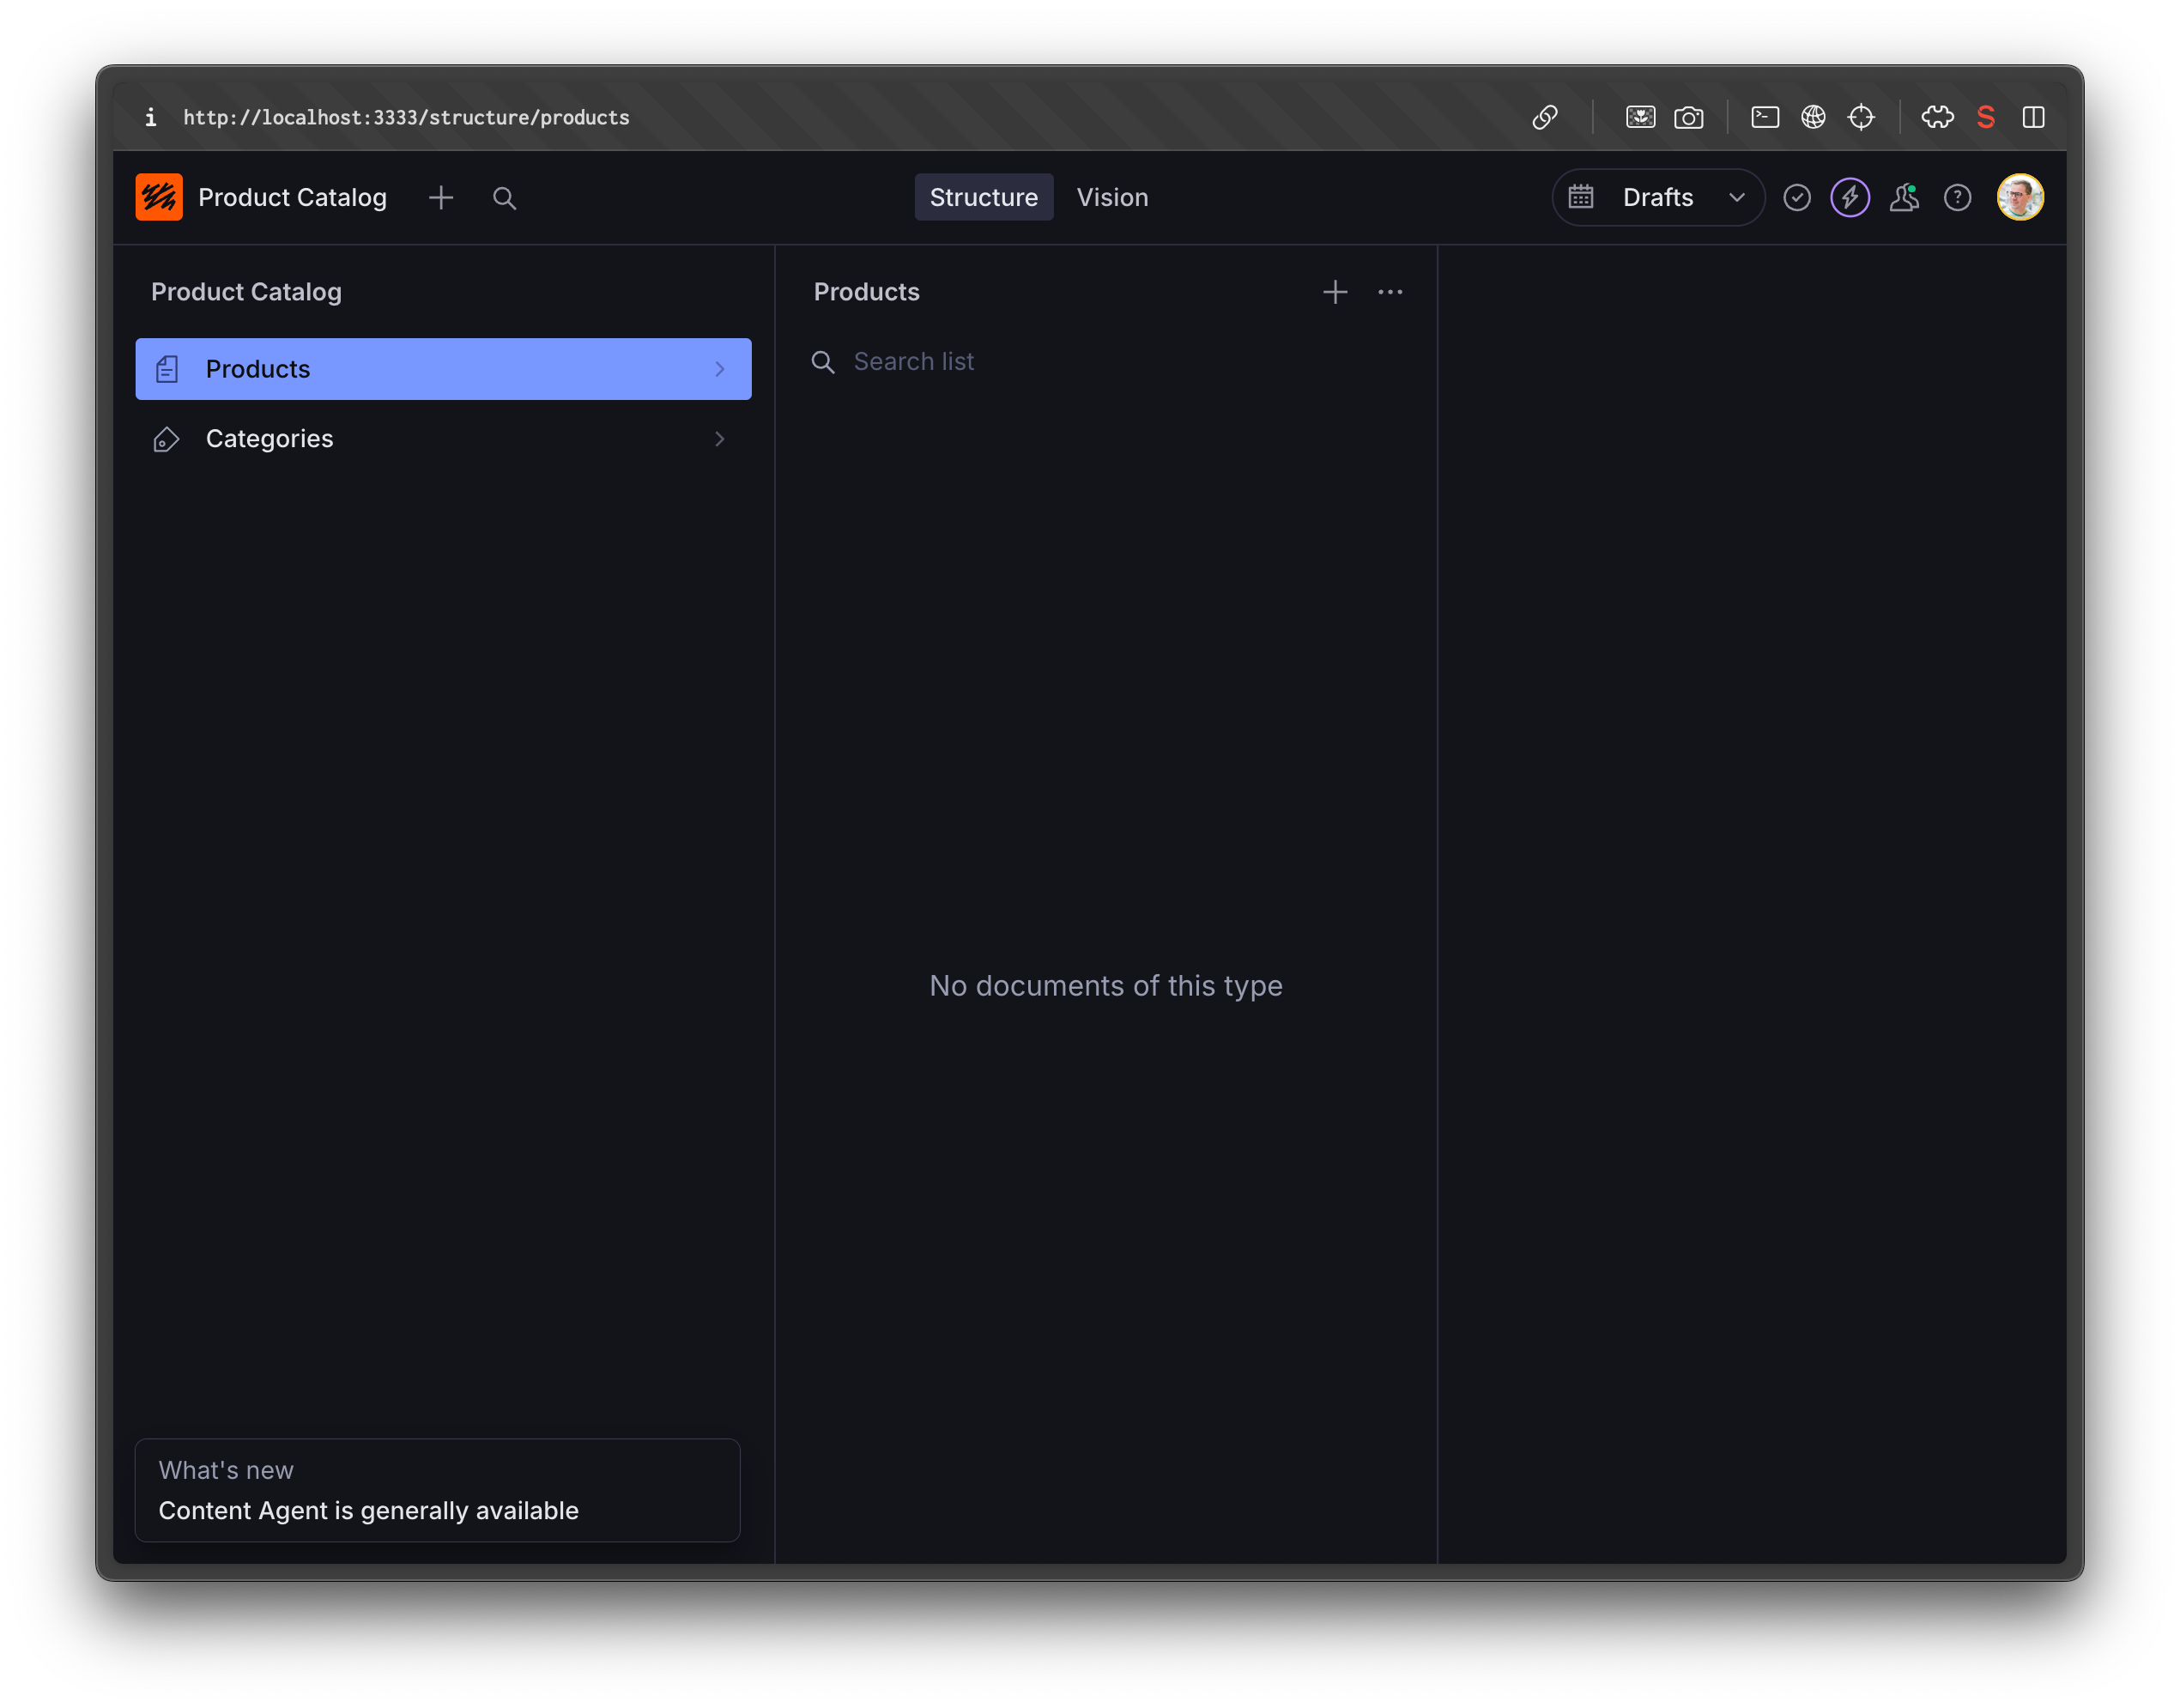
When it finishes, you’ll have a studio folder, a frontend folder, and a Sanity project connected to the Content Lake. The Studio is where your editors work. The Content Lake is where content lives. The frontend is what your stakeholders see. All three are wired up to talk to each other.
You haven’t seen the project structure yet. Take a beat to inspect it before moving on. This is the wow moment for a non-dev: one prompt, and Claude scaffolded the whole thing.
A quick vocabulary check first. Your content model is the structure of the things your team works with. For a product catalog, the content types are Product and Category. Each has its own content fields: name, description, price, image. The model captures what content you have, what fields it has, and how those pieces connect to each other.
In Sanity, the content model lives in code as a schema. The Studio reads the schema to generate the editing interface your team uses. The frontend reads the same schema (through GROQ queries) to know what to render. This is the heart of structured content: define the shape once, and every surface follows the same rules.
Open my-prototype/studio in VS Code. Claude built a schema that matches the content you described in CLAUDE.md. Here’s the product schema, abridged. You don’t need to understand every line. What’s worth noticing are the description fields and validation rules, because those are what your editors will see when they open the Studio. Part of working with AI coding tools is building a feel for what the code does even if you can’t write it yourself yet. That instinct gets sharper every time you look.
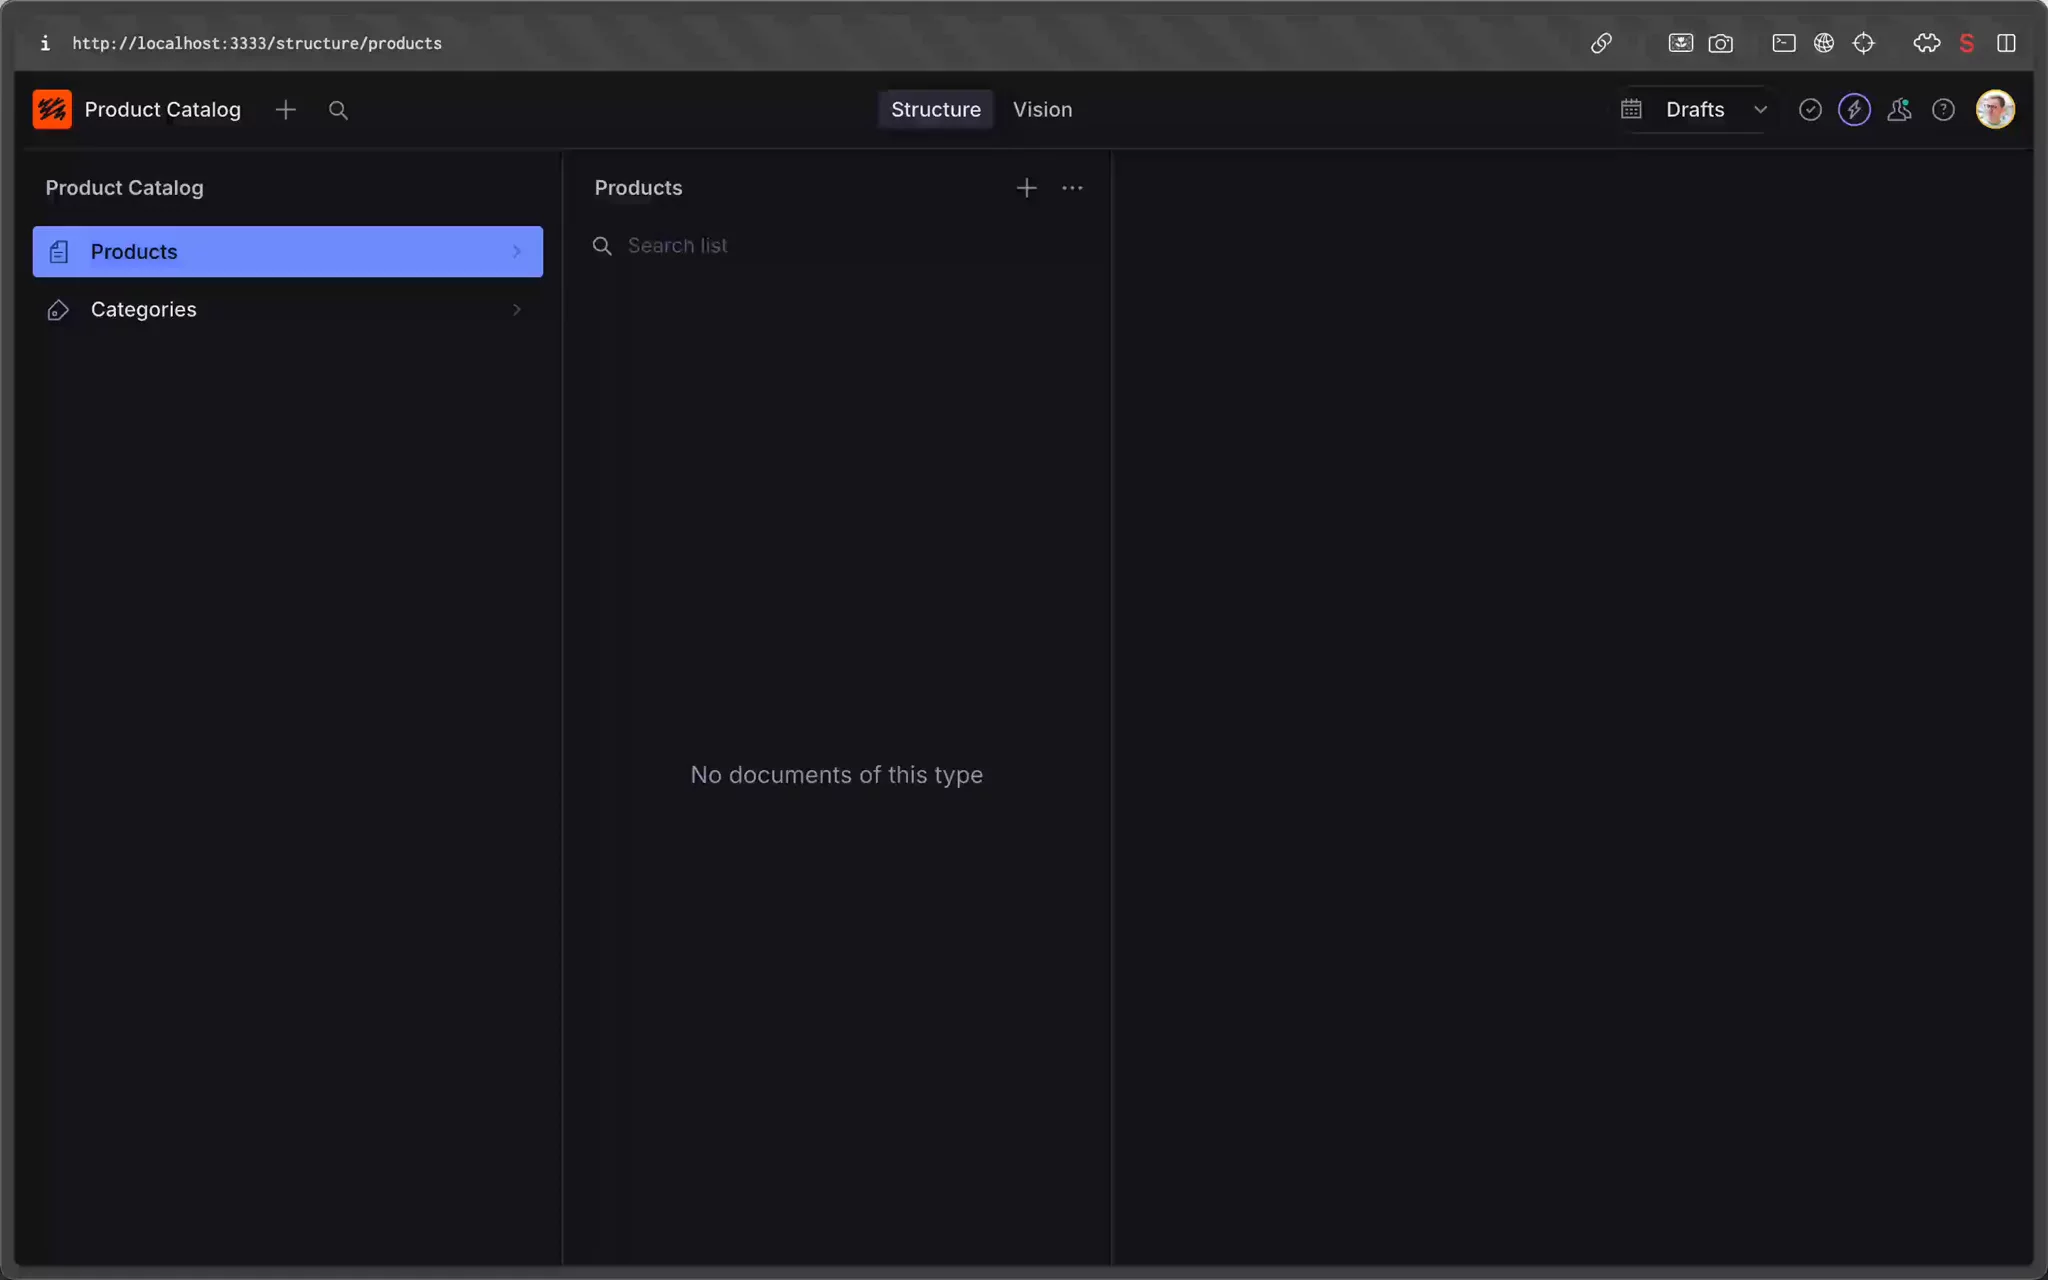
Five fields and a preview block. There’s a separate category schema next to it with a name and description, and the Studio’s left sidebar has been customized to show just Products and Categories. No clutter for non-dev editors.
Things to notice that came out of your CLAUDE.md plus the Sanity skills you installed:
-49. The image’s alt text is required too, which keeps the catalog accessible by default.description field uses Sanity’s text type with rows: 4 instead of a single-line string. That’s a small detail that turns the editor into a friendly multi-line textarea, which matters when descriptions are a sentence or two.preview block drives how each product appears in the Studio’s document list: the product name as the title, the linked category name as a subtitle (resolved through the reference), and the image as a thumbnail. No more “Untitled” rows.hotspot: true, which lets editors click on the part of the image that should always stay in frame, so the same image can crop differently for product cards and detail pages without re-uploading.You described a sales team that needs to add products. Claude Code built an editing interface designed for that team.
Open my-prototype/frontend. Claude scaffolded a Next.js app that already knows how to read from your Sanity project:
src/app/products/page.tsx with a product grid showing images, names, and prices, plus category buttons along the top to filter.src/sanity/lib/queries.ts. GROQ is Sanity’s query language. It’s how the frontend asks Sanity for content. You’ll never need to write these yourself. Claude generates them based on your schema.src/sanity/client.ts and a defineLive setup in src/sanity/lib/live.ts for real-time content updates..env.local with your project ID, dataset, and a read token. This is what connects the frontend to your Sanity project.If anything in the configuration looks off later (the frontend can’t see your content, for example), ask Claude Code: “Make sure the frontend is configured to read from my Sanity project and that the .env.local file has the right project ID and dataset.”
So far everything lives on your machine. The schema is in local code. The Studio runs at localhost:3333, which only works on your laptop. Time to deploy.
A single command (npx sanity deploy) does two things at once: it pushes your schema to your Sanity project (so the frontend can read content), and it publishes the Studio itself to a hosted URL like https://your-name.sanity.studio/ that anyone on your team can open in a browser without running anything locally. That’s how you’ll invite teammates later.
Both the login and the deploy commands are interactive in ways Claude Code’s shell can’t drive, so you’ll run them yourself in a regular terminal.
Open a new terminal window. Keep your Claude Code session running. From your project folder:
Why a separate terminal? The login command starts with an interactive provider picker that uses arrow keys to navigate:
Claude Code’s shell can’t respond to arrow-key prompts, so don’t try to run this through Claude Code or with the ! shell escape. You’ll get stuck on the picker. A regular OS terminal handles it just fine.
Pick your provider, complete the browser flow, and approve. The browser tab will say you can close it. Come back to your terminal and you should see a confirmation that you’re logged in.
In the same terminal, run:
The first time you deploy, Sanity asks for a Studio hostname. This becomes the public URL for your Studio. Pick something memorable but specific to this project:
Type a name, press Enter, and the deploy starts. You’ll see output like this (abridged):
Two things just happened. First, your schema is now in your Sanity project so the frontend can query content. Second, your Studio has a public URL. You can keep using localhost:3333 for fast local development, but when you want a teammate to add content or kick the tires, send them the .sanity.studio URL.
Tip: On future deploys, Sanity will skip the hostname prompt because the name is now saved in sanity.cli.ts. The deploy becomes non-interactive, which means you can also ask Claude Code to redeploy for you (“redeploy the Studio”) and it’ll handle it.You have two Studios now: the one you just deployed at <your-name>.sanity.studio and a local copy you’ll run on your own machine for fast iteration during development. The hosted one is for sharing. The local one is for working. Both edit the same content.
The fastest way to start the local Studio is to ask Claude Code:
It’ll offer to run the command for you. Approve it and you’ll see logs in the terminal ending with something like http://localhost:3333/.
If you’d rather run it manually, open a new terminal window (so your Claude Code session keeps running), then:
npm install downloads the Studio’s dependencies (only needed the first time, or after dependencies change). npm run dev starts the Studio.
Open http://localhost:3333 in your browser. The first time you load it, Sanity will ask you to sign in. Use the same Sanity account you used during setup. If you see your document types (“Product” and “Category”) in the left sidebar, the schema is working.
Tip: To stop a dev server, click the terminal window where it’s running and press Ctrl+C. To start it again, run npm run dev from the same folder.With the Studio running, it’s time to put real content into your project. Start with a couple of categories, then add a product.
To create a category:
Repeat for a second category like “Accessories.” Then create a product the same way: click Product in the sidebar, Create, fill in the fields, and Publish. The category field will let you pick from the categories you just published.
When you open the product editor, you’ll see the field descriptions you saw in the schema. The short description field shows a character count warning if you go over 200 characters. The image field prompts you for alt text. The category field lets you pick from the categories you created. Every field tells your editors what it expects and where the content will appear.
Content quality makes or breaks a proof-of-concept demo. Placeholder text and stock photos make stakeholders see a mockup. Real content makes them see a product. Use your actual product names, descriptions, and images if you have them.
If you don’t have real content ready, or you want to populate the catalog quickly, ask Claude Code:
Because Claude Code is connected to your Sanity project through the MCP server, it writes the content directly to the Content Lake. You go from an empty Studio to a populated demo in one prompt. You can edit or replace these with real content later. The point is to have something convincing for the demo.
Once you have content in the Studio, invite a teammate to try it. Send them the hosted Studio URL you got back from npx sanity deploy (the https://...sanity.studio/ link). They can sign in with their own Sanity account and add or edit content without running anything on their machine. If they can figure out the interface without your help, your proof of concept is ready to demo.
The Studio is running and full of content. Time to start the frontend and watch the two talk to each other.
The fastest way to start the frontend is to ask Claude Code:
It’ll offer to run the command for you. Approve it. You’ll see install logs (first run only) and then a line like Ready on http://localhost:3000. The frontend runs on a different port than the Studio, so both can be running at the same time.
If you’d rather run it manually, open a new terminal window (you can leave Claude Code running):
Either way, open http://localhost:3000 in your browser.
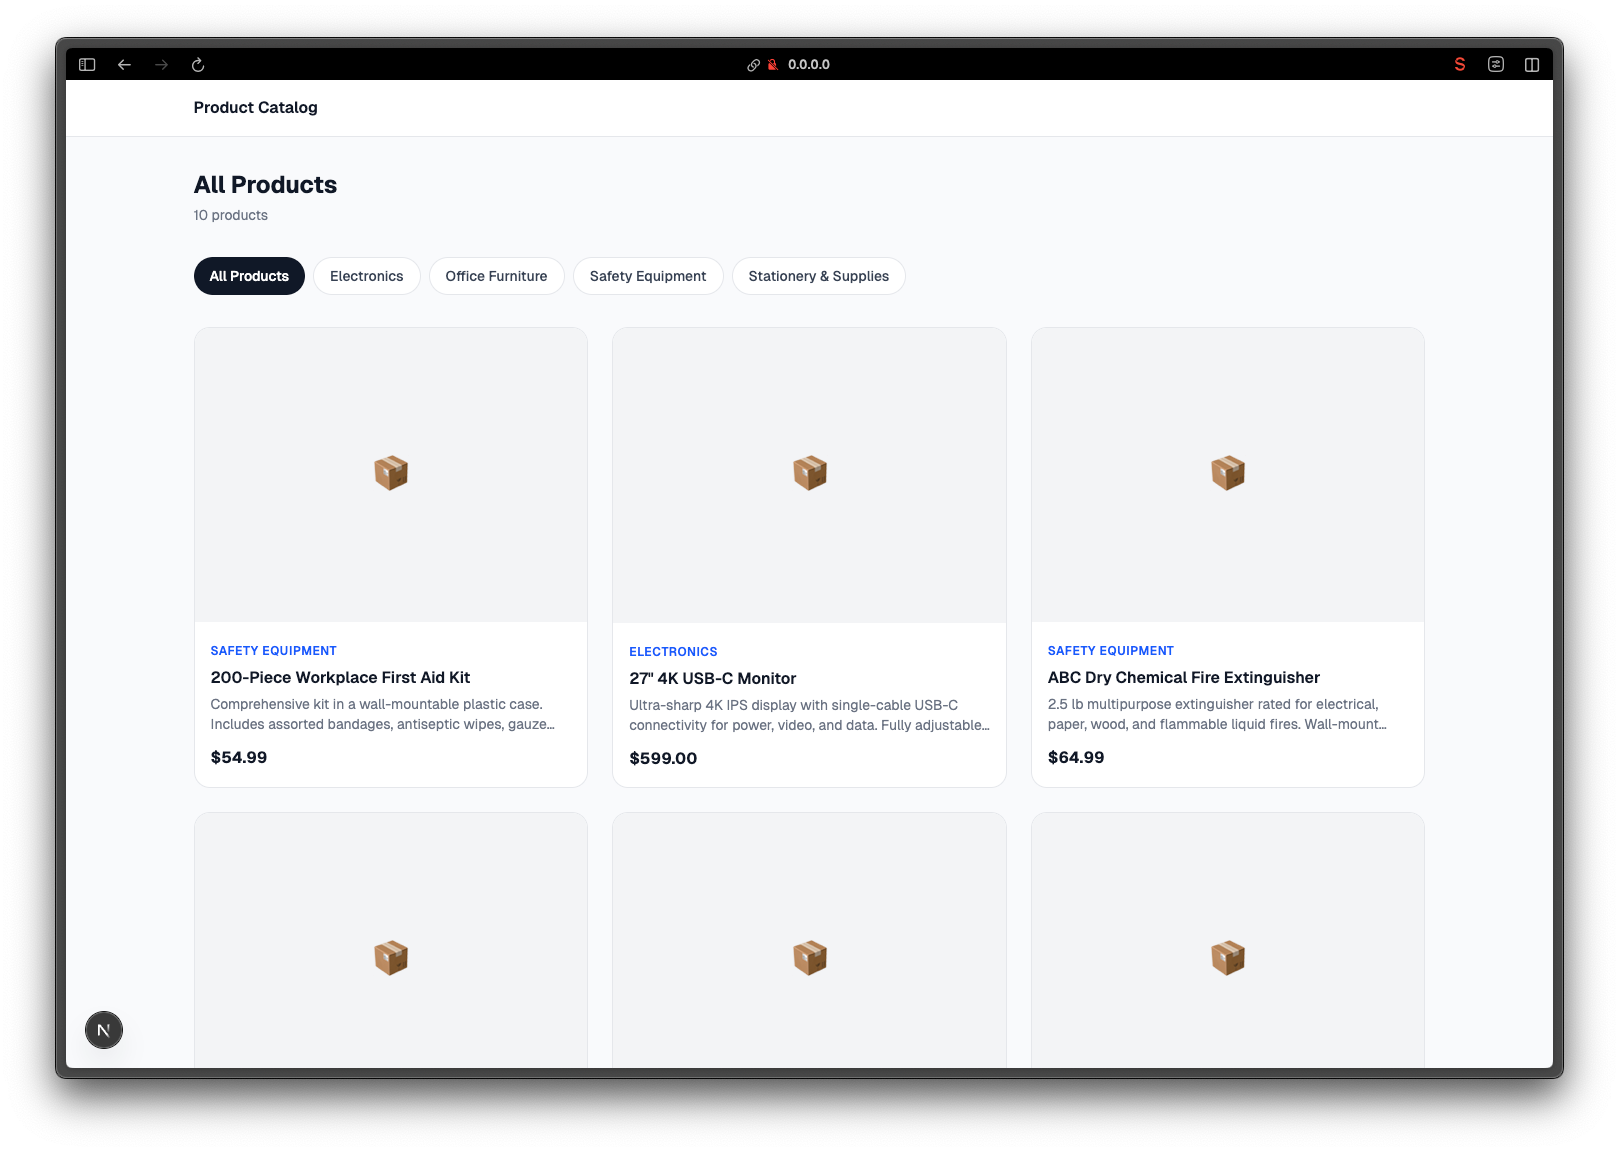
Here’s the moment that matters. Open the frontend in one browser tab and the Studio in another. In the Studio, change a product name. Click Publish. Switch back to the frontend tab and refresh. The name updates.
And that’s the prototype! A stakeholder can open the Studio, change any piece of content, and see it reflected on the site. No code changes. No deploys. No developer needed. (In a production setup, you’d add real-time updates so changes appear without a refresh. For a demo, refreshing the page works fine.)
You’re running a working prototype. Click through it. Scroll the list. Resize the window. Notice what bugs you. The page heading might be hard to read against the background. The product cards might not be clickable. The grid might feel too sparse. None of this is wrong, exactly. It’s the default Claude Code chose when you told it to keep things simple. Now’s when you shape it.
The loop is the same one you've been using all along: tell Claude Code what's off, approve the changes, refresh the browser tab. A quick example:
Most fixes like these take Claude Code less than a minute. The browser tab updates on refresh. When something doesn’t land the way you wanted, describe what’s still off and Claude will adjust.
This is the part that’s hard to overstate. You’re now in the iteration loop that real software gets shaped in. You don’t need to know CSS or React or what a Tailwind class is. You need to be able to see what’s off and describe it. Claude does the rest.
A few things worth cleaning up before you demo to stakeholders:
You don’t need it polished. You need it convincing. The point of the demo isn’t “this is finished,” it’s “this is real, and it can grow.”
A localhost:3000 URL works while you’re driving the demo in person. For stakeholders to click a link from their own machine, you’ll want the frontend on a public host. Vercel is the most direct fit since they make Next.js. Netlify and Cloudflare Pages work fine too. Pick whichever your team already uses.
The first deploy is interactive (account auth, project setup, naming the app) so it’s easiest to run yourself in a regular terminal, the same way you handled npx sanity login. After the first deploy, redeploys are non-interactive and Claude Code can handle them.
For Vercel, in a new terminal from your frontend folder:
Walk through the prompts. When it finishes, you’ll get a public URL like your-app.vercel.app. That’s what stakeholders see.
For redeploys after you’ve made changes, ask Claude Code:
Netlify (npx netlify deploy) and Cloudflare (npx wrangler pages deploy) follow the same shape. The first deploy stays in your terminal, the rest can run through Claude Code.
Tip: If the deployed site loads but the product grid is empty, the host probably doesn’t have your Sanity environment variables. Ask Claude Code to set up the env vars on the deployment host so the frontend can read from the Content Lake the same way it does locally.
Now you have two public URLs: the hosted Studio at your-name.sanity.studio and the hosted frontend at the host’s URL. Both are real things you can hand to anyone. That’s the prototype.
You have a working prototype with a content backend. Here’s how to show it off in a way that gets buy-in.
Walk through three things, in this order:
Lines that land well:
Questions you’ll get (and answers):
The single most useful habit while working through this guide: copy the error message back to Claude Code and ask “what’s happening here?” Claude can read the error, find the file, and propose a fix. You don’t have to know what the message means.
A few specific snags and how to clear them:
claude: command not found. Claude Code didn’t install correctly, or your terminal can’t find it. Close and reopen your terminal, then try again. Still failing? Reinstall from claude.com/code.claude mcp add says “command not found”. You’re inside Claude Code’s interactive session. Type /exit and run the command from your OS terminal, not from inside Claude Code.localhost:3333. Check the terminal where you ran npm run dev. If you see red error text, copy it to Claude Code. If the terminal looks idle, the server probably crashed. Run npm run dev again..env.local file is missing or wrong. Ask Claude Code to verify the configuration.cd back into the folder, and run npm run dev again.A full run through this guide came in at $3.52 in API token costs, with about an hour of wall-clock time and roughly 13 minutes of actual API activity. The other 47 minutes was reading, approving, looking at the Studio, and testing the live edit. Here’s the breakdown by model:
The session also produced 506 lines of code added across the studio and frontend, with 84 lines removed during iteration. That’s the project getting shaped in real time.
If you’re on a Claude Pro or Max plan, the dollar figure isn’t billed to you directly. You’re paying a flat subscription, and the work counts toward session and weekly limits instead. The same hour came in at about 38% of the session limit and 10% of weekly usage on a Max-tier plan, so you’ve got plenty of headroom for the polishing pass and a few demo iterations.
You can see your own usage at any time inside Claude Code:
Costs vary with how much you re-prompt, how chatty you get, and which model you’re using. Sonnet is the workhorse and the right default for everything in this guide. Opus is overkill but harmless if it’s your default. Switching to Haiku would cut costs dramatically but produce a less capable scaffold.
You started with a prototype that only you could edit. Now you have a content backend your team can use, a frontend that reads from it, and a demo that answers “can we change this headline?” with “yes, go ahead.”
The prototype is a starting point. When you’re ready to go further:
Your next prompt to Claude Code might be: “Add a blog section to this project” or “Deploy the Studio so my team can access it.” The setup you did carries forward. Claude Code already knows your project, your editors, and your content model.
As your project grows, you can create your own skills that encode your team’s specific patterns: your naming conventions, your content model rules, your editorial guidelines. Skills are plain-text files. You write them in natural language, and Claude Code reads them before every task. Your standards get enforced automatically, even when someone new joins the project and starts prompting. The agent skills documentation explains how to create and share them.
Browsing anthropics/skills is also worth a few minutes, and Anthropic ships skills for testing, documentation, accessibility, and more. Each one is a composable addition to your stack.
Keep building!
We are still figuring out how all of this AI and agent stuff should work. And yes, there is a lot of movement in the AI space. So if you have feedback on this guide we’d love to hear from you. Feel free to send me an email on knut@sanity.io or reach out on social, you can find me on X, LinkedIn, and BlueSky.
此内容由惯性聚合(RSS阅读器)自动聚合整理,仅供阅读参考。 原文来自 — 版权归原作者所有。