










The world of AI is rapidly expanding, and now the JavaScript/TypeScript ecosystem is joining in. With the emergence of tools like Pinecone, HuggingFace, OpenAI, Cohere, and many others, JavaScript developers can create AI applications more quickly, addressing new challenges that were once exclusive to machine learning engineers and data scientists.
Traditionally, Python has been the go-to language for AI/ML solutions. In many cases, the product of this type of code is a Python notebook. But as we all know, creating full-fledged AI applications is usually more involved, especially when we need our applications to be commercial grade. It requires us to think of the solution in a much more holistic way.
The Javascript ecosystem has the advantage of being oriented towards applications from the get-go. It has a huge collection of tools that deliver highly performant and scalable applications both on the edge and the server. Javascript developers are uniquely positioned to productize AI solutions, and now they can translate their skillset and get on the AI train without abandoning the tools they know and love.
In this post, we’ll see how we can use well-known Javascript frameworks and tools to build an AI application. As you’ll see, we won’t train a machine learning model from scratch — nor do we need to learn the math behind these algorithms. But we’ll still be able to leverage them to create a powerful AI product.
The use case we’ll tackle is image recognition: We want an AI model to recognize various objects, faces, and so on, and a mobile application that will allow users to just point the phone camera at any object, assign it with a label and “train” the application to detect that object. Then, after the training is complete, any time the user points the camera at the object, the detected label will appear.
We also need our application to support multiple users — where each user can label and train their own objects, without other users seeing those labels. Finally, we’ll need to allow users to reset their labels and delete their accounts if they so choose.
Here’s a short video that demonstrates what the app does:
Before we dive into the build, let’s discuss some potential commercial uses of this type of application.
In this post, you’ll learn how to build an image recognition application using Hugging Face, Pinecone, Vercel, and React Native (with Expo). In case you’re unfamiliar with any of these, here’s a quick introduction:
The app will work in two steps: “training” and “detecting”.
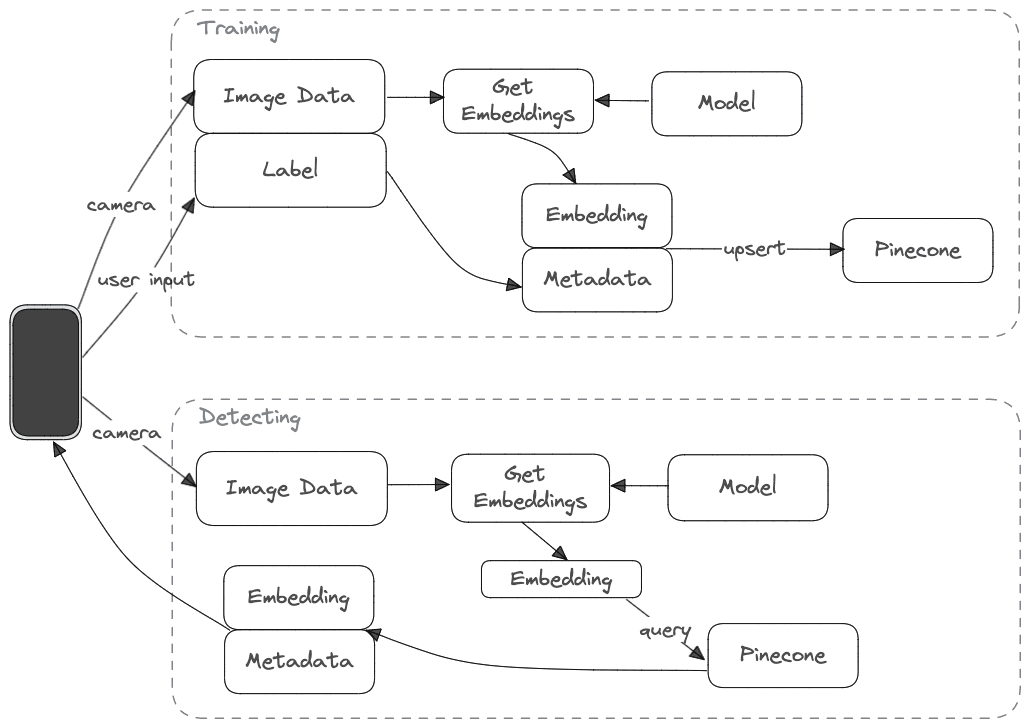
We’re going to learn how to:
Note: While we won’t detail the React-Native application build, you can find the code for the app in this Github repo
In this example, we’ll be using the CLIP model, which is a multi-modal computer vision model. By default, CLIP will provide us with image classification given an image (and optionally text).
In this case, we’re not going to use the classifications but rather the vector embeddings for the images. In simple terms, vector embeddings are the vector representation of the image, as the model “understands” it (so instead of saying “horse” or “cat” it’ll spit back an array of numbers — aka vector). Technically speaking, the model has many layers, where the final layer is the classification layer. The penultimate layer of the model produces the vector representation we call the “embedding”.
Because we aren’t trying to get specific classifications from the model and only need the vector embeddings, we’ll need to create a custom inference endpoint. Let’s see how that’s done.
First, we’ll initialize a new model in HuggingFace:

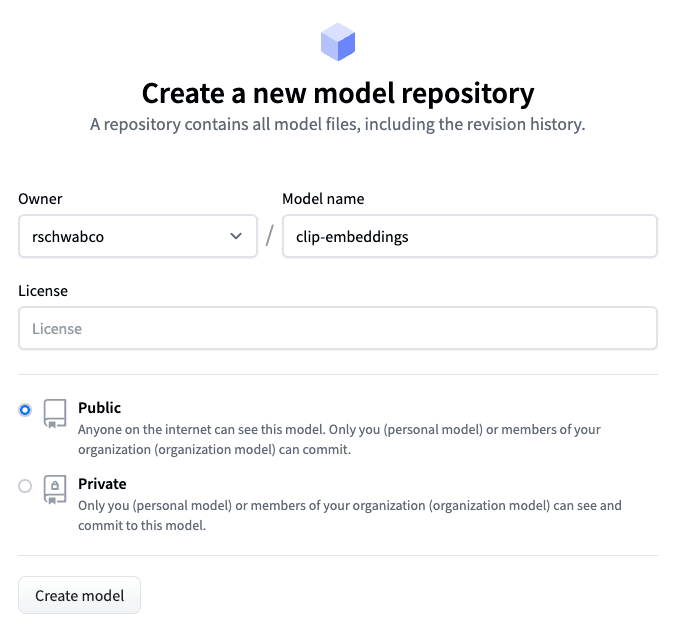
Clone your model repository by running the following:
git lfs install
git clone https://huggingface.co/[your-repo]/clip-embeddingsIn the cloned repo, create a new requirements.txt file with the needed dependencies:
requirements.txt
pillow
numpy
Next, create a handler.py file, which will handle incoming requests to the endpoint:
from typing import Dict, List, Any
import numpy as np
from transformers import CLIPProcessor, CLIPModel
from PIL import Image
from io import BytesIO
import base64

class EndpointHandler():
    def __init__(self, path=""):
        # Preload all the elements you we need at inference.
        self.model = CLIPModel.from_pretrained("openai/clip-vit-base-patch32")
        self.processor = CLIPProcessor.from_pretrained("openai/clip-vit-base-patch32")


    def __call__(self, data: Dict[str, Any]) -> List[Dict[str, Any]]:
        inputs = data.get("inputs")
        text = inputs.get("text")
        imageData = inputs.get("image")
        image = Image.open(BytesIO(base64.b64decode(imageData)))
        inputs = self.processor(text=text, images=image, return_tensors="pt", padding=True)
        outputs = self.model(**inputs)
        embeddings = outputs.image_embeds.detach().numpy().flatten().tolist()
        return { "embeddings": embeddings }
The EndpointHandler class initializes the CLIP model and processor from the model (openai/clip-vit-base-patch32). The __init__ function is called when the endpoint is initialized and makes the model and processor available when calls are made to the endpoint. The processor will take our inputs and transform them into the data structure the model is expecting (we’ll get into the specifics in a moment).
The __call__ method is the main function that’s executed when the endpoint is called. This method takes a data dictionary as input and returns a list of dictionaries as output. The data dictionary contains an “inputs” key, which in turn contains two keys: “text” and “image”. “text” is an array of text strings, and “image” is an encoded image in base64 format.
The method then converts the base64 encoded image data into a PIL image object and uses the processor to prepare the input data for the model. The processor tokenizes the text, converts it to tensors, and performs padding if necessary.
The processed inputs are then passed to the CLIP model for inference and the image embeddings are extracted from the output of the model. The embeddings are then flattened and converted to a list, which is returned as the output of the endpoint. The output is a dictionary with a single key “embeddings” that contains the list of embeddings.
To get this endpoint deployed, push the code back to the HuggingFace repo. Then, in the Hugging Face console, click the on-click-deploy button for the model.

Follow the prompts and created a “Protected” endpoint using your preferred cloud provider. Once the endpoint is set up, you’ll get the endpoint URL. We’ll use that later on in our server alongside your HuggingFace API key.

With the Hugging Face endpoint set up, it’s time to move on to setting up the Pinecone index.
Create a Pinecone account and click the “Create Index” button. You’ll see the following screen:
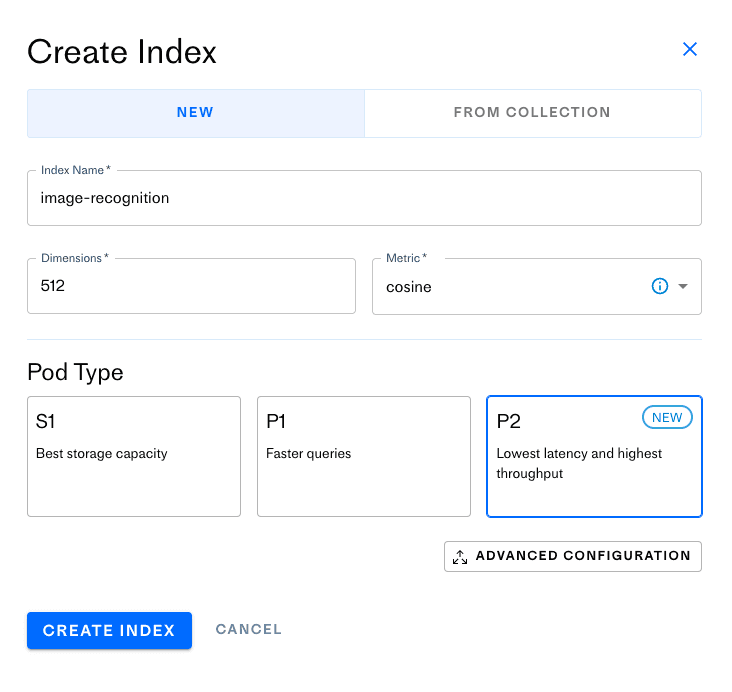
The CLIP model has 512 dimensions and uses the cosine similarity metric, so you’ll choose the same settings for the index. You can choose any pod type you’d like, but for the ideal performance, select the P2 pod type. Click “Create Index,” and it should take up to a couple of minutes for the index to initialize.
While in the Pinecone console, click on “API Keys” and retrieve your Pinecone API key — you’ll need it for setting up your Node.JS backend.
Now that you’ve set up the index, you can create the server that will interact with it. The full code listing for the server is available in this repo.
We’re going to use Express and the Pinecone NodeJS client. Run the following command to install them:
npm install --save express body-parser @pinecone-database/pineconehandleImage receives images from the mobile device looks like this:
const handleImage = async (req, res) => {
  const data = req.body;

  const { data: imageData, uri, label, stage, user } = data;
  const id = `${label}-${md5(uri)}`;
  const userHash = md5(user);
  const text = "default";
  try {
    const embeddings = await getEmbeddings(imageData, [text]);
    const result = await handleEmbedding({
      id,
      embeddings,
      text,
      label,
      stage,
      user: userHash,
    });
    res.json(result);
  } catch (e) {
    const message = `Failed handling embedding: ${e}`;
    console.log(message, e);
    res.status(500).json({ message });
  }
};
Next, we do the following:
md5)getEmbeddings function to get the embeddings for the imagehandleEmbeddings to deal with the training and detection step appropriatelyThe getEmbeddings function simply sends the image data (along with optional text) to the Hugging Face inference endpoint and returns the embeddings.
const getEmbeddings = async (imageBase64, text) => {
  const data = {
    inputs: {
      image: imageBase64,
      text,
    },
  };
  try {
    const response = await fetch(inferenceEndpointUrl, {
      method: "POST",
      headers: {
        Authorization: `Bearer ${inferenceEndpointToken}`,
        "Content-Type": "application/json",
      },
      body: JSON.stringify(data),
    });

    const json = await response.json();
    return json.embeddings;
  } catch (e) {
    console.log(e);
  }
};
As we saw above, the Node.JS backend has to handle the “training” and “detecting” states the application is in. The handleEmbedding function does just that:
const handleEmbedding = async ({
  id,
  embeddings,
  text,
  label,
  stage,
  user,
}) => {
  switch (stage) {
    case "training":
      return await saveEmbedding({
        id,
        values: embeddings,
        namespace: user,
        metadata: { keywords: text, label },
      });
    case "detecting":
      return await queryEmbedding({
        values: embeddings,
        namespace: user,
      });
  }
};handleEmbeddings function will send the embeddings, the user’s identifier as well as metadata which includes the label the user provided to saveEmbeddings.handleEmbeddings function will send the embeddings and the user identifier to the queryEmbedding function.In both cases, we’ll use the user identifier to write and read embeddings to a namespace in Pinecone which will ensure we’re segregating each user’s data from all the other users.
To save the embeddings, we select the index we’ll be writing to, and then use the index.upsert method.
const saveEmbedding = async ({ id, values, metadata, namespace }) => {
  const index = pineconeClient.Index(indexName);
  const upsertRequest = {
    vectors: [
      {
        id,
        values,
        metadata,
      },
    ],
    namespace,
  };
  try {
    const response = await index.upsert({ upsertRequest });
    return response?.upsertedCount > 0
      ? {
          message: "training",
        }
      : {
          message: "failed training",
        };
  } catch (e) {
    console.log("failed", e);
  }
};
To query the embedding, we select the index, specify the number of results we want to get back from the index with the topK parameter (here we just want one result) and pass the vector we want to use for the query.
As we mentioned before, the namespace will be the user identifier, which will limit the results to the embeddings created by that user. This will also improve the performance of our queries, since it’ll only run the query on the subset of vectors belonging to the user, instead of all the vectors in the index.
The includeMetadata parameter ensures we get back the metadata associated with the vector – that will include the label which we eventually want to display to the user.
const queryEmbedding = async ({ values, namespace }) => {
  const index = pineconeClient.Index(indexName);
  const queryRequest = {
    topK: 1,
    vector: values,
    includeMetadata: true,
    namespace,
  };
  try {
    const response = await index.query({ queryRequest });
    const match = response.matches[0];
    const metadata = match?.metadata;
    const score = match?.score;
    return {
      label: metadata?.label || "Unknown",
      confidence: score,
    };
  } catch (e) {
    console.log("failed", e);
  }
};
The result of the query will include an array of matches, from which will pick the first one. For that match, we’ll return the label and the confidence score as the final result.
Finally, we have a simple Express server that exposes the /api/image endpoint:
import * as dotenv from "dotenv";
import express from "express";
import http from "http";
import bodyParser from "body-parser";
import handler from "./handler.js";

dotenv.config();
const port = process.env.PORT;

const app = express();
app.use(bodyParser.json());

const server = http.createServer(app);
app.post("/api/image", handler);

// Start the HTTP server
server.listen(port, () => console.log(`Listening on port ${port}`));If you didn’t build the server yourself, you can clone the server repo by running:
git@github.com:pinecone-io/pinecone-vision-server.gitInstall the dependencies (if you haven’t already):
Create a .env file and provide the following values:
INFERENCE_ENDPOINT_TOKEN=<YOUR_HUGGING_FACE_TOKEN>
INFERENCE_ENDPOINT=<YOUR_HUGGING_ENDPOINT_URL>
PINECONE_ENVIRONMENT=<YOUR_PINECONE_ENVIRONMENT>
PINECONE_API_KEY=<YOUR_PINECONE_API>
Start the server by running:
npm run start
To deploy the server to Vercel, we simply have to add a vercel.json file with the following:
{
  "version": 2,
  "name": "pinecone-vision",
  "builds": [{ "src": "src/index.js", "use": "@vercel/node" }],
  "routes": [{ "src": "src/(.*)", "dest": "src/index.js" }]
}
Then, push the changes and set a new Vercel project for the repo. Follow these instructions to import your existing repo into a Vercel project.
You’ll need to set up the same environment variables in Vercel we mentioned earlier.
The mobile application has two jobs:
Here’s what the detectImage function does:
takePictureAsync.async function detectImage() {
if (!cameraReady) {
return;
}
const pic = await cameraRef.current?.takePictureAsync({
base64: true,
});
const resizedPic = await manipulateAsync(
pic.uri,
[{ resize: { width: 244, height: 244 } }],
{ compress: 0.4, format: SaveFormat.JPEG, base64: true }
);
!detecting && setNumberOfImages((prev) => prev + 1);
const payload = {
uri: pic.uri,
data: resizedPic.base64,
height: resizedPic.height,
width: resizedPic.width,
label,
user,
stage: !detecting ? "training" : "detecting",
};
try {
const result = await fetch(`${ENDPOINT}/api/image`, {
method: "POST",
headers: {
Accept: "application/json",
"Content-Type": "application/json",
},
body: JSON.stringify(payload),
});
const json = await result.json();
const { label, confidence: score } = json;
...
} catch (e) {
console.log("Failed", e);
}
}The full application code is available in this repo. You can clone it locally and run it with Expo.
If you’re running the server locally, first create a .env file with the following value:
ENDPOINT=<YOUR_LOCAL_IP_ADDRESS>
If you’d like to use the demo endpoint instead, use the following:
ENDPOINT=pinecone-vision-latest.vercel.app
Then, run the following command:
npx expo start
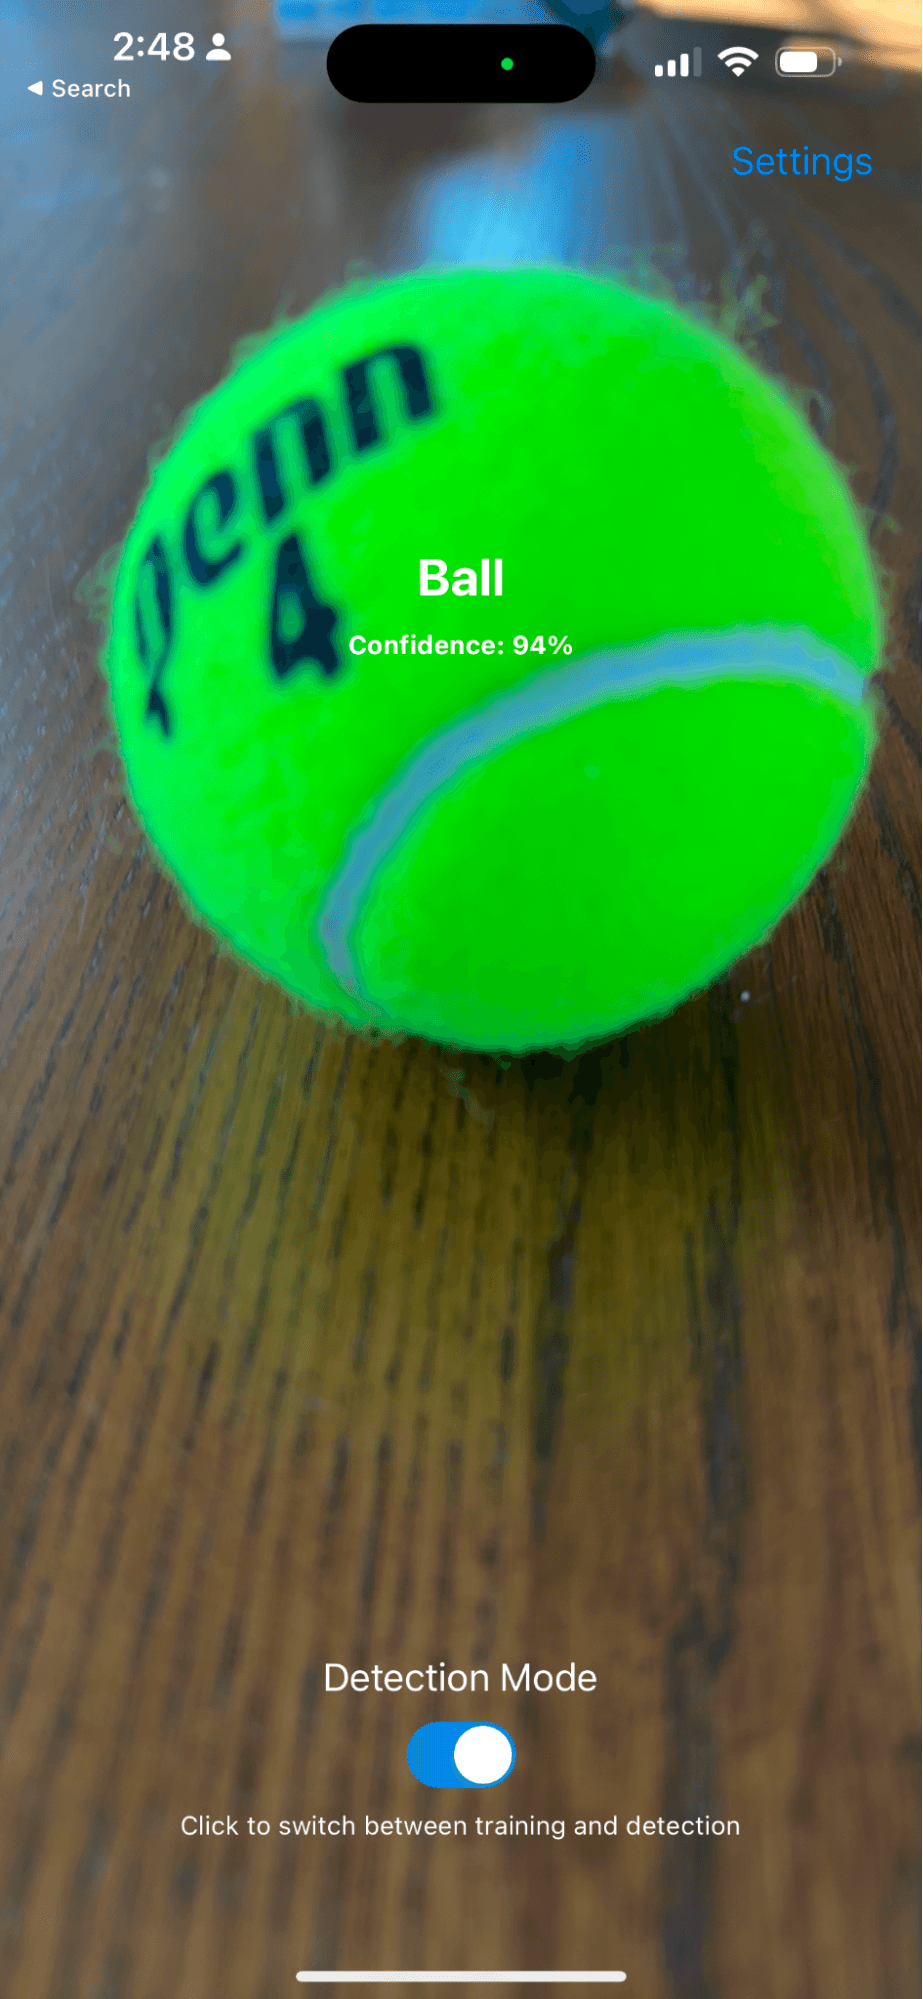
You should see a scannable QR which will open the application on your phone. It should look something like this:
The combination of the popularity of Javascript and the rise of AI applications has created a lot of potential for innovation. With powerful tools like Pinecone, Vercel, and Hugging Face available, developers can now create AI applications with ease. This opens up many possibilities for developers to create AI applications for a wider range of users. If you’re a JS developer, I hope this inspires you to build something great!
此内容由惯性聚合(RSS阅读器)自动聚合整理,仅供阅读参考。 原文来自 — 版权归原作者所有。