








Performance tuning, in general, requires a holistic view of the application traffic profiles, features leveraged and the criteria for performance from the application perspective. In this blog, we will take a look at some of the factors to consider when optimizing NSX for performance.
In a typical data center, applications may have different requirements based on their traffic profile. Some applications such as backup services, log files and certain types of web traffic etc., may be able to leverage all the available bandwidth. These long traffic flows with large packets are called elephant flows. These applications with elephant flows, in general, are not sensitive to latency.
In contrast, in-memory databases, message queuing services such as Kafka, and certain Telco applications may be sensitive to latency. These traffic flows, which are short lived and use smaller packets are generally called mice flows. Applications with mice flows are not generally bandwidth hungry.
While in general, virtual datacenters may be running a mixed set of workloads which should run as is without much tuning, there may be instances where one may have to tune to optimize performance for specific applications. For example, applications with elephant flows often impact the latency experienced by applications with mice flows. This is true for both physical and virtual infra. For business critical applications, traffic may need to be steered to stay separate on all components, virtual and physical, to avoid impact on performance. Hence, understanding the application traffic profile and business criticality, will help in tuning it for optimal performance based on application requirements.
NSX provides three datapath options.
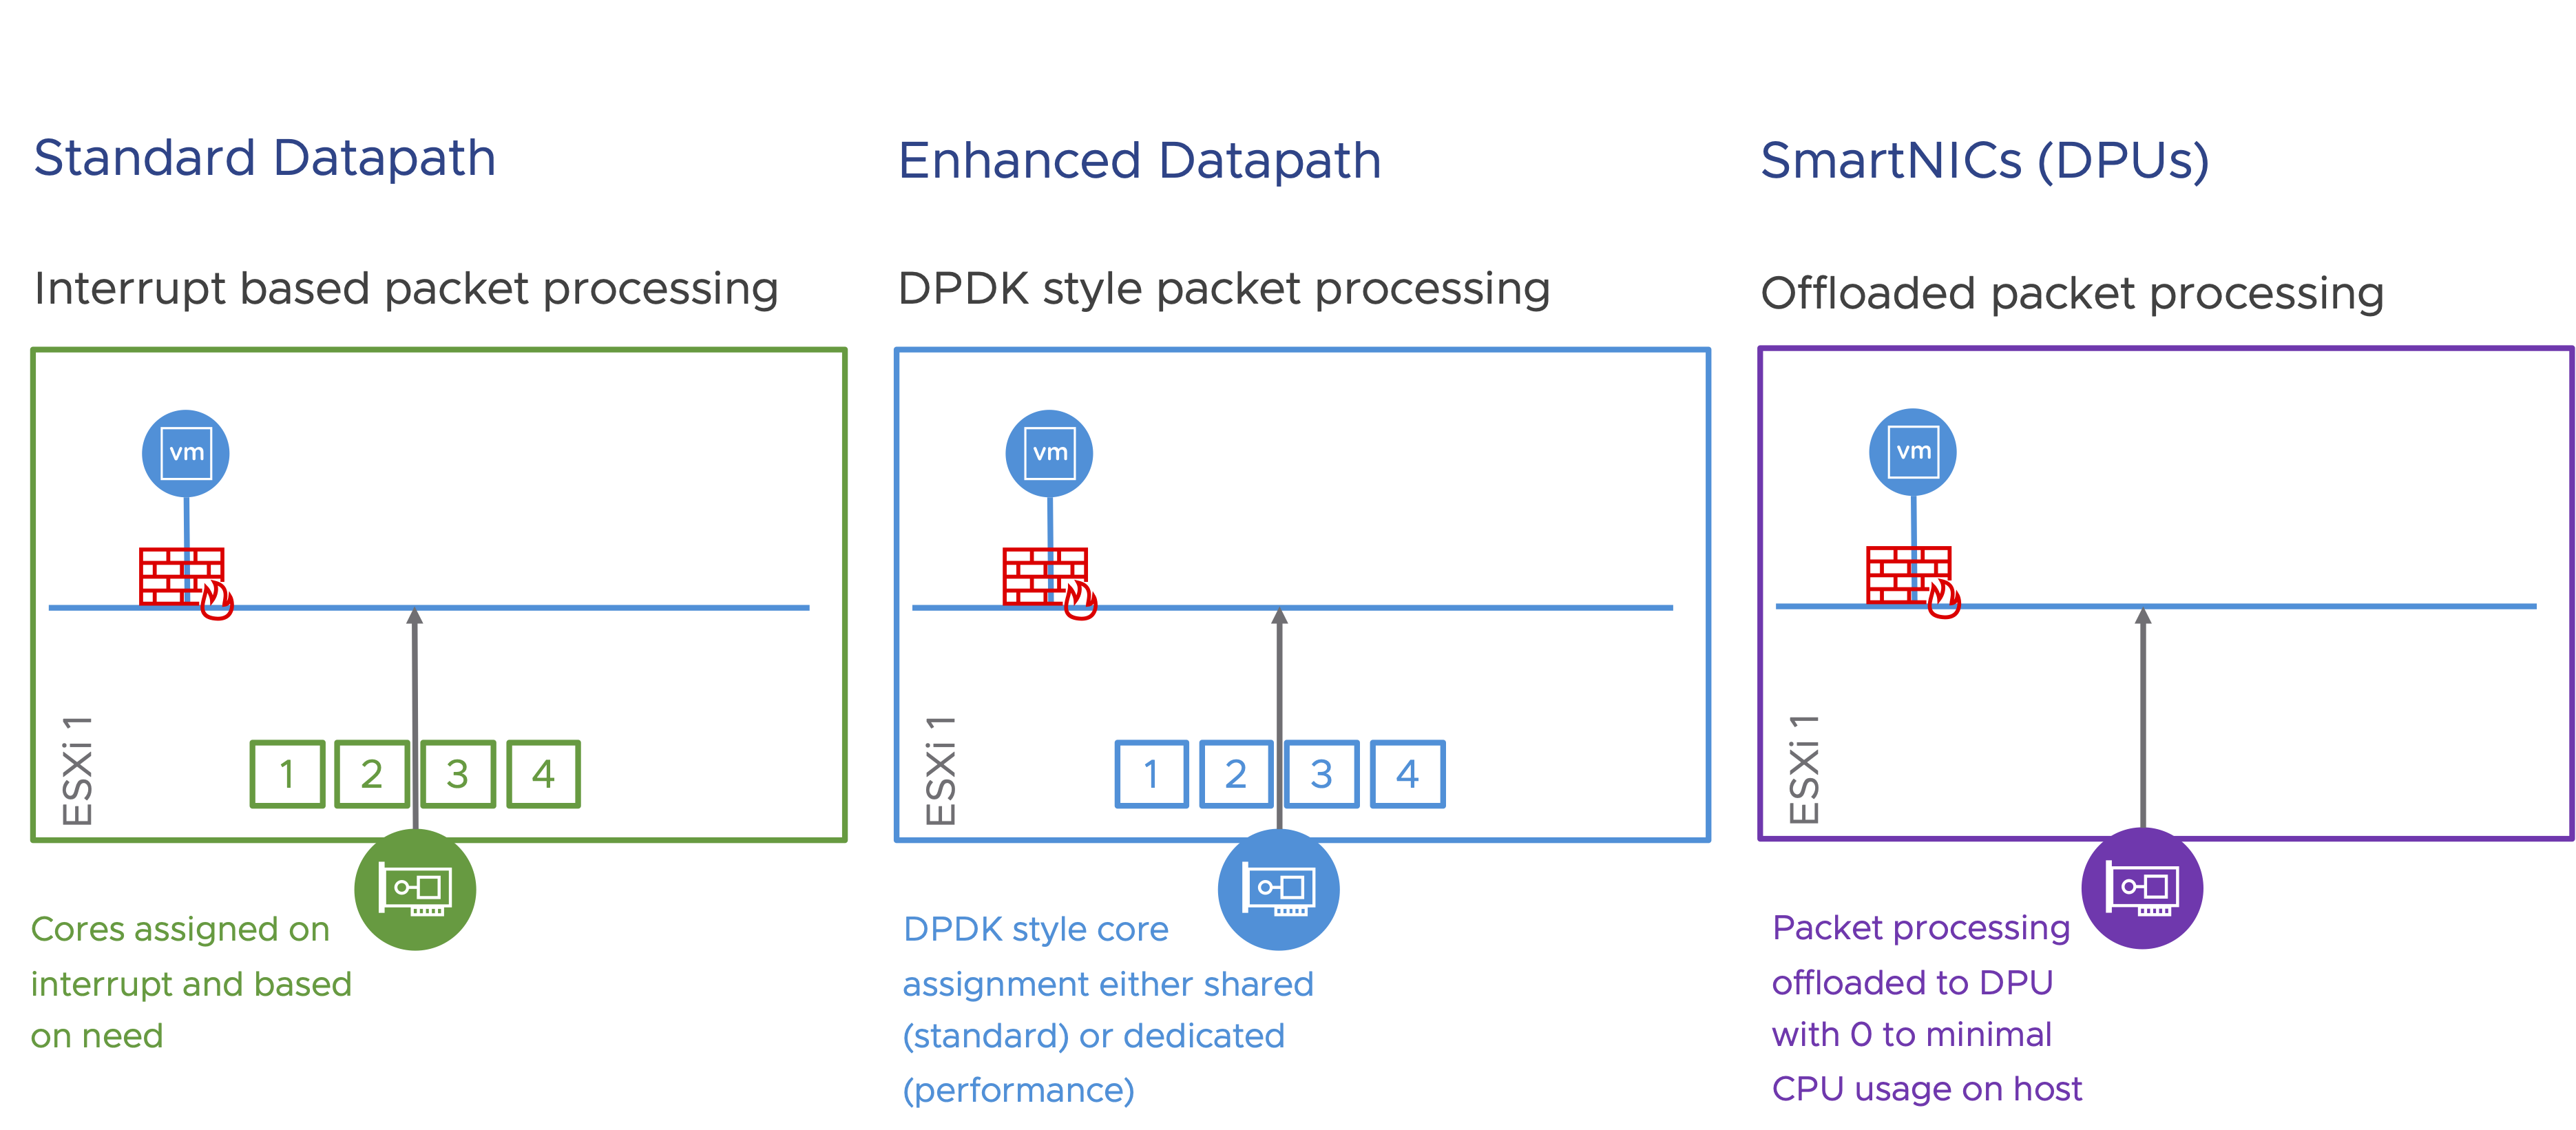
In this blog, we will focus on tuning the Standard Datapath, for optimal performance.
Standard Datapath, by default, is tuned to maximize bandwidth usage. Applications that are throughput hungry will benefit from the optimizations that are included by default in this mode. Following are some of those optimizations. Note: some of these optimizations are enabled by default:
Geneve offload is basically TSO (and LRO) for Geneve traffic. TSO helps move larger segments through the TCP stack on the transmit side. These larger segments are broken down into MTU compliant packets by either a NIC that supports Geneve offload or in software as a last step if the NIC doesn’t support this feature. LRO is a similar feature that’s enabled for the traffic on the receiving side. While most NICs support TSO, LRO support is not so prevalent. Often, LRO is done in software.
Geneve offload is essential, for applications with elephant flows. Apart from Geneve Offload that is enabled by default if the pNIC supports it, another way to optimize for applications with elephant flows is to enable jumbo MTU (9000).
Geneve Rx / Tx Filters are a smarter version of RSS, that provides queueing based on need. While RSS works at the hardware level and queue flows based on the outer headers, Geneve Rx / Tx Filters queue flows based on insights into traffic flows. Queueing is simply providing multiple lanes for traffic flow. Similar to highways where multiple lanes ease congestion and maximize traffic flows, queuing does the same thing for application traffic flows. In general, performance increases almost linearly, based on the number of available queues, as long as the applications are able to leverage it.
Either Geneve Rx / Tx Filters or RSS is essential for all applications to improve performance.
Queuing needs to happen not only at the ESXi layer, but also at the VM layer. When enabling multiple queues, the vCPU count also should be considered, to avoid CPU related bottlenecks. The following image highlights all the tuning parameters related to queuing and how they relate to the entire stack, from pNIC to the VM.
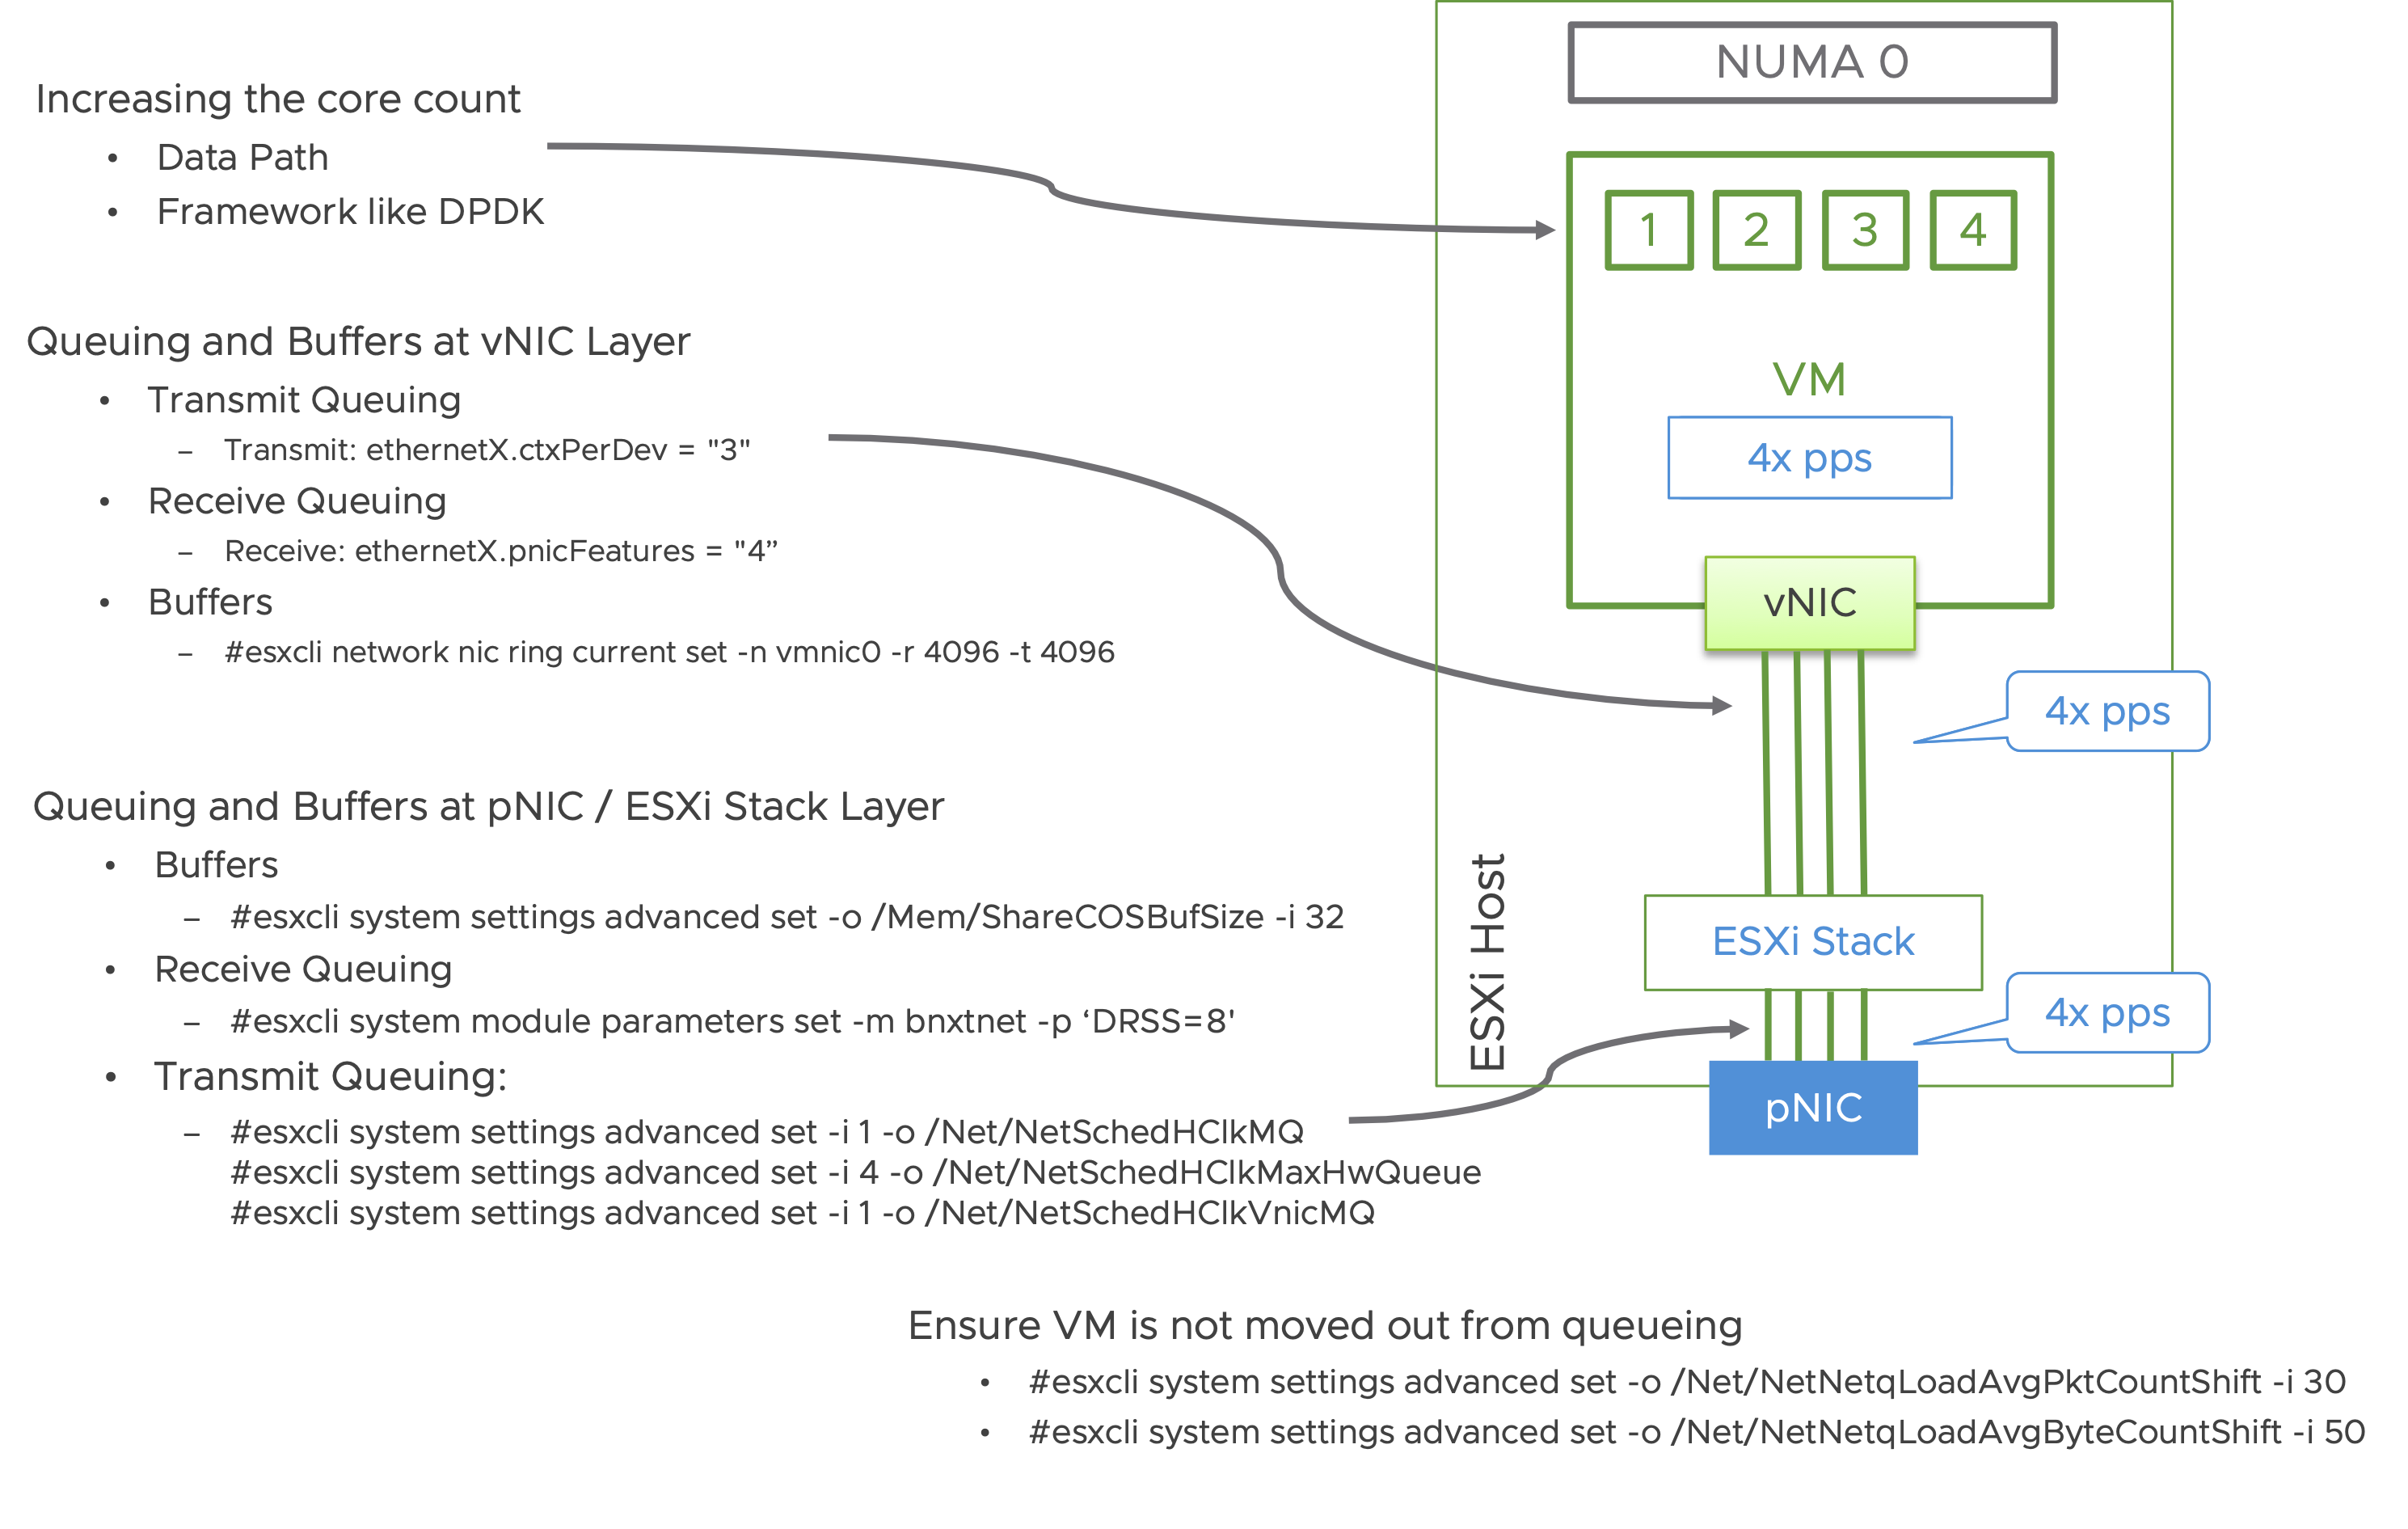
For easier consumption, repeating the tuning commands in text below:
Adding additional pNICs helps scale out the packet processing capacity of a system.
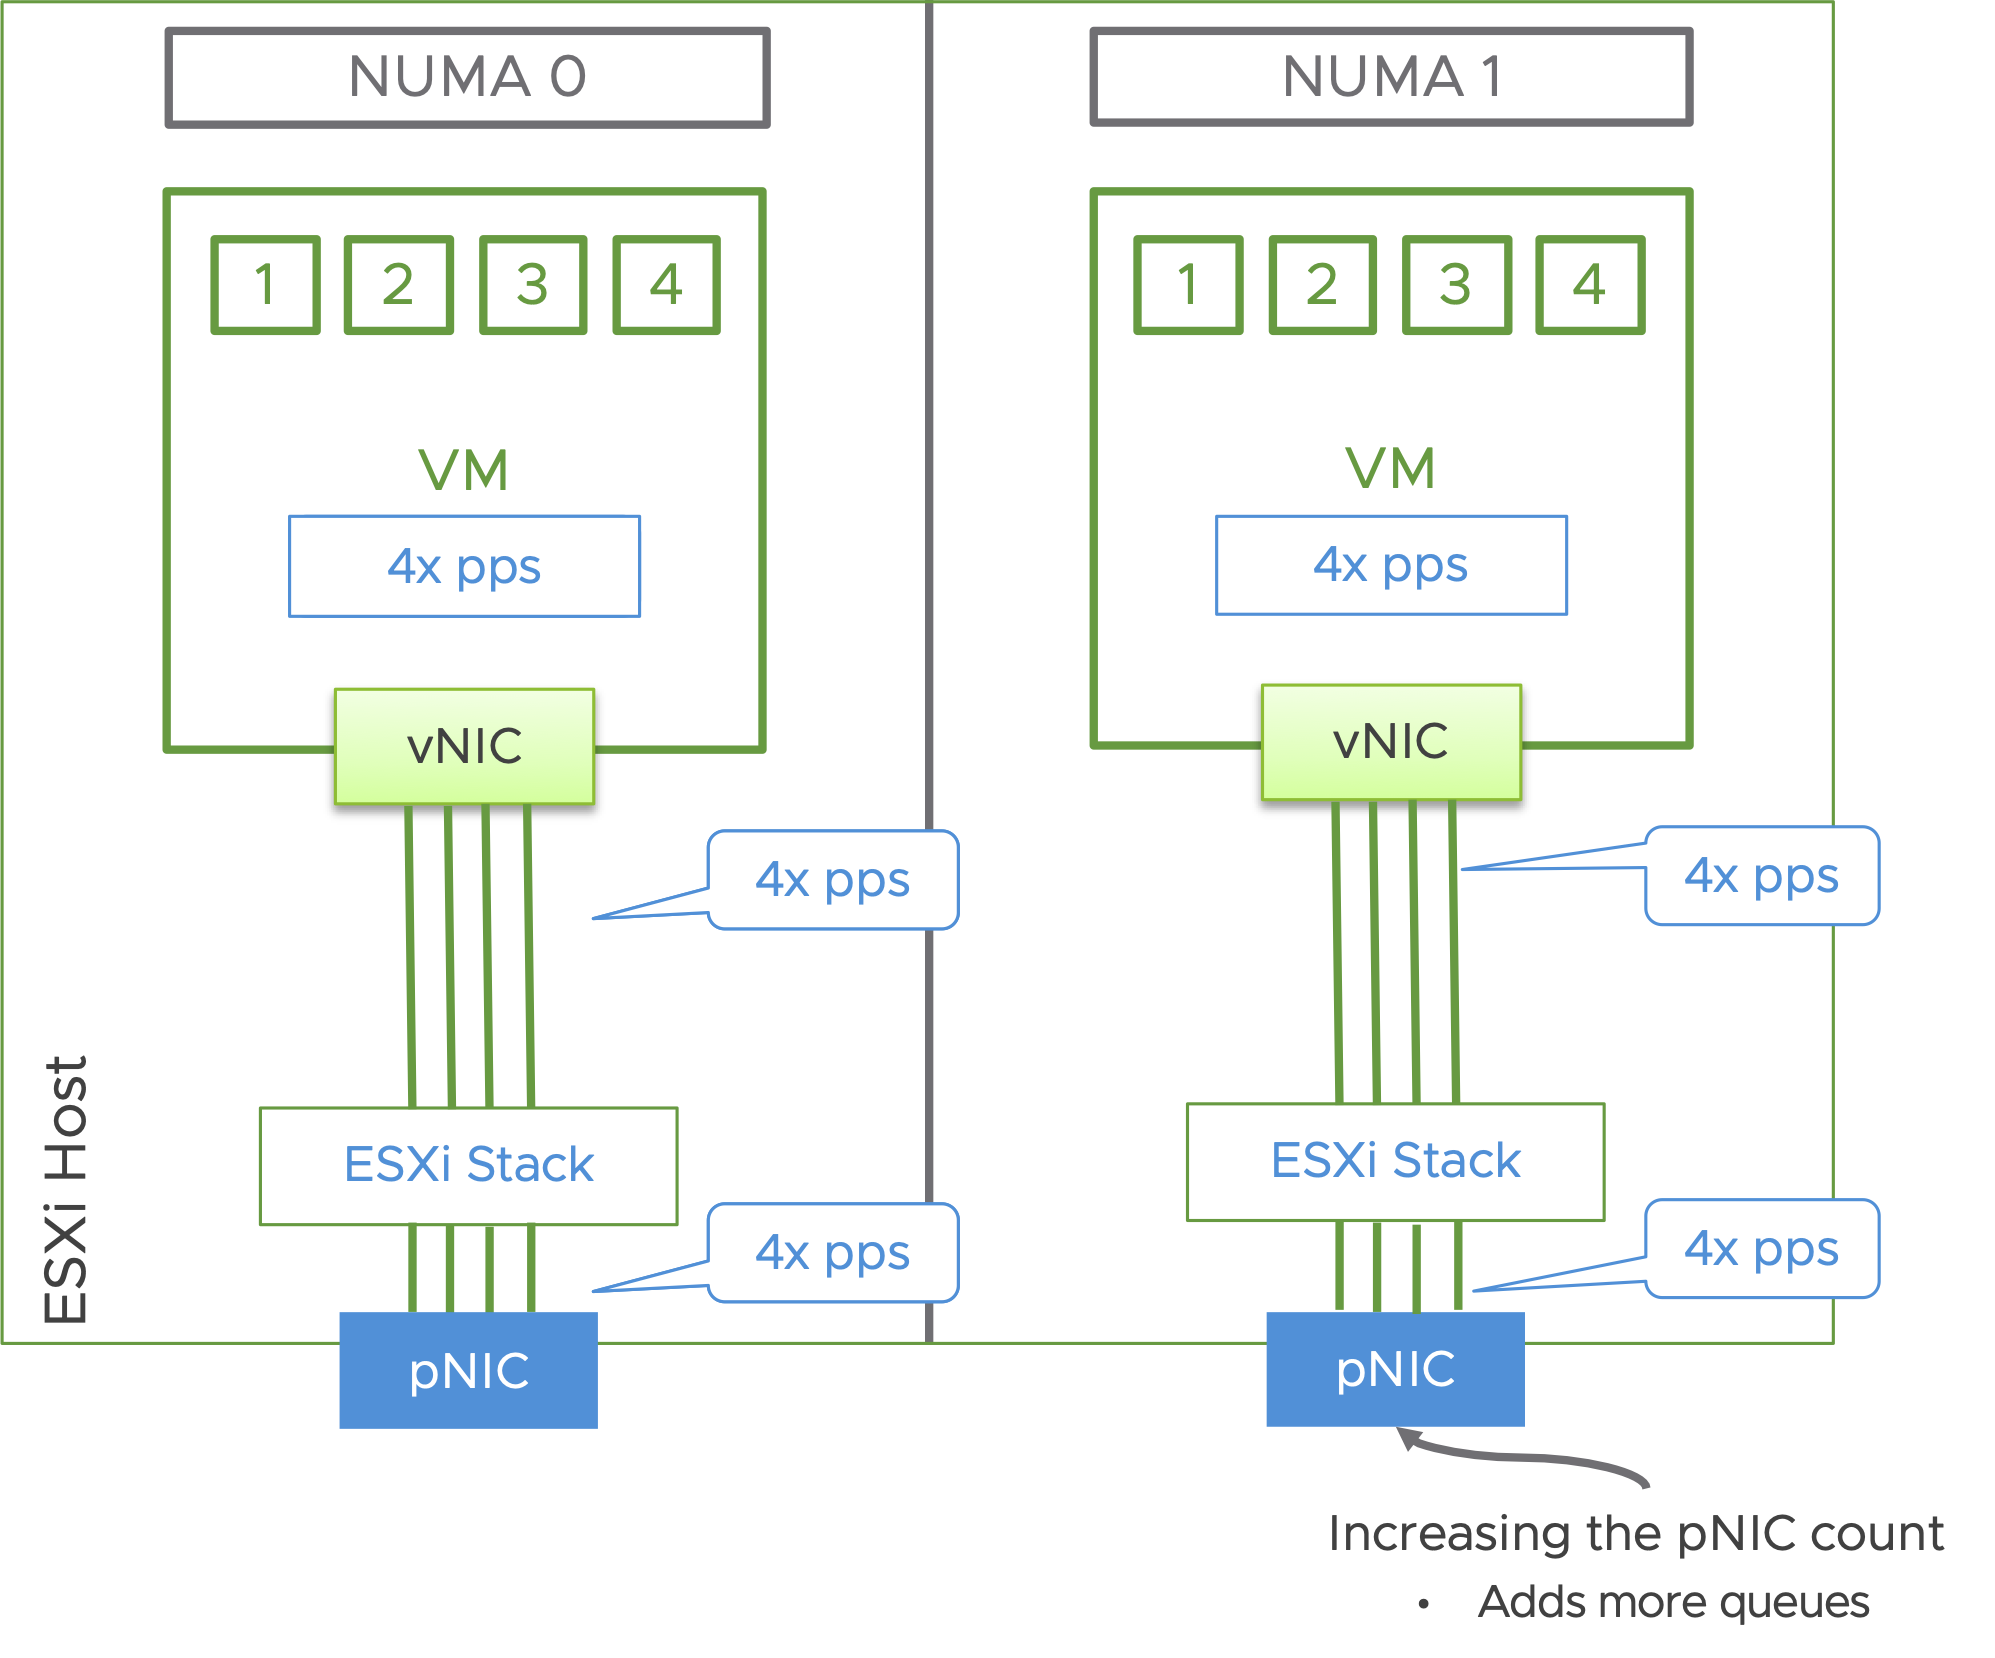
In general, every queue will potentially consume a thread. However, this is only when needed. The threads are available for other tasks, when not in use for processing packets. The threads for the pNIC queues are allocated from the host.
Threads for the vNIC queues are allocated from the vCPUs allocated to the VMs. Given that, the vCPU count of the VM should be considered, to ensure CPU doesn’t become a bottleneck.
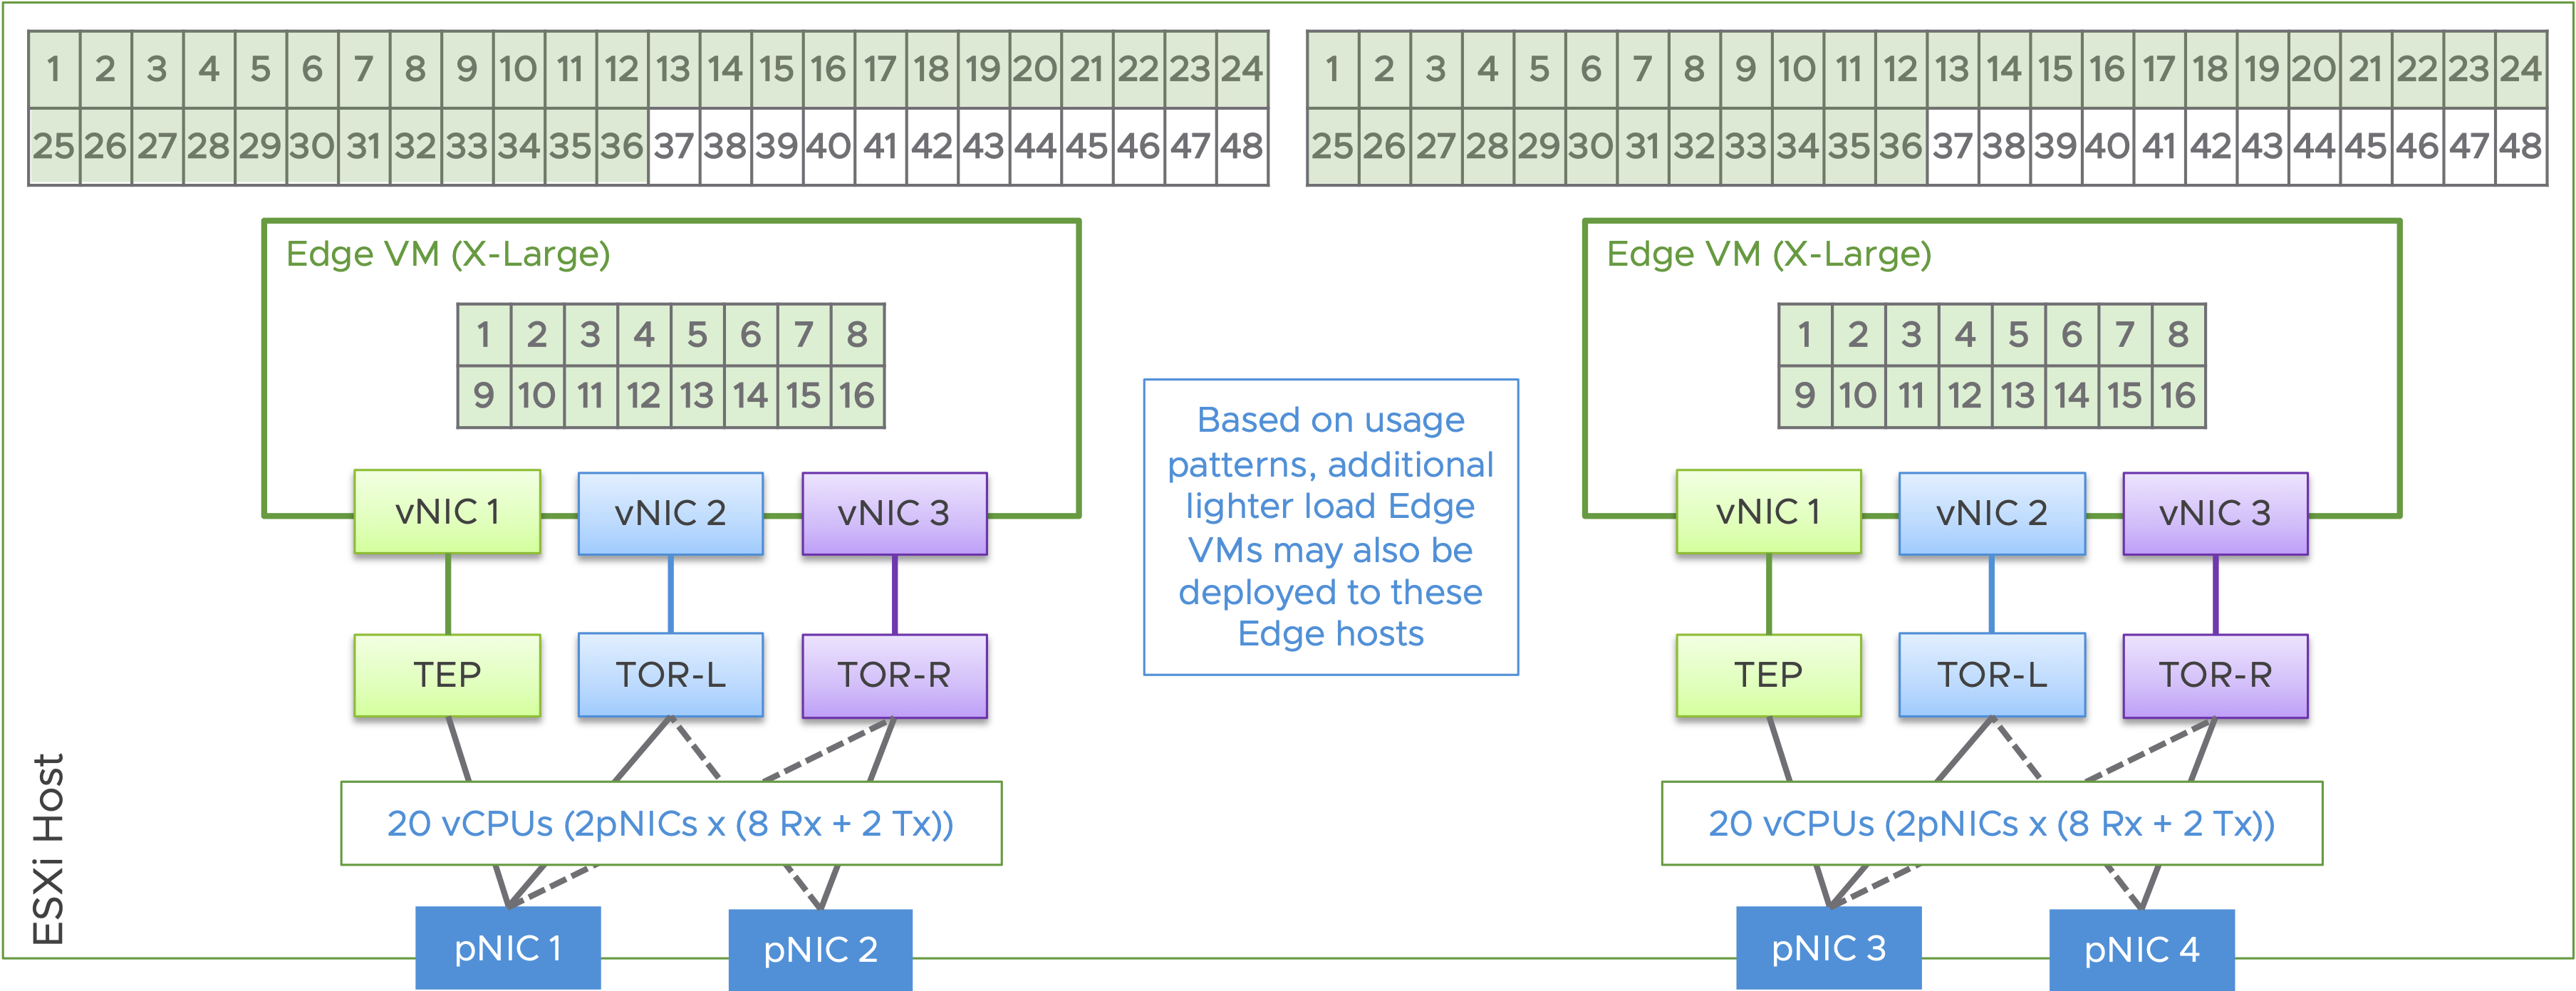
Current servers are able to support, with a dual socket architecture, over 120 cores / 240 threads on a single host. Often, the pNIC capacity is reached before fully leveraging all the available cores. Following is an example with one NSX X-Large Edge on a dual socket host with a modest 96 cores, where the pNICs are configured with 8 Rx queues and 2 Tx queues:
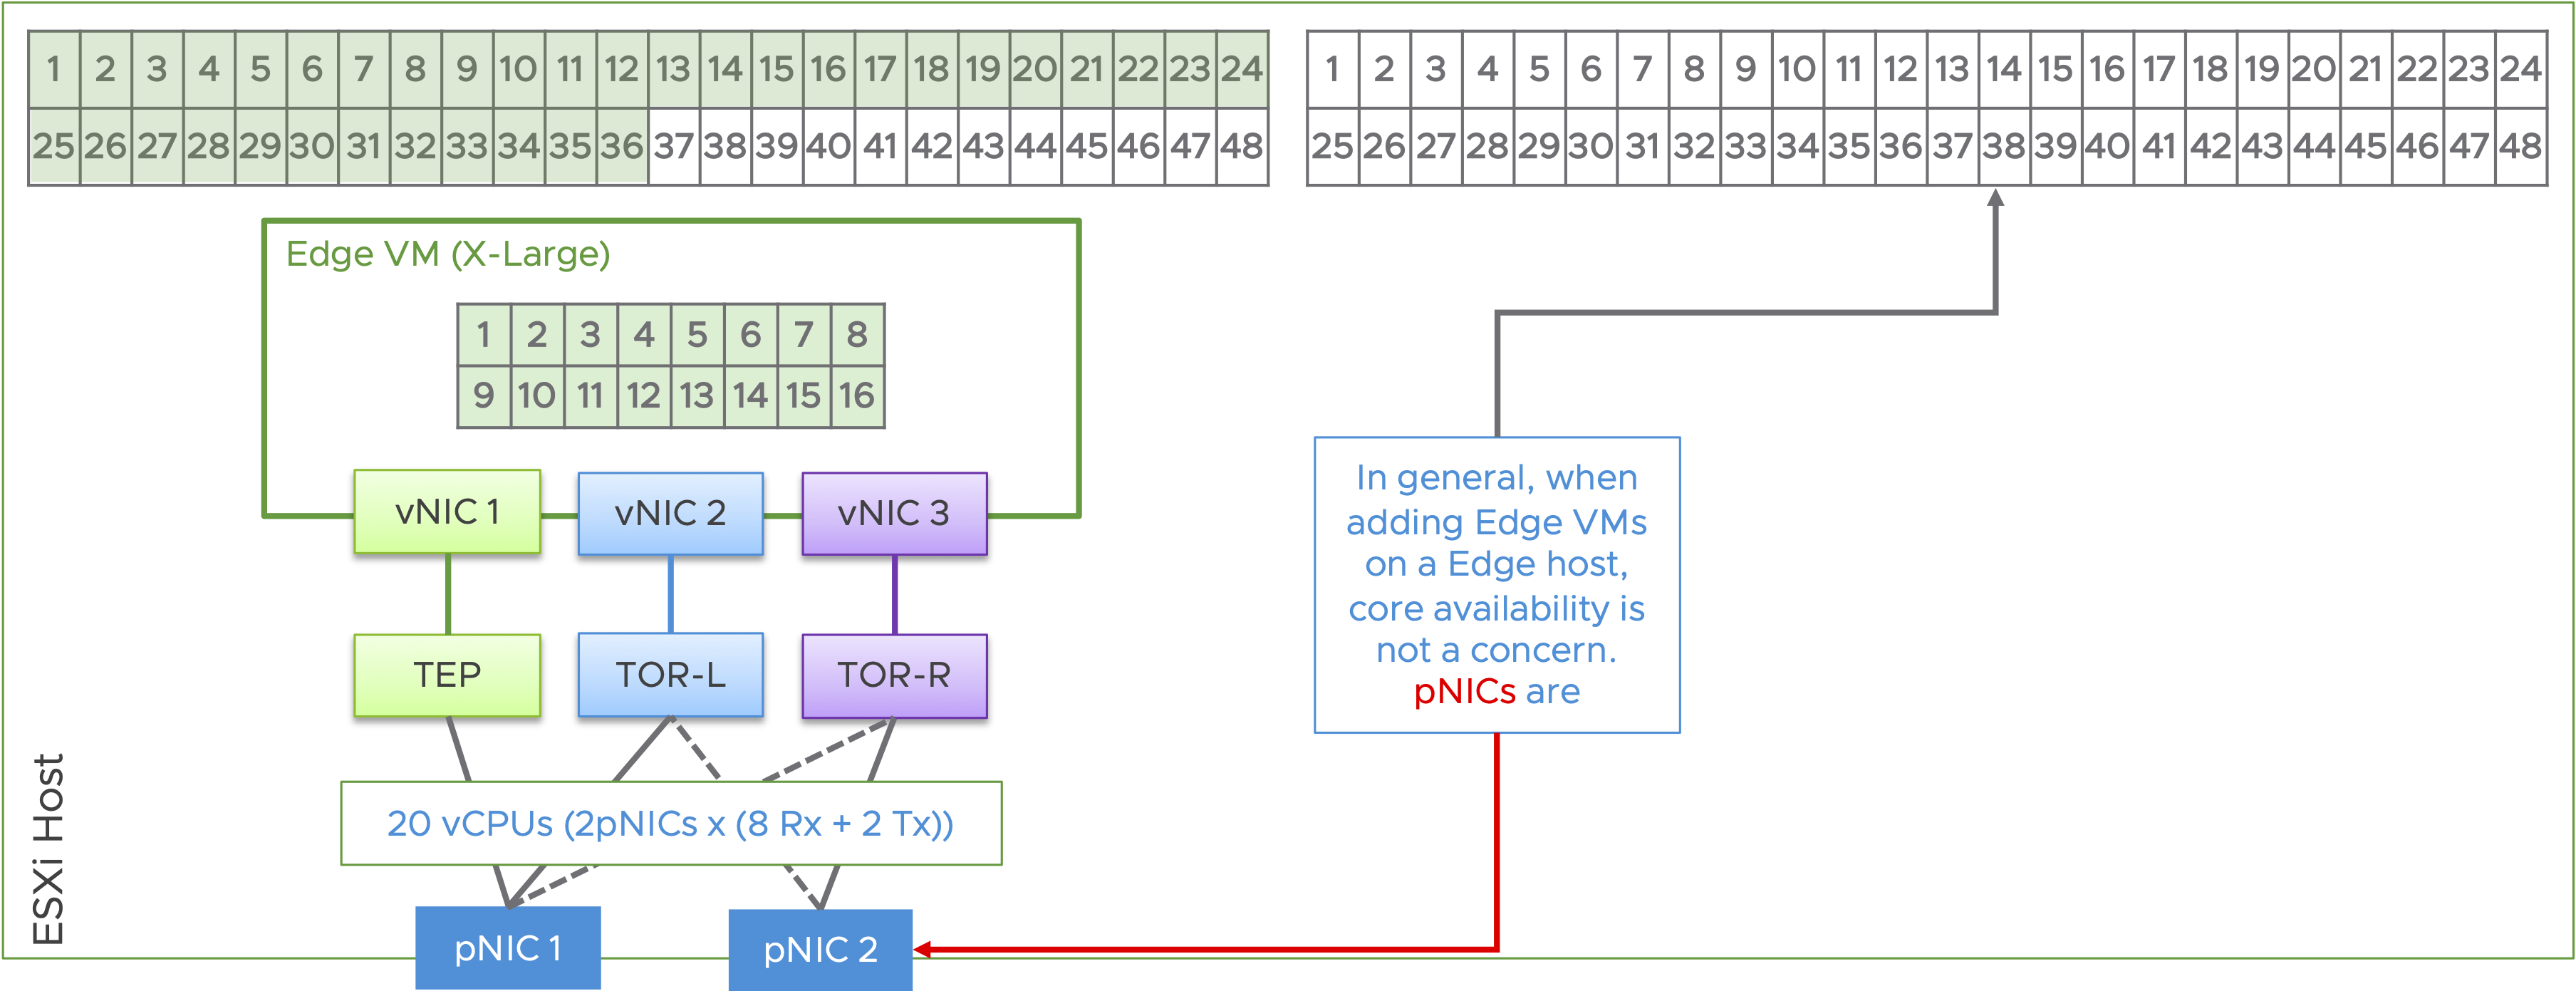
To leverage all the available cores on a system and to avoid pNIC bottlenecks, consider 4 x pNIC design. With a 4 x pNIC design, the same host can be leveraged to address twice the workload capacity. This also helps reduce the number of hosts for the workload, by half. Following is an example with 2 x NSX X-Large Edges, on a dual socket host. Note: The system in this illustration, still has capacity to host more edge VMs.
Following is an illustration of the benefit of leveraging a 4 x pNIC design, compared with a 2 x pNIC design.
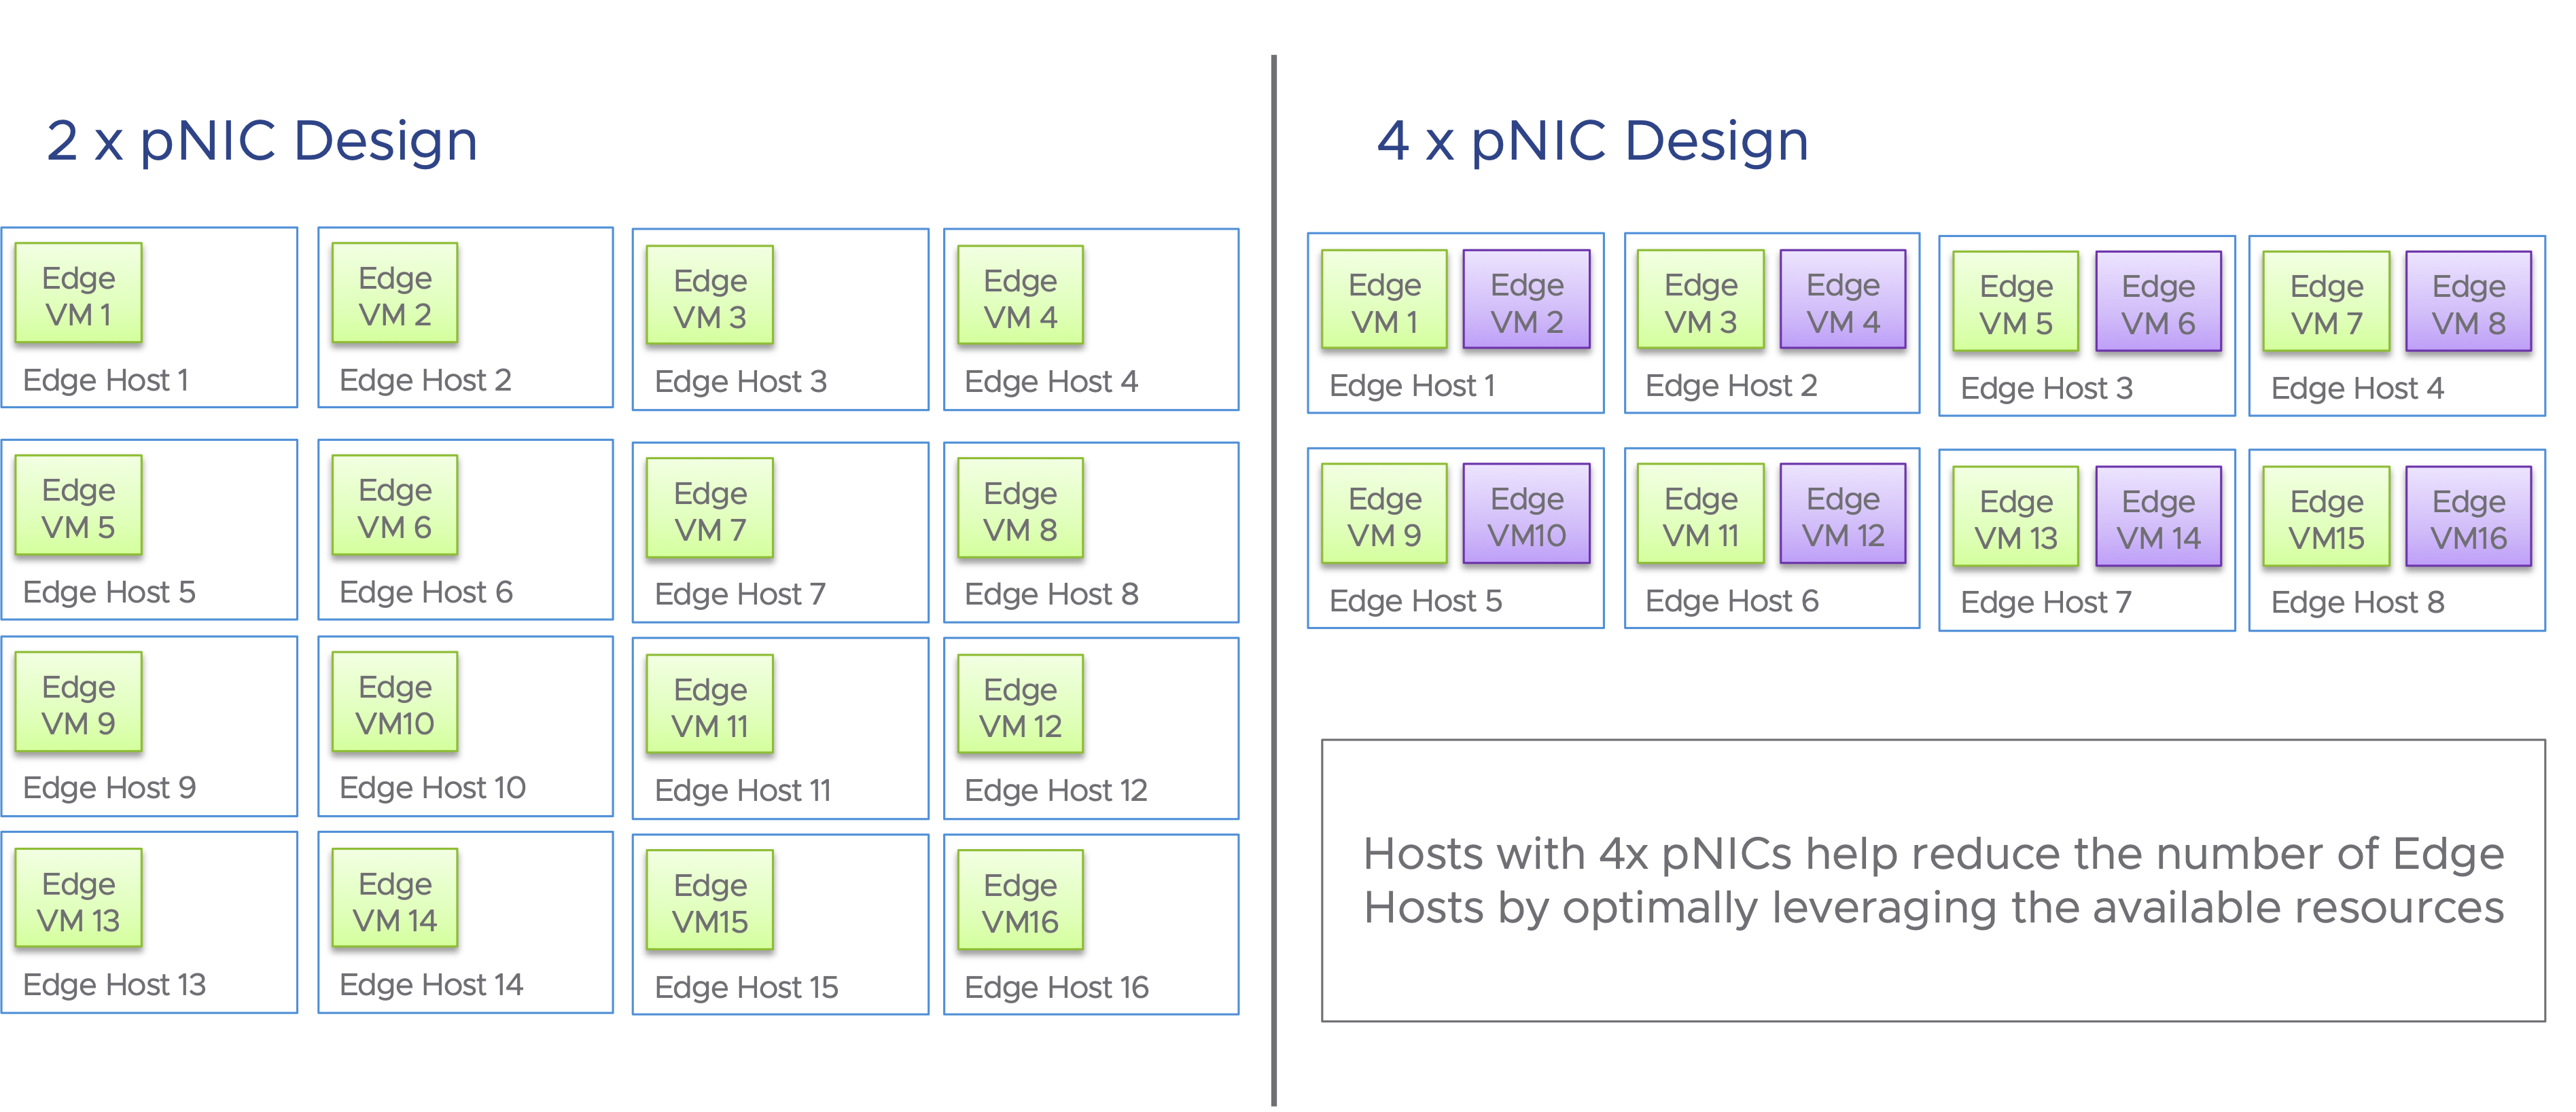
Performance tuning must consider the application traffic patterns and requirements. While most general purpose datacenter workloads should perform well with the default settings, some applications may require special handling. Queuing, buffering, separation of workloads and datapath selection are some of the key factors that help optimize performance for applications. Considering the large number of cores available today, a 4 x pNIC design would help not only with optimizing performance but also in optimizing CPU usage and reducing the server footprint.
Want to learn more? Check out the following resources:
此内容由惯性聚合(RSS阅读器)自动聚合整理,仅供阅读参考。 原文来自 — 版权归原作者所有。