







Bootstrapping an account on the web
This section applies when the Relying Party (RP) does not yet know who is controlling the client device. There is no browser artifact (such as a cookie or a credential ID in local storage) available to the RP, although for now we assume that the user has an existing account with the RP.
To bootstrap an account, serve the user a sign-in page.
Start off by asking the user for their account identifier, typically a username or email address:
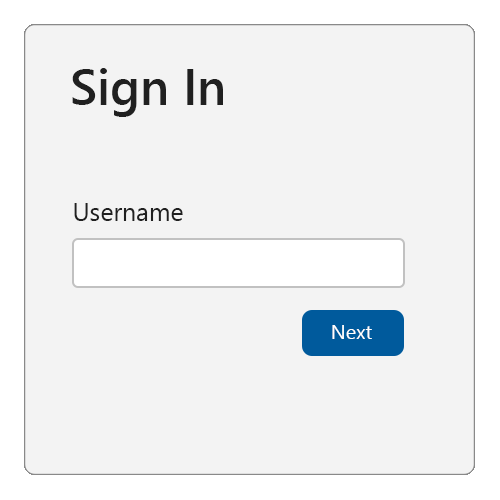
To support the autofill UI for passkeys, make sure to:
Add the username and webauthn value to any existing autocomplete annotations on the username input field as shown below in the example.
<div>
  <label for="username">Username:</label>
  <input name="username" id="loginform.username"
         autocomplete="username webauthn">
</div>
On page load, check to see if autofill UI (conditional mediation) is available using an if statement, then call navigator.credentials.get() with mediation: "conditional" and userVerification: "preferred".
<script>
  (async () => {
    if (
      typeof window.PublicKeyCredential !== 'undefined'
      && typeof window.PublicKeyCredential.isConditionalMediationAvailable === 'function'
    ) {
      const available = await PublicKeyCredential.isConditionalMediationAvailable();

      if (available) {
        try {
          // Retrieve authentication options for `navigator.credentials.get()`
          // from your server.
          const authOptions = await getAuthenticationOptions();
          // This call to `navigator.credentials.get()` is "set and forget."
          // The Promise will only resolve if the user successfully interacts
          // with the browser's autofill UI to select a passkey.
          const webAuthnResponse = await navigator.credentials.get({
            mediation: "conditional",
            publicKey: {
              ...authOptions,
              // see note about userVerification below
              userVerification: "preferred",
            }
          });
          // Send the response to your server for verification and
          // authenticate the user if the response is valid.
          await verifyAutoFillResponse(webAuthnResponse);
        } catch (err) {
          console.error('Error with conditional UI:', err);
        }
      }
    }
  })();
</script>
This will cause the following to happen:
Retrieve the authentication options from your server. Return at least a random challenge to be associated with this authentication request.
When the user interacts with the username field, the browser and platform will check whether a passkey exists in the platform authenticator that can be used with the relying party
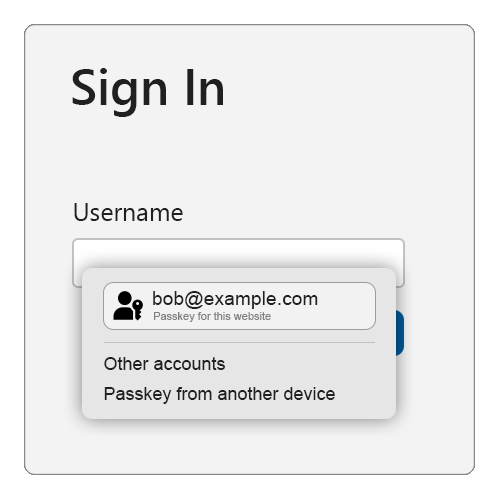
If this is the case, the passkey will be presented to the user as an option to choose (along with other credentials that can be auto-filled, such as usernames stored in the browser’s password manager).
The browser/platform might render a UI similar to the one shown below, although the exact look and feel will vary from platform to platform (Windows vs. Android vs. iOS), and from form factor to form factor (desktop vs. mobile):
If the user selects the passkey, the platform UI will guide the user through a (often biometrics-based) user verification check.
If the user successfully passes the user verification, the navigator.credentials.get() succeeds and returns a WebAuthn response.
If the user selects a credential other than a passkey, the browser/platform chooses a different appropriate action (such as auto-filling the username), and the navigator.credentials.get() call does not resolve.
If the user selects the “Passkey from another device” option (NOTE: the exact text will vary slightly by platform), then the browser/platform will guide the user through using a FIDO2 security key or the Cross-Device Authentication (CDA) flow to use a passkey from their smartphone or tablet to deliver a WebAuthn response to the navigator.credentials.get() call.
Send the WebAuthn response to your server for verification and additional security checks. If all checks succeed then start an authenticated session for this user.
This is why this is called the Conditional UI (or more commonly, the autofill UI) mode of WebAuthn — the platform authenticator UI that guides the user through the verification, or through using their phone, is only shown if the user has a passkey on this device (or chooses the “another device” option).
As we can see, in this mode the navigator.credentials.get() call either succeeds, or it doesn’t (never resolves). If it does succeed, then the result of the call will reveal both a user id, as well as a signed WebAuthn assertion, which the relying party will use to authenticate the user.
If the call doesn’t succeed, perform a “legacy” user authentication: you’ll get a username from this first page, and you then serve appropriate further login challenges (such as passwords, responding to SMS challenges, etc.) to the user in subsequent pages. These may include “account recovery” steps in case the user has forgotten their password or is otherwise not able to pass the regular login challenges. Once the user has passed all the login challenges, they’re considered authenticated and signed in.
What happens when the user doesn’t already have an account with the relying party? Usually, you will give users the option on the sign-in page to create an account. If the user chooses that option, collect the necessary information from the user to open a new account. If the user successfully opens a new account, they’re also considered authenticated and signed-in.
Once the user is signed in, it might be time to set up a new passkey for them. Do this for any of the following cases:
authenticatorAttachment
attribute in the returned PublicKeyCredential object.If the user used a passkey from another device (such as a phone, tablet, or FIDO2 security key), the authenticatorAttachment property in the authentication response (getAssertion) will have the value cross-platform.
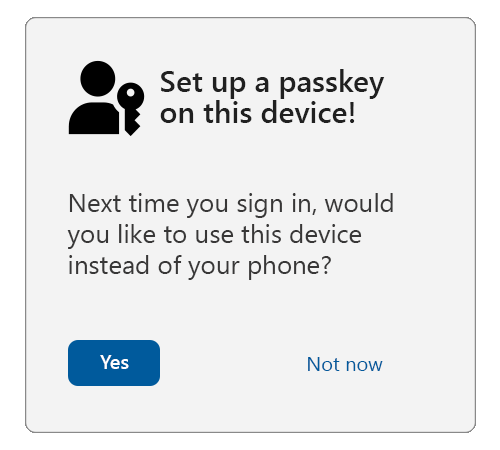
In such a scenario, offer the user the choice to create a passkey on their local device. This will result in a more seamless user experience in the future, as the user will not be required to use their other device.
This guidance sets userVerification to preferred, meaning that user verification will be attempted when possible.
Some devices, such as desktops and older laptops, may not have biometric sensors. On these devices, the user may be asked to enter their system login password for each sign in using a passkey if userVerification is set to required. This can be a very frustrating user experience to repeat over and over.
When preferred is used, some platform authenticators will always require a user verification check when the device has biometric sensors, but may skip user verification on devices without them.
The user verification result (conveyed in authenticator data flags ) will reflect the actual user verification result and should always be validated against your requirements on the server.
First, verify that the user is sufficiently strongly authenticated using other login methods, including multi-factor authentication.
Second, ensure that the user’s device and OS combo supports passkeys by calling:
PublicKeyCredential.isUserVerifyingPlatformAuthenticatorAvailable()If passkeys are supported, this will return true. If they aren’t supported, this will return false and you should abort the passkey enrollment flow.
Serve an opt-in or “upsell” modal/interstitial or page to the user offering them to create a passkey:
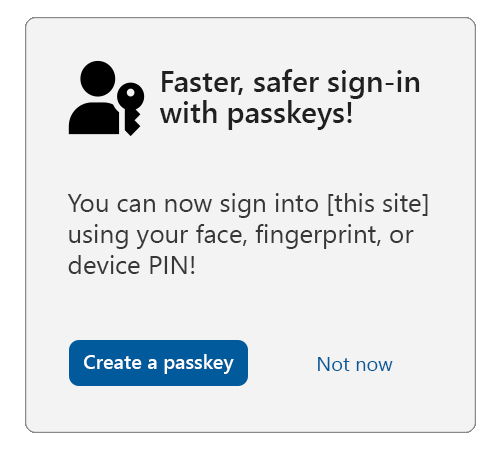
Consider showing (or linking to) longer descriptions explaining that all users that are able to unlock the current device will be able to access the account at the relying party to ensure that the user is giving fully informed consent.
If the user consents, call navigator.credentials.create() with the options as shown in the example below:
navigator.credentials.create({
  publicKey: {
    rp: {
      // user friendly name of your service
      name: "Passkeys Developer",
      // Relying Party (RP) identifier (hostname/FQDN)
      id: "passkeys.dev"
    },

    user: {
      // persistent, unique identifier for the user account in your backend
      id: Uint8Array.from("0525bc79-5a63-4e47-b7d1-597e25f5caba", c => c.charCodeAt(0)),
      // user friendly identifier often displayed to the user (e.g. email address)
      name: "[email protected]",
      // human readable display name, sometimes displayed by the client
      displayName: "Julia Coleman"
    },
    // the challenge is a buffer of cryptographically random bytes generated on your backend
    // and should be tightly bound to the current user session
    challenge: Uint8Array.from("XZJscsUqtBH7ZB90t2g0EbZTZYlbSRK6lq7zlN2lJKuoYMnp7Qo2OLzD7xawL3s", c => c.charCodeAt(0)),
    pubKeyCredParams: [
      // an array of objects describing what public key types are acceptable to a server.
      {
        "type": "public-key",
        "alg": -7 // EC P256
      },
      {
        "type": "public-key",
        "alg": -257 // RSA
      }
    ],
    excludeCredentials: [
      // array of credential IDs for existing passkeys tied to the user account.
      // this avoids creating a new passkey in an authenticator that already has
      // a passkey tied to the user account
      {
        // example only
        type: "public-key",
        id: new Uint8Array([21, 31, 56, ...]).buffer
      },
      {
        // example only
        type: "public-key",
        id: new Uint8Array([21, 31, 56, ...]).buffer
      }
    ],
    authenticatorSelection: {
      // tells the authenticator to create a passkey
      residentKey: "required",
      // tells the client / authenticator to request user verification where possible
      // e.g. biometric or device PIN
      userVerification: "preferred"
    },
    "extensions": {
      // returns back details about the passkey
      "credProps": true
    }
  }
})
Note
We recommend that most relying parties not specify the attestation conveyance parameter
attestation(thus defaulting to none), or instead explicitly use the valueindirect. This guarantees the most streamlined user experience (platforms are likely to obtain consent from the user for other types of attestation conveyances, which likely results in a larger fraction of unsuccessful credential creations due to users canceling the creation).
When the WebAuthn call resolves, send the response to your server and associate the returned public key and credential ID with the previously authenticated user account.
此内容由惯性聚合(RSS阅读器)自动聚合整理,仅供阅读参考。 原文来自 — 版权归原作者所有。