







I was looking for a simple and lightweight commenting system with moderation for my static blog. There are dozens of solutions out there, but ISSO seemed like a perfect fit for me. I decided to host it on another server, using a subdomain and Podman or Docker. However, there are different ways to install it - like same server, same domain, without Docker and so on.
Illustration of our plan:
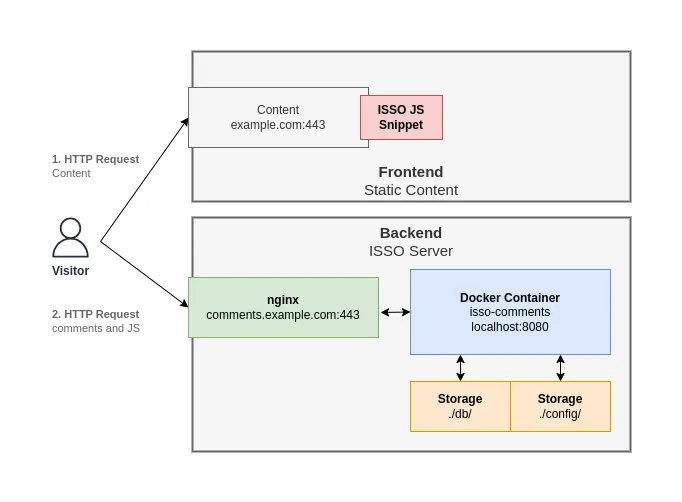
You can add the JS snipped in Hugo, Jekyll, documentation or wherever you want.
My assumptions before we begin:
example.com for the frontend / static blog and comments.example.com for the backend / ISSO server.Feel free to test the comment section at the end of this article.
Let us start with the Backend server.
Create two directories for the container for the configuration file and database:
mkdir -p config/ db/
Download and save the default configuration isso.cfg into the /config directory:
Using curl:
curl -L https://raw.githubusercontent.com/isso-comments/isso/master/isso/isso.cfg -o config/isso.cfg
Now we need to modify this config file according to our setup and preferences.
We'll add the frontend domain and enable moderation - I'll leave the rest as is for this article.
Open the configuration file config/isso.cfg in your favorite editor and change the following options:
[general]
[...]
# Frontend domain
host =
    https://example.com
[...]
# Enabling moderation
[admin]
enabled = true

# Admin access password
password = reallylongandsecurepasswordforhteadminaccess
[...]
[moderation]
enabled = true
[...]
The configuration file does a good job of showing and describing many features - take your time and configure it to your liking. A more detailed overview can be found in its official documentation.
Next, we will start the container. As mentioned before, I use Podman, but we will use Docker for this example:
docker run -d --name isso-comments \
    -p 127.0.0.1:8080:8080 \
    -v /path/to/storage/config:/config \
    -v /path/to/storage/db:/db \
    ghcr.io/isso-comments/isso:0.13.0
docker run -d # run detached container--name isso-comments # set container name-p 127.0.0.1:8080:8080 # exposes port 8080 of the container to the localhost:8080 of the host system-v /path/to/storage/config:/config # creates bind mount for persistant storage for the containerghcr.io/isso-comments/isso:0.13.0 # get and use the on Github hosted ISSO image with a certain tagImportant: Make sure to change the path and that 127.0.0.1:8080 is available or change the host port.
Check locally with curl if container is working:
curl -L 127.0.0.1:8080/admin
<html>
<head>
  <title>Isso admin</title>
  <link type="text/css" href="http://127.0.0.1:8080/css/isso.css" rel="stylesheet">
  <link type="text/css" href="http://127.0.0.1:8080/css/admin.css" rel="stylesheet">
</head>
<body>
  <div class="wrapper"
[...]
This is looking fine!
If you get an error message, check the logs:
docker container logs isso-comments
Currently, the ISSO backend is only available from the host itself. We need to add a reverse proxy to forward the requests and make it available to other hosts. I will be using nginx, but feel free to use Caddy, Apache, or something else. The certification configuration is handled by certbot.
We won't go into much detail, but the following config works for me (some privacy modifications):
server {
    server_name  comments.example.com;

    access_log  /var/log/nginx/comments.example.com.access.log;

    location / {
        proxy_set_header   X-Forwarded-For $remote_addr;
        proxy_pass         "http://127.0.0.1:8080";
        proxy_set_header   Host $host;
        proxy_set_header   X-Real-IP $remote_addr;
        proxy_set_header   X-Forwarded-For $proxy_add_x_forwarded_for;
        proxy_set_header   X-Forwarded-Proto $scheme;
    }

    #error_page  404              /404.html;
    error_page   500 502 503 504  /50x.html;
    location = /50x.html {
        root   /usr/share/nginx/html;
    }

    listen 443 ssl; # managed by Certbot
    ssl_certificate /etc/letsencrypt/live/comments.example.com/fullchain.pem; # managed by Certbot
    ssl_certificate_key /etc/letsencrypt/live/comments.example.com/privkey.pem; # managed by Certbot
    include /etc/letsencrypt/options-ssl-nginx.conf; # managed by Certbot
    ssl_dhparam /etc/letsencrypt/ssl-dhparams.pem; # managed by Certbot
}

server {
    if ($host = comments.example.com) {
        return 301 https://$host$request_uri;
    } # managed by Certbot

    listen 80;
    server_name  comments.example.com;
    return 404; # managed by Certbot
}
If everything went well, the admin interface should be available:
https://comments.example.com/admin/
If it doesn't work: - check the logs of your reverse proxy - reverse proxy up and running - secondary domain pointing to Backend server (DNS) - Container up and running - port configration is correct (container > Docker > nginx) - check network and host firewalls
Regarding the Backend server, this should be everything!
In the next step, we just have to add some Javascript to all pages that should receive a comment section. ISSO will do the rest automaticly.
<script data-isso="//comments.example.com/"
        data-isso-max-comments-top="10"
        data-isso-max-comments-nested="5"
        data-isso-reveal-on-click="5"
        data-isso-sorting="newest"
        data-isso-avatar="false"
        data-isso-vote="false"
        src="//comments.example.com/js/embed.min.js"></script>

<section id="isso-thread">
    <noscript>Javascript needs to be activated to view comments.</noscript>
</section>
Feel free to change those options! - A full overview of all options can be found in their official documentation.
Currently, it is not possible to hide certain fields with the ISSO options.
A simple but not perfect workaround is to hide them with CSS. If you want to hide the website field, you could use the following CSS snippet:
/* ISSO COMMENTS */
label[for=isso-postbox-website] {
  display: none !important;
}

input#isso-postbox-website {
    display: none;
That hides the website field. Replace website with email to hide the email field.
I won't cover it in this article, but if you have many comments, it makes sense to insert some kind of lazy-load, so the comments load only if they are being display to improve the user experience and decrease the page loading speed.
As a reminder, with this setup you have to approve new comments via admin interface:
https://comments.example.com/admin/
So, as you can see, it is really straightfoward. Feel free to test it in the comment section below.
此内容由惯性聚合(RSS阅读器)自动聚合整理,仅供阅读参考。 原文来自 — 版权归原作者所有。