






开发android应用,肯定会经常用到andorid手机联系人,在android中一般都用Listview呈现手机联系人,如果想实现用checkbox实现全选的效果,默认的ListView好像不太好解决这个问题。
以下步骤,可以使用自定义布局来实现手机联系人的全选,效果如下图
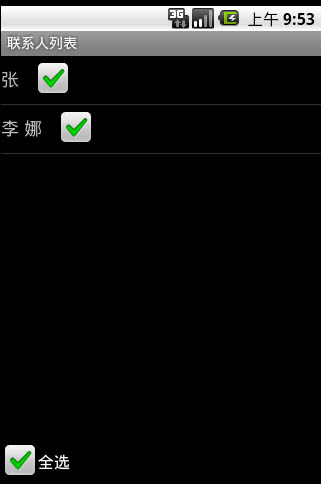
1.创建包含Listview的主界面布局文件main.xml
<?xml version="1.0" encoding="utf-8"?>
<LinearLayout android:orientation="vertical"
android:layout_width="fill_parent"
android:layout_height="fill_parent"
xmlns:android="http://schemas.android.com/apk/res/android"
>
<LinearLayout android:gravity="bottom"
android:orientation="vertical" android:layout_width="fill_parent"
android:layout_height="fill_parent"
>
<ListView android:id="@+id/lvContact"
android:layout_width="fill_parent"
android:layout_height="wrap_content"
android:layout_weight="1.0" />
<ScrollView android:gravity="bottom"
android:id="@+id/scroll_bottom" android:layout_width="fill_parent"
android:layout_height="wrap_content">
<LinearLayout android:id="@+id/rlall"
android:layout_width="fill_parent"
android:layout_height="wrap_content"
android:orientation="vertical">
<LinearLayout
android:paddingBottom="0.0dip" android:layout_width="fill_parent"
android:layout_height="wrap_content">
<CheckBox android:id="@+id/cbSelectAll"
android:layout_width="0.0dip"
android:layout_height="wrap_content"
android:layout_weight="0.5"
android:text="全选" />
</LinearLayout>
</LinearLayout>
</ScrollView>
</LinearLayout>
</LinearLayout>
2.创建包含单个联系人信息的布局文件contactlistitem.xml
<?xml version="1.0" encoding="utf-8"?>
<LinearLayout android:orientation="horizontal"
android:layout_width="fill_parent"
android:layout_height="fill_parent"
xmlns:android="http://schemas.android.com/apk/res/android">
<TextView android:id="@+id/contact_name"
android:layout_width="wrap_content"
android:layout_height="wrap_content"
android:textSize="18sp"
/>
<CheckBox android:id="@+id/multiple_checkbox"
android:focusable="false"
android:layout_width="wrap_content"
android:layout_height="wrap_content"/>
</LinearLayout>
3.主程序,所有的程序说明都在程序中做了注释
package com.demo;
import java.util.HashMap;
import android.app.Activity;
import android.content.ContentResolver;
import android.content.Context;
import android.database.Cursor;
import android.net.Uri;
import android.os.Bundle;
import android.provider.ContactsContract;
import android.view.LayoutInflater;
import android.view.View;
import android.widget.AdapterView;
import android.widget.CheckBox;
import android.widget.CompoundButton;
import android.widget.LinearLayout;
import android.widget.ListView;
import android.widget.SimpleCursorAdapter;
import android.widget.TextView;
import android.widget.AdapterView.OnItemClickListener;
import android.widget.CompoundButton.OnCheckedChangeListener;
public class main extends Activity {
private CheckBox cbSelectAll;
boolean blCkAll=false;
private MyAdapter madapter;
@Override
public void onCreate(Bundle savedInstanceState) {
super.onCreate(savedInstanceState);
setContentView(R.layout.main);//加载主布局界面文件
setTitle("联系人列表");
ListView listView = (ListView)findViewById(R.id.lvContact); //得到ListView;
cbSelectAll = (CheckBox) findViewById(R.id.cbSelectAll);//得到全选的CheckBox
ContentResolver contentResolver = this.getContentResolver();
Uri uri = Uri.parse("content://com.android.contacts/contacts");//查找手机所有联系人
Cursor cursor = contentResolver.query(uri, null, null, null, null);
startManagingCursor(cursor);//得到所有联系人的游标
//关键部分,使用继承了SimpleCursorAdapter的自定义Adapter来实现联系人信息的展现,
//从而在每个联系人名字后面添加一个checkbox选择框
//R.layout.contactlistitem是ListiView中每个联系人的布局xml,cursor为所有联系人游标数据
//String[]是所有要呈现在ListView中的数据列,
//int[]是String[]中的数据在contactlistitem中展现时对用的控件id
//由于重写了bindView方法把数据绑定在布局文件上,所以展现的控制重点在bindView方法中
madapter=new MyAdapter(getApplicationContext(),R.layout.contactlistitem,cursor,
new String[]{ContactsContract.Contacts._ID,ContactsContract.Contacts.DISPLAY_NAME,ContactsContract.Contacts.DISPLAY_NAME},
new int[]{R.id.contact_name,R.id.contact_name,R.id.multiple_checkbox});
listView.setAdapter(madapter);
//选择最下方的全选时,切换所有checkBox的选中状态
cbSelectAll.setOnCheckedChangeListener(new OnCheckedChangeListener() {
@Override
public void onCheckedChanged(CompoundButton buttonView, boolean isChecked) {
if(isChecked)
{
for(int i=0;i<madapter.getCount();i++) //让adapter里面的map全部为true;
{
madapter.map.put(i, true);
}
}
else
{
for(int i=0;i<madapter.getCount();i++)//让adapter里面的map全部为false;
{
madapter.map.put(i, false);
}
}
ListView listView = (ListView)findViewById(R.id.lvContact); //得到ListView;
listView.setAdapter(madapter);
}
});
// 为ListView添加单击事件监听器
listView.setOnItemClickListener(new OnItemClickListener() {
@Override
public void onItemClick(AdapterView<?> av, View v, int position,
long id) {
CheckBox checkBox = (CheckBox) v.findViewById(R.id.multiple_checkbox);
checkBox.toggle();
if(checkBox.isChecked())
{
madapter.map.put(position, true);
}
else
{
madapter.map.put(position, false);
}
}
});
}
public class MyAdapter extends SimpleCursorAdapter
{
private LayoutInflater mInflater;
//定义一个HashMa存放每个联系人的编号和一个bool值,布尔值用来判断checkbox是否选中
HashMap<Integer, Boolean> map=new HashMap<Integer, Boolean>();
//构造函数循环遍历HashMap,让所有的联系人默认都是出于非选中状态
public MyAdapter(Context context, int layout, Cursor c, String[] from,
int[] to) {
super(context, layout, c, from, to);
for(int i=0;i<c.getCount();i++)
{
map.put(i, false);
}
}
//使用bindView把数据绑定在自定义布局文件中
public void bindView(View view, Context context, Cursor cursor) {
//得到每一个item的布局文件
LinearLayout ll = null;
if (view == null) {
//使用contactlistitem.xml布局文件
ll = (LinearLayout) mInflater.inflate(R.layout.contactlistitem,null);
} else {
ll = (LinearLayout)view;
}
//通过cursor得到每一个字段的ColumnIndex
int idCol = cursor.getColumnIndex(ContactsContract.Contacts._ID);
//得到联系人姓名
int nameCol = cursor.getColumnIndex(ContactsContract.Contacts.DISPLAY_NAME);
final int nCount = cursor.getPosition();
TextView txtName = (TextView)ll.findViewById(R.id.contact_name); //联系人姓名展示控件
String contactId=cursor.getString(idCol);//得到联系人id;
txtName.setText(cursor.getString(nameCol)+" ");
final CheckBox ckSel = (CheckBox)ll.findViewById(R.id.multiple_checkbox);
//响应联系人列表上的checkbox,点击时切换选中行的checkBox状态
ckSel.setOnCheckedChangeListener(new OnCheckedChangeListener() {
@Override
public void onCheckedChanged(CompoundButton buttonView, boolean isChecked) {
if(isChecked)
{
map.put(nCount, true);
}
else
{
map.put(nCount, false);
}
}
});
//根据HashMap中的当前行的状态布尔值,设定该CheckBox是否选中
ckSel.setChecked(map.get(nCount));
}
}
}
4.修改AndroidManifest.xml添加读取联系人列表权限
<uses-permission android:name ="android.permission.READ_CONTACTS"/>
启动模拟器运行程序就可以看到效果了。
此内容由惯性聚合(RSS阅读器)自动聚合整理,仅供阅读参考。 原文来自 — 版权归原作者所有。