
Jack Hyland has worked in information security ever since graduating college and has dedicated his free time to deeply learning new techniques and technologies. He now spends his time creating and contributing to open-source projects along with performing security assessments of corporations networks and infrastructure.
I’ve been a web application pentester for a while now and over the years must have found hundreds of cross-site scripting (XSS) vulnerabilities.1 Cross-site scripting is a notoriously difficult problem to solve, and its detection is hindered by a web server’s lack of visibility into client-side attacks.
So, I had a crazy idea one day: “Would it be possible to build a canary that notifies the website owner if an XSS vulnerability was exploited anywhere on their site?”
Let’s find out…
Warning: This blog gets a little technical and is geared towards readers with a basic understanding of web development, JavaScript, and Linux.
Edit Log (7/28/2025): This blog was updated to no longer rely on xsscanary.com and instead self-host the canary scripts.
A canary is a subtle indicator that signals the presence of a specific condition or event, often serving as an early warning system or alert abosut potential issues.
When security researchers look for XSS vulnerabilities on a website, they often aim to execute the alert() JavaScript function as a proof-of-concept. This is because the alert() function provides a clear and unmistakable indication of exploitation, halting the execution of the webpage and allowing hackers to quickly identify and verify the presence of an XSS vulnerability. As a result, alert() has become a staple in online XSS wordlists.2
In my experience, modern websites rarely use the alert() function to display information in the browser, making it an unusual occurrence during legitimate browsing. Therefore, when an alert box is triggered on a modern webpage, it is likely a sign of a successful XSS exploit.
With the alert() function identified as our trigger, we can now design the rest of the canary. Our goal is to signal the presence of an XSS vulnerability and provide valuable insights back to the blue team. To achieve this, our canary must:
The following JavaScript example demonstrates a barebones implementation of hooking the alert() function, allowing us to execute custom code before proceeding with the original behavior. In this case, we’ll calculate 2+2 before continuing.
const originalAlert = window.alert; // Saving a copy of alert()
window.alert = function(...args) { // Hooking alert()
    console.log(2+2); // Run any code you want here
    originalAlert.apply(window, args); // Calling the original alert()
};
With the alert() function hooked, we can now shift our focus to reconstructing the attack sequence and gaining a deeper understanding of how our website was exploited. To achieve this, we’ll generate a detailed stack trace, providing a clear visualization of the execution path that led to the exploit triggering. We’ll also collect the alert message, the URL of the compromised page, the timestamp of the incident, and the document referrer. Then we’ll capture a snapshot of the DOM at the time of the exploit, which should contain any malicious code reflected in the page.
const debugData = {
    alert_msg: args.join(' '), 	// The message displayed by the attacker
    stack: error.stack,		// A full stack trace of the execution
    url: window.location.href, 	// The current URL with parameters
    ref: document.referrer,	// The referrer domain
    dom: document.documentElement.outerHTML,	// A copy of the DOM
    timestamp: new Date().toISOString()	// Timestamp
};
The final step is to transmit the collected debugging information to a server controlled by the website owners, enabling them to investigate the vulnerability and take action. We do that below with a POST request.
// Send the data to the callback server via a POST request
fetch('https://example.com/xss', {
    method: 'POST',
    headers: {
        'Content-Type': 'application/json',
    },
    // Convert the debug data to JSON
    body: JSON.stringify(debugData)
})
Putting it all together, we get the final code for our XSS canary. In the next section, we’ll outline the process of setting up a canary callback server, which will receive the contextual information for incident response and analysis.
const originalAlert = window.alert;

window.alert = function(...args) {
    // Create an error to capture the stack trace
    const error = new Error();

    // Gather the debugging information
    const debugData = {
        alert_msg: args.join(' '),	// Alert Message
        stack: error.stack,        	// Stack Trace
        url: window.location.href, 	// Current URL
        ref: document.referrer,		// Website Referrer
        dom: document.documentElement.outerHTML, // Copy of the DOM
        timestamp: new Date().toISOString() 	 // Timestamp
    };

    // Send the data to the canary callback server via a POST request
    fetch('https://example.com/xss', {
        method: 'POST',
        headers: {
            'Content-Type': 'application/json',
        },
        // Convert the debug data to JSON
        body: JSON.stringify(debugData)
    })
    .catch((error) => {
        console.error('Failed to send xss report:', error);
    });

    // Call the original alert function to ensure the alert still works
    originalAlert.apply(window, args);
};
Before proceeding, ensure you have a dedicated domain and a dedicated Linux virtual private server (VPS) running either Ubuntu or Debian with at least two cores and 2GB of RAM. Set an A record from the domain pointing to the VPS public IP address. The following steps will refer to this domain generically as example.com.
To receive logs from the XSS canary, you’ll need to set up the callback server to view collected reports in an admin portal. Feel free to modify the server code to send notifications via email, Slack, Discord, or any other messaging platform of your choice. If you develop a real-time message integration, please consider sharing it with the community.
To easily install the XSS canary callback software on your server I’ve created an installation script.3 This script first installs dependencies and then creates a system daemon to run the web server as a low privileged user. The email in the command is used by Let’s Encrypt to notify you when your SSL certificate is nearing expiration, although auto-renewal is enabled by default. Piping curl to bash as root is commonly ill-advised so, please read the code before executing the following command on a dedicated VPS. Note that the video uses xsscanary.com for the install script, but you should use the link to the GitHub gist provided below.
bash <(curl -s https://gist.githubusercontent.com/ACK-J/9acef3f7d188de49d6ff7304328e168a/raw/284f0f41127c40ecb162904c7a31881b49521680/install_xss_canary_callback_server.sh) example.com [email protected]The video below shows what a successful installation should look like. If you get errors try running the script again or if you need help troubleshooting, open an issue on the GitHub repo.4
The XSS canary callback server we just installed is a simple proof of concept and while I did my best to ensure its secure, it doesn’t have rate limiting or load balancing and uses basic authentication without MFA. This is a starting point that I’m hoping the community will build on top of to make it feature complete.
The callback web server has four endpoints. First, the /xss endpoint accepts POST requests containing the debugging information from XSS canaries. Upon receiving a request, the server stores the accompanying XSS canary data as a JSON object in the xss_canary.json file. Second, the /dashboard endpoint returns a password protected page for admins to view incoming canaries. You can log in here after installation with username admin and the password shown in the install script’s output. Lastly, the /canary.js and /canary_no_dom.js endpoints serve variations of the canary file.
Now that we have our callback server all set up, we return our focus to the canary code.
To simplify the process, Note that the video uses xsscanary.com for the install script, but you should use the link to the GitHub gist provided below.the canary code is available on the webserver you just set up. The domain GET parameter allows you to substitute your website’s callback server, making it easy to integrate the canary into your existing infrastructure. There are two versions of the script, one that includes the DOM in the debugging info and one that excludes it. The links to both are provided below:
https://example.com/canary.js?domain=example.com
https://example.com/canary_no_dom.js?domain=example.com
It is generally good security practice to use a sub resource integrity5 (SRI) check to prevent remote scripts from changing without your knowledge. This hard-codes a SHA-384 hash of the script such that a browser will only execute it if the hashes match exactly.
The following website will create a secure canary script tag for you. I’ll be using test.xsscanary.com as my callback domain for the remainder of the blog, but you should substitute your own domain name (https://example.com/canary.js?domain=example.com).
https://www.srihash.org/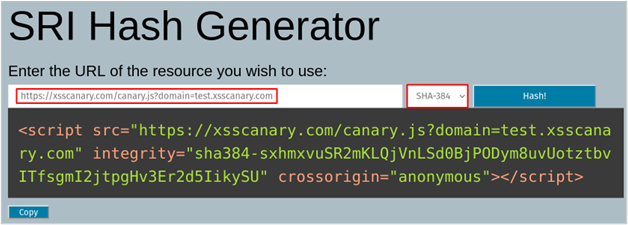
Alternatively, you can choose to directly include the XSS canary script on your site, which eliminates the need to rely on an external source and provides an additional layer of control and security.
To test out your XSS canary, replace the highlighted script tags in the following HTML file with your own generated by srihash.org. Save the updated HTML file to your desktop and open it in your preferred web browser to verify that the canary is working as expected.
<!DOCTYPE html>
<html lang="en">
<script src="https://xsscanary.com/canary.js?domain=test.xsscanary.com" integrity="sha384-sxhmxvuSR2mKLQjVnLSd0BjPODym8uvUotztbvITfsgmI2jtpgHv3Er2d5IikySU" crossorigin="anonymous"></script>
<head>
<meta charset="UTF-8">
<meta name="viewport" content="width=device-width, initial-scale=1.0">
<title>XSS Canary Test</title>
</head>
<body>
<h1>Testing XSS Canary</h1>
<p>Welcome to the vulnerable webpage. </br>Please check the URL's <strong>id</strong> parameter!</p>
<script>
// Retrieve the 'id' query parameter from location.search
var urlParams = new URLSearchParams(location.search);
// Only using the 'id' parameter from the query string
var userId = urlParams.get('id');
// Vulnerable: Using document.write without sanitization
document.write("<p>User ID: " + userId + "</p>");
</script>
</body>
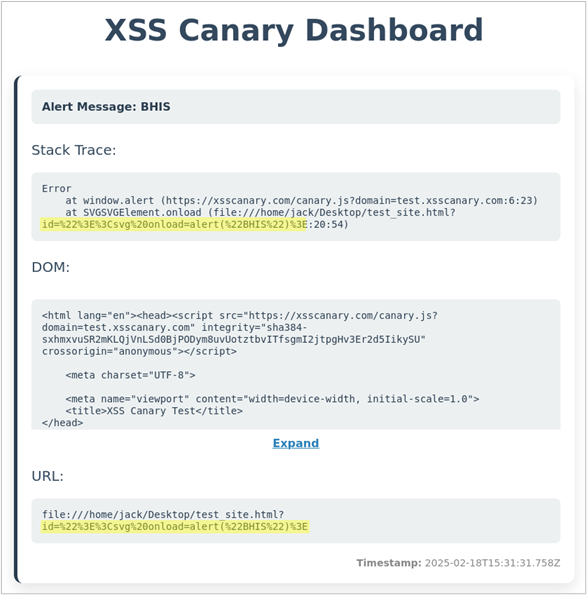
</html>Once the HTML file is opened, the XSS canary will be automatically loaded, as indicated by (1) and (2) in developer tools screenshot below. This webpage has a DOM-based cross-site scripting vulnerability in the id GET parameter which can be exploited by adding the payload ?id=”><svg%20onload=alert(“BHIS”)> to the URL bar, as shown below (3). The id parameter value is written to the webpage in an unsafe manner which triggers the exploit. Because we hooked the alert() function, the canary is activated (4) and sends the debugging information to my callback server (in this case, test.xsscanary.com). Finally, the original alert() function is called, displaying the alert to the user (5), without any visual indication that a canary was sent.
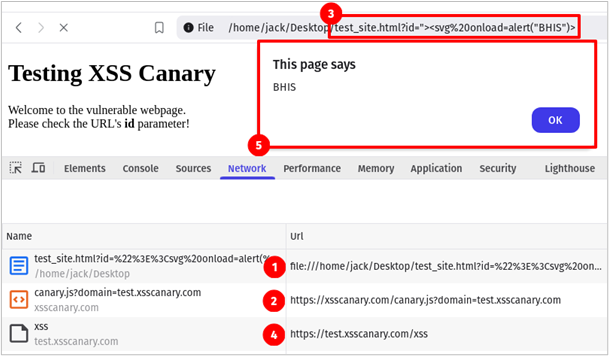
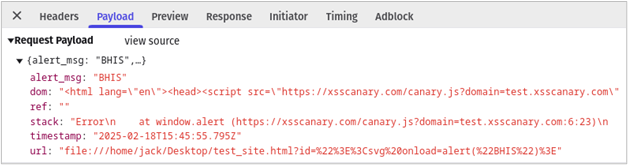
If we inspect the request (4) in the image above, we see that the POST body includes the following information sent to the canary callback web server.
To view the XSS canary collected by the callback server open https://example.com/dashboard in your browser, this will prompt you for a username and password. The username is admin, and your password was generated during the installation. If you forgot your password, log back into the callback server and execute the following command. This password will only change if you re-run the installation script.
echo $DASHBOARD_PASSWORDOnce logged in you should see the information below. From the canary report, we can easily identify that the id GET parameter led to an XSS vulnerability at the /example.html endpoint of our website. Now sit back and let the attackers do all the work while your monitoring system catches XSS 0-days.
Once you’ve verified that your XSS canary is functioning correctly, you can integrate it into your website by simply adding the canary code to the top of every webpage. Keeping the canary at the top of each webpage ensures our hooking script runs before any other code.
If you’ve gotten this far, you’ve successfully implemented a robust monitoring system that detects and alerts you to reflected, DOM-based, and stored cross-site scripting (XSS) vulnerabilities on your website. This proactive approach will help you stay ahead of threats, enabling you to respond swiftly and minimize the window of exposure.
While the XSS canary is a highly effective tool for detecting cross-site scripting exploits in real-time, it’s essential to consider a few key factors before implementing it on your website.
If an attacker is thoroughly scrutinizing your website over an extended period, they will likely investigate an “XSS Canary” and block the domain from connecting. However, as we mentioned earlier, most XSS wordlists on the internet use alert() as a proof of concept, and for good reason: attackers and security researchers tend to avoid adding complexity to their payloads, as it may cause the exploit to fail. These wordlists are often loaded into scanners and sprayed at website parameters without additional unhooking logic.
If you’re concerned about your canary being bypassed, consider including an obfuscated version of the JavaScript canary with a modified callback endpoint. This method makes it more difficult for users to block at the DNS level, while also complicating attempts to detect it using static signatures.
As of this writing, I believe the XSS canary concept to be original but if that is not the case please reach out and I’ll happily include references to similar research.
If you implement an XSS Canary on your website and it alerts you of a vulnerability please reach out (BHIS Discord7, GitHub Issue8), I would love to hear the story.
3/24 Update – Similar Research: https://www.trustwave.com/en-us/resources/blogs/spiderlabs-blog/detecting-successful-xss-testing-with-js-overrides/
Ready to learn more?
Level up your skills with affordable classes from Antisyphon!
Available live/virtual and on-demand

此内容由惯性聚合(RSS阅读器)自动聚合整理,仅供阅读参考。 原文来自 — 版权归原作者所有。