Ethan Robish //
Here’s a quick recap from Part 1. A typical home network is flat. This means that all devices are connected to the same router and are on the same subnet. Each device can communicate with every other with no restrictions at the network level.

This network’s first line of defense is a consumer router[1][2]. It also has your smart doorbell[3], door lock[4][5][6], lightbulb[7], and all your other IoT devices[8][9]. Not to mention all your PCs, tablets, and smartphones, which you, of course, keep patched with the latest security updates[10] right? Windows 7 is now unsupported and most mobile devices only receive 2-3 years of OS and security updates at the most. What about devices brought over by guests? Do you make sure those are all up to date as well?
Once an attacker has a foothold on your network, how hard would it be for them to spread to your other devices? Many router vulnerabilities are available for an attacker to exploit from inside the router’s firewall. Your router is the gateway for all your other devices’ internet traffic, opening you up to rogue DNS, rogue routes, or even TLS stripping man-in-the-middle attacks. Some of the most devastating ransomware attacks[11] have spread by exploiting vulnerabilities in services like SMB or through password authentication to accessible systems on the same network segment. Speaking of passwords, yours are all at least 15 characters (preferably random) right[12]? Ransomware is also known to try default or common passwords and even attempt brute forcing[13]. You might as well make sure that you have multi-factor authentication enabled where you can because malware can also steal passwords from your browser and email[14].
[1]: https://threatpost.com/threatlist-83-of-routers-contain-vulnerable-code/137966/
[2]: https://routersecurity.org/bugs.php
[3]: https://threatpost.com/ring-plagued-security-issues-hacks/151263/
[5]: https://techcrunch.com/2019/07/02/smart-home-hub-flaws-unlock-doors/
[6]: https://threatpost.com/smart-lock-turns-out-to-be-not-so-smart-or-secure/146091/
[7]: https://www.theverge.com/2020/2/5/21123491/philips-hue-bulb-hack-hub-firmware-patch-update
[8]: https://threatpost.com/half-iot-devices-vulnerable-severe-attacks/153609/
[9]: https://threatpost.com/?s=iot
[11]: https://www.wired.com/story/notpetya-cyberattack-ukraine-russia-code-crashed-the-world/
[12]: https://www.blackhillsinfosec.com/?s=password
[13]: https://www.zdnet.com/article/ransomware-attacks-weak-passwords-are-now-your-biggest-risk/
Segmentation means separating your devices so that they cannot freely communicate with each other. This may be completely isolating them or only allowing certain traffic but blocking everything else.
How does segmentation help combat the issues outlined above? The first thing to realize is that no one is perfect. Even if you are security conscious and actively work to fix issues, there are always going to be security vulnerabilities and weaknesses.
Once we realize that we can’t be perfect, the idea of having different layers of security and practicing defense in depth starts making sense.
https://en.wikipedia.org/wiki/Defense_in_depth_(computing)
You likely already have some layers implemented.
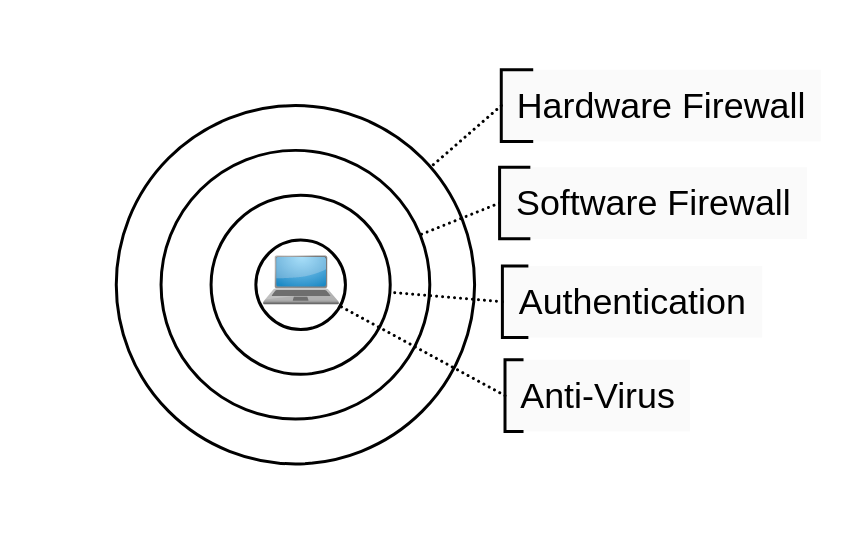
Each of these layers is fallible, but adding more layers makes it harder and harder for an attacker to craft an exploit path that bypasses all of them. They can also limit the damage should one layer be compromised. For instance, say an attacker somehow broke through your edge firewall. Your security layers could prevent or delay further compromise into other devices. Network segmentation is an excellent layer to add to your defense in depth strategy.
You can think of segmentation on a linear scale.
On one end of the scale, every device is on the same network. This is the same as no segmentation, but everything is interoperable (including malware). You don’t need instructions on setting this up because it is the default in every networking device on the planet. This is like a bowl of candy where every piece can freely move around and touch all the others.

On the other end of the scale, every device is completely isolated from each other. This is similar to giving every device a public IP address and making it available on the internet. This isn’t as crazy as it sounds as IPv6 makes this completely possible and it forces you to treat everything as untrusted. Everything has firewall rules only allowing certain services to be accessed. The services that are accessible enforce authentication and encryption (likely SSO and TLS). This is similar to a box of chocolate where every piece is isolated from the others.

Notably Google has implemented this in what they call BeyondCorp.
https://cloud.google.com/beyondcorp
https://security.googleblog.com/2019/06/how-google-adopted-beyondcorp.html
https://thenewstack.io/beyondcorp-google-ditched-virtual-private-networking-internal-applications/
Google’s BeyondCorp has research papers for guidance and solutions to craft your own implementation, provided you use Google’s cloud for everything.
Cloudflare created a product that operates on a similar idea but can be used anywhere, rather than requiring you to migrate everything into a cloud environment. This is a paid product, but the free tier may well work for home networks.
https://blog.cloudflare.com/introducing-cloudflare-access/
https://blog.cloudflare.com/cloudflare-access-now-teams-of-any-size-can-turn-off-their-vpn/
https://teams.cloudflare.com/access/index.html
As I mentioned, network segmentation is a scale. This post will fall somewhere in the middle between these extremes. Keeping with the candy analogies, our goal is to group similar pieces together into separate containers.

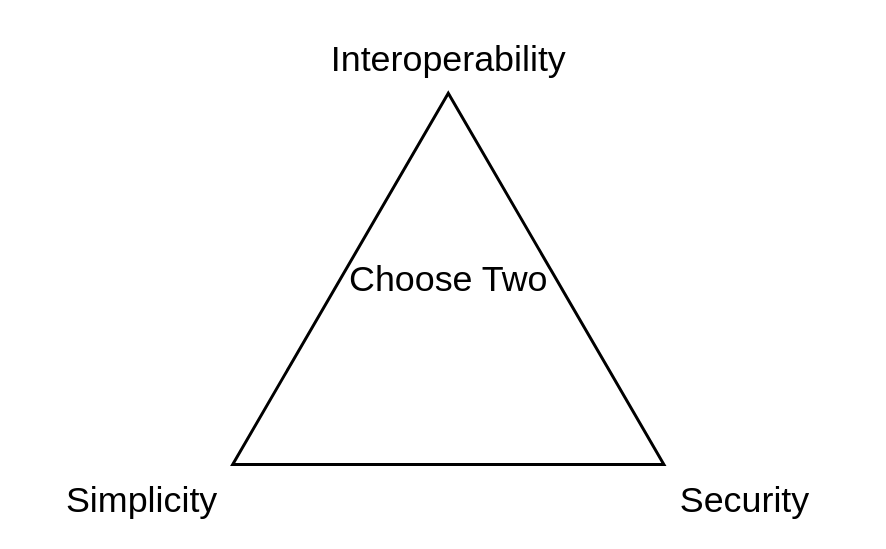
The challenge is to determine the best balance between simplicity, interoperability, and security for you.
In order to get segmentation, you need your packets to traverse a device that can apply some sort of filtering. Much of my confusion when setting up my own network stemmed from the fact that this happens at different layers of the OSI model, with different concepts overlapping or working together. If these concepts are new to you, see the “Terminology” section of my previous posts:
https://www.blackhillsinfosec.com/home-network-design-part-1


This doesn’t even cover all the available options. In addition, there is wireless client isolation, virtual routing and forwarding (VRF), and along with others that I don’t even know about. Finding the right combination of these concepts is a balance between your configuration needs, your available equipment, and your throughput requirements.
What I have above should get you through this post but if you are interested, here are some further resources:
Devices on the same network segment will be able to talk to each other freely with no (network) firewall restrictions, or potentially only the ACLs which your managed switch can enforce. Additionally, broadcast and multicast traffic will be available to all the devices on the segment. Whereas, devices on different segments can talk to each other using unicast traffic within the bounds of router routes and firewall rules.
If you are security-minded (a likely assumption since you’re reading this blog) then you might be tempted to isolate each of your devices and open firewall rules one by one as needed. Or to create a multitude of segments with a few devices in each. This is a decent approach if you have the resources and time to dedicate to this. But I’ll give you the benefit of my experience as to why I think simpler is better. As you get more complex, you increase the setup and maintenance burden. Not only does this take more time and energy, but you also run the risk of losing the security benefits you were after due to creating something more complex than what you currently understand.
There is a reason this post is written in 2020 while part one of this series was in 2017. After I wrote part one I grouped my 21 devices into 10 different types, created a spreadsheet, and assigned them into 8 segments. Even then I realized this was too many and ended up implementing 6 segments. I spent too much time trying to get devices to work together, pruning and merging certain segments over time in frustration.
The final straw was after I had visitors connected to my guest wireless network and noticed that the dynamic IP addresses they had gotten didn’t look right. I investigated and discovered that somewhere along the way I had completely blown the separation I thought I had between my home devices and guest devices. At this point, I decided to tear everything down and start from scratch: to build something up that I could fully understand rather than trying to patch up a design that was overly complex to begin with.
I came up with two ways to approach network segmentation:
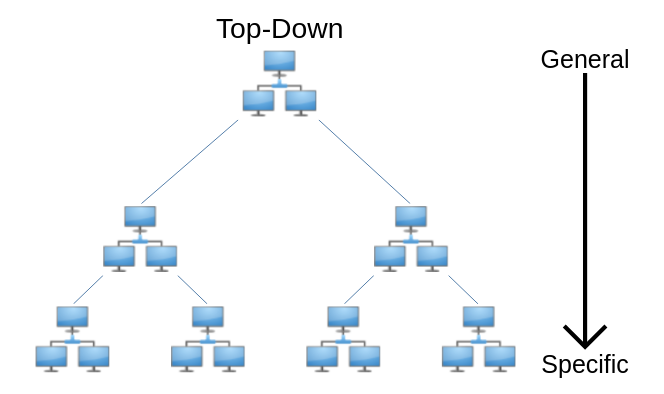
You will likely find a hybrid of the two approaches most useful. At the end of the top-down approach you can use the bottom-approach to continue splitting up your biggest groups and help develop firewall rules. And if you start with the bottom-up approach, you will still likely want to make some high-level group decisions like splitting off your work and guest segments.
The primary reason we are implementing network segmentation is for security. It is easy to get lost in the weeds so one piece of advice is to keep the end goal of compartmentalizing services and data in mind.
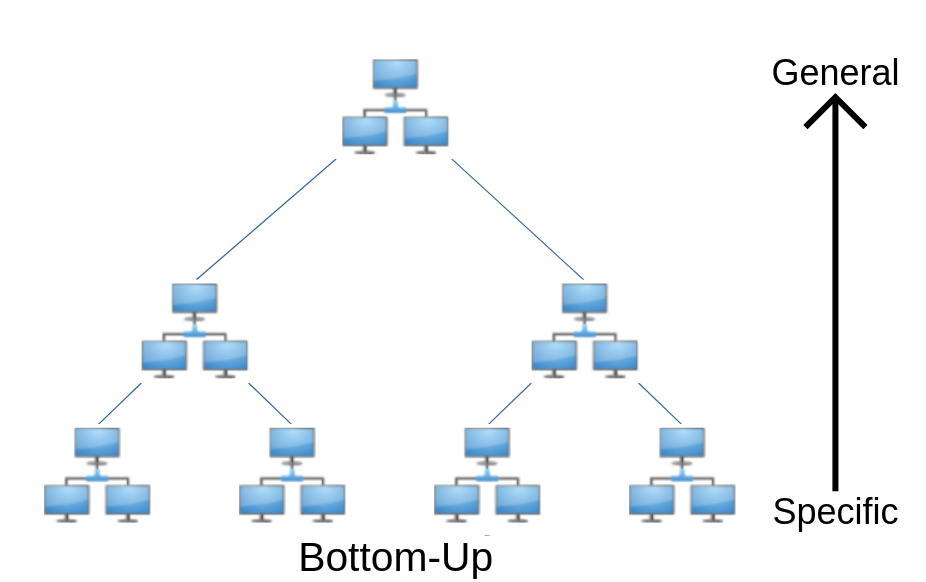
Start with all of your devices in one group and identify groups to break out based on your needs. It is called top-down because you are going from general (one group) to specific (multiple groups). This is the approach I took most recently and ended up with a network that was simpler to configure and simpler to manage. I recommend taking this approach to start with.
You can start with these segments, or you can divide them up further if you can easily identify additional groups of devices. For instance, you might decide that you have several Home devices that only need internet access and nothing else. You could choose to connect these to your Guest segment, or you could create a separate segment called Internet Only.
This approach is meant for simplicity and if you start getting too granular you will benefit from reading through the considerations needed for the bottom-up approach.
Let’s walk through a real-world example where the primary goals are to separate work devices from home devices and provide a guest network.
You can do this a number of ways. I’ll use a spreadsheet, but you can use pen and paper, lists in a document, or a kanban (e.g. Trello) board.
| Device | Home | Work | Guest |
| NAS | x | ||
| Desktop | x | ||
| ThinkPad | x | ||
| MacBook 13″ | x | ||
| MacBook 15″ | x | ||
| Surface | x | ||
| iPhone 8 | x | ||
| Pixel 3 | x | ||
| Galaxy S4 | x | ||
| iPhone SE | x | ||
| Kindle Fire | x | ||
| Xbox One | x | ||
| Shield TV | x | ||
| Brother Printer | x | ||
| HD HomeRun | x |
In this case, I’m reserving the Guest group for anyone who visits my house and brings a phone or laptop of their own. If I get any additional work devices in the future, those will also go in the Workgroup.
I could take this further if I wanted to. Let’s say that some of my devices don’t need access to anything local and that they only ever talk to the internet. I’ve also decided to put my home server into its own group.
| Device | Home | Work | Server | Internet Only | Guest |
| NAS | x | ||||
| Desktop | x | ||||
| ThinkPad | x | ||||
| MacBook 13″ | x | ||||
| MacBook 15″ | x | ||||
| Surface | x | ||||
| iPhone 8 | x | ||||
| Pixel 3 | x | ||||
| Galaxy S4 | x | ||||
| iPhone SE | x | ||||
| Kindle Fire | x | ||||
| Xbox One | x | ||||
| Android TV | x | ||||
| Brother Printer | x | ||||
| HD HomeRun | x |
Remember that we have several tools at our disposal to limit traffic:
If I keep this in mind, I can start seeing that I’ll need to put in firewall rules to allow each group access to certain services on my home server. While I could consider connecting my Internet Only devices to my Guest network and implement wireless client isolation, I would prefer to keep them separate. Sharing the network password with other devices introduces a risk of eavesdropping. Furthermore, Windows 10 has been known to share wireless credentials with the user’s contact list, meaning your guest wireless network key could make it into the hands of your friends’ friends, who you do not know.
Start with each of your devices in its own group. You will have as many groups as you have devices. Then start grouping devices together based on specific needs until you can no longer justify merging groups together. I took the bottom-up approach during my first attempt at segmenting my network. My advice if you decide to take this approach is:
My steps for the bottom-up approach are:
Printers, Chromecasts, and home automation devices often use multicast traffic to perform service auto-discovery, specifically, multicast DNS (mDNS), though other multicast-based protocols are sometimes used. Multicast traffic does not cross network segments (technically broadcast domains) without extra configuration (IGMP) and the multicast used by mDNS requires a repeater service in order to cross network segments.
For example, I have a network TV tuner that requires an app to connect and watch TV. The app will automatically detect the tuner with no way to manually enter its IP address. It relies on multicast traffic which means I have to keep it on the same network as all the devices I expect to use it with. Other examples of devices you might run into are screen mirroring (e.g. Chromecast), speakers (e.g. Sonos), file shares (e.g. Apple Time Capsule), and printing.
Some devices may appear to use auto-discovery but in reality, use a cloud service to facilitate discovery and management. If you’re not sure if your device relies on local auto-discovery, disconnect your home’s internet connection and try to locate the device in your client application (you may have to remove it first if it was already saved). If it finds it and can connect there’s a good chance it is using some form of auto-discovery. You can also fire up Wireshark and look for mDNS packets (filter: mdns) or use a tool that speaks mDNS to query for services on your network.
In this post, I am choosing the simpler route that requires multicast devices to be on the same network segment, but at the end are some options if you’d like to research a different solution for your specific network setup.
You can skip this approach if you’re happy with the top-down exercise. But the bottom-up approach can help you create further segmentation and gain a more intimate knowledge of your network devices and services and how they interact, which will help you when it comes time to create firewall rules.
Again, I’ll use a spreadsheet but you can do this with pen and paper, lists in a document, or a kanban (e.g. Trello) board.
| Device | Server | Auto-discovery |
| NAS | x | |
| Desktop | ||
| ThinkPad | ||
| MacBook 13″ | ||
| MacBook 15″ | ||
| Surface | ||
| iPhone 8 | ||
| Pixel 3 | ||
| Galaxy S4 | ||
| iPhone SE | ||
| Kindle Fire | ||
| Xbox One | ||
| Shield TV | x | x |
| Brother Printer | x | |
| HD HomeRun | x | x |
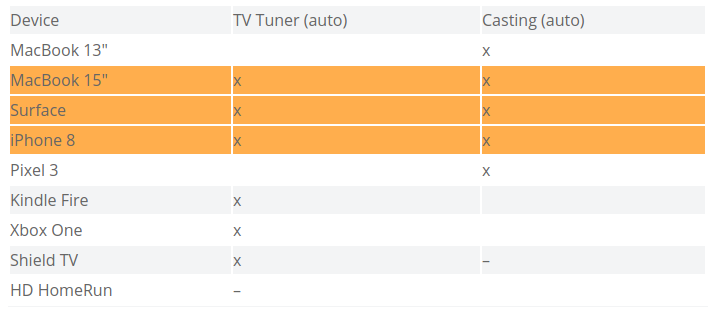
In this case, I have 4 devices which are classified as servers on my home network. Of these, only 2 have auto-discovery as a mandatory feature. Auto-discovery would be nice for adding printers, but considering I can manually add the location of a printer and once it’s set up I don’t have to worry about it again I’m fine neutering the auto-discovery feature.
Next, we’re going to expand our table. For every server you marked, make a new column for each service that needs to run. Pay attention here as you might have multiple services hosted on the same system. For instance, my NAS hosts a media server, a fileshare, and a DNS server from the same server so I will make a new column for each of these services. For any services which require auto-discovery, mark the column with (auto).
Here’s what the table looks like now.
| Device | Server | Auto-Discovery | Media | Fileshare | DNS | Printing | TV Tuner (auto) | Casting (auto) |
| NAS | x | |||||||
| Desktop | ||||||||
| ThinkPad | ||||||||
| MacBook 13″ | ||||||||
| MacBook 15″ | ||||||||
| Surface | ||||||||
| iPhone 8 | ||||||||
| Pixel 3 | ||||||||
| Galaxy S4 | ||||||||
| iPhone SE | ||||||||
| Kindle Fire | ||||||||
| Xbox One | ||||||||
| Shield TV | x | x | ||||||
| Brother Printer | x | |||||||
| HD HomeRun | x | x |
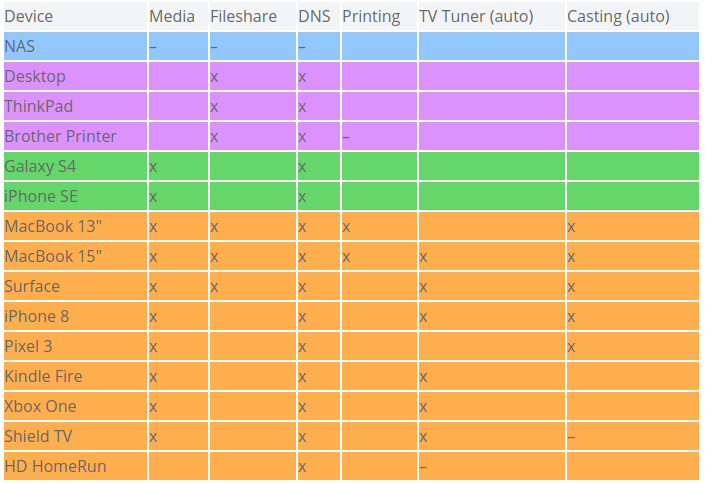
Next, go through each service and mark which devices will require access to that service. I used dashes to indicate the server hosting the service.
| Device | Media | Fileshare | DNS | Printing | TV Tuner (auto) | Casting (auto) |
| NAS | – | – | – | |||
| Desktop | x | x | ||||
| ThinkPad | x | x | ||||
| MacBook 13″ | x | x | x | x | x | |
| MacBook 15″ | x | x | x | x | x | x |
| Surface | x | x | x | x | x | |
| iPhone 8 | x | x | x | x | ||
| Pixel 3 | x | x | x | |||
| Galaxy S4 | x | x | ||||
| iPhone SE | x | x | ||||
| Kindle Fire | x | x | x | |||
| Xbox One | x | x | x | |||
| Shield TV | x | x | x | – | ||
| Brother Printer | x | x | – | |||
| HD HomeRun | x | – |
We won’t necessarily use all these columns to determine what groups to put systems in. But they will come in handy when creating firewall rules later. The columns we do care about are the auto-discovery services since those will need to be on the same segment to function correctly. Unless you use an mDNS repeater (described earlier in this article) then any rows with marks in multiple auto-discovery columns means those services will have to be on the same segment.
Here’s what I mean from the table above:
Even though there are several devices that only need access to one of the services and not the other, the orange highlighted devices (MacBook 15″, Surface, iPhone 8) need access to both services requiring auto-discovery. This means that the TV Tuner and Casting services (served by the Shield TV and HD HomeRun) will need to be on the same network segment along with those client devices. And that means that any other device that needs access to only one of those services will be on that segment as well. In the event that you have some auto-discovery services that do not have overlapping clients, congratulations! You can put these each in their own network segments and keep their respective clients isolated from each other.
At this point we have one network segment for sure that contains all the aforementioned auto-discovery related devices. Since every other service required is unicast we could technically put each of the remaining devices in their own isolated segment and simply manage routes and firewall rules between each of them. This would offer the greatest security in theory. But in practice, this is likely too complex and time-consuming to be worth it. This is why I advised to keep going an extra step and see which devices make sense to group together next.
In the table below, you can see how I’ve rearranged and grouped devices based on similarities in services they require access to. This would simplify firewall configuration as instead of having to require rules for individual devices, I could instead configure firewall rules for an entire segment and any devices in that segment which require access to a certain service goes in that segment. For example, below I could have a “Fileshare” segment and a separate “Media” segment and configure the firewall rules accordingly.
While this is a good exercise to inform firewall rules, it would be a mistake to stop here. Looking at my groups I can see that I still need to have my ThinkPad work machine isolated which means it can’t go on the same segment as the Desktop and Printer. Furthermore, I think I’d like to have the printer isolated in its own segment. Printers aren’t known for having the best security and by putting in a segment by itself I could implement firewall rules that let all other segments reach into the print spooling port but prevent the printer from reaching out to any of my other devices (save for the DNS and Fileshare services it needs). On the other hand, I’m just fine with putting the Galaxy S4 and iPhone SE together in the same segment and creating separate segments for each of them would be overkill.
There are a number of reasons you may want to allow devices to communicate across segments. One scenario is having a separate guest network but you still want to give them access to specific services on a different segment.
First, a warning: you don’t know if the devices your guests bring over are already infected with malware or what they will do once connected to your network. Letting them connect to any of your own devices is a risk. That said, here are some options for dealing with these issues.
Once you have a plan for which devices to segment from each other, you’ll need to start thinking about implementation. You’ll need to create an inventory of networking gear you already have and what capabilities it has.
At the minimum you’ll need:
I gave some recommendations on hardware in Part 1 of this series.
I’m planning at least one more post in this series where I will cover how I implemented the segmentation with my own hardware. I have Mikrotik devices so my configuration will be specific to them, though the concepts should be broadly applicable.
If you’re anxious to get going on your own, here are some resources to get you on the right path.
Ready to learn more?
Level up your skills with affordable classes from Antisyphon!
Available live/virtual and on-demand

此内容由惯性聚合(RSS阅读器)自动聚合整理,仅供阅读参考。 原文来自 — 版权归原作者所有。