惯性聚合 高效追踪和阅读你感兴趣的博客、新闻、科技资讯
阅读原文 在惯性聚合中打开

推荐订阅源

H
Heimdal Security Blog
小众软件
小众软件
钛媒体:引领未来商业与生活新知
钛媒体:引领未来商业与生活新知
罗磊的独立博客
Google DeepMind News
大猫的无限游戏
大猫的无限游戏
奇客Solidot–传递最新科技情报
奇客Solidot–传递最新科技情报
Hugging Face - Blog
Hugging Face - Blog
阮一峰的网络日志
阮一峰的网络日志
A
About on SuperTechFans
宝玉的分享
宝玉的分享
博客园 - 聂微东
月光博客
月光博客
Cyberwarzone
Cyberwarzone
Microsoft Security Blog
V
Visual Studio Blog
Project Zero
Project Zero
T
Tor Project blog
freeCodeCamp Programming Tutorials: Python, JavaScript, Git & More
L
LINUX DO - 最新话题
博客园 - 叶小钗
Recent Commits to openclaw:main
Attack and Defense Labs
Spread Privacy
Spread Privacy
Forbes - Security
Forbes - Security
Simon Willison's Weblog
N
Netflix TechBlog - Medium
P
Proofpoint News Feed
Engineering at Meta
Engineering at Meta
Hacker News: Ask HN
Hacker News: Ask HN
I
InfoQ
M
MIT News - Artificial intelligence
AI
AI
博客园 - 三生石上(FineUI控件)
W
WeLiveSecurity
C
Check Point Blog
The Hacker News
The Hacker News
C
Cyber Attacks, Cyber Crime and Cyber Security
Application and Cybersecurity Blog
T
Tenable Blog
让小产品的独立变现更简单 - ezindie.com
Threat Intelligence Blog | Flashpoint
The Cloudflare Blog
Blog — PlanetScale
Blog — PlanetScale
美团技术团队
D
Darknet – Hacking Tools, Hacker News & Cyber Security
GbyAI
GbyAI
Hacker News - Newest:
Hacker News - Newest: "LLM"
腾讯CDC
K
Kaspersky official blog

Black Hills Information Security, Inc.

Bad Habits: An ANTISOC Operation Same Problem, Different Angles: When Red Team and Blue Team Actually Talk to Each Other How to Identify and Exploit New Vulnerabilities Swapper – A Pure Regex Match/Replace Burp Extension A Practical Guide to BloodHound Data Collection Network Engineering Basics Signed, Trusted, and Abused: Proxy Execution via WebView2 Getting Started In Pentesting – Advice From The BHIS Pentest Lead Cloud Security: Tips and Resources for Securing the Cloud Lessons From A Chatbot Incident How to Lead Effective Tabletops Understanding GRC: How to Navigate Risks and Compliance Standards The “P” in PAM is for Persistence: Linux Persistence Technique Malware Analysis: How to Analyze and Understand Malware OSINT: How to Find, Use, and Control Open-Source Intelligence What to Do with Your First Home Lab When the SOC Goes to Deadwood: A Night to Remember Social Engineering and Microsoft SSPR: The Road to Pwnage is Paved with Good Intentions Common Cyber Threats Finding the Right Penetration Testing Company Deceptive-Auditing: An Active Directory Honeypots Tool The Curious Case of the Comburglar How to Set Smart Goals (That Actually Work For You) Inside the BHIS SOC: A Conversation with Hayden Covington Abusing Delegation with Impacket (Part 3): Resource-Based Constrained Delegation Why You Got Hacked – 2025 Super Edition Abusing Delegation with Impacket (Part 2): Constrained Delegation Abusing Delegation with Impacket (Part 1): Unconstrained Delegation GoSpoof – Turning Attacks into Intel Model Context Protocol (MCP) Bypassing WAFs Using Oversized Requests Getting Started with AI Hacking Part 2: Prompt Injection Wrangling Windows Event Logs with Hayabusa & SOF-ELK (Part 2) DomCat: A Domain Categorization Tool Wrangling Windows Event Logs with Hayabusa & SOF-ELK (Part 1) Microsoft Store and WinGet: Security Risks for Corporate Environments Default Web Content MailFail Commonly Abused Administrative Utilities: A Hidden Risk to Enterprise Security Stop Spoofing Yourself! Disabling M365 Direct Send Bypassing CSP with JSONP: Introducing JSONPeek and CSP B Gone Offensive Tooling Cheatsheets: An Infosec Survival Guide Resource DNS Triage Cheatsheet GraphRunner Cheatsheet Burp Suite Cheatsheet Impacket Cheatsheet Wireshark Cheatsheet Hashcat Cheatsheet EyeWitness Cheatsheet Nmap Cheatsheet Netcat (nc) Cheatsheet Hunt for Weak Spots in Your Wireless Network with Airodump-ng from the Aircrack-ng Suite Detecting ADCS Privilege Escalation Vulnerability Scanning with Nmap Getting Started with NetExec: Streamlining Network Discovery and Access How to Use Dirsearch Augmenting Penetration Testing Methodology with Artificial Intelligence – Part 3: Arcanum Cyber Security Bot How to Design and Execute Effective Social Engineering Attacks by Phone Abusing S4U2Self for Active Directory Pivoting Why Use a Macro Pad? Espanso: Text Replacement, the Easy Way Caging Copilot: Lessons Learned in LLM Security Augmenting Penetration Testing Methodology with Artificial Intelligence – Part 2: Copilot Augmenting Penetration Testing Methodology with Artificial Intelligence – Part 1: Burpference Intercepting Traffic for Mobile Applications that Bypass the System Proxy How to Root Android Phones Communicating Security to the C-Suite: A Strategic Approach Offline Memory Forensics With Volatility Getting Started with AI Hacking: Part 1 Go-Spoof: A Tool for Cyber Deception How to Test Adversary-in-the-Middle Without Hacking Tools Canary in the Code: Alert()-ing on XSS Exploits How to Hack Wi-Fi with No Wi-Fi Why Your Org Needs a Penetration Test Program Burp Suite Extension: Copy For Light at the End of the Dark Web Wi-Fi Forge: Practice Wi-Fi Security Without Hardware Avoiding Dirty RAGs: Retrieval-Augmented Generation with Ollama and LangChain Gone Phishing: Installing GoPhish and Creating a Campaign 5 Things We Are Going to Continue to Ignore in 2025 John Strand’s 5 Phase Plan For Starting in Computer Security Questions From a Beginner Threat Hunter GRC for Security Managers: From Checklists to Influence AI Large Language Models and Supervised Fine Tuning Attack Tactics 9: Shadow Creds for PrivEsc w/ Kent & Jordan One Active Directory Account Can Be Your Best Early Warning Introduction to Zeek Log Analysis Indecent Exposure: Your Secrets are Showing Creating Burp Extensions: A Beginner’s Guide Pitting AI Against AI: Using PyRIT to Assess Large Language Models (LLMs) The Top Ten List of Why You Got Hacked This Year (2023/2024) ICS Hard Knocks: Mitigations to Scenarios Found in ICS/OT Backdoors & Breaches Intro to Data Analytics Using SQL Finding Access Control Vulnerabilities with Autorize The Detection Engineering Process Cyber Risk Lessons We Can Learn From Hurricane Preparedness Intro to Desktop Application Testing Methodology What Is Penetration Testing? Adversary in the Middle (AitM): Post-Exploitation Pentesting, Threat Hunting, and SOC: An Overview
Using SDR to Build a Trunk Tracker – Police, Fire, and EMS Scanner
BHIS · 2021-05-18 · via Black Hills Information Security, Inc.

Ray Felch //

Introduction 

Recently, I came across an interesting article on using software-defined radio (SDR) to create a Police, Fire, EMS, and Public Safety systems scanner. Viewing a few of these Trunk tracking scanners on Amazon, I quickly discovered that they are not cheap at all. You can spend several hundred dollars on a Trunked Radio tracking scanner; however, we can build one with just two $25 SDR USB dongles. 

How Trunking systems work 

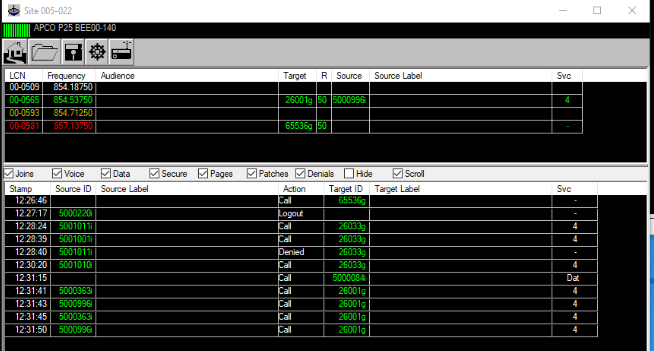
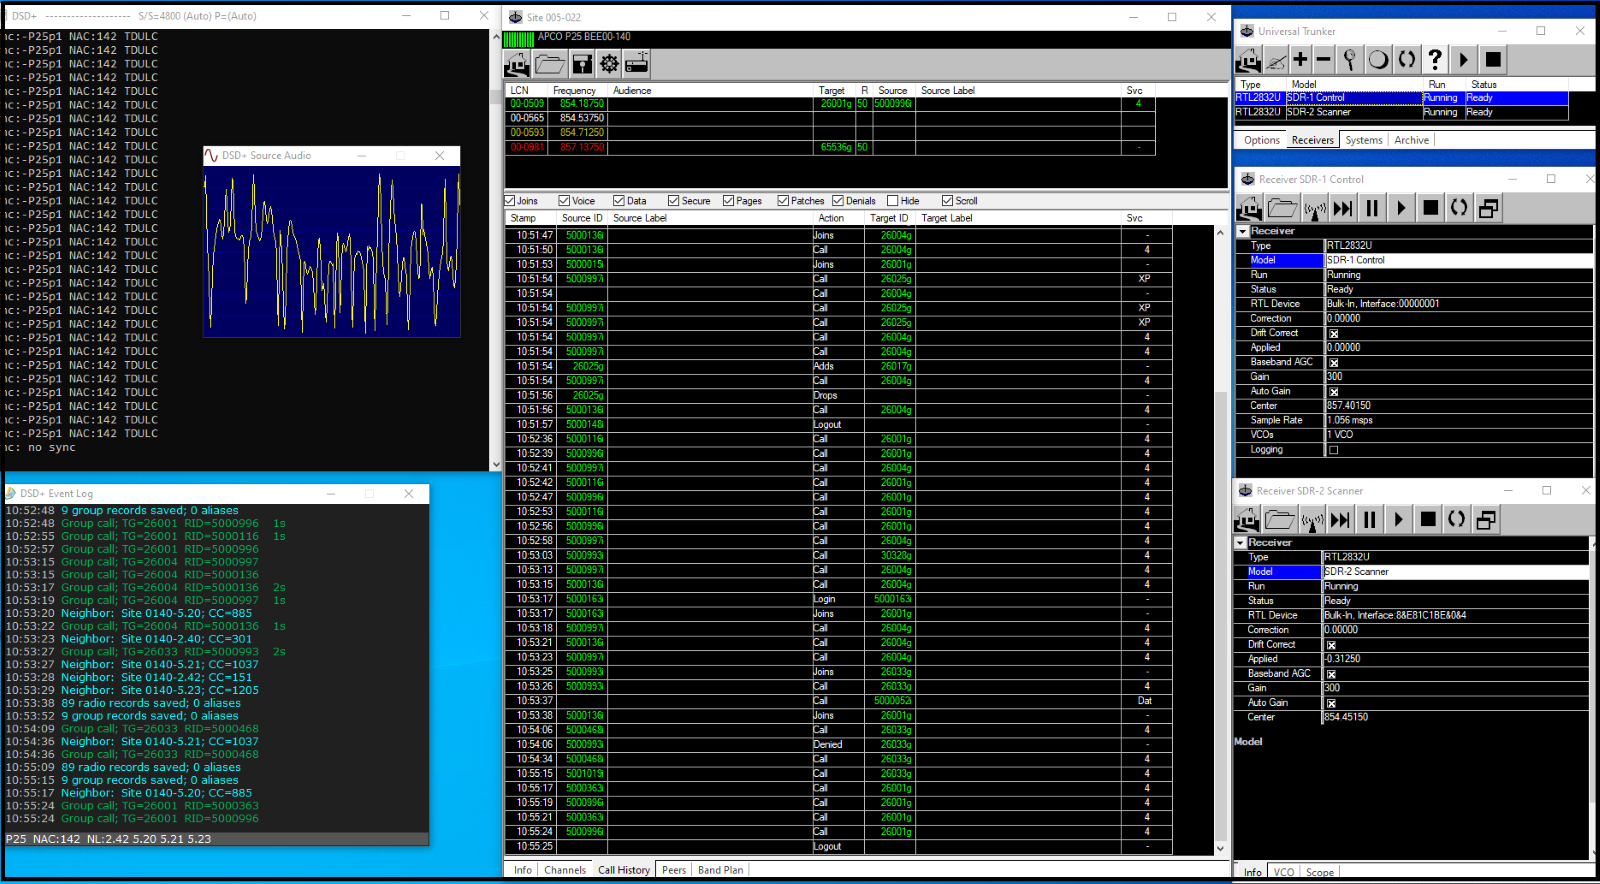
Trunking systems carry an exceptionally large volume of analog and digital radio traffic and are a frequency hopping system. Trunk systems are controlled by computers and broadcast information to all the radios on the network by way of a control channel. In the following diagram, notice that the control channels appear in red.  

The channels that are displayed in green are the allotted frequencies for a given Talkgroup (an assigned group on a trunked radio system). 

Wikipedia defines a talkgroup as follows: 

talkgroup is an assigned group on a trunked radio system. Unlike a conventional radio which assigns users a certain frequency, a trunk system takes several frequencies allocated to the system. Then the control channel coordinates the system so talkgroups can share these frequencies seamlessly. 

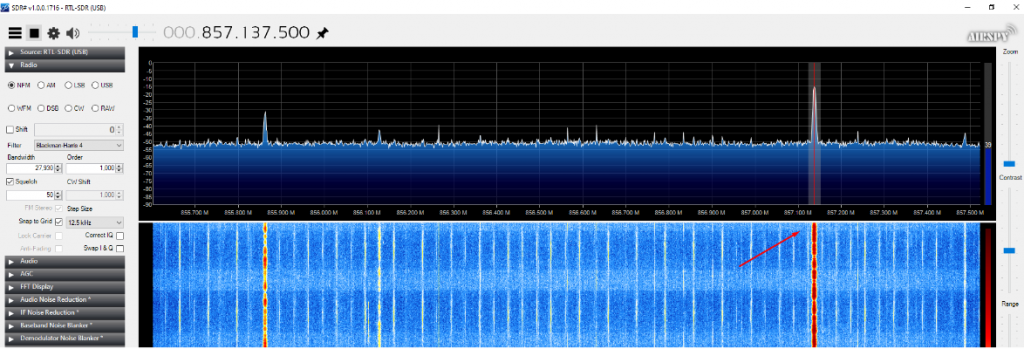
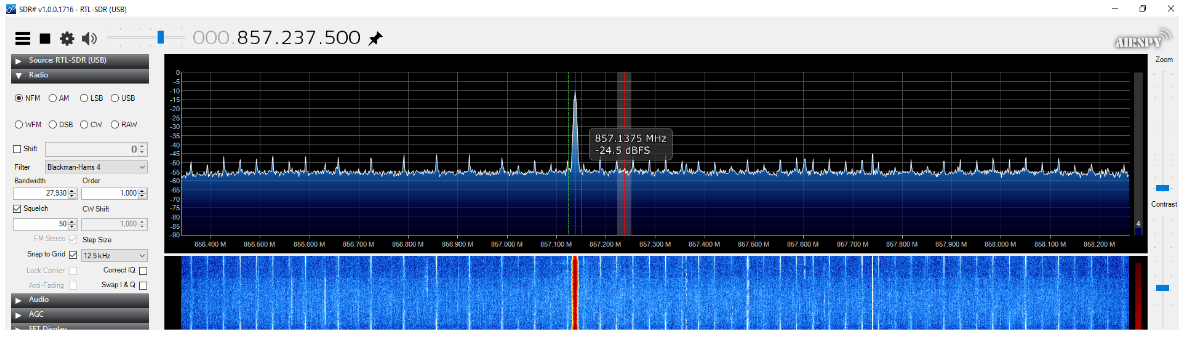
If we were to tune to the control channel frequency using SDR# (software-defined radio software), we would discover the following waterfall. Not only is it visually recognizable, but it also has an incredibly unique (raspy/metallic) digital sound. 

All radios in the talkgroup monitor the control channel to know which frequency to listen to. Virtual channels are created by an admin and assigned talkgroup numbers (listed in the Target column of UniTrunker). 

When the user pushes the PTT (push-to-talk) key, a request is sent to the control computer. The control computer then assigns a frequency, and all radios logged into that talkgroup, switch to that assigned frequency, so they can hear the transmission. 

When the transmission is responded to, this process is repeated and typically a different frequency is assigned for the reply. It becomes apparent that if we were to monitor a single frequency, we would miss most of the radio traffic for a given talkgroup’s system. 

Why the trunking system was created 

Trunking systems provide very efficient use of the radio spectrum. Prior to its implementation, radio frequencies that were assigned were static. An example could be made that a police agency needing a dozen conventional channels, would waste that portion of the spectrum if the channel were idle for any significant amount of time. In the ‘trunked’ system, the officers would be assigned to a talkgroup and not a dedicated channel and share a smaller pool of channels. It is common for greater than 350 talkgroups to share as few as 20 channels. 

Another benefit of a trunking system is multiple sites at separate locations can be linked together. School campuses consisting of multiple buildings in various parts of the city can all be linked. Even cities, states, and provinces can be linked together. My location here in Iowa borders Illinois, so talkgroups for law enforcement, fire, and safety share a common control channel. 

UniTrunker: Trunk Radio decoding software 

UniTrunker is a Trunk Radio decoder that supports Motorola Type II, EDACS, MPT1327, P25 systems and works well with RTL-based SDRs.

To build our SDR-based Trunked Radio scanner, we will need to install UniTrunker, as well as a few other required dependencies.  

Note: When I first attempted to install these programs, I ran into a few problems, mostly due to the order that I installed things. That being the case, I will attempt to present this information in a structured, step-by-step manner and hopefully prevent you from making the same mistakes. 

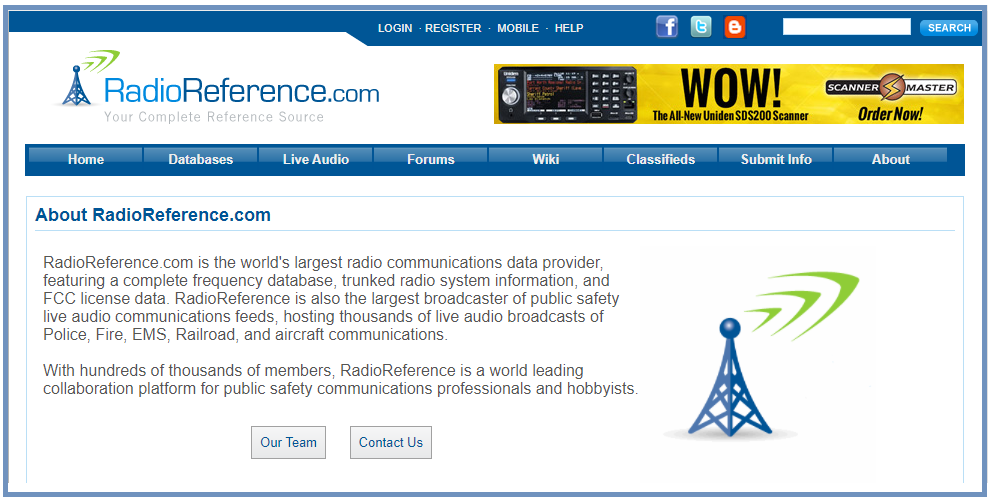
Note: We will be using an extremely popular online site (RadioReference.com) to find the control channels for our location. 

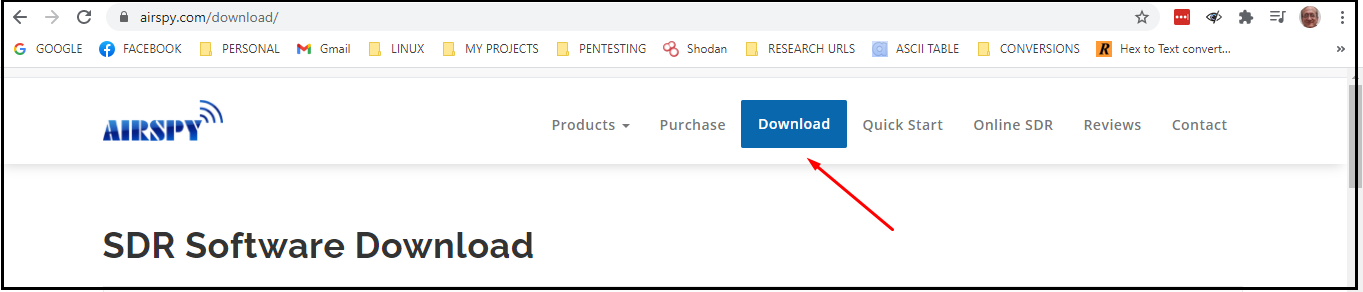
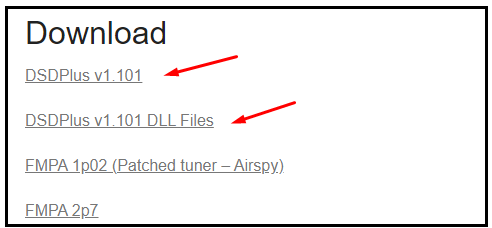
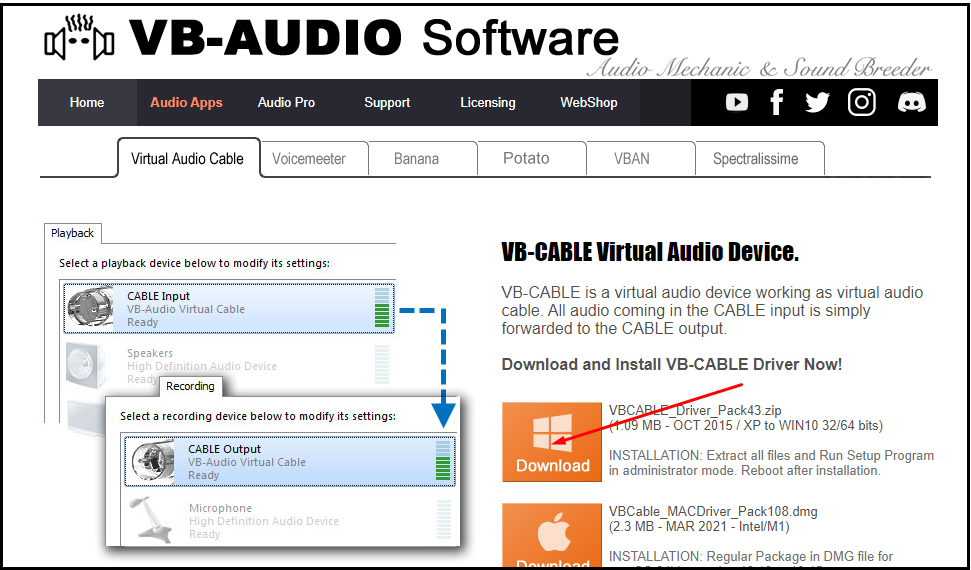
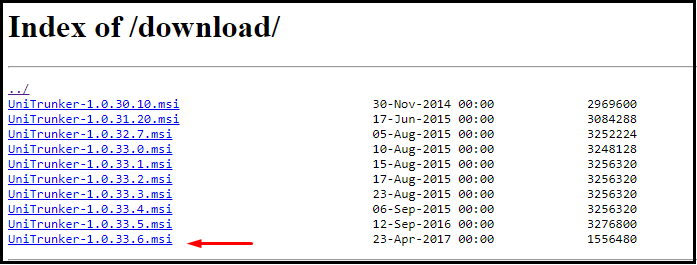
We need to download the following software: 

I will walk you through it. It is not that bad, really! 

  • SDR Sharp 
  • UniTrunker 
  • Virtual Cable 
  • DSDPlus 
SDR Sharp (SDR#): Install procedure 

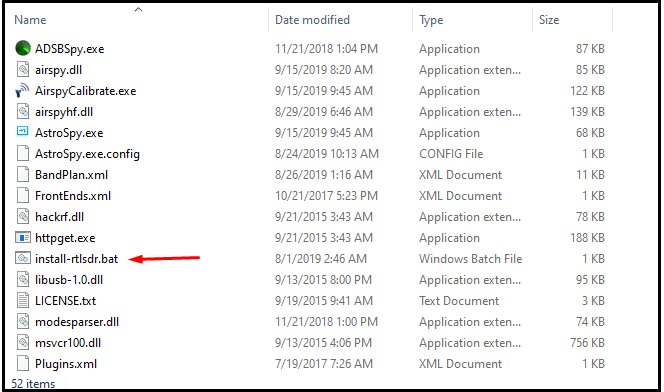
Note: You will not need SDR Sharp to build our UniTrunker tracking radio scanner, however, it will come in handy to ensure the required RTL-SDR drivers and WinUSB drivers have been installed properly. Also, we will be using SDR Sharp to verify that the listed control channel frequency specified is accurate. The Radio Reference group attempts to keep their databases up to date, however sometimes the listed control channels may be outdated or recently changed (slightly shifted).  

SDR Sharp is also a “fun to play with” piece of software. You can tune to frequencies in the FM radio band 88MHZ to 108MHz and find your favorite radio stations for your area! 

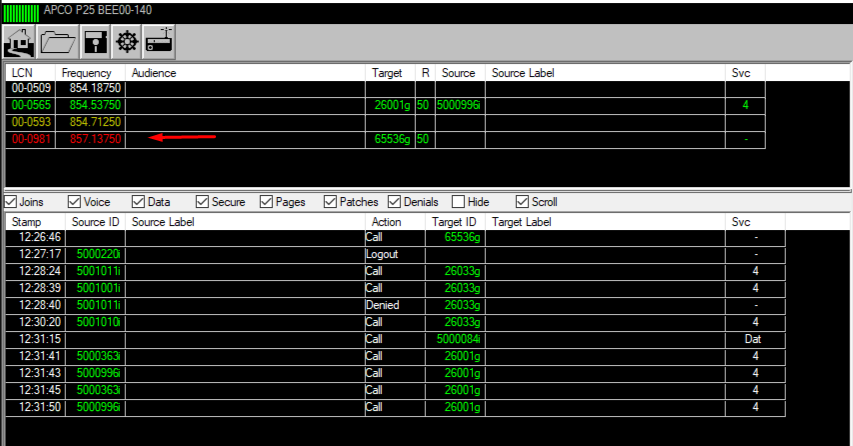
I typically will use SDR Sharp to tune into the listed control channel frequency, to be sure the frequency is accurately listed. I.e. For my location in southeast Iowa, the RACOM Network control channel frequency for my neighboring city of Rock Island, Illinois is displayed as 857.2375MHz. (Control channels are always displayed in red) 

However, checking this with SDR Sharp shows the frequency needs to be 857.1375MHz (shifted down by 100KHz). We will need to remember this frequency when we configure the UniTrunker software later. 

Note: I chose the ‘unskinned’ version of SDR Sharp version for this demo. 

  • Scroll down a few lines and find the link for ‘unskinned SDR#’, click where it says “here.” 
  • Insert the rtl-sdr USB dongle(s) 
  • Download the SDR Sharp zip file 
  • Double-click the zip file and extract the files to a folder of your choice 
  • Navigate to the extracted folder 
  • Execute “install-rtlsdr.bat” (This installs RTL-SDR drivers and writes the file “zadig.exe” to the folder) 
WinUSB driver (using zadig,exe): Install procedure 
  • Right mouse-click on “zadig.exe” and Run as Administrator 
  • Answer “Yes” to “Allow this app to make changes to this device” 
  • Select “Options – List Devices” 
  • Select “Bulk-In, Interface (Interface 0)” 
  • Click “Install Driver” 

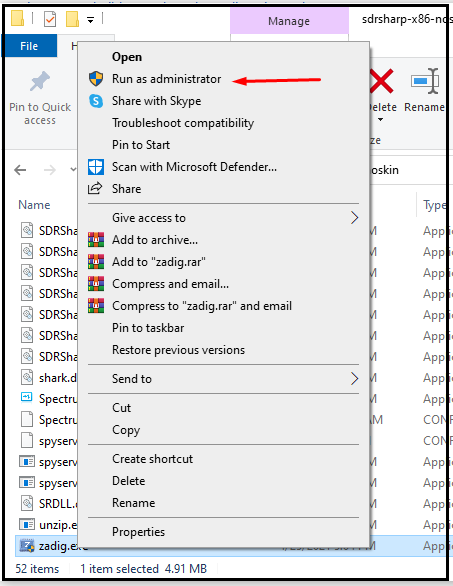
Verify a successful SDR Sharp install by executing “SDRSharp.exe” 

(Don’t forget to select the RTL-SDR under “Devices” after SDR Sharp loads) 

DSDPlus (Digital decoder software): Install procedure 

Visit: https://www.dsdplus.com/download-2/ 

  • Click on DSDPlus v1.101 link 
  • Click on DSDPlus v1.101_DLL_Files 
  • Navigate to /Downloads folder 
  • Right mouse-click on the DSDPlus v1 101 zip file and “extract all” 
  • Right mouse-click on the DSDPlus v1 101 DLL zip file and “extract-all” 
  • Navigate to the DSDPlus DLL extracted folder 
  • Press CTL-A (select all) and move them to the DSDPlus extracted folder 
  • Click on DSDPlus.exe  (to run DSDPlus) 

We will see a few windows pop open, and we now know DSDPlus is up and running. 

Virtual Cable: Install procedure 
  • Navigate to the /Downloads folder 
  • Right mouse-click on the zip file and “extract-all” 
  • Navigate to the VBCABLE_Driver_Pack43 extracted folder 
  • Right mouse-click and Run as Administrator “VBCABLE_Setup_x64.exe” 
  • Click “Install Driver” 
  • When completed, reboot Windows 
After Reboot 

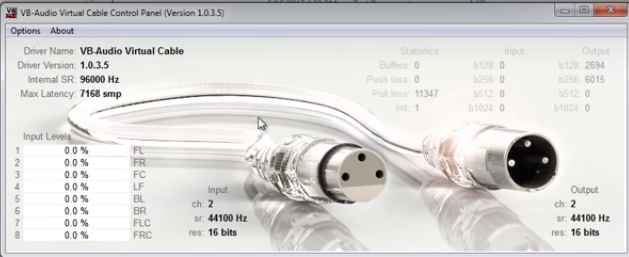
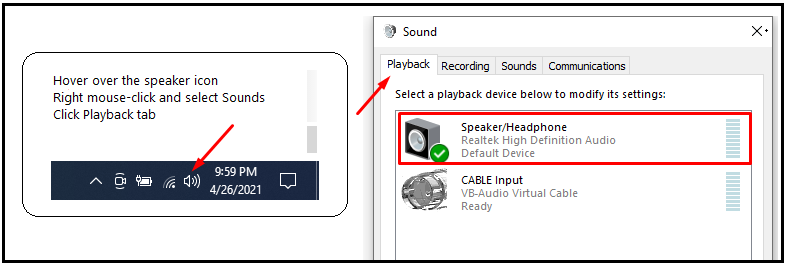
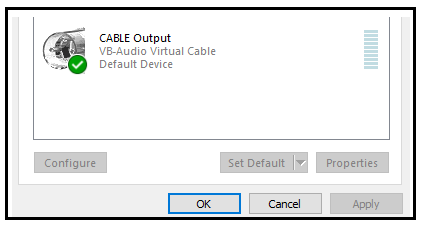
We can quickly verify that VB-Cable is installed properly by clicking “VBCABLE_ControlPanel.exe”.  

We should see the following window open. This indicates a successful install, and we can now close this window. 

Configuring VB Cable 

  • Hover over the speaker icon (bottom right on the task bar) Select Sounds – Playback 
  • Ensure that the speakers are the default for Playback 
  • Click the Recording tab 
  • Left mouse-click (one time) on the VB Cable (to highlight it) 
  • Right mouse-click and select “Set as default” 
  • Click “OK” 

Configure UniTrunker 

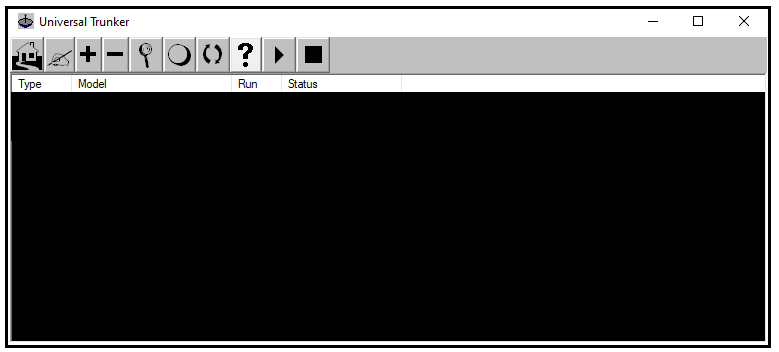
With all the required dependencies now installed, we are ready to install, configure, and run UniTrunker. 

UniTrunker software: Install procedure 
  • Navigate to the /Downloads folder 
  • Double-click on “UniTrunker-1.0.33.6.msi” (to install) 

Info: UniTrunker will be installed to C:/Program Files(x86) 

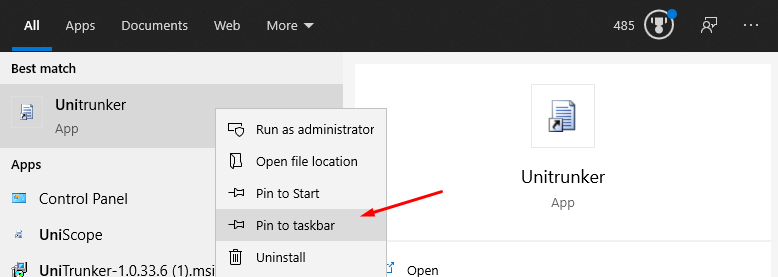
Note: Do not create a shortcut for “uniform.exe” (UniTrunker), instead click the Windows logo, type “unitrunker”, right mouse-click on the app, and select “Pin to taskbar” or optionally “Pin to Start”. 

  • Click the UniTrunker icon on the taskbar 
  • Click “First time installation” 
  • Click the “plus” button to add a receiver (we’ll need to do this twice, once for SDR-1 and then again later for SDR-2 (for now, let us configure SDR-1) 
  • Click the RTL2832 button 
The following is my configuration for both receivers (SDR-1 and SDR-2) 

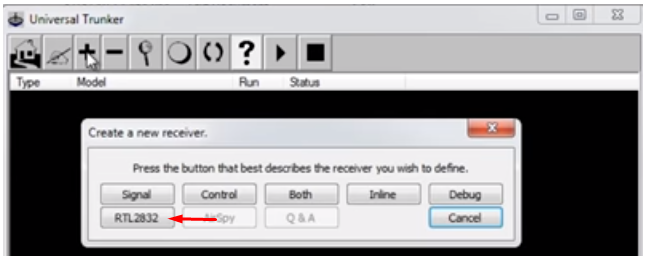
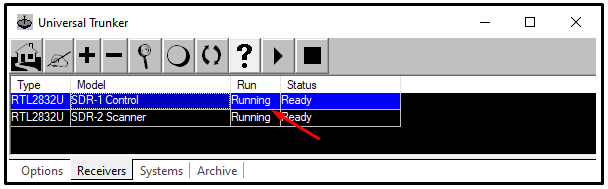
After completing the configuration for receiver #1 (SDR-1), repeat the process by clicking the “plus” button again and selecting RTL2832 for receiver #2 (SDR-2). 

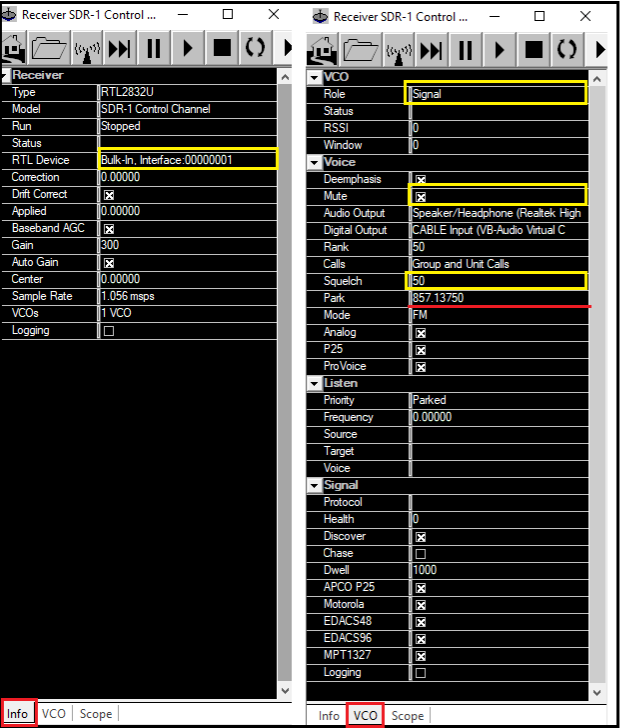
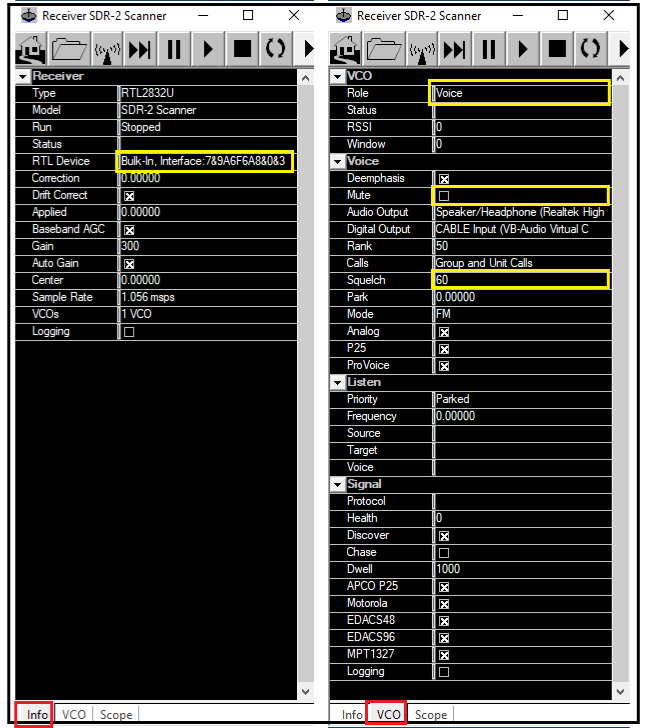
Important: The settings highlighted in yellow are the only differences between the two receivers and it is especially important to enumerate these settings exactly as shown above (The only exception is the name you give the receiver in the Model field. I chose to name the first receiver “SDR-1 Control channel” and the second receiver “SDR-2 Scanner”. You are free to call them anything you like.)  

Also, the “Park” value (frequency) underlined in red (SDR-1 receiver) is set according to my location here in Iowa and it will need to be changed to one of your control channel frequencies (as per the Radio Reference database for your area). 

That is it!  Everything is installed and we are ready to operate our Trunked scanner! 

Ensure that DSDPlus is running and click the Play arrow (Start) on both receivers. You should now see the following in the UniTrunker window, and the scanner should open and be operational. 

Conclusion 

This was a fun project that opened some new avenues for me in the realm of software-defined radio. There are a ton of interesting features to explore, as this is a very robust application! Interestingly, DSDPlus is also an amazing tool that takes care of decoding the digital trunk traffic into something we can hear. 

While researching this project, I discovered that there is quite a bit of information out there regarding UniTrunker, as well as the implementation of other SDR based projects. I even ran across another SDR Trunk tracking scanner application known as “SDR Trunker”, although I have not reviewed it… yet.  


Ready to learn more?

Level up your skills with affordable classes from Antisyphon!

Pay-What-You-Can Training

Available live/virtual and on-demand