
This is the first installment in a series of blogs relating to practical analysis of wireless communications: what they are, how they work, and how they can be attacked. In this post, we are going to walk through setting up the Kismet tool and performing basic analysis of 802.11x traffic.
This section provides background on wireless communications and the electromagnetic spectrum. If you simply want instructions on setting up Kismet, skip to the “Setup” section.
Rather than sending messages via electrical signal going over wires, WIFI, Bluetooth, and other recent technologies utilize waves of various frequencies to transmit information. This transmission relies on digital data being converted into an analogue waveform which will be projected onto the carrier wave using some modulation technique (i.e., Amplitude modulation or Frequency Modulation). The antenna then takes this modulated signal and transmits it out through the airspace.
The WIFI signals we’re talking about today transmit waves in the 2.4GHz and 5.8GHz ranges (“5G” operates at a frequency of 5.8GHz). The image below shows approximately where 2.4 GHz WIFI falls on EMF spectrum.

The above may be a bit misleading as cellphones and 2.4G wireless, as well as microwave ovens, have some overlap; however, it gets the general idea across. 5G wireless would fall just on the right of microwaves and before infrared remote controls.
The next section provides a detailed walkthrough on setting up an adapter and software to view these signals. Then we will move on to interpreting and analyzing the data.
We can see many interesting things while monitoring our surrounding airspace including nearby devices, our neighbors SSIDs, and if we’re lucky, maybe even capturing some 4-way handshakes. You can follow along from the comfort of your own home, or wherever you’d like, provided you are able to acquire the following items.
You will need:
Our setup consists of an ARM-64 Kali instance running in VMWare and a USB-C connected ALFA AWUS036ACH WIFI adapter.

Once you have your Kali machine up and running, you will need to install drivers for the wireless adapter. If you are using the same wireless adapter mentioned above, the following commands should be sufficient.
sudo apt install dkms

git clone https://github.com/aircrack-ng/rtl8812au

cd rtl8812au

sudo make dkms_install

# if you get an error about missing kernel headers, install them

sudo apt install linux-headers-6.6.9-arm64  # your version may differ. The error should tell you which version is requested.

make dkms_install  # again, after headers are installed

make clean  # run if the previous command fails

make

make install
Once you have your Kali machine up and running, you will need to install drivers for the wireless adapter. If you are using the same wireless adapter mentioned above, the following commands should be sufficient.
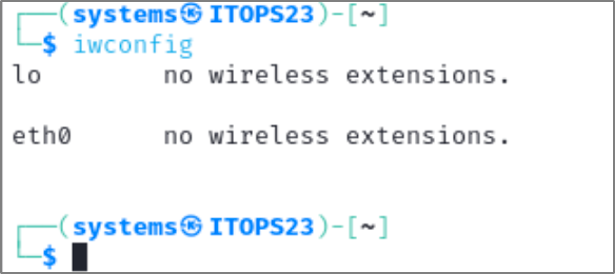
Your machine should now be able to communicate with your wireless adapter. To verify, we can use the utility iwconfig. This utility is used to view and modify parameters of wireless interfaces. In the screenshot below, we only see two interfaces: the loopback, and eth0. This is because we forgot to plug in the adapter.
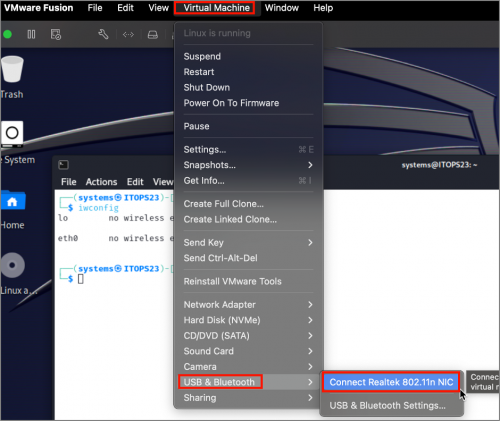
To connect the USB adapter to the virtual machine, go to Virtual Machine -> USB & Bluetooth -> Connect Realtek 802.11 NIC as shown in the screenshot below.
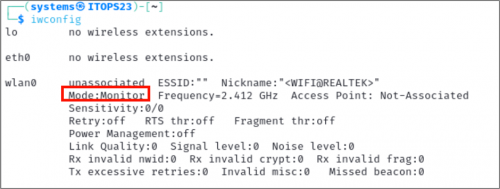
Now, we can run iwconfig again, and we see that Kali recognizes a new wireless interface, wlan0.
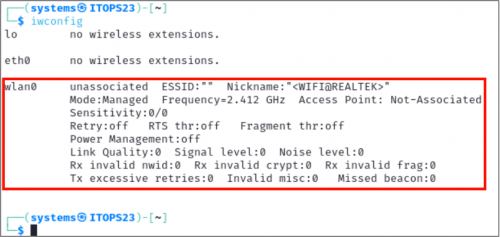
In the screenshot above it can also be seen that the interface is being managed by NetworkManager, a popular network management service which comes pre-installed and will typically take over your WIFI adapter by default. To snoop the airwaves, we need to put the wireless card in Monitor mode. This can be done by issuing the following commands:
(Note that you will need to change the interface name if yours is not wlan0)
sudo ip link set wlan0 down
sudo iw dev wlan1 set type monitor
sudo ip link set wlan0 up
To verify that we successfully put the device in monitor mode, we can simply run iwconfig one more time.
Finally, we are ready to run Kismet and start exploring. If it is not installed on your machine, you can either download it from the GitHub repo or run sudo apt install Kismet. You can verify the install by running which Kismet or Kismet --version.
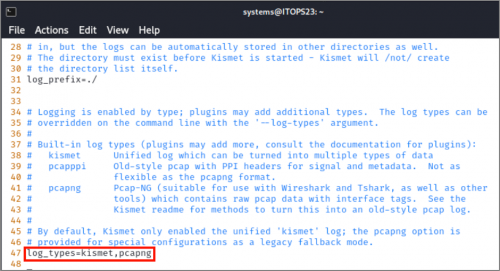
Kismet will save all captured traffic to a Kismet log file. There are various file types available but, by default, it will only capture the Kismet log. This is fine and can be converted to a PCAP later. However, if you’d like, Kismet to also capture a PCAP file while it’s running, edit the config file as shown below.
We are going to edit the default configuration file and add PCAP-NG logging. If you installed Kismet via the apt repository, this will be in the location: /etc/Kismet/Kismet_logging.conf
You can also convert Kismet logs to PCAP-NG files after they’ve been captured using the following command.
Kismetdb_to_pcap --in some-Kismet-log.Kismet --out some-pcap-log.pcapng It is finally time to launch Kismet. We will be running it with the following command.
Kismet -c wlan0 -p ~/log_directory -t output_file This tells Kismet we want to use wlan0 as our data source. If you leave this part out, the program will start, but you will not see any traffic in the interface. In theory, one should be able to select the data source from the web interface, however, this has not always been reliable. The -p flag tells Kismet which directory to write the log files to, and the -t determines what the output file will be titled.
If you still aren’t seeing traffic, try unplugging the adapter and plugging it back in again.
If this is your first time logging in, you will be prompted for credentials. Don’t forget these!
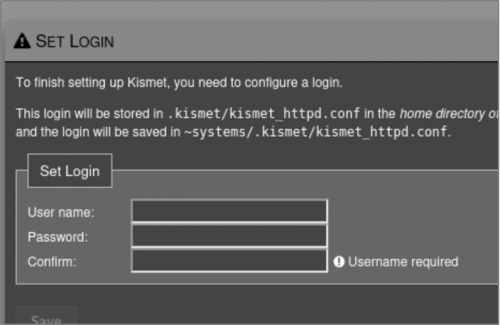
If you do forget your credentials, they can be found in the ~/.Kismet/Kismet_httpd.conf, where ~ is the home directory of the user who installed Kismet.
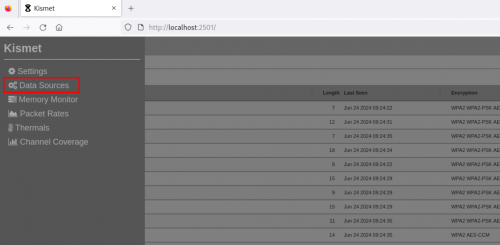
As soon as you launch the Web UI, you should see the data start flooding in. Before we look at the data, let’s have a quick look at how the data collection is actually working. Access the Data Sources tab by expanding the hamburger menu on the top right of the interface.
This next screen shows us which network interface is being used, as well as some basic hardware information. The “Channel Options” listed underneath show how our wireless adapter is ingesting data from the airspace.
To a noob like myself, the “channels” label showing all channels highlighted may make it appear as though we are monitoring the entire airspace at once. With current hardware, this is a physical impossibility. Only a single channel can be monitored at any given time. The second highlight in the screenshot below shows that the channel speed is set to 5 channels per second. This means Kismet is listening on a single channel for 1/5 of a second, moving to the next one, and so on. This results in a very useful but incomplete analysis of the spectrum. With this configuration, Kismet is very likely to see new devices, but less likely to capture data such as complete 4-way handshakes since so little time is spent on each channel.
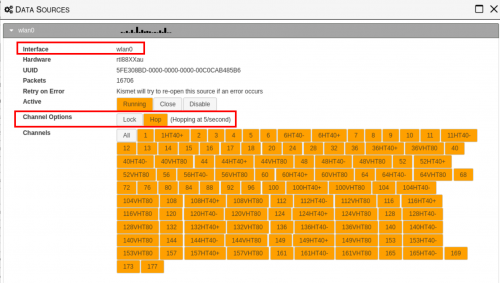
You can change which channel you’re interested in by only selecting those. For example, if you are only interested in data in the 2.4GHz range (WIFI, Bluetooth, Baby Monitors, etc.) You can select channels 1 through 11 and Kismet will hop between these channels only.
On the default page, we are looking at a summary of all devices picked up by Kismet. In my case, I am primarily surrounded by WIFI access points, which can be seen in the screenshot below. The AP names and BSSIDs are redacted, as these pieces of information combined with OSINT tools such as WIGLE1 could likely be used to pinpoint my exact physical location. (OSINT is pretty scary)
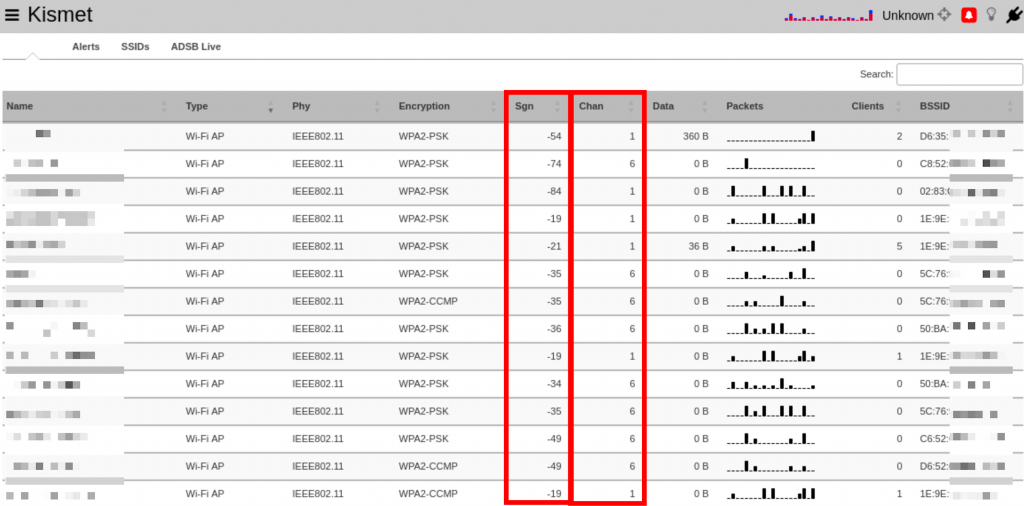
In the next post, when we talk about attacks, data such as the encryption type and number of clients, will be discussed in depth. Here, we will only discuss the two columns highlighted above, each of which can give us some interesting information about the device.
The signal strength column indicated how close the device is to us. The number represents the power level received by our wireless adapter. This is useful for tracking down unknown devices, since, as we bring our receiver closer to the unknown device, the signal strength should get stronger. This nerd rendition of Marco-Polo is not infrequently employed on client sites.
In the same way, if our receiver is not moving, and the signal strength of a device is constantly changing, we can infer that the device is in motion, such as a cellphone or other wireless hotspot.
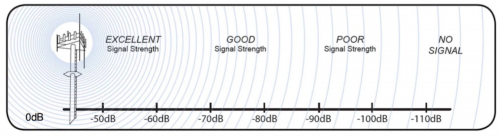
But how far are the devices exactly? Signal strength is measured in dBm (decibels per milliwatt) and typically range from 0dBm to -100dBm. The closer the signal is to 0, the closer you are to the transmitting device. However, in practice, the maximum achievable signal strength is about -30dBm. -90 is approaching the noise floor. Though you may pick up the signal, it is unlikely you would be able to interact with the network in any meaningful way.
The channel tells us which frequency the device is operating on. Some devices may show up twice. For example, a WIFI router that transmits both 2.4 and 5G signals will show up twice, because our receiver picks them up as two different signals.
Clicking on one of the devices can bring up more information about the device as shown in the screenshot below.
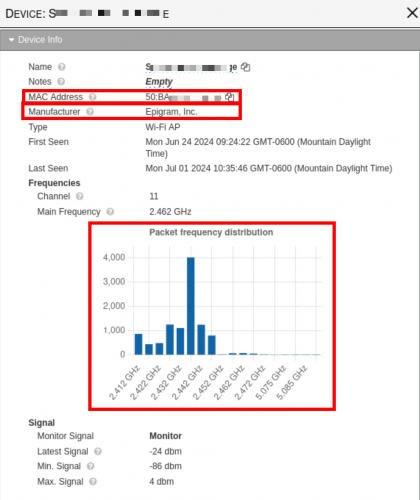
The BSSID for a device is typically the same as the MAC address, hence why both are redacted in screenshots. The MAC address is what Kismet uses to determine the manufacturer of a device. The first 4-6 digits in the MAC address can typically be used to identify the device vendor. One list of known prefixes can be found on GitHub2
You should now have a solid foundation to jump into more advanced wireless analysis. We discussed the electromagnetic spectrum, installed Kismet, and captured wireless signals in real-time. Additionally, we demonstrated how this information can be used to identify and locate wireless devices. In future installments, we will cover how to correlate devices, identify rogue access points, and launch some active attacks against PSK networks.
Ready to learn more?
Level up your skills with affordable classes from Antisyphon!
Available live/virtual and on-demand

此内容由惯性聚合(RSS阅读器)自动聚合整理,仅供阅读参考。 原文来自 — 版权归原作者所有。