前一段时间在Mac上用VSCode的时候,发现VSCodeVim这个插件严重拖慢了我的开发效率。本来用Vim模式难道不应该是提高效率么?问题是在Normal模式下,光标的移动会有肉眼可见的长延时。比如我按着j,等我松开j后,光标还在移动,而且还移动了一会儿。预期的效果应该是按下移动,松开停止。为此我查了一下相关issue,发现跟我一样的情况的人还不少。(不过也有不少人没有这个问题,貌似跟显卡有关系?我的mac是集显的)。
卸载了VSCodeVim之后,光标移动的速度又恢复了正常,不过没有Vim模式的话非常别扭。所以我就开始看看VSCode还有没有其他Vim模式的插件。于是我又试了另外两个插件:vimStyle和amVim。最终我选择了后者。不仅是支持的Vim命令更多,还有就是开发者的维护一直在继续。而且很关键的一点,amVim的光标移动体验就是 如丝般顺滑 !
不过它有个让我很不习惯的地方:不支持:号调起VSCode的Command Line窗口,实现诸如:w保存,:wq退出等常见功能。这些功能在VSCodeVim里是支持的。于是我就在想有没有办法「移植」一下VSCodeVim的功能到amVim来,既能保持光标移动体验顺滑,又能用上Command Line的一些常用命令。所以开启了魔改模式,并在跟开发者的一系列交流后最终我提交的PR被merge了。

本文记录一下我第一次对VSCode插件(修改)开发的过程。
修改插件
开发前的准备
VSCode的插件通常是用TypeScript来写的。如果你需要开发或者修改它,先要拥有TypeScript的开发环境。
1
2
3
| npm install -g typescript
yarn global add typescript
|
通常TypeScript的项目都会用上tslint。所以你也最好全局安装它:
1
2
3
| npm install -g tslint
yarn global add tslint
|
然后打开VSCode,安装一下tslint这个插件,它将通过我们上面安装在系统里的tslint给我们的项目提供代码检查。
修改别人的插件,可以先fork一份别人的代码。也为了之后方便提PR做准备。
然后就可以把插件clone到本地了。比如本文的amVim-for-VSCode。
运行插件
用VSCode打开这个项目,点击左侧的debug可以看到一个launch extension的配置:
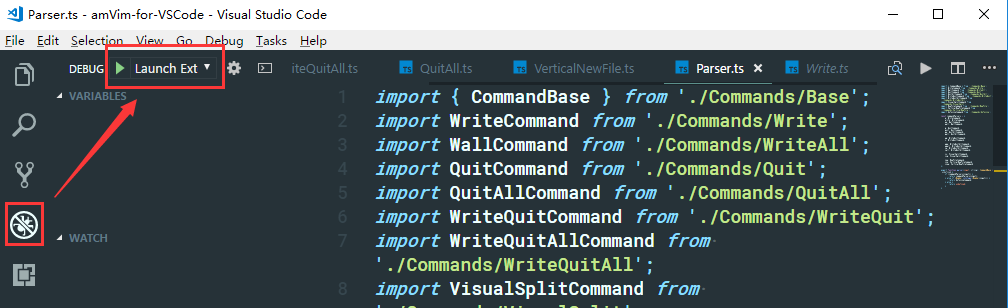
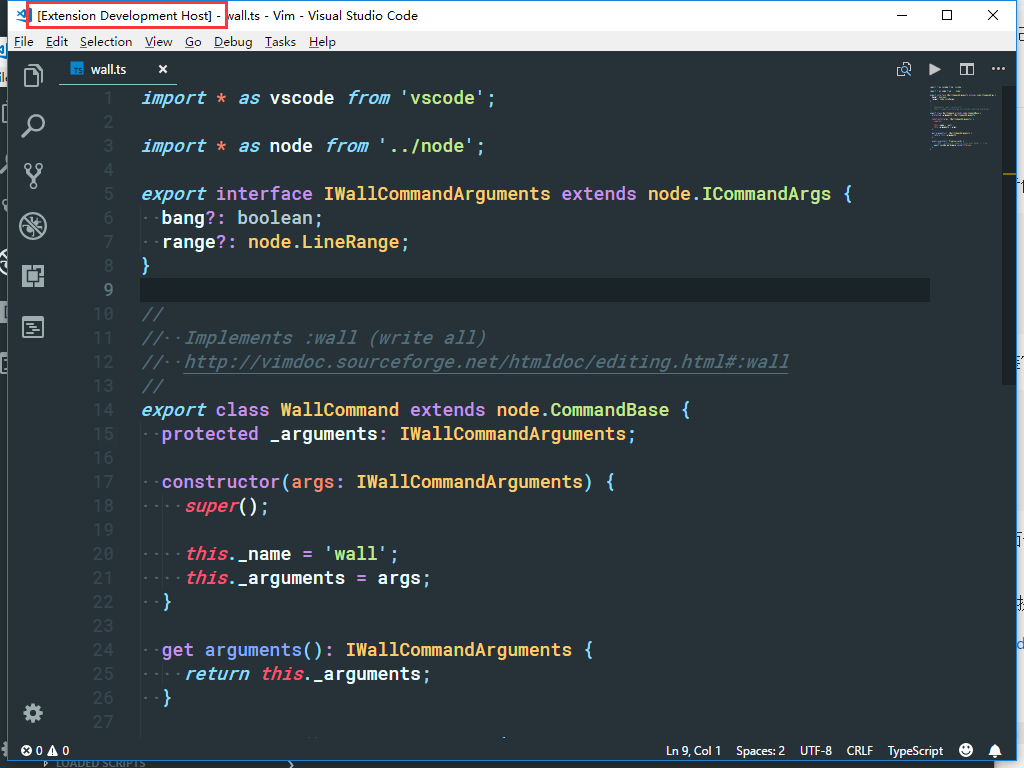
运行它,你会得到另外一个窗口,这个就是可以调试插件功能的窗口了:
改进插件
我的改进源码在这里:https://github.com/Molunerfinn/amVim-for-VSCode 作者合并之后做了一些修改,本文是以我的版本为主。
为了实现VSCodeVim通过:调起VSCode的inputBox效果,我需要翻阅一下VSCodeVim的源代码。
大致效果如下:
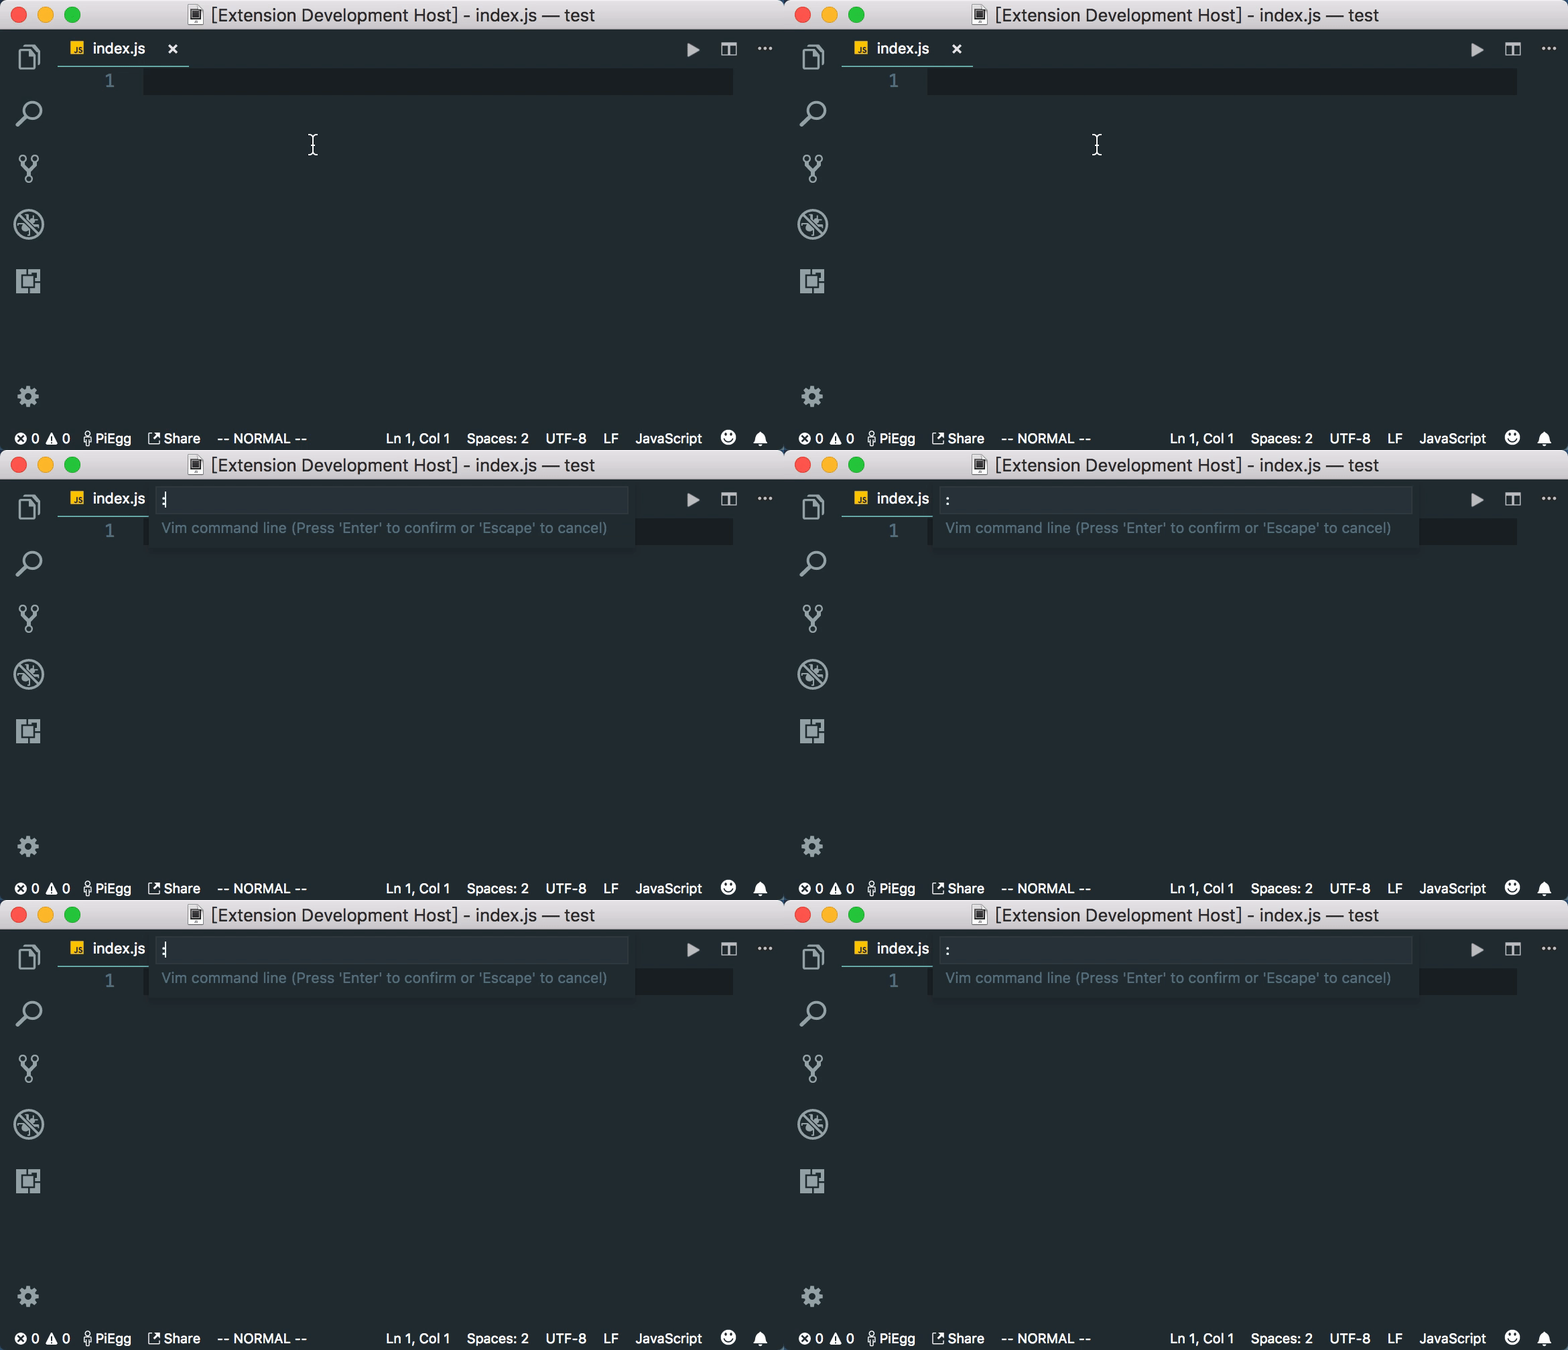
在查看了amVim和VSCodeVim在实现命令上的部分源码后,发现二者的实现上差距还是不小的。不过相比VSCodeVim代码的庞大(甚至还有neoVim的支持),amVim在实现上就比较精巧了。
在我的PR未被merge之前,amVim插件提供了一个功能,按:打开一个GoToLine的inputBox:

不过只能用于输入数字并跳转到相应行数。好在查看release更新日志,追溯这个commit,我们可以很容易找到它是如何实现的。
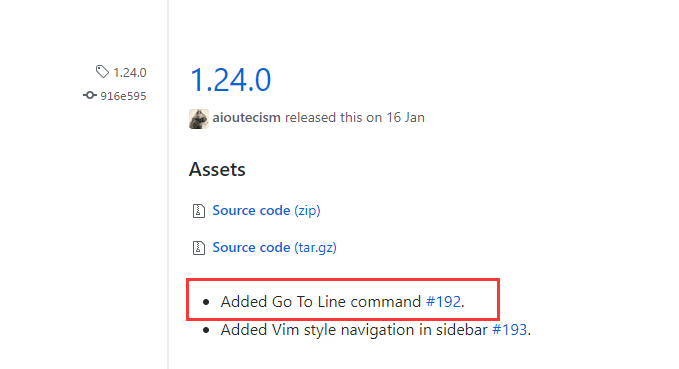
代码不多,就几行:
1
2
|
{ keys: ':', actions: [ActionCommand.goToLine] },
|
具体实现代码如下:
1
2
3
4
5
6
7
8
9
10
|
import {commands} from 'vscode';

export class ActionCommand {

    static goToLine(): Thenable<boolean | undefined> {
        return commands.executeCommand('workbench.action.gotoLine');
    }

}
|
所以是通过vscode的commands来打开的gotoLine的inputBox窗口。
再来看看VSCodeVim是如何打开inputBox的:
1
2
3
4
5
6
7
8
9
10
11
12
13
14
15
16
17
18
19
20
21
22
23
24
25
26
27
28
29
30
31
32
33
|
export class CommandLine {

  public static async PromptAndRun(initialText: string, vimState: VimState): Promise<void> {
    if (!vscode.window.activeTextEditor) {
      Logger.debug('CommandLine: No active document');
      return;
    }

    let cmd = await vscode.window.showInputBox(this.getInputBoxOptions(initialText));
    if (cmd && cmd[0] === ':' && configuration.cmdLineInitialColon) {
      cmd = cmd.slice(1);
    }

    this._history.add(cmd);
    this._history.save();

    await CommandLine.Run(cmd!, vimState);
  }


  private static getInputBoxOptions(text: string): vscode.InputBoxOptions {
    return {
      prompt: 'Vim command line',
      value: configuration.cmdLineInitialColon ? ':' + text : text,
      ignoreFocusOut: false,
      valueSelection: [
        configuration.cmdLineInitialColon ? text.length + 1 : text.length,
        configuration.cmdLineInitialColon ? text.length + 1 : text.length,
      ],
    };
  }
}
|
可以看到关键的部分是通过vscode.window.showInputBox打开的inputBox。所以我也根据这个关键的入口来一步步实现我想要的功能。
功能分析
参考VSCodeVim的实现,在amVim里可以大概分四个部分:
src/Modes/Normal.ts作为入口文件,当用户输入:键时触发后续功能。【已有】src/Actions/CommandLine/CommandLine.ts作为打开inputBox的入口函数,打开inputBox,然后负责把用户输入的内容传给下一级的parser,用于解析并执行相应命令。src/Actions/CommandLine/Parser.ts,负责接收上一级传进来的命令,然后找到命令对应的函数,并执行该函数。如果找不到相应则返回。src/Actions/CommandLine/Commands/*,存放各个命令的实现函数。
其中src/Actions/CommandLine/CommandLine.ts的逻辑跟VSCodeVim的src/cmd_line/commandLine.ts非常类似。
具体实现
- src/Actions/CommandLine/CommandLine.ts
1
2
3
4
5
6
7
8
9
10
11
12
13
14
15
16
17
18
19
20
21
22
23
24
25
26
27
28
29
30
31
32
33
34
35
36
37
38
39
40
41
42
| import * as vscode from 'vscode';
import { parser } from './Parser';
export class CommandLine {
public static async Run(command: string | undefined): Promise<void> {
if (!command || command.length === 0) {
return;
}
try {
const cmd = parser(command);
if (cmd) {
await cmd.execute(command);
}
} catch (e) {
console.error(e);
}
}
public static async PromptAndRun(): Promise<void> {
if (!vscode.window.activeTextEditor) {
return;
}
try {
let cmd = await vscode.window.showInputBox(CommandLine.getInputBoxOptions());
if (cmd && cmd[0] === ':') {
cmd = cmd.slice(1);
}
return await CommandLine.Run(cmd);
} catch (e) {
console.error(e);
}
}
private static getInputBoxOptions(): vscode.InputBoxOptions {
return {
prompt: 'Vim command line',
value: ':',
ignoreFocusOut: false,
valueSelection: [1, 1]
};
}
}
|
- src/Actions/CommandLine/Parser.ts
1
2
3
4
5
6
7
8
9
10
11
12
13
14
15
16
17
18
19
20
21
22
23
24
25
26
27
28
29
30
31
32
33
34
35
36
37
38
39
40
41
42
43
44
45
46
47
48
| import { CommandBase } from './Commands/Base';
import WriteCommand from './Commands/Write';
import WallCommand from './Commands/WriteAll';
import QuitCommand from './Commands/Quit';
import QuitAllCommand from './Commands/QuitAll';
import WriteQuitCommand from './Commands/WriteQuit';
import WriteQuitAllCommand from './Commands/WriteQuitAll';
import VisualSplitCommand from './Commands/VisualSplit';
import NewFileCommand from './Commands/NewFile';
import VerticalNewFileCommand from './Commands/VerticalNewFile';
import GoToLineCommand from './Commands/GoToLine';
const commandParsers = {
w: WriteCommand,
write: WriteCommand,
wa: WallCommand,
wall: WallCommand,
q: QuitCommand,
quit: QuitCommand,
qa: QuitAllCommand,
qall: QuitAllCommand,
wq: WriteQuitCommand,
x: WriteQuitCommand,
wqa: WriteQuitAllCommand,
wqall: WriteQuitAllCommand,
xa: WriteQuitAllCommand,
xall: WriteQuitAllCommand,
vs: VisualSplitCommand,
vsp: VisualSplitCommand,
new: NewFileCommand,
vne: VerticalNewFileCommand,
vnew: VerticalNewFileCommand
};
export function parser(input: string): CommandBase | undefined {
if (commandParsers[input]) {
return commandParsers[input];
} else if (Number.isInteger(Number(input))) {
return GoToLineCommand;
} else {
return undefined;
}
}
|
- 命令的实现
由于命令很多,我就举三个例子。一个是w,一个是q,和一个wq。VSCode自己的一些功能比如关闭当前文件、保存文件等都是有自己的command的。在实现Vim模式的时候,实际上最后也是去调用VSCode自带的功能而已。
Write
1
2
3
4
5
6
7
8
9
10
11
12
13
| import * as vscode from 'vscode';
import { CommandBase } from './Base';
class WriteCommand extends CommandBase {
constructor() {
super();
}
async execute(): Promise<void> {
await vscode.commands.executeCommand('workbench.action.files.save');
}
}
export default new WriteCommand();
|
Quit
1
2
3
4
5
6
7
8
9
10
11
12
13
| import * as vscode from 'vscode';
import { CommandBase } from './Base';
class QuitCommand extends CommandBase {
constructor() {
super();
}
async execute(): Promise<void> {
await vscode.commands.executeCommand('workbench.action.closeActiveEditor');
}
}
export default new QuitCommand();
|
WriteQuit
1
2
3
4
5
6
7
8
9
10
11
12
13
14
15
| import { CommandBase } from './Base';
import WriteCommand from './Write';
import QuitCommand from './Quit';
class WriteQuitCommand extends CommandBase {
constructor() {
super();
}
async execute(): Promise<void> {
await WriteCommand.execute();
await QuitCommand.execute();
}
}
export default new WriteQuitCommand();
|
这一步就很有意思了,因为我们之前实现了Write和Quit的功能,所以可以在这里调用它们。看到这里你可能会有问题,虽然我知道VSCode有这些功能,但是你是怎么知道这些功能是怎么写的呢?
如果只是我这篇文章的话,我在实现Vim模式的这些命令的时候,大部分是参考了VSCodeVim的一些写法。它主要的命令实现在src/cmd_line/commands/*里。但是只这样显然还是不够的。因此我给出几个比较有用的地方供大家开发插件的时候参考:
- VSCode官方文档里的Extending Visual Studio Code,介绍扩展VSCode的原理和给出了一些例子。
- VSCode官方文档里的Extensibility Reference,介绍VSCode扩展的api文档。
- VSCode官方文档里的Key Bindings for Visual Studio Code,介绍VSCode的快捷键和相应的命令id。
- VSCode本身的快捷键编辑面板:
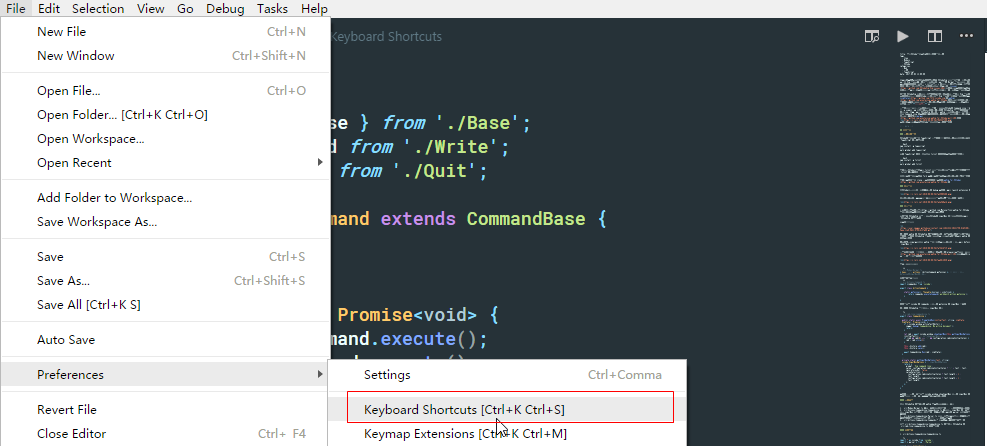
说实话VSCode的文档写得不是特别好。我要实现一个功能,查找文档查了半天。其实其中很大一部分操作,你可以在上面的第3点、第4点里通过快捷键的提供的Command id去实现:
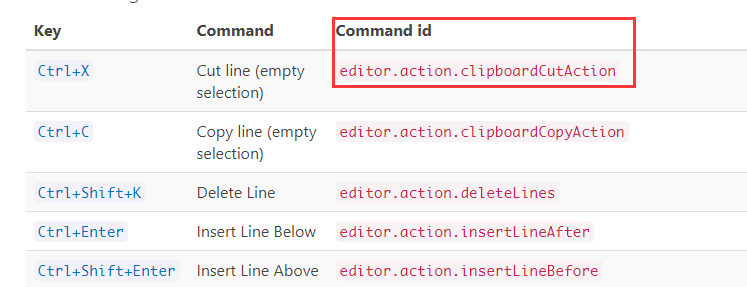
比如你要实现一个剪切的功能,有了Command id,你就可以通过vscode.commands.executeCommand('editor.action.clipboardCutAction')来实现。因此我推荐,如果你要实现的功能有些可以用已有快捷键实现的,那么就能在这个列表里找到对应的Command id来手动实现了。
至于其他的一些非快捷键提供的功能,就还需要阅读第2点的api文档做出更深层次的修改了。
总结
在改进完这个插件之后,我向作者提交了PR。在和作者交流后做出了一些修改,并最终被作者接受并合并。为开源项目贡献代码的感觉是真的很不错。








