






Compatibility + Security Notice
The newest version 3.17 has fixed a side-channel attack (CVE-2024-26306) which makes the authentication process incompatible with older versions. For backwards-compatibility use the --use-pkcs1-padding flag. More information can be found in the iperf3 Github Repo.
In this article I am using iperf3 version 3.9.
For a general introduction visit my iperf3 guide or the official documentation.
There are some things we have to prepare before we can use the authentication feature of iperf3. We are going through all the steps in the following sections.
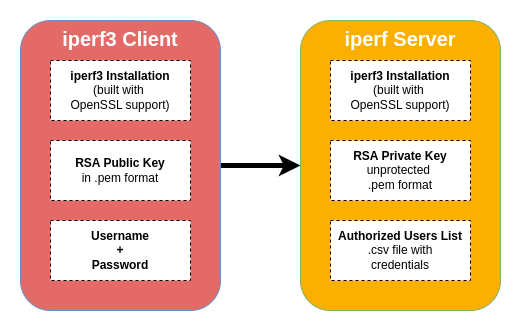
The following commands are simple examples - the explanation of all the things we need follow in the next sections.
iperf3 -s 10.20.30.91 -p 1337 --authorized-users-path users.csv --rsa-private-key-path private_unprotected.pem
iperf3 -s # start iperf3 as a server10.20.30.91 # listen on a specific IP-p 1337 # listen on a specific port (default is 5201)--authorized-users-path users.csv # choose the .csf file with the hashed credentials--rsa-private-key-path private_unprotected.pem # choose the unprotected private key fileSide note: use absolute paths for files when you use iperf3 version <3.17 in --daemon mode as it changes the working directory Source.
iperf3 -c 10.20.30.91 -p 1337 --username iperf-user --rsa-public-key-path public.pem
Side note: We must enter the password of the iperf-user or add the password as an Linux env variable IPERF3_PASSWORD
iperf3 -c # start iperf3 as a client10.20.30.91 # IP of the iperf3 server-p 1337 # destination port of the iperf3 server--username iperf-user # name of the authorized user--rsa-public-key-path public.pem # choose the public key fileAs mentioned before, in the next sections we find everything we need to set it up.
The RSA keypair is used to encrpyt and decrypt the user credentials. The client will receive the public key in the .pem format and the server side needs the private key in the .pem format without a password.
Side note: In my tests it was working with an encrypted private key too, but as the docs say it has to be unprotected, I went with it too.
On Linux you can generate the needed key pair with the following commands.
openssl genrsa -des3 -out private.pem 2048openssl rsa -in private.pem -outform PEM -pubout -out public.pempublic.pem file can be send to the iperf3 client.openssl rsa -in private.pem -out private_unprotected.pem -outform PEMOn the server we need a .csv file with the hashed credentials of the user. For our example we are going to use username iperf-user and the password hunter2.
cat users.csv
# Format: username,sha256hash
iperf-user,e8c37ee89b09dd23ec6658a80caaa941df4de8dd946482d861fa37b52338226a
You have to create the SHA256 hash with the username and password in the following format: {username}password. You can use GUI tools like Cyberchef: click here to visit the example
Or use the Linux CLI:
echo -n "{iperf-user}hunter2" | sha256sum
e8c37ee89b09dd23ec6658a80caaa941df4de8dd946482d861fa37b52338226a  -
Authentication is only available when both iperf3 installations are built with OpenSSL support. That seems to be the default and the following methods should be enough to check if authentication is available:
iperf3 --version
Print the iperf3 versions and check if the authentication feature is available:
$ iperf3 --version
iperf 3.9 (cJSON 1.7.13)
Linux pleasejustwork 5.15.0-107-generic #117-Ubuntu SMP Fri Apr 26 12:26:49 UTC 2024 x86_64
Optional features available: CPU affinity setting, IPv6 flow label, SCTP, TCP congestion algorithm setting, sendfile / zerocopy, socket pacing, authentication
Dependencies
Use the Linux command ldd to print shared object dependencies and look for the libcrypto.so dependency:
$ ldd /usr/bin/iperf3
        linux-vdso.so.1 (0x00007ffc9c7bc000)
        libiperf.so.0 => /lib/x86_64-linux-gnu/libiperf.so.0 (0x00007fc13ba2f000)
        libc.so.6 => /lib/x86_64-linux-gnu/libc.so.6 (0x00007fc13b806000)
        libcrypto.so.3 => /lib/x86_64-linux-gnu/libcrypto.so.3 (0x00007fc13b3c2000)
        libsctp.so.1 => /lib/x86_64-linux-gnu/libsctp.so.1 (0x00007fc13b3bc000)
        libm.so.6 => /lib/x86_64-linux-gnu/libm.so.6 (0x00007fc13b2d5000)
        /lib64/ld-linux-x86-64.so.2 (0x00007fc13ba7e000)
Source and openssl github
此内容由惯性聚合(RSS阅读器)自动聚合整理,仅供阅读参考。 原文来自 — 版权归原作者所有。