






While there are plenty of IOT security cameras that promise privacy, none of them really do. Eufy recently got busted for secretly accessing peoples’ feeds, Unifi got breached, and literally every off-shore IOT device is slurping as much metadata (and regular data) off your devices as they possibly can. It’s not hard to understand a need for secure and private home security devices.
Despite its age and legacy, ZoneMinder is still by far the most capable and complete solution for this. While it is difficult to install and manage, the results are fairly good.
My solution will involve a cheap mini-PC, a pair of cheap 1080 RTSP cams, a cheap high-gain Wi-FI radio, and a few evenings of tinkering.
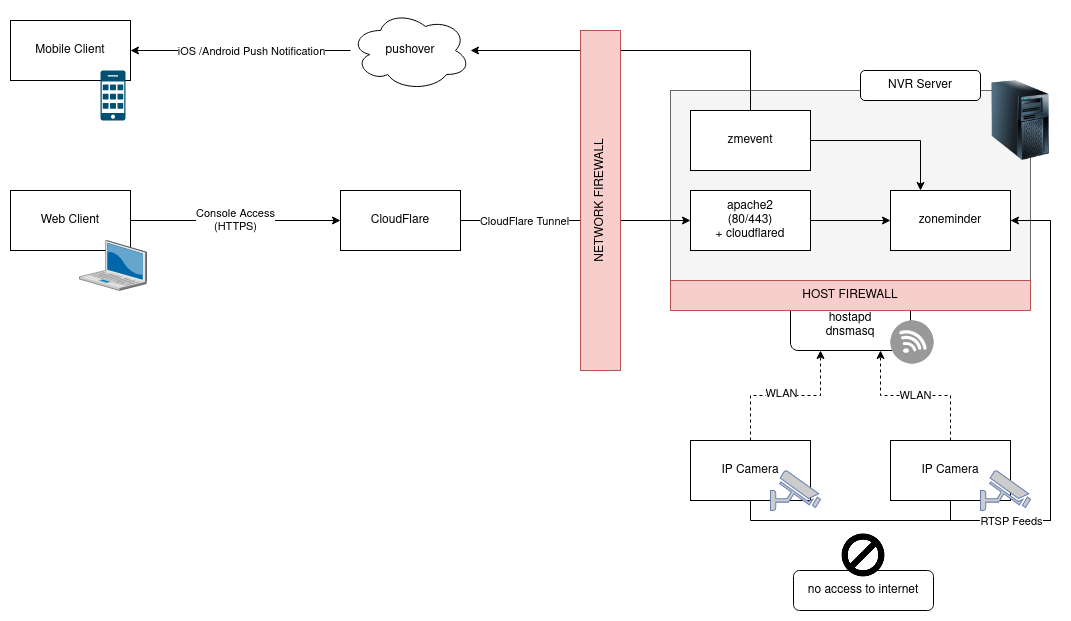
Wireless Networking Configuration
To provide a dedicated, single-purpose wireless network for the cameras, the wireless radio in the NVR server will be used to create a WLAN for the cameras to communicate with the Zoneminder server. Because the module in my mini-PC did not fully support access point mode in Linux, I elected to use an old TL-WN722N sitting around instead.
To maintain a decent segmentation between networks, the NVR server will not be providing NAT or any packet forwarding to the CCTV camera network.
Why not wired?
Frankly, because I’m lazy. The house we rent is over a hundred years old, and drilling holes & routing wires is such a colossal pain that I’m willing to tolerate some flakyness, lag, and odd packet loss for the sake of convenience. If you’re lucky enough to live somewhere that has CAT-6 wired directly to your front porch, skip this part…
Creating the camera WLAN with Hostapd
To create the hotspot, hostapd will be used to bring up the WLAN interface and configure it properly for broadcasting the SSID for cameras to join.
It’s fairly easy to install and configure:
sudo apt install hostapd
/etc/hostapd/hostapd.conf
interface=wlan0
hw_mode=g
channel=10
ieee80211d=1
country_code=US
ieee80211n=1
wmm_enabled=1

ssid=securityscams
auth_algs=1
wpa=2
wpa_key_mgmt=WPA-PSK
rsn_pairwise=CCMP
wpa_passphrase=securepassword
Providing DHCP addresses with dnsmasq
While it can do much more, dnsmasq is only used for providing DHCP addresses to the IP cameras.
sudo apt install dnsmasq
/etc/dnsmasq.conf
interface=wlan0
dhcp-range=192.168.0.100,192.168.0.150,255.255.255.0,6h
I also add a static reservation for each camera to simply the zoneminder configuration later:
dhcp-host=34:60:f9:ac:90:62,cam-01,192.168.0.10,infinite
Tangent: Making an IoT camera into a dumb RTSP camera
To complete this project, I purchased a pair of TP-Link Tapo C310 indoor/outdoor IP cameras. They’re quite cost-effective and have fairly good image quality, but managing them is frankly awful. To get them to work as a dumb RTSP or ONVIF camera, you first have to install the app, sign up for an account, register the cameras, and join them to the wireless network. Unlike most cameras, there is no web UI that you can access with a browser, and no usable API to reconfigure them without the app. I wouldn’t really recommend these, other than being quite good for the price. Luckily, you only have to do this once as they’ll run as RTSP cams indefinitely without access to the web.
Installing Zoneminder
Installing Zoneminder is fairly standard. It’s a mess of PHP, Perl, CGI scripts, and creaky C programs, but it works well enough. The gist of the install guide is as follows:
sudo apt install apache2 mariadb-server php libapache2-mod-php php-mysql lsb-release gnupg2

sudo echo "deb https://zmrepo.zoneminder.com/debian/release-1.36 "`lsb_release  -c -s`"/" | sudo tee /etc/apt/sources.list.d/zoneminder.list

wget -O - https://zmrepo.zoneminder.com/debian/archive-keyring.gpg | sudo apt-key add -

sudo apt update && sudo apt install -y zoneminder

sudo adduser www-data video

sudo a2enconf zoneminder
sudo a2enmod rewrite headers expires

sudo systemctl enable --now zoneminder
sudo systemctl restart apache2
Adding the camera to Zoneminder
Once Zoneminder is installed, the camera can be added as a data source. The admin console can be accessed with a browser, where we just add a new device with the source stream as:
rtsp://user:[email protected]:554/stream1
In the camera’s config, set the capture settings to only record the MPEG stream instead of individual JPEG frames.
- Storage > Save JPEGs: Disabled
- Storage > Video Writer: Camera Passthrough
- Storage > Optional Encoder Parameters:
crf=23
This will yield a 50-100x savings in storage space. It really should be the default, but it must be manually configured on each camera in the system.
I also like to set the date format to be ISO-8601 similar:
- Timestamp > Timestamp Label Format:
%N - %y-%m-%d %H:%M:%S
It’s also useful to increase the buffers slightly, as this will allow more visual context when replaying events:
- Buffers > Pre Event Image Count: 15
- Buffers > Post Event Image Count: 30
To reduce CPU usage, the Analysis can be run on fewer frames.
- General > Analysis FPS: 2.00
Notifications and alerts for motion detection
While zoneminder does come with Filters which can send emails based on search criteria, they don’t quite trigger fast enough to be useful for answering the question, “is there somebody at the door?” Fortunately, there is an add-on service for custom event triggers.
The installation is largely based on the install guide for zmeventnotification with some small deviations.
Install zmevent
First, install the prerequisites:
sudo apt-get install libcrypt-mysql-perl libcrypt-eksblowfish-perl libmodule-build-perl libjson-perl liblwp-protocol-https-perl libyaml-perl make python3-pip
sudo perl -MCPAN -e "install Net::WebSocket::Server"
The software is installed from git, so the entire repository must be cloned:
git clone https://github.com/zoneminder/zmeventnotification.git && cd zmeventnotification
git fetch --tags
git checkout $(git describe --tags $(git rev-list --tags --max-count=1))
Then, the install script may be executed. Most of the questions it asks can be answered with “yes” for the first install.
sudo ./install.sh
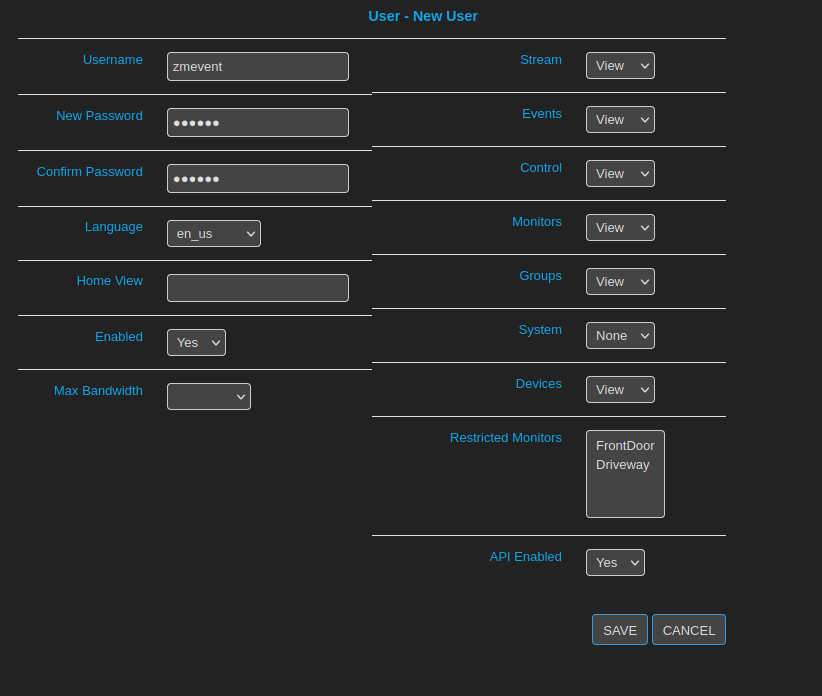
Create user account for zmevent
The zmeventnotification service requires access to the Zoneminder API to fetch event data. While it’s possible to use the builtin admin account, best practice is generally to create a logon for the service.
It appears to work well with read-only access plus API access enabled:
Configure zmevent
While I will be using zmevent for only sending alerts for motion detection, it can also be used for much more, including object recognition, license plate recording, face detection, and more.
First, the service account credentials and connection strings should be configured in /etc/zm/secrets.ini
[secrets]
ZMES_PICTURE_URL=http://localhost/zm/index.php?view=image&eid=EVENTID&fid=objdetect&width=600
ZM_USER=zmevent
ZM_PASSWORD=xxxxxx
ES_ADMIN_INTERFACE_PASSWORD=xxxxxx
ZM_PORTAL=http://localhost/zm
ZM_API_PORTAL=http://localhost/zm/api
ES_CERT_FILE=/etc/ssl/certs/ssl-cert-snakeoil.pem
ES_KEY_FILE=/etc/ssl/private/ssl-cert-snakeoil.key
My server has a very weak CPU and no GPU, so I will not be running the machine learning modules.
All of these configurations are in the file /etc/zm/zmeventnotification.ini
[customize]
use_hooks = no

...

[hook]
#event_start_hook = '{{base_data_path}}/bin/zm_event_start.sh'
Since the server will be behind a reverse proxy, we can disable the builtin SSL
Event filtering for quiet hours
A rules file can apply a mute filter to the monitors to avoid sending alerts at night. This is configured in a separate json config file, /etc/zm/es_rules.json
{
    "notifications": {
        "monitors":{
            "1": {
                "rules": [{
                    "time_format":"%I:%M %p",
                    "from":"10:00 pm",
                    "to":"7:00 am",
                    "action": "mute"
                    }
                ]
            }
        }
    }
}
The corresponding line should be un-commented in the main config file, /etc/zm/zmeventnotification.ini
[customize]
es_rules=/etc/zm/es_rules.json
Pushover for mobile device notifications
I will use Pushover for sending alerts since the “zmninja” app isn’t completely reliable on my device. With some tinkering, other systems like Telegram, Slack, or Matrix should also be possible integrations.
It should be noted that this configuration will upload thumbnail images to the pushover cloud service. If this is not desired, that can be disabled fairly easily. I value the convenience of this feature, so I will leave it enabled – but I can fully understand the reasons for turning it off.
In a pushover account, an application is created to give us an API token:
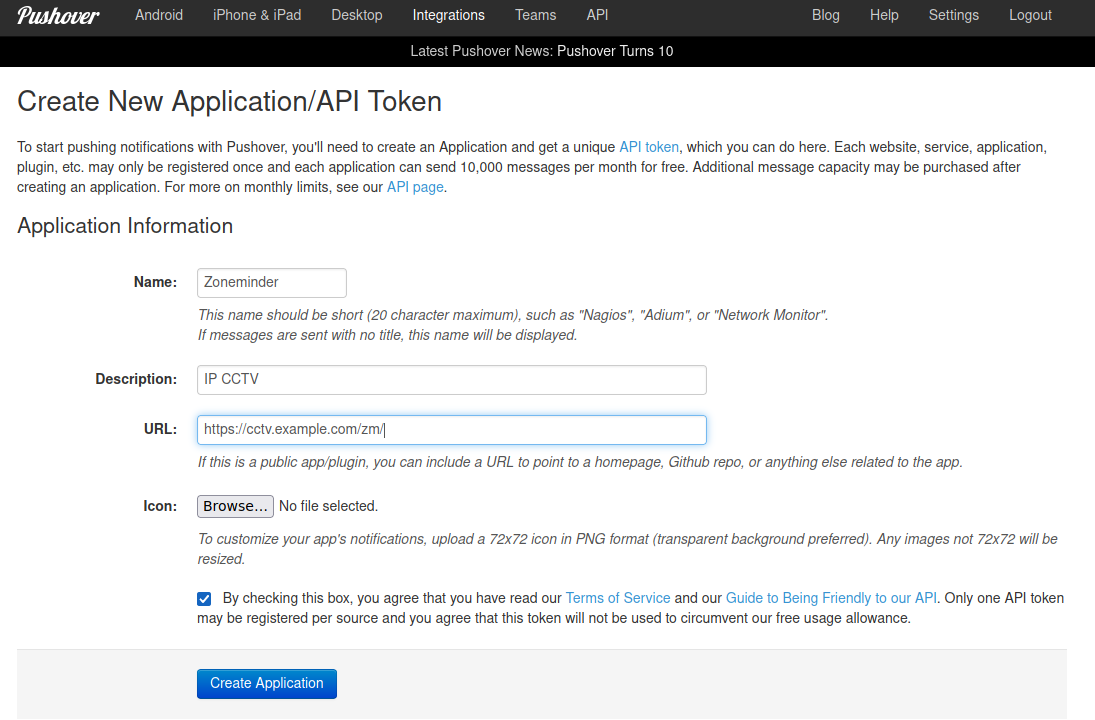
Once created, the API token can be added to /etc/zm/secrets.ini
[secrets]
...
PUSHOVER_APP_TOKEN=xxxxxx
PUSHOVER_USER_KEY=yyyyy
Then, the pushover integration can be added to /etc/zm/zmeventnotification.ini
[push]
use_api_push = yes
api_push_script=/var/lib/zmeventnotification/bin/pushapi_pushover.py
Once complete, the zmevent service is nearly ready to startup.
Test configuration and start service
sudo -u www-data /usr/bin/zmeventnotification.pl --debug
Enable the daemon by going to “Options > System” in the web UI and enable OPT_USE_EVENTNOTIFICATION

After this is enabled, the service must be restarted.
sudo systemctl restart zoneminder
To check the status:
sudo zmdc.pl status zmeventnotification.pl

    'zmeventnotification.pl' running since 23/01/07 16:28:15, pid = 101731
If the configuration for zmevent is changed, that component can be restarted individually, instead of restarting the entire zoneminder service.
sudo zmdc.pl restart zmeventnotification.pl
The log for this component can be checked for successful startup:
sudo tail -f /var/log/zm/zmeventnotification.log
If everything is working properly, the startup sequence should look roughly like this:
zmeventnotification[121911].INF [main:338] [Running on WebSocket library version:0.004]
zmeventnotification[121911].INF [main:1048] [PARENT: using config file: /etc/zm/zmeventnotification.ini]
zmeventnotification[121911].INF [main:1048] [PARENT: using secrets file: /etc/zm/secrets.ini]
zmeventnotification[121911].INF [main:1048] [PARENT: Push enabled via FCM]
zmeventnotification[121911].INF [main:1048] [PARENT: Pushes will be sent through APIs and will use /var/lib/zmeventnotification/bin/pushapi_pushover.py]
zmeventnotification[121911].INF [main:1048] [PARENT: MQTT Disabled]
zmeventnotification[121911].INF [main:1048] [PARENT: |------- Starting ES version: 6.1.28 ---------|]
zmeventnotification[121911].INF [main:1048] [PARENT: Event Notification daemon v 6.1.28 starting]
zmeventnotification[121911].INF [main:1048] [PARENT: Re-loading monitors]
zmeventnotification[121911].INF [main:1048] [PARENT: Web Socket Event Server listening on port 9000]
At this point, all of the “important” pieces of the system are working.
Apache2 tweaks
Since I’m using Cloudflare Tunnels to expose this service, some minor tweaks were needed.
First, I wanted the root document to redirect to zoneminder without any fuss. This is fairly easy in Apache, simply adding a redirect rule in the default vhost.
`/etc/apache2/sites-enabled/000-default`

RedirectMatch ^/$ /zm
Another tweak was to force Apache to use the Cloudflare custom header to give my server logs accurate source IP information.
First, the remoteip module is installed,
sudo a2enmod remoteip
sudo systemctl restart apache2
Then, a configuration is added to translate the content of the CF-Connecting-IP header into the source address. This is added to a new file, /etc/apache2/conf-enabled/remoteip.conf
RemoteIPHeader CF-Connecting-IP
RemoteIPTrustedProxy ::1
RemoteIPTrustedProxy 127.0.0.1
After the config is applied, the server is good to go.
sudo apachectl configtest && sudo systemctl reload apache2
Monitoring
A simple way to ensure zoneminder is running is to setup a monit check
check process zoneminder with pidfile /run/zm/zm.pid
  start program = "/usr/bin/systemctl start zoneminder"
  stop program  = "/usr/bin/systemctl stop  zoneminder"
I plan to extract much more information in the future. While there is a custom prometheus exporter for zoneminder, it appears to be a bit crusty. It might be worth dusting off to get some better telemetry from the server.
Another neat integration would be hooking up MQTT to another system to allow for some neat automation to take place during motion detection, such as turning on a light or playing a “ping” signal to provide an alert other than the pushover device alert.
Backups
It’s absolutely critical to have an off-site backup for a CCTV system. Not only for long-term archival purposes, but so that you can retrieve the recordings of somebody stealing your CCTV system.
This is a fairly basic script, but it’s good enough to start with. The need for a more complex system will emerge over time.
#!/bin/bash
USER="zmbackup"
SERVER="nas.local"

## Backup the database
NOW=$(date +"%Y-%m-%d-%H-%M-%S")
mysqldump zm | gzip > /opt/mysql-backups/zoneminder-"$NOW".sql.gz
find /opt/mysql-backups/ -mtime +14 -delete

# Sync database backups to server
rsync -azh --delete /opt/mysql-backups/ "$USER"@"$SERVER":/backups/zoneminder/database/

# Sync zoneminder directory to server
rsync -azh --delete /var/cache/zoneminder/ "$USER"@"$SERVER":/backups/zoneminder/archive/
This script exports the mysql database, then syncs the event video files plus the database backup to a remote NAS server. Ideally, this should be pushed to a remote site or cloud service; I recommend using a service like rsync.net.
As always, any backup should be regularly audited and tested.
So, while it’s far from perfect, it works well enough to pass the “wife-test”. It was able to be put together with scraps & cheap cameras, and with zero recurring licensing or subscription cost. If you make it this far, check out some much better resources, written by people far smarter than me: