惯性聚合 高效追踪和阅读你感兴趣的博客、新闻、科技资讯
阅读原文 在惯性聚合中打开

推荐订阅源

酷 壳 – CoolShell
酷 壳 – CoolShell
雷峰网
雷峰网
H
Hackread – Cybersecurity News, Data Breaches, AI and More
Spread Privacy
Spread Privacy
H
Hacker News: Front Page
PCI Perspectives
PCI Perspectives
Webroot Blog
Webroot Blog
罗磊的独立博客
H
Heimdal Security Blog
TaoSecurity Blog
TaoSecurity Blog
Exploit-DB.com RSS Feed
大猫的无限游戏
大猫的无限游戏
月光博客
月光博客
cs.CV updates on arXiv.org
Google Online Security Blog
Last Week in AI
Last Week in AI
美团技术团队
Help Net Security
Help Net Security
The Hacker News
The Hacker News
C
Cisco Blogs
T
The Blog of Author Tim Ferriss
J
Java Code Geeks
The Register - Security
IT之家
IT之家
WordPress大学
WordPress大学
Jina AI
Jina AI
Recent Commits to openclaw:main
H
Help Net Security
cs.CL updates on arXiv.org
T
Threat Research - Cisco Blogs
P
Proofpoint News Feed
NISL@THU
NISL@THU
爱范儿
爱范儿
The GitHub Blog
The GitHub Blog
Scott Helme
Scott Helme
V
Vulnerabilities – Threatpost
B
Blog
T
Tenable Blog
博客园 - 三生石上(FineUI控件)
T
The Exploit Database - CXSecurity.com
S
Security Affairs
小众软件
小众软件
Hacker News: Ask HN
Hacker News: Ask HN
Security Latest
Security Latest
Threat Intelligence Blog | Flashpoint
W
WeLiveSecurity
A
Arctic Wolf
L
LINUX DO - 热门话题
Google DeepMind News
M
MIT News - Artificial intelligence

KuangjuX(狂且)

提高 Directory Cache 性能 高速缓存技术(Cache) 随笔(一) 指令级并行技术 TLB MMU 笔记(基于 MIPS) Verilator 学习笔记 MIT-6.S081-mmap MIT-6.S081 Networking MIT-6.S081 Lazy Page Allocation MIT-6.S081 Copy on Write Fork MIT-6.S081 User Level Threads 2021年终总结 xv6-riscv中的KPTI机制 RISC -V N扩展 io_uring 阅读笔记 在Ubuntu中升级Linux内核 飞书Rust实习面试 Rust并发安全总结 Rust String 用法总结
Chisel 学习笔记
KuangjuX · 2022-03-05 · via KuangjuX(狂且)

环境配置

下载 jdksbt,将其加入环境变量中。

Basic Components

Signal Types and Constants

  • Bit: Bits(8.W)
  • 无符号整数: UInt(8.W)
  • 有符号整数: SInt(10.W)

Conbinational Circuits

val logic = (a & b) | c

1
2
3
4
5
6
7
8
9
val and = a & b // bitwise and
val or = a | b // bitwise or
val xor = a ˆ b // bitwise xor
val not = ˜a // bitwise negation
The arithmetic operations use the standard operators:
val add = a + b // addition
val sub = a - b // subtraction
val neg = -a // negate
val mul = a * b // multiplication

我们可以将信号定义为网线类型,在定义为网线类型后就可以使用持续赋值,例如:

1
2
val w = Wire(UInt())
w := a & b

Multiplexer

Chisel 提供了基础的多路选择器:

1
val result = Mux(sel, a, b)

Registers

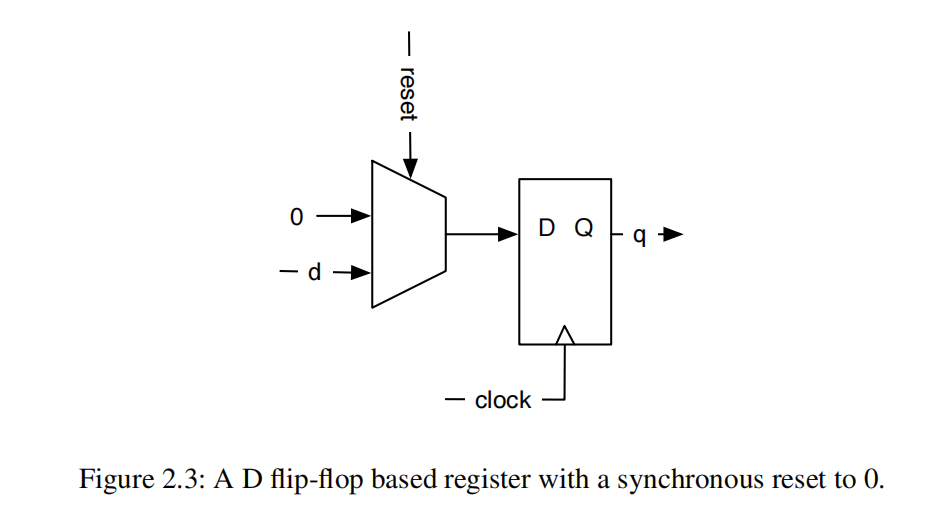
Chisel 提供了一个 D flip-flop 集合的寄存器。寄存器隐式地连接全局的始终并且在上升沿的时候更新。当在寄存器声明处提供初始化值时,它使用连接到全局复位信号的同步复位。 寄存器可以是任何可以表示为位集合的 Chisel 类型。 以下代码定义了一个 8 位寄存器,在复位时初始化为 0:

1
val reg = RegInit (0.U(8.W))

输入可以被连接到寄存器上通过使用 := 操作符并且输出的寄存器仅能与表达式的名称中一起使用:

寄存器也可以被连接通过以下定义:

1
val nextReg = RegNext(d)

寄存器也可以通过以下方式初始化并连接:

1
val bothReg = RegNext(d, 0.U)

Counting

1
2
val cntReg = RegInit (0.U(8.W))
cntReg := Mux(cntReg === 9.U, 0.U, cntReg + 1.U)

Structure with Bundle and Vec

Chisel 提供了两种结构来对相关信号进行分组:

  • Bundle 组织不同的信号
  • Vec 表示相同信号的可索引集合

Chisel Bundle 组织几个不同的信号。Bundle 既可以被整个引用,也可以通过它们的名字访问域:

1
2
3
4
class Channel() extends Bundle {
val data = UInt (32.W)
val valid = Bool ()
}

一个使用的例子:

1
2
3
4
val ch = Wire(new Channel ())
ch.data := 123.U
ch.valid := true.B
val b = ch.valid

Chisel Vec 表示相同信号的集合。,元素可以通过索引访问:

1
2
3
4
5
6
val v = Wire(Vec(3, UInt (4.W)))
v(0) := 1.U
v(1) := 3.U
v(2) := 5.U
val idx = 1.U(2.W)
val a = v(idx)

Vec 也可以包裹在寄存器中使用:

1
2
3
val registerFile = Reg(Vec (32, UInt (32.W)))
registerFile (idx) := dIn
val dOut = registerFile (idx)

一些可能的陷阱:

在 Chisel 中不可以部分进行连续赋值,尽管它们在 Chisel 2 和 Verilog 中是允许的,这将会产生电路错误:

1
2
3
val assignWord = Wire(UInt (16.W))
assignWord (7, 0) := lowByte
assignWord (15, 8) := highByte

Wire,Reg and IO

UInt, SInt 和 Bits 都是 Chisel 的类型,但是它们不代表任何硬件类型。只有把它们包裹在 WireRegIO 中才能生成硬件。Reg 表示寄存器,IO 表示一个模块的集合。

1
2
3
4
val number = Wire(UInt ())
val reg = Reg(SInt ())
number := 10.U
reg := value - 3.U

在 Chisel 中使用 = 描述符创建硬件对象,使用 := 描述符 assign 或者 reassign 为已经存在的硬件对象。组合值可以有条件地赋值,但需要在条件的每个分支中赋值。 否则,将描述一个锁存器,Chisel 编译器将拒绝该锁存器。 最佳实践是在创建 Wire 时已经定义了一个默认值。 因此,前面的代码最好改写如下:

1
2
val number = WireDefault (10.U(4.W))
val reg = RegInit (0.S(8.W))

Chisel Generates Hardware

尽管 Chisel 看起来像高级语言一样是串行的,但在编译成 Verilog 之后是并行的。

Build Process and Testing

Building your Project with sbt

Source Organization

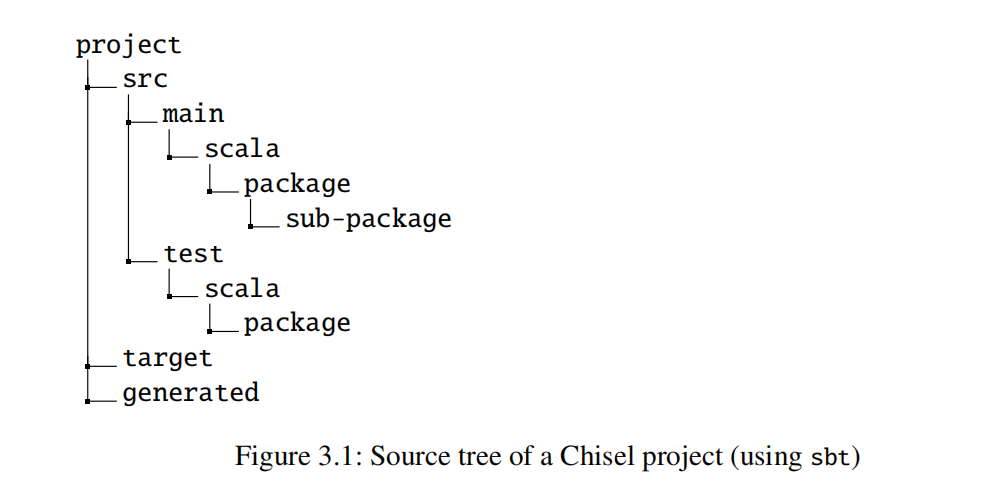
上图展示了 Scala 工程的目录结构。项目的根目录是 project 目录,包含 build.sbtsrc 包含所有源代码:main 包含硬件源代码,test 包含测试代码。Chisel 从 Scala 继承,而 Scala 从 Java 继承,使用 packages 来组织源代码。

1
2
3
4
5
package mypack
import chisel3._
class Abc extends Module {
val io = IO(new Bundle {})
}
1
2
3
4
5
import mypack._
class AbcUser extends Module {
val io = IO(new Bundle {})
val abc = new Abc ()
}

也可以不 import 而写命名空间的全称:

1
2
3
4
class AbcUser2 extends Module {
val io = IO(new Bundle {})
val abc = new mypack.Abc ()
}

或者只 import 一个 class:

1
2
3
4
5
import mypack.Abc
class AbcUser3 extends Module {
val io = IO(new Bundle {})
val abc = new Abc ()
}

Running sbt

1
2
3
4
sbt run
sbt "runMain mypacket.MyObject"
sbt test
sbt "test:runMain mypacket.MyMainTest"

Generating Verilog

为了生成 Verilog 描述,我们需要一个 application。接下来的代码将生成 Hello.v:

1
2
3
object Hello extends App {
emitVerilog (new Hello ())
}

使用 emitVerilog() 将会将生成的代码放到根目录中,如下将会将生成的代码放入子目录中:

1
2
3
object HelloOption extends App {
emitVerilog (new Hello (), Array("--target -dir", "generated"))
}

Tool Flow

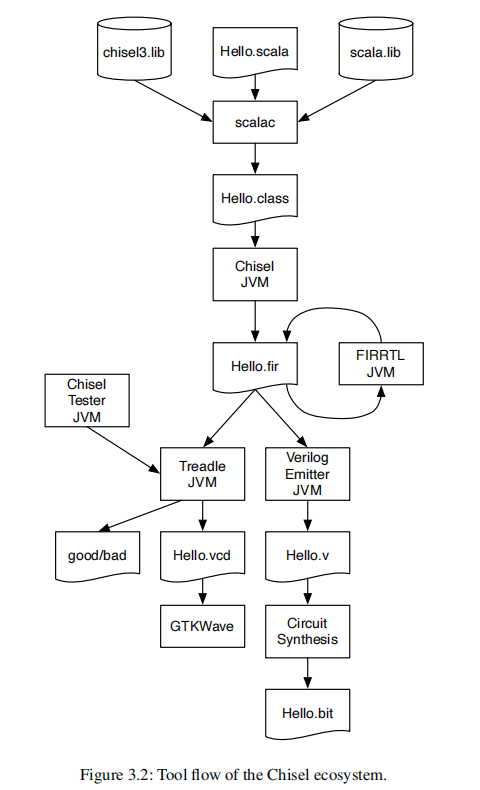
Chisel 的一大优势是它可以利用 Scala 的全部功能来编写这些测试平台。 例如,可以在软件模拟器中对硬件的预期功能进行编码,并将硬件模拟与软件模拟进行比较。 这种方法在测试处理器的实现时非常有效。

ScalaTest

build.sbt 中添加:

1
libraryDependencies += "org.scalatest" %% "scalatest" % "3.1.4" % "test"

写测试代码如下:

1
2
3
4
5
6
7
8
9
10
11
12
13
14
import org. scalatest ._
import org. scalatest .flatspec. AnyFlatSpec
import org. scalatest .matchers.should. Matchers
class ExampleTest extends AnyFlatSpec with Matchers {
"Integers" should "add" in {
val i = 2
val j = 3
i + j should be (5)
}
"Integers" should "multiply" in {
val a = 3
val b = 4
a * b should be (12)
} }

ChiselTest

build.sbt 中添加:

1
libraryDependencies += "edu.berkeley.cs" %% "chiseltest" % "0.5.0"

一个测试的例子如下:

1
2
3
4
5
6
7
8
9
10
11
12
13
14
15
16
17
18
19
20
21
22
23
24
25
26
27
28
29
import chisel3._
import chiseltest ._
import org. scalatest .flatspec. AnyFlatSpec

class DeviceUnderTest extends Module {
val io = IO(new Bundle {
val a = Input(UInt (2.W))
val b = Input(UInt (2.W))
val out = Output(UInt (2.W))
})

io.out := io.a & io.b
}

class SimpleTest extends AnyFlatSpec with ChiselScalatestTester
{
"DUT" should "pass" in {
test(new DeviceUnderTest ) { dut =>
dut.io.a.poke (0.U)
dut.io.b.poke (1.U)
dut.clock.step ()
println("Result is: " + dut.io.out.peek ().toString)
dut.io.a.poke (3.U)
dut.io.b.poke (2.U)
dut.clock.step ()
println("Result is: " + dut.io.out.peek ().toString)
}
}
}

DUT 的输入和输出端口通过 dut.io 访问。 我们可以通过端口上的 poke 设置值,该端口将值作为输入端口的 Chisel 类型作为参数。 可以通过在端口上调用 peek() 来读取输出端口,这会将值作为 Chisel 类型返回。 toString 方法将该值转换为字符串。 测试使用 dut.clock.step() 将模拟推进一个时钟周期。 为了将模拟推进几个时钟周期,我们可以为 step() 提供一个参数。 我们可以使用 println() 打印输出的值。

随后我们可以使用:

1
sbt "testOnly SimpleTest"

运行测试。

Waveforms

1
sbt "testOnly SimpleTest -- -DwriteVcd=1"

也可以通过将 WriteVcdAnnotation 注释传递给 test() 函数来启动波形的生成。 要启用将注释传递给测试,我们需要导入以下类和包:

1
2
3
import chisel3._
import chiseltest ._
import org. scalatest .flatspec. AnyFlatSpec

我们从一个简单的测试器开始,该测试器将值插入输入并逐步推进时钟。 我们不读取任何输出或将其与期望进行比较。 相反,我们可以将 WriteVcdAnnotation 添加到测试的选项中,使其生成波形文件(.vcd 文件)。

1
2
3
4
5
6
7
8
9
10
11
12
13
14
15
16
17
18
19
20
class WaveformTest extends AnyFlatSpec with
ChiselScalatestTester {
"Waveform" should "pass" in {
test(new DeviceUnderTest )
. withAnnotations (Seq( WriteVcdAnnotation )) { dut =>
dut.io.a.poke (0.U)
dut.io.b.poke (0.U)
dut.clock.step ()
dut.io.a.poke (1.U)
dut.io.b.poke (0.U)
dut.clock.step ()
dut.io.a.poke (0.U)
dut.io.b.poke (1.U)
dut.clock.step ()
dut.io.a.poke (1.U)
dut.io.b.poke (1.U)
dut.clock.step ()
}
}
}

Components

Components in Chisel are Modules

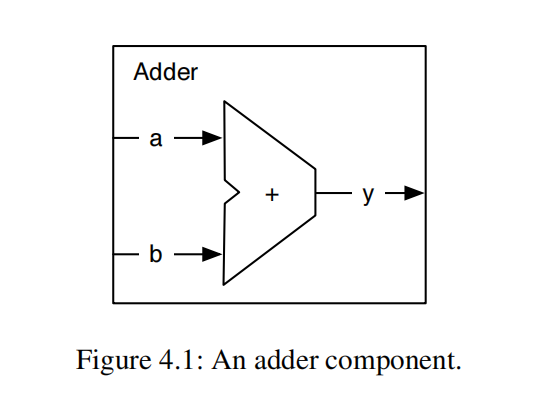
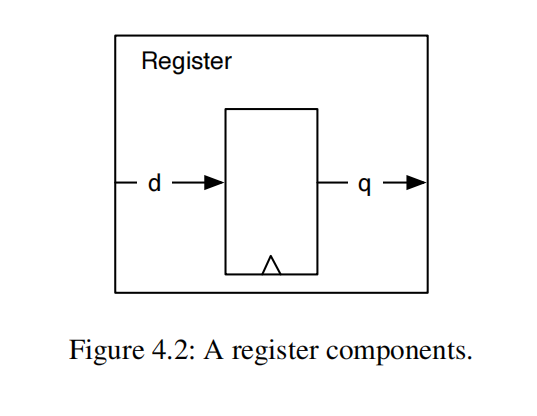
在 Chisel 中硬件 components 是被叫做 modules。每个 module 需要 extend Module 类并且包含 IO 接口。

1
2
3
4
5
6
7
8
class Adder extends Module {
val io = IO(new Bundle {
val a = Input(UInt (8.W))
val b = Input(UInt (8.W))
val y = Output(UInt (8.W))
})
io.y := io.a + io.b
}

1
2
3
4
5
6
7
8
9
class Register extends Module {
val io = IO(new Bundle {
val d = Input(UInt (8.W))
val q = Output(UInt (8.W))
})
val reg = RegInit (0.U)
reg := io.d
io.q := reg
}

1
2
3
4
5
6
7
8
9
10
11
12
13
14
15
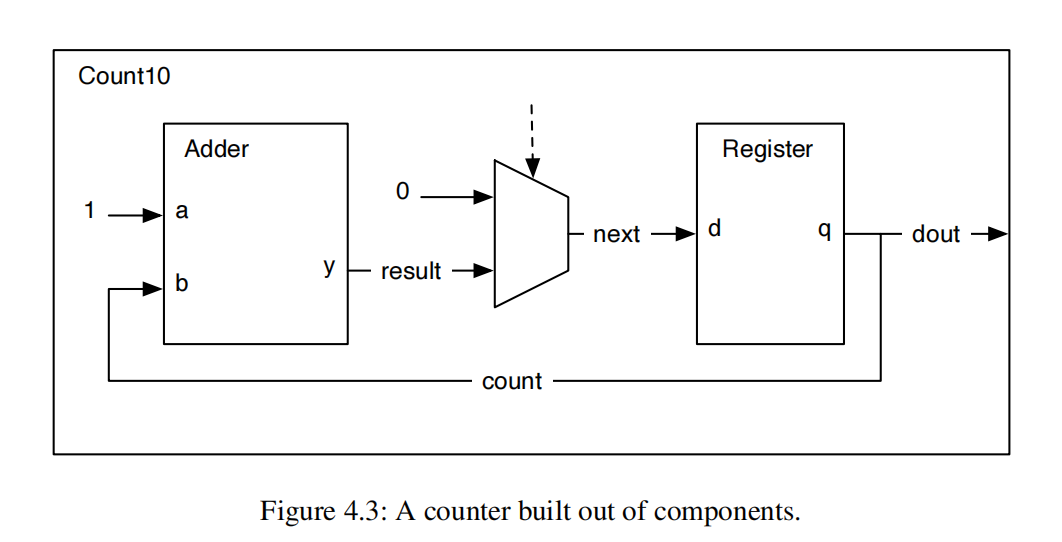
class Count10 extends Module {
val io = IO(new Bundle {
val dout = Output(UInt (8.W))
})
val add = Module(new Adder ())
val reg = Module(new Register ())
val count = reg.io.q

add.io.a := 1.U
add.io.b := count
val result = add.io.y
val next = Mux(count === 9.U, 0.U, result)
reg.io.d := next
io.dout := count
}

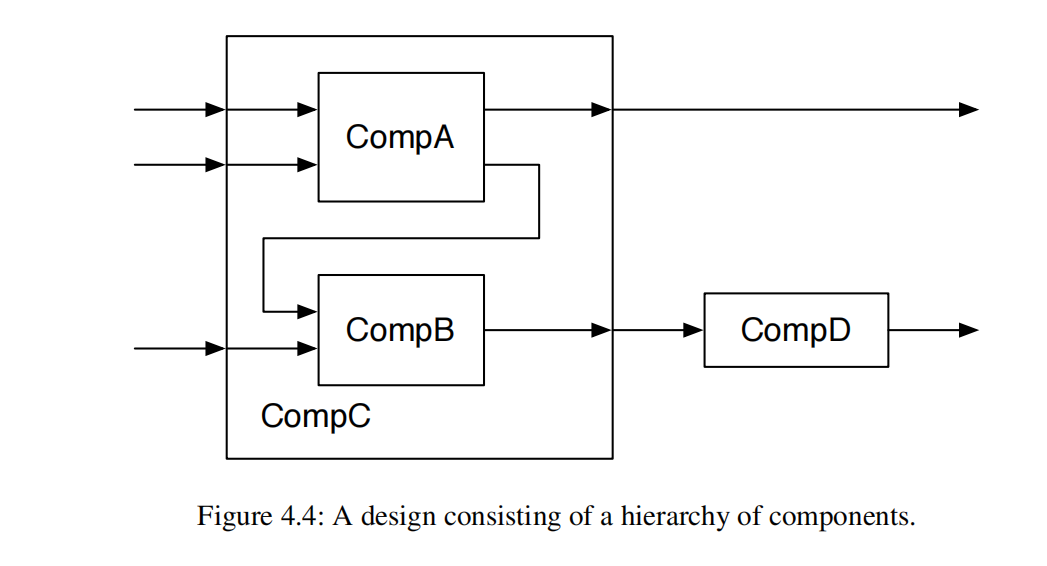
Nested Conponents

1
2
3
4
5
6
7
8
9
10
11
12
13
14
15
16
17
18
19
20
21
22
23
24
25
26
27
28
29
30
31
32
33
34
35
36
class CompA extends Module {
val io = IO(new Bundle {
val a = Input(UInt (8.W))
val b = Input(UInt (8.W))
val x = Output(UInt (8.W))
val y = Output(UInt (8.W))
})

class CompB extends Module {
val io = IO(new Bundle {
val in1 = Input(UInt (8.W))
val in2 = Input(UInt (8.W))
val out = Output(UInt (8.W))
})


class CompC extends Module {
val io = IO(new Bundle {
val in_a = Input(UInt (8.W))
val in_b = Input(UInt (8.W))
val in_c = Input(UInt (8.W))
val out_x = Output(UInt (8.W))
val out_y = Output(UInt (8.W))
})

val compA = Module(new CompA ())
val compB = Module(new CompB ())

compA.io.a := io.in_a
compA.io.b := io.in_b
io.out_x := compA.io.x

compB.io.in1 := compA.io.y
compB.io.in2 := io.in_c
io.out_y := compB.io.out
}

Bulk Connections

为了连接具有多个 IO 端口的组件,Chisel 提供了批量连接运算符 <>。 该运算符在两个方向上连接部分束。 Chisel 使用叶字段的名称进行连接。 如果缺少名称,则不会被连接。

1
2
3
4
5
6
7
8
9
10
11
12
13
14
15
16
17
18
19
20
21
22
23
24
25
26
27
28
29
30
31
32
33
34
35
class Fetch extends Module {
val io = IO(new Bundle {
val instr = Output(UInt (32.W))
val pc = Output(UInt (32.W))
})

}

class Decode extends Module {
val io = IO(new Bundle {
val instr = Input(UInt (32.W))
val pc = Input(UInt (32.W))
val aluOp = Output(UInt (5.W))
val regA = Output(UInt (32.W))
val regB = Output(UInt (32.W))
})

}

class Execute extends Module {
val io = IO(new Bundle {
val aluOp = Input(UInt (5.W))
val regA = Input(UInt (32.W))
val regB = Input(UInt (32.W))
val result = Output(UInt (32.W))
})

}

val fetch = Module(new Fetch ())
val decode = Module(new Decode ())
val execute = Module(new Execute)
fetch.io <> decode.io
decode.io <> execute.io
io <> execute.io

Lightweight Components with Functions

模块是构建硬件描述的一般方式。 但是,在声明模块以及实例化和连接它时,会有一些样板代码。 构建硬件的一种轻量级方法是使用函数。 Scala 函数可以采用 Chisel(和 Scala)参数并返回生成的硬件。 作为一个简单的例子,我们生成一个加法器:

1
2
3
4
5
6
def adder (x: UInt , y: UInt) = {
x + y
}
val x = adder(a, b)

val y = adder(c, d)

请注意,这是一个硬件生成器。 您在细化过程中没有执行任何添加操作,而是创建了两个加法器(硬件实例)。 加法器是一个人为的例子,以使其保持简单。 Chisel 已经有一个加法器生成函数,比如 +(that: UInt)。
作为轻量级硬件生成器的函数也可以包含状态(包括寄存器)。 以下示例返回一个时钟周期延迟元素(寄存器)。 如果一个函数只有一条语句,我们可以将它写在一行中并省略花括号:

1
def delay(x: UInt) = RegNext(x)

通过以函数本身作为参数调用函数,这会产生两个时钟周期的延迟。

1
val delOut = delay(delay(delIn))

External Modules

Combination Building Block

Combinational Circuits

1
2
3
4
5
6
val w = Wire(UInt ())
when (cond) {
w := 1.U
} . otherwise {
w := 2.U
}
1
2
3
4
5
6
7
8
val w = Wire(UInt ())
when (cond) {
w := 1.U
} .elsewhen (cond2) {
w := 2.U
} . otherwise {
w := 3.U
}