



While many turn to SaaS platforms for their flexibility over on-prem software, the real value unlocked by SaaS is allowing users to create their own custom workflows, such as to transform or enrich a data stream, or to build bespoke automation, without needing to maintain production infrastructure.
Many SaaS platforms already offer user-driven customizability — Slack enables building custom modular workflows, Salesforce allows creating workflows based off sales and marketing activities, and Twilio offers manipulation of voice calls through a serverless environment. And these platforms minimize friction to create these workflows by offering their users an in-browser IDE that deploys and runs code — removing the need to maintain another piece of production infrastructure.
However, adding a fully featured in-browser editor to an app can be challenging, not to mention building a platform for securely deploying and executing untrusted user code on the web. Allowing anyone to deploy and run code welcomes potentially nefarious users deploying code that tries to access other deployments and your own systems, as well as exploit your resources for bitcoining mining.
In this blog post, we’ll go over solving for these key challenges, and by the end, you’ll have a simple browser IDE that can deploy and run code in the cloud.
Follow the steps below or skip directly to the source code.
If you are bringing a Next.js app to this tutorial, great. If not, you can create a new one from scratch and follow along. Note that we’ll be using Next.js version 14 in this tutorial.
Let’s create the page that shows the in-browser editor. Under the folder app,
we’ll create the folder ide and, within that, a page.js file.
First, we’ll add the directive and necessary imports. We’ll use
@monaco-editor/react,
which is a nifty React component for Monaco. We’ll also import useState and
useEffect hooks to help manage state.
"use client";

import Editor from "@monaco-editor/react";
import { useEffect, useState } from "react";
Below that, we’ll define the component IDE:
export default function IDE() {
  const handleSubmit = async () => {};

  return (
    <div className="flex justify-center items-start pt-10 h-screen">
      <div className="w-full max-w-4xl p-4 border">
        <form action="#" onSubmit={handleSubmit}>
          <div className="">
            <label htmlFor="comment" className="sr-only">
              Add your code
            </label>
            <Editor
              height="50vh"
              defaultLanguage="javascript"
              defaultValue='Deno.serve(req => new Response("Hello!"));'
            />
          </div>
          <div className="flex justify-between pt-2">
            <div className="flex items-center space-x-5"></div>
            <div className="flex-shrink-0">
              <button
                type="submit"
                className="inline-flex items-center rounded-md bg-indigo-600 px-3 py-2 text-sm font-semibold text-white hover:bg-indigo-500"
              >
                Run
              </button>
            </div>
          </div>
        </form>
      </div>
    </div>
  );
}
Note we currently stub out the functions handleSubmit — we’ll fill those in
later. Now, if you start your server with npm run dev and point your browser
to localhost:3000/ide, you should see:
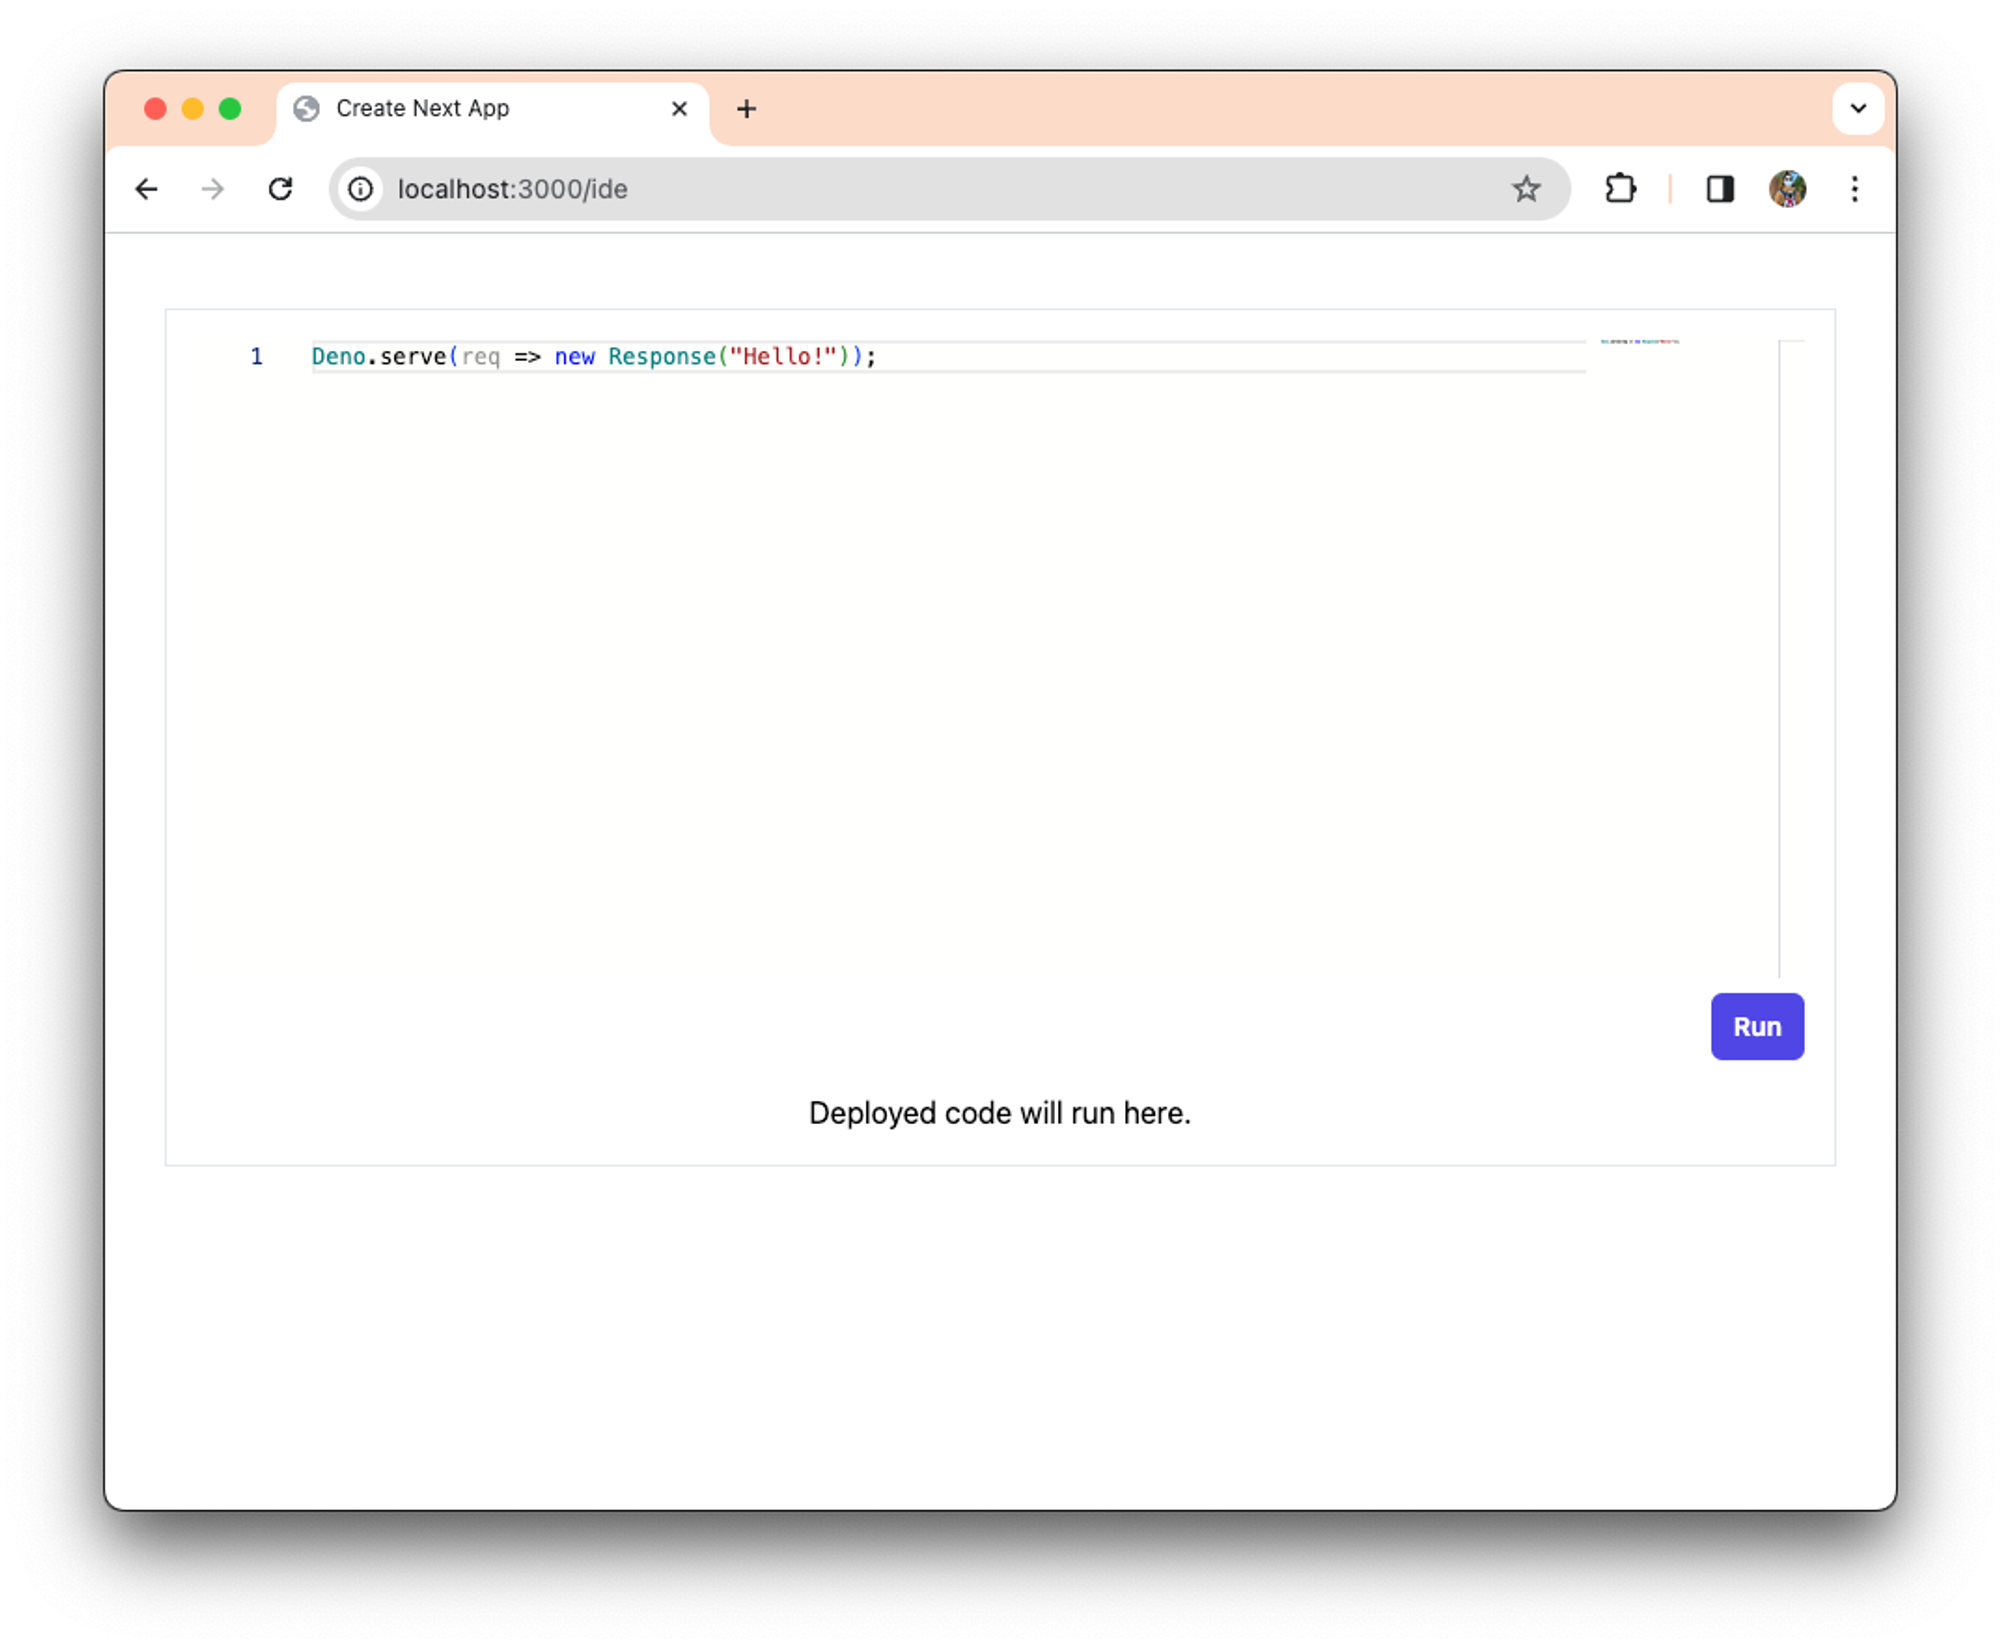
Great — you have the Monaco editor working in your Next.js app! While you can write code, you can’t deploy or execute it. Let’s fix that.
Deploying and executing third party code is a complex engineering problem that requires provisioning multiple sandboxes on demand, preventing deployments from accessing other deployments as well as your own systems, and routing request traffic properly to maintain performance for all users.
While you can build that yourself, for this tutorial we’ll use the Deno Deploy Subhosting API, which allows you to programmatically deploy and execute code in the cloud. It’s designed to run untrusted code securely — you don’t need to worry about a single deployment attempting to access the processes of another or of your internal systems.
This section will expand on the above with the following:
app/ide/page.jsBefore you begin, you’ll need to have a Deno Deploy access token and an ID for the Deno Deploy organization you’re using for Subhosting.
Once you have them, create a .env file that looks like the following:
DEPLOY_ACCESS_TOKEN=ddp_xxxxxxxxxxxxxxxxxxxxxxxxxx
DEPLOY_ORG_ID=536xxxxx-1111-1111-1111-111111111111
Let’s define three new API routes in our Next.js app:
app/api/createproject/route.tsapp/api/createdeployment/route.tsapp/api/getdeployment/route.tsNext, our createproject route will contain logic to create a new project given
a Subhosting org.
import Subhosting from "subhosting";

const subhosting = new Subhosting();

export async function GET() {
  const orgId = process.env["DEPLOY_ORG_ID"];
  const project = await subhosting.organizations.projects.create(orgId, {
    name: null,
  });
  return Response.json(project);
}
Note that we explicitly pass name: null , which tells Deno Deploy to generate
a globally unique project name.
Our createdeployment route will contain logic to submit a request. To
interface with the Subhosting API, we’ll use
the Subhosting npm client library.
Install it with npm install --save subhosting, then import and use it like
below:
import { NextRequest } from "next/server";
import Subhosting from "subhosting";

const subhosting = new Subhosting();

export async function POST(req: NextRequest) {
  const data = await req.json();
  const code = data["code"];
  const projectId = data["project"];

  const res = await subhosting.projects.deployments.create(projectId, {
    entryPointUrl: "main.ts",
    assets: {
      "main.ts": {
        kind: "file",
        content: code,
        encoding: "utf-8",
      },
    },
    envVars: {},
  });
  return Response.json(res);
}
For more details on the Subhosting API, refer to our documentation.
Finally, our getdeployment route will retrieve the status of the deployment:
import { NextRequest } from "next/server";
import Subhosting from "subhosting";

const subhosting = new Subhosting();

export async function POST(req: NextRequest) {
  const data = await req.json();
  const deploymentId = data["id"];
  const deployment = await subhosting.deployments.get(deploymentId);
  return Response.json(deployment);
}
Since the API to create a deployment will return a response with the deployment
status as pending, we’ll need to poll the deployment details endpoint until
the status changes to failed or success.
app/ide/page.js to newly created API routesOnce we have the API routes wired up, we’ll fill out the rest of the functionality and state management needed in our main IDE page.
In our app/ide/page.js:
export default function IDE() {
  const [project, setProject] = useState("");

  useEffect(() => {
    const createProject = async () => {
      try {
        const response = await fetch("/api/createproject", {
          method: "GET",
        });
                if (!response.ok) {
                    throw new Error(`Error: ${response.status}`);
                }
                const responseData = await response.json();
                setProject(responseData);
            } catch (error) {
                console.error("Failed to create project: ", error);
            }
        };


        createProject();
    }, []);


    const project_id = project["id"];


    const sleep = ms => new Promise(res => setTimeout(res, ms));


    const pollDeploymentStatus = async (deploymentId) => {
        let response;
        try {
            response = await fetch("/api/getdeployment", {
                method: "POST",
                headers: {
                    "Content-Type": "application/json",
                },
                body: JSON.stringify({ id: deploymentId }),
            });
        } catch (error) {
            console.log(error);
        }
        return await response.json();
    };

    const handleSubmit = async (event) => {
        event.preventDefault();


        const codeText = event.target.querySelector(".monaco-scrollable-element").textContent;

        try {
            const response = await fetch("/api/createdeployment", {
                method: "POST",
                headers: {
                    "Content-Type": "application/json",
                },
                body: JSON.stringify({ code: codeText, project: project_id }),
            });
            if (!response.ok) {
                throw new Error(`Error: ${response.status}`);
            }

            let responseData = await response.json();

      while (responseData["status"] === "pending") {
        await delay(3000);
        responseData = await pollDeploymentStatus(responseData["id"]);
      }


        } catch (error) {
            console.log(error);
        }
    };

    return (

    );
}
Here’s what’s going on with the new code:
createProject and grab its
project_id.deployment_id until its deployment
status is no longer pending.The deployment is created successfully, however, there’s nothing to show for it. And the browser IDE that doesn’t show the deployed code might as well be a local text editor. So next, we’ll add the success deployment in an iframe.
We’ll grab the deployment URL, add it as an iframe, and show it when the status
of the deployment is success.
Let’s update app/ide/page.js to include the following:
success and iframe
doesn’t errorHere’s the updated app/ide/page.js (code from previous versions omitted for
simplicity and readability):
export default function IDE() {


  const [URL, setURL] = useState("");
  const [isLoading, setIsLoading] = useState(true);


  const updateStatus = (message) => {
    if (document.querySelector(".ide-message")) {
      document.querySelector(".ide-message").textContent = message;
    }
  };


  const handleSubmit = async (event) => {
    event.preventDefault();

    updateStatus("Deploying code...");

    const codeText =
      event.target.querySelector(".monaco-scrollable-element").textContent;
    try {
      const response = await fetch("/api/createdeployment", {
        method: "POST",
        headers: {
          "Content-Type": "application/json",
        },
        body: JSON.stringify({ code: codeText, project: project_id }),
      });

      if (!response.ok) {
        throw new Error(`Error: ${response.status}`);
      }


      let responseData = await response.json();
      while (responseData["status"] === "pending") {
        await delay(3000);
        responseData = await pollDeploymentStatus(responseData["id"]);
      }


      if (responseData["status"] === "success") {
        setURL(`http://${responseData.domains[0]}`);
        updateStatus("Successfully deployed.");
      } else {
        updateStatus("Deployment failed.");
        throw new Error("Deployment failed");
      }
    } catch (error) {
      console.log(error);
    }
  };

  const handleLoad = () => {
    setIsLoading(false);
  };

  const handleError = () => {
    setIsLoading(true);
  };

  return (
    <div className="flex justify-center items-start pt-10 h-screen">
      <div className="w-full max-w-4xl p-4 border">
        {}
        <div className="mt-4">
          {}
          <p className="ide-message mb-4"></p>
          {isLoading && (
            <p className="text-center">Deployed code will run here.</p>
          )}
          <iframe
            src={URL}
            title="Deployed Project"
            width="100%"
            height="300px"
            onLoad={handleLoad}
            onError={handleError}
            style={{ display: isLoading ? "none" : "block" }}
          >
          </iframe>
        </div>
      </div>
    </div>
  );
}
Note we’ve added two new useState hooks:
setURL for persisting the deployment’s URLsetIsLoading for persisting the the loading state of the iframe.Now, when the deployment succeeds, we setURL to the domain retrieved from
responseData and we update the status to read “Successfully deployed”. The
iframe with src set to the deployment URL will then appear beneath the text
editor.
Here it is in action:
You can also edit and re-deploy the code:
Voila! Now you have integrated Monaco into a browser IDE with Next.js that can also deploy and run code securely.
For the sake of education and simplicity, we pared down this tutorial for integrating a Monaco editor in Next.js to create a browser IDE. However, there are still many features that we can add to improve the user experience:
Finally, if you found this helpful, have more questions, or want us to expand on this guide, please let us know on Twitter or Discord.
🚨️ Want to build a browser IDE, but concerned about security around deploying and executing untrusted code? Check out Subhosting.
此内容由惯性聚合(RSS阅读器)自动聚合整理,仅供阅读参考。 原文来自 — 版权归原作者所有。