





One of the first XKCD comics to go viral was this one, #303:

Today, the web developer version would be “my site’s building” and they would be playing swords in VR.
Sites take time to build these days. A large Next.js 11 site will take several minutes to build. This is wasted time in the development cycle. Build tools like Vite or Turbopack highlight their ability to get this number down.
But the deeper question hasn’t been considered:
Why do we even need a build step?
In simpler times, you added a few <script src="my_jquery_script.js"></script>
tags in your index.html and all was golden.
Then Node was created, allowing developers to write servers and backends in JavaScript. Soon, developers no longer needed to know multiple languages to build scalable, production-ready apps. They only needed to know JavaScript.

If we’d left it there, everything would be fine. But at some point, somebody posed the dangerous question:
What if I could write server side JS but in the browser?
Node’s server-side JavaScript isn’t compatible with browser JavaScript, because each implementation satisfies two entirely different systems:
Other key issues that drove the necessity of a build step include:
async/awaits, top-level awaits, ES Modules, and classes) while Node’s
JavaScript is a few cycles behind.Over time, frameworks and metaframeworks improved developer experience by making it easier to write and manage complex apps. But the trade off for better developer experience was a more complex build step. For example, you could make a zero build blog and write it in HTML. Or, you could write your blog in markdown that will be rendered through HTML, which requires a build step.
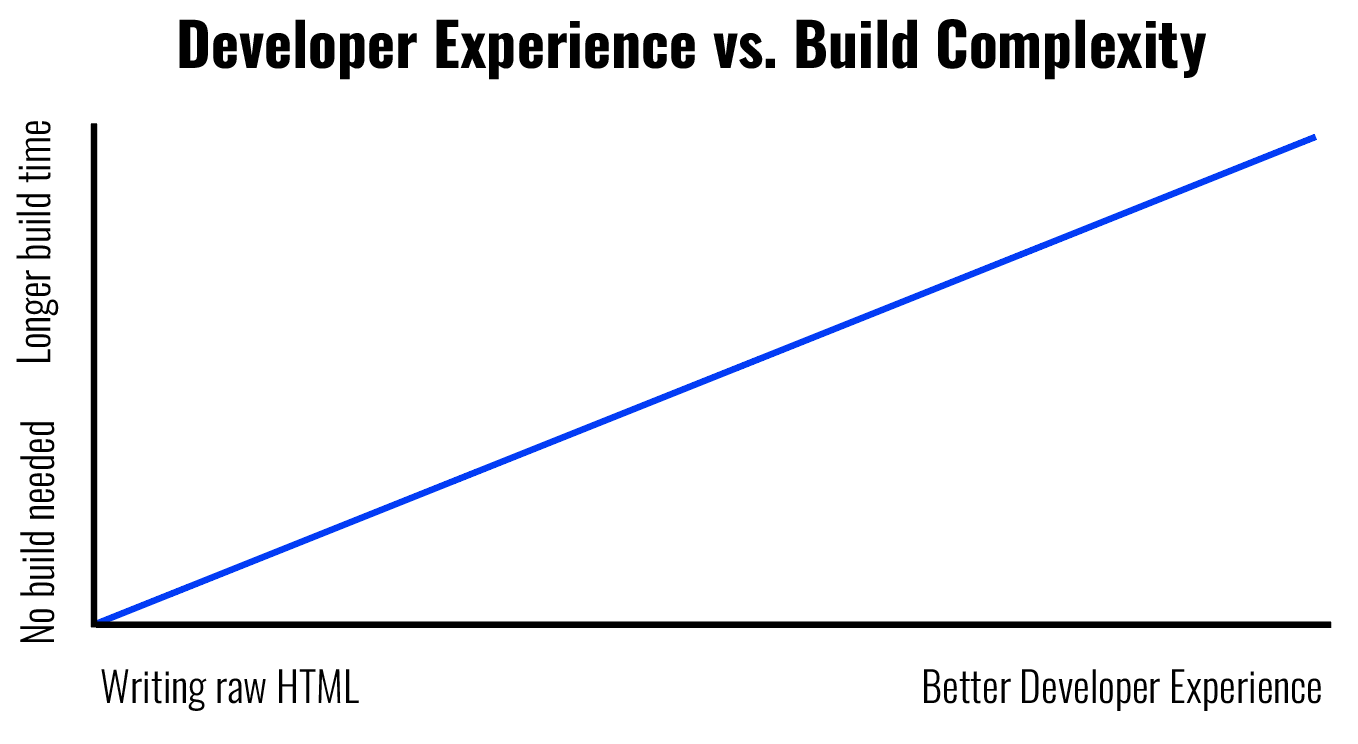
But not all build steps are meant to allow a good developer experience. Others are to improve the performance for the end user (e.g. optimization steps such as creating several image sizes and converting them to optimal formats).
All that to say, inevitably, a set of code transformations must be applied for the code to run in the browser, which today we all know as… the build step.
To meet the growing interest of making server-side JavaScript work in the browser, several open source build tools launched, marking the advent of the “build tool ecosystem” of JavaScript.
In 2011, Browserify launched to bundle Node/npm for the browser. Then came Gulp (2013) and other build tools, task runners, etc., to manage the variety of build tasks needed to allow devs to keep writing Node but for the browser. More and more build tools came onto the scene.
Here’s a non-exhaustive list of build tools over time:
By 2020’s, build tools have become their own category of JS library/framework. Many of these tools also have their own ecosystem of plugins and loaders to allow developers to use their favorite technologies.
For example, Webpack provides a variety of loaders for SASS, Babel, SVGs, and Bootstrap among many others. This allows developers to choose their own build stack: they can have webpack as their module bundler, babel as their TS transpiler, with a postcss loader for Tailwind.
Build steps are inevitable in modern web development. But before we can ask whether build tools are even needed, let’s first ask:
What exactly needs to happen to make server-side JavaScript run in the browser?
Let’s take a look at a real-life example with Next.js. We won’t spool up their basic app, instead we’ll use the blog starter as something you may well build with this framework:
npx create-next-app --example blog-starter blog-starter-appWithout changing anything, we’ll run:
This is going to kick off a 4-step process to get your Next.js project to run in the browser:
Each step in the build process is either to support developer experience in writing code or to improve performance for the end user. Let’s dive in.
When you’re building a web app, your main focus is productivity and experience.
So you’ll use a framework like Next.js, which means you’re likely also using
React, ESM modules, JSX, async/await, TypeScript, etc. But this code needs
to be converted into vanilla JavaScript for the browser, which occurs in the
compilation step:
If you want to learn more about the internals of compilers, The Super Tiny Compiler is an excellent tutorial into how they work.
Next.js’s first step is to compile all of your code to plain JavaScript. Let’s
take the Post function in [slug].tsx as an example:
export default function Post({ post, morePosts, preview }: Props) {
  const router = useRouter()
  if (!router.isFallback && !post?.slug) {
    return <ErrorPage statusCode={404} />
  }
  return (
    <Layout preview={preview}>
      <Container>
        <Header />
        {router.isFallback ? (
          <PostTitle>Loading…</PostTitle>
        ) : (
          <>
            <article className="mb-32">
              <Head>
                <title>
                  {post.title} | Next.js Blog Example with {CMS_NAME}
                </title>
                <meta property="og:image" content={post.ogImage.url} />
              </Head>
              <PostHeader
                title={post.title}
                coverImage={post.coverImage}
                date={post.date}
                author={post.author}
              />
              <PostBody content={post.content} />
            </article>
          </>
        )}
      </Container>
    </Layout>
  )
}
The compiler will parse this code, transform it into AST, manipulate that AST into the correct functional form for browser JS, and generate the new code. And here’s the compiled code for that function that gets shipped to the browser:
function y(e) {
  let { post: t, morePosts: n, preview: l } = e,
    c = (0, r.useRouter)();
  return c.isFallback || (null == t ? void 0 : t.slug)
    ? (0, s.jsx)(v.Z, {
      preview: l,
      children: (0, s.jsxs)(a.Z, {
        children: [
          (0, s.jsx)(h, {}),
          c.isFallback
            ? (0, s.jsx)(j, {
              children: "Loading…",
            })
            : (0, s.jsx)(s.Fragment, {
              children: (0, s.jsxs)("article", {
                className: "mb-32",
                children: [
                  (0, s.jsxs)(N(), {
                    children: [
                      (0, s.jsxs)("title", {
                        children: [
                          t.title,
                          " | Next.js Blog Example with ",
                          w.yf,
                        ],
                      }),
                      (0, s.jsx)("meta", {
                        property: "og:image",
                        content: t.ogImage.url,
                      }),
                    ],
                  }),
                  (0, s.jsx)(p, {
                    title: t.title,
                    coverImage: t.coverImage,
                    date: t.date,
                    author: t.author,
                  }),
                  (0, s.jsx)(x, {
                    content: t.content,
                  }),
                ],
              }),
            }),
        ],
      }),
    })
    : (0, s.jsx)(i(), {
      statusCode: 404,
    });
}
Of course, that code isn’t meant to be read by a human, it only needs to be understood by a browser. The minifying step replaces function and component names with single characters to ship fewer kilobytes to the browser, improving performance for the end user.
The above is also the ‘prettified’ version. Here’s what it really looks like:
function y(e) {
  let { post: t, morePosts: n, preview: l } = e, c = (0, r.useRouter)();
  return c.isFallback || (null == t ? void 0 : t.slug)
    ? (0, s.jsx)(v.Z, {
      preview: l,
      children: (0, s.jsxs)(a.Z, {
        children: [
          (0, s.jsx)(h, {}),
          c.isFallback
            ? (0, s.jsx)(j, { children: "Loading…" })
            : (0, s.jsx)(s.Fragment, {
              children: (0, s.jsxs)("article", {
                className: "mb-32",
                children: [
                  (0, s.jsxs)(N(), {
                    children: [
                      (0, s.jsxs)("title", {
                        children: [
                          t.title,
                          " | Next.js Blog Example with ",
                          w.yf,
                        ],
                      }),
                      (0, s.jsx)("meta", {
                        property: "og:image",
                        content: t.ogImage.url,
                      }),
                    ],
                  }),
                  (0, s.jsx)(p, {
                    title: t.title,
                    coverImage: t.coverImage,
                    date: t.date,
                    author: t.author,
                  }),
                  (0, s.jsx)(x, { content: t.content }),
                ],
              }),
            }),
        ],
      }),
    })
    : (0, s.jsx)(i(), { statusCode: 404 });
}
All the above code is contained in a file called (for this build)
[slug]-af0d50a2e56018ac.js. When that code is prettified, the file is 447
lines long. Compare that to the much smaller 56 lines of code from the original
[slug].tsx that we edit.
Why did we ship a 10X larger file?
Because of another critical part of the build process: bundling.
Despite [slug].tsx being only 56 lines long, it relies on many dependencies
and components, which in turn relies on more dependencies and components. All of
those modules need to be loaded for [slug].tsx to work properly.
Let’s use dependency cruiser to visualize this. First, we’ll just look at the components:
npx depcruise --exclude "^node_modules" --output-type dot pages | dot -T svg > dependencygraph.svg
Here’s the dependency graph:
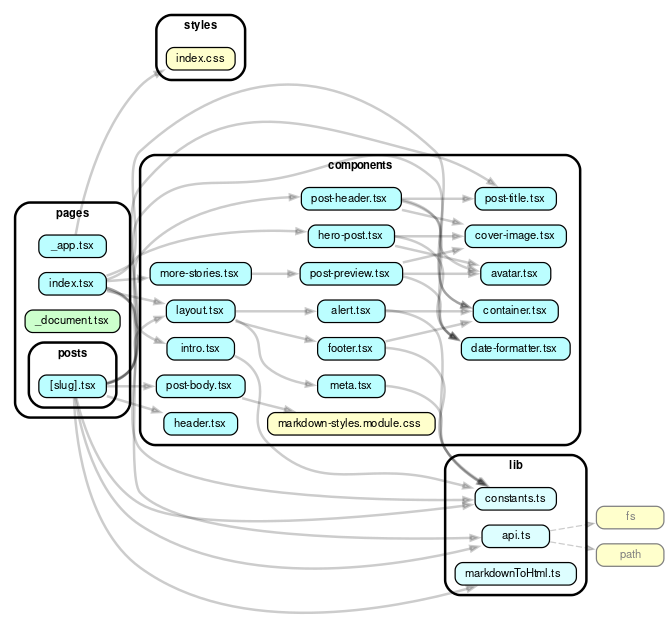
Not too bad. But each of these has node module dependencies. Let’s remove that
--exclude "^node_modules" to look at everything in this project:
npx depcruise --output-type dot pages | dot -T svg > dependencygraph.svg
When we factor those in, the graph gets larger. Like, huge. It’s so big that to keep the image interesting, we annotated it as if it were a fun, medieval era map. (Also, this is an svg so feel free to open it in a new tab so you can zoom in and soak in all the juicy details.)
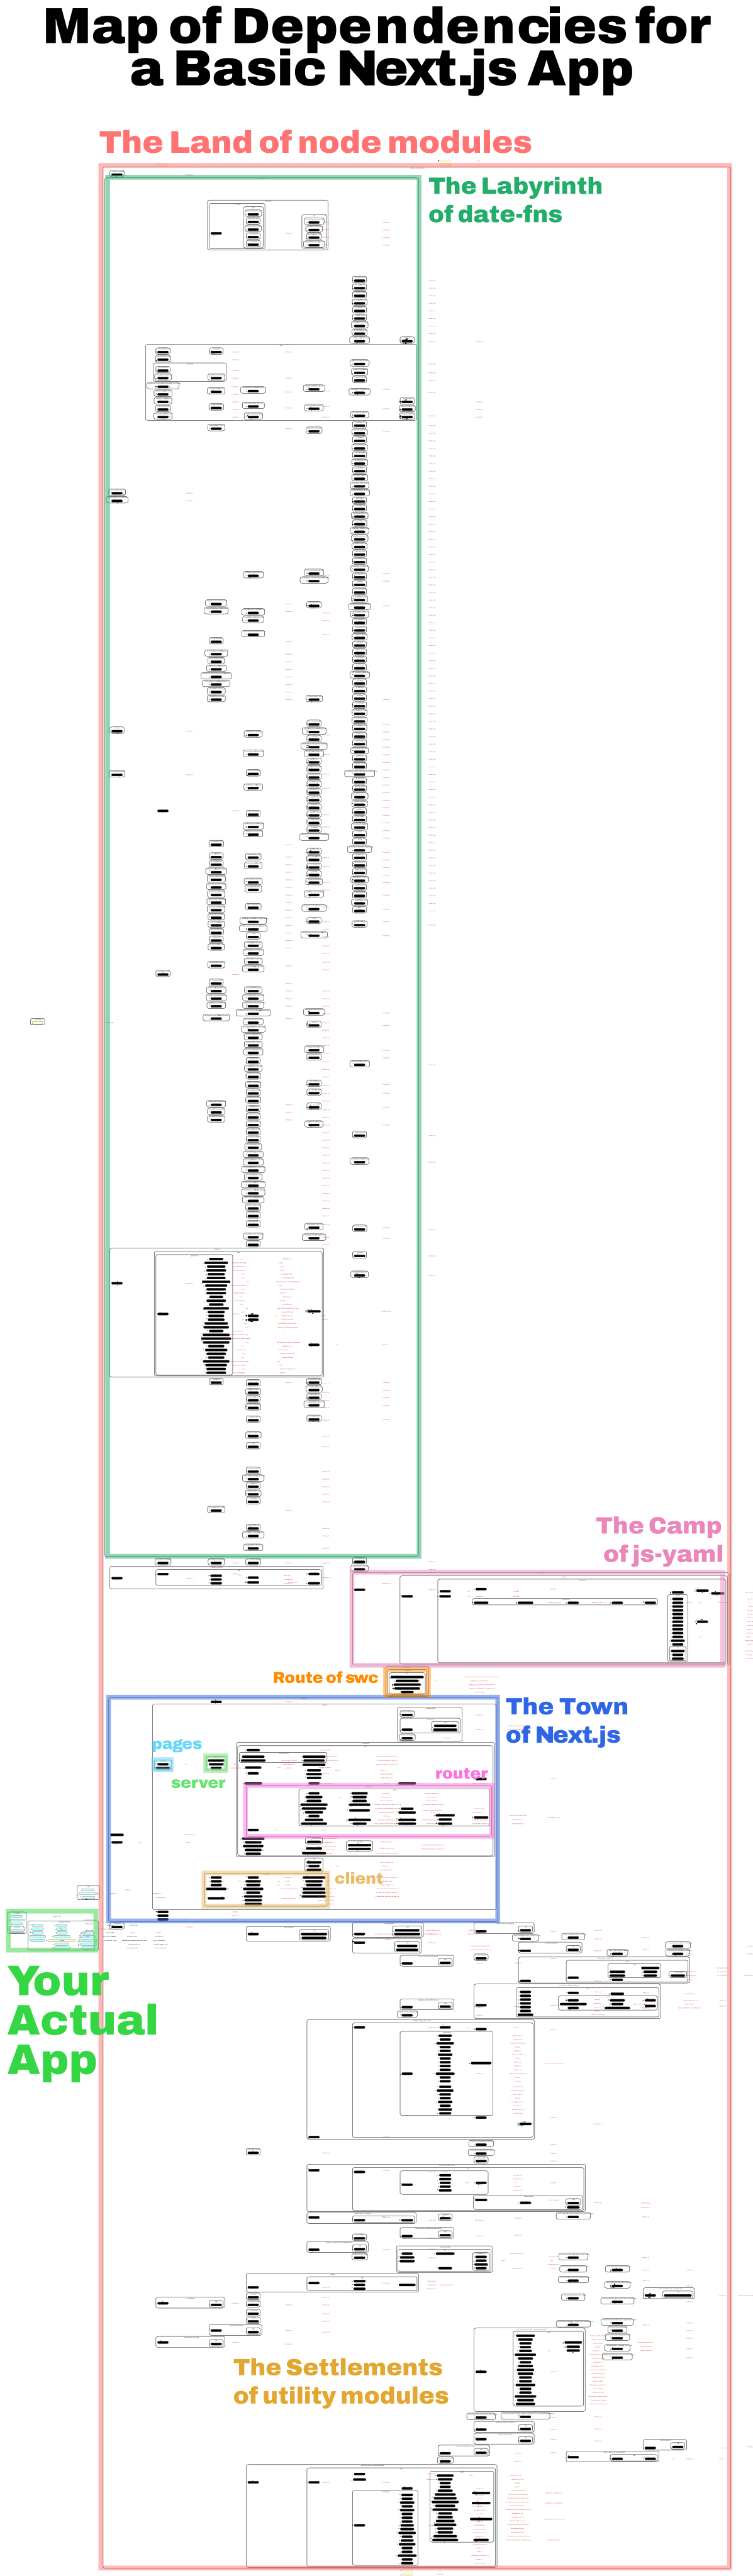
(Who knew that so much went into
date-fns?)
Bundlers require creating a dependency graph for an entry point into the code
(usually index.js), then work backwards looking for everything that index.js
depends on, then everything that index.js depends on depends on, and so on. It
then bundles all that into a single output file that can be shipped to the
browser.
For large projects, this is where the bulk of the build time is spent: traversing and creating a dependency graph, then adding what’s necessary to send to the client in a single bundle.
Or not, if you have code-splitting.
Without code-splitting, a single, bundled JS file would be shipped to the client the first time a user touched the site, whether or not the entirety of that JavaScript was needed. With code-splitting, a performance optimization step, JavaScript is chunked by entry point (e.g. by page or by UI component) or by dynamic imports (so only a small portion of the JavaScript has to be shipped at any one time). Code-splitting helps “lazy load” things currently needed by the user by loading only what is needed and avoiding code that may never be used. With React, you can experience up to 30% reduction in main bundle size when using code splitting.
In our example, [slug]-af0d50a2e56018ac.js is the code needed to load a
specific blog post page, and it does not include any code for the home page or
any other component on the site.
You can start to see why there is a proliferation of build systems and tools in the ecosystem: this shit is complicated. We haven’t even got into all the options you have to configure and compile CSS. Webpack tutorials on YouTube are literally hours long. Long build times are a common frustration, so much so that a main theme of the recent Next.js 13 update was faster building.
As the JavaScript community worked on improving the developer experience in building apps (metaframeworks, CSS preprocessors, JSX, etc.), it also had to work on building better tools and task runners to make the build step less painful.
What if there is another approach?
I find Deno similar: if you learn server-side JavaScript with Deno, you might accidentally learn the web platform along the way. It’s transferable knowledge.
— Jim Nielsen, Deno is Webby (pt. 2)
The build steps above all stem from a simple problem—Node’s JavaScript has
diverged from that of the browser. But what if we could write browser compatible
JavaScript that uses web APIs like fetch and native ESM imports, from the get
go?
That’s Deno. Deno takes the approach that web JS has improved massively in recent years and is now an extremely powerful scripting language. We should all be using it.
Here’s how you might do the same thing as above, build a blog, but with Deno and Fresh.
Fresh is a web framework built on Deno that does not have a build step — no bundling, no transpiling — and that is by design. When a request comes into the server, Fresh renders each page on the fly and sends only HTML (unless an Island is involved, then only the needed amount of JavaScript will be sent as well).
The lack of bundling comes into the first part of this: just-in-time builds. Rendering a page with Fresh is like loading a plain web page. Because all imports are URLs, the page you load calls the URLs to load the other code it needs (either from source, or from a cache if it’s been previously used).
With Fresh, when a user clicks on a post page, /routes/[slug].tsx is loaded.
This page imports these modules:
import { Handlers, PageProps } from "$fresh/server.ts";
import { Head } from "$fresh/runtime.ts";
import { getPost, Post } from "@/utils/posts.ts";
import { CSS, render } from "$gfm";
This may look a lot like importing anything in Node. But that’s because we’re using specifiers from our import map. When resolved these imports are:
import { Handlers, PageProps } from "https://deno.land/x/fresh@1.1.0/server.ts";
import { Head } from "https://deno.land/x/fresh@1.1.0/runtime.ts";
import { getPost, Post } from "../utils/posts.ts";
import { CSS, render } from "https://deno.land/x/gfm@0.1.26/mod.ts";
We’re importing getPost and Post from our own module
posts.ts.
In those components, we’re
importing modules from other URLs:
import { extract } from "https://deno.land/std@0.160.0/encoding/front_matter.ts";
import { join } from "https://deno.land/std@0.160.0/path/posix.ts";
At any given point in the dependency graph, we’re just calling code from other URLs. Like turtles, it’s URLs all the way down.
Fresh doesn’t require any separate transpile steps either, since it all happens just-in-time on request:
And to make your Fresh app more performant, all client-side JavaScript/TypeScript is cached after the first request for fast subsequent retrievals.
As long as developers are not writing raw HTML, JS, and CSS, and need to optimize assets for the performance of the end user, there will inevitably be some sort of “build” step. Whether that step is a separate step that takes minutes and happens in CI/CD or just-in-time when the request happens, depends on your framework or stack of choice.
But removing the build step means you can move faster and be more productive. Stay in flow for longer. No more sword fighting breaks (sorry) or context switching when making a change to your code.
You can also deploy faster. Since there’s no build step, especially when using Deno Deploy’s v8 isolate cloud, your deployment globally takes seconds since it’s simply uploading a few kb’s of JavaScript.
You’re also writing better code, with a better developer experience. Instead of learning Node or vendor specific APIs while trying to tie Node, ESM, and browser compliant JavaScript through a web of bundlers, you can write web standard JavaScript, learning APIs that you can re-use with any cloud primitives.
Skip the build step and try making something with Fresh and Deno Deploy.
此内容由惯性聚合(RSS阅读器)自动聚合整理,仅供阅读参考。 原文来自 — 版权归原作者所有。