






There’s a lot of really great tutorials for anyone looking to get started building a REST API with TypeScript and Express. These tutorials, as great as they are, have two downsides:
They require you to install and configure TypeScript, and ship everything required to accomplish that. This can be time-consuming and a source of frustration, particularly for new developers.
They don’t address the need to be proactive about boxing in untrusted code; this isn’t surprising, as the majority of tooling doesn’t support it.
Which is why we have created this tutorial. With Deno, you don’t need to configure TypeScript, so you can get up and running with minimal dependencies.
 Feel free to watch the
video walkthrough of this post.
Feel free to watch the
video walkthrough of this post.
If you want to skip to the code, you can do so here.
Let’s create main.ts, which will contain the logic for our API.
In this file, let’s import Express through an npm specifier.
import express, { NextFunction, Request, Response } from "npm:express@4.18.2";
This gets us express, but not the type definitions. Let’s import the type definitions by adding this comment:
import express, { NextFunction, Request, Response } from "npm:express@4.18.2";
Next, we need to define a way to interact with Express’ application interface, and we’re going to need to define a port for it to run which we’ll get from the environment:
const app = express();
const port = Number(Deno.env.get("PORT")) || 3000;
Let’s define a test route that will say hello upon receiving a GET request, which we’ll just make the default base route for now:
app.get("/", (_req, res) => {
  res.status(200).send("Hello from Deno and Express!");
});
Now we’ve built the simple logic, we just need it to listen and start serving
requests! For this we’ll use .listen() as shown:
app.listen(port, () => {
  console.log(`Listening on ${port} ...`);
});
And now we’re ready to go!
Let’s start our server:
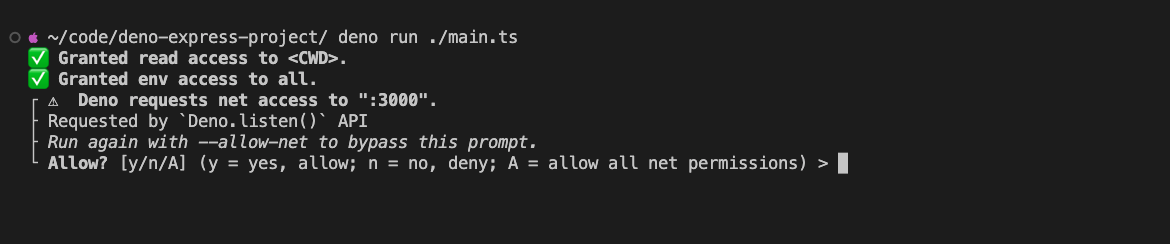
We have to pull in all kinds of code when we’re developing APIs, from geo information, AI, ad servers and whatever other inputs have to come together to produce what’s required. Sure, we don’t anticipate Express introducing vulnerabilities, but Express is just one part of the stack you’re going to need to make something.
Had it requested access to system information, high resolution timers, or access outside of the directory, it would have been a red flag. You can specify permissions in a variety of ways, including the shebang in scripts.
At this point, we have a running API service that we can query with curl:

We’re now certain the framework is working correctly, so we’re sure about our
installation and everything else. But, it’s not really a great working
environment yet, so let’s set up our deno.jsonc file to define some helper
scripts:

This works similar to package.json scripts (in fact, Deno can even use
package.json scripts, but a deno.jsonc is recommended), where we have one
task for development, and another to start the server without watching and
reloading on changes.
Seeing the output of deno task, we can confirm that we have two scripts
available:
$ deno task
Available tasks:
- dev
    deno run --allow-read --allow-net --allow-env --watch main.ts
- start
    deno run --allow-read --allow-net --allow-env main.ts
We can use deno task dev and deno task start, respectively.
The next thing we’re going to need is some kind of logging functionality so that we can troubleshoot our requests while we’re building them, and that’s a great introduction into the concept of middleware in Express.
Middleware is a function that can read and even modify the req and res
objects. We use middleware to do everything from logging to injecting headers,
or even rate limiting and checking auth. Middleware must do one of two things
when it’s done:
next(), which tells Express that it’s time to pass the objects
to the next middleware functionMiddleware takes 3 arguments: req and res as you’d expect, and also next,
which points to the next appropriate middleware function (or returns control to
the handler function).
Rather than console.log() something in every handler that we write, let’s
define the first middleware function to be a logger, and tell Express that we’d
like to use it. In main.ts:
const reqLogger = function (req, _res, next) {
  console.info(`${req.method} request to "${req.url}" by ${req.hostname}`);
  next();
};
You can have as much middleware as you want, and organize it in a way that works for you. Just remember that the speed of your responses depends on how quickly your middleware chain hands control back to the framework. Middleware is executed in the order that the framework is informed of it.
So we’re now in a pretty great place to start developing. Run the
./generate_data.ts command (deno run -A ./generate_data.ts if the shebang
won’t work for you), which will generate some mock user data in data_blob.json
that we can safely use like any other read-only data store safely through Deno’s
import type assertions:
import demoData from "./data_blob.json" with { type: "json" };
We now have access to demoData.users in our handlers, so let’s write two
handlers:
/users which returns the entire contents of the users object, andapp.get("/users", (_req, res) => { res.status(200).json(demoData.users); }); app.get("/users/:id", (req, res) => { const idx = Number(req.params.id); for (const user of demoData.users) { if (user.id === idx) { res.status(200).json(user); } } res.status(400).json({ msg: "User not found" }); });
We can also clear away the hello world default route, which leaves us with a nice API starting point:
import express, { NextFunction, Request, Response } from "npm:express@4.18.2";
import demoData from "./data_blob.json" with { type: "json" };

const app = express();
const port = Number(Deno.env.get("PORT")) || 3000;

const reqLogger = function (req, _res, next) {
  console.info(`${req.method} request to "${req.url}" by ${req.hostname}`);
  next();
};

app.use(reqLogger);

app.get("/users", (_req, res) => {
  res.status(200).json(demoData.users);
});

app.get("/users/:id", (req, res) => {
  const idx = Number(req.params.id);
  for (const user of demoData.users) {
    if (user.id === idx) {
      res.status(200).json(user);
    }
  }
  res.status(400).json({ msg: "User not found" });
});

app.listen(port, () => {
  console.log(`Listening on ${port} ...`);
});
Note the Hello, world! handler on / has been removed (and isn’t present in
the linked repository).
We have a great starting point for a REST API in under 30 lines of code. Now,
you can add a POST handler using app.post(), PUT handler with app.put(),
or whatever other methods you want.
In a future post, we’ll cover how we can use Deno’s test runner and benchmark tools so we’re more comfortable taking our code from a proof of concept to something we’ll trust in production. We’ll end the series after that with ways that we can deploy our project.
Stuck? Get help in our Discord!
此内容由惯性聚合(RSS阅读器)自动聚合整理,仅供阅读参考。 原文来自 — 版权归原作者所有。