


预备工作:
1、安装cocoapods
2、准备github账号,gitee账号,和cocoapod账号
其中github,gitee账号直接在线创建即可。
而注册cocoapods账号需要的终端命令:
pod trunk register xxx@xxx.com "xxx"
然后在邮箱里找到验证链接,登录一下即可。
pod trunk me命令,显示如下格式信息,证明注册成功:
 - Name:     xxx
  - Email:    xxx@xxx.com
  - Since:    November 17th, 09:33
  - Pods:     None
  - Sessions:
    - November 17th, 09:33 - March 24th, 2024 09:34. IP: 112.64.61.93
3、使用pod search libName 命令,在在线库中查找有没有同名的组件库
pod search JJTost
没有的话可以使用。
4、创建库
使用pod lib create libName命令创建一个模板工程
根据提示,选择平台语言,等一系列信息。 如图:
平台选iOS,语言选Objc, 创建一个示例工程选yes, 可以不选测试框架,可以选一个前缀JJ
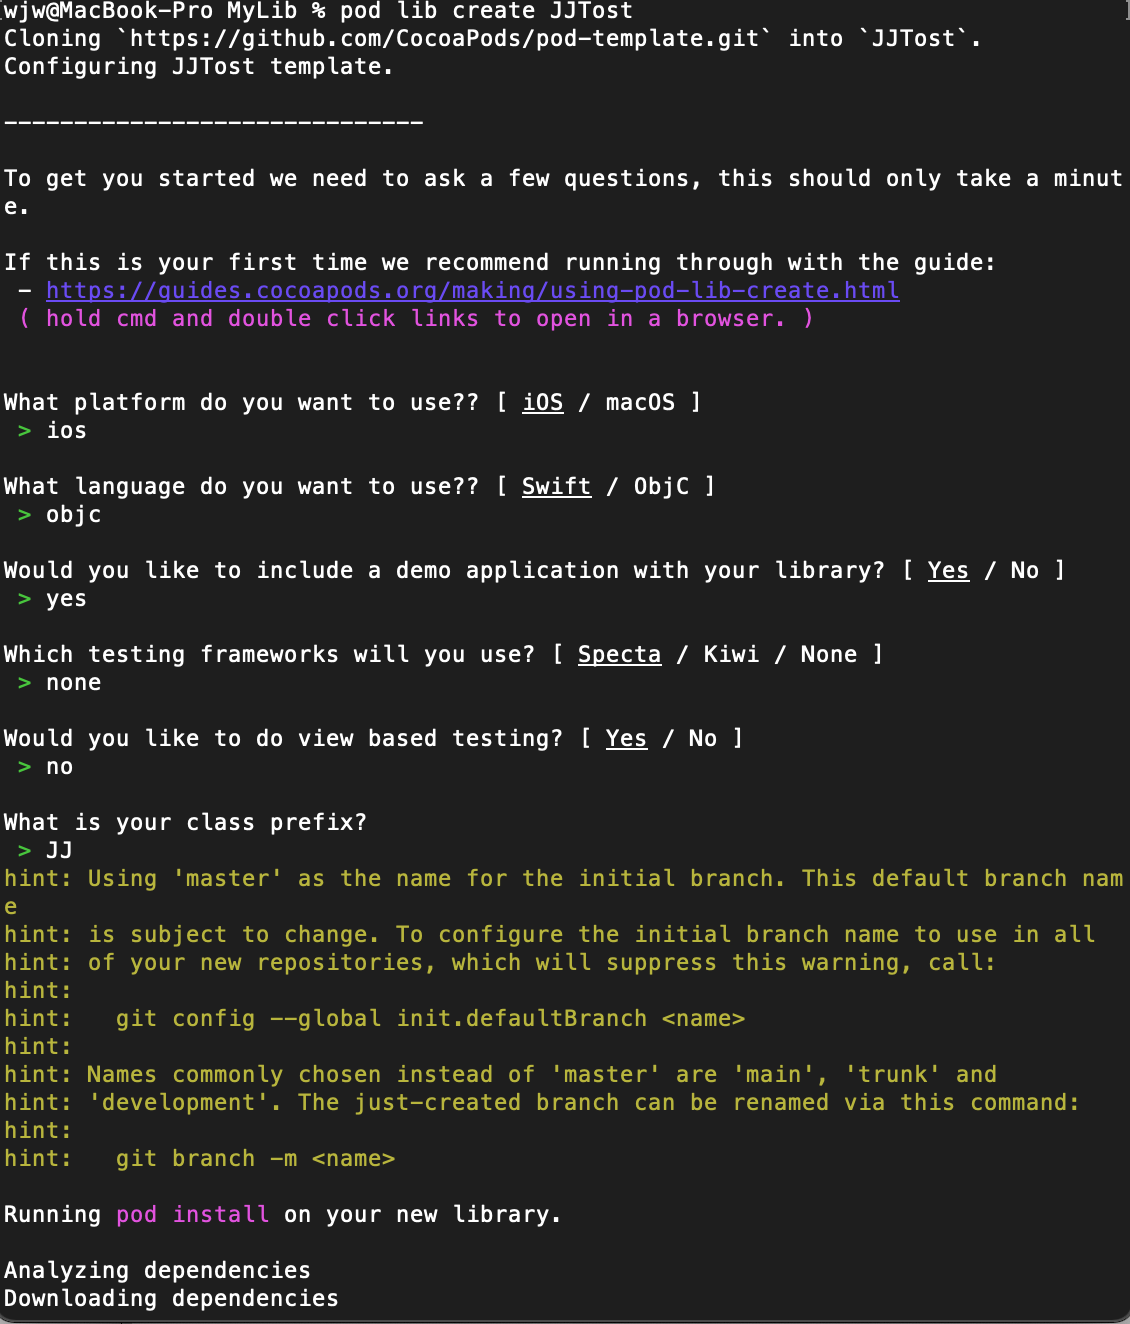
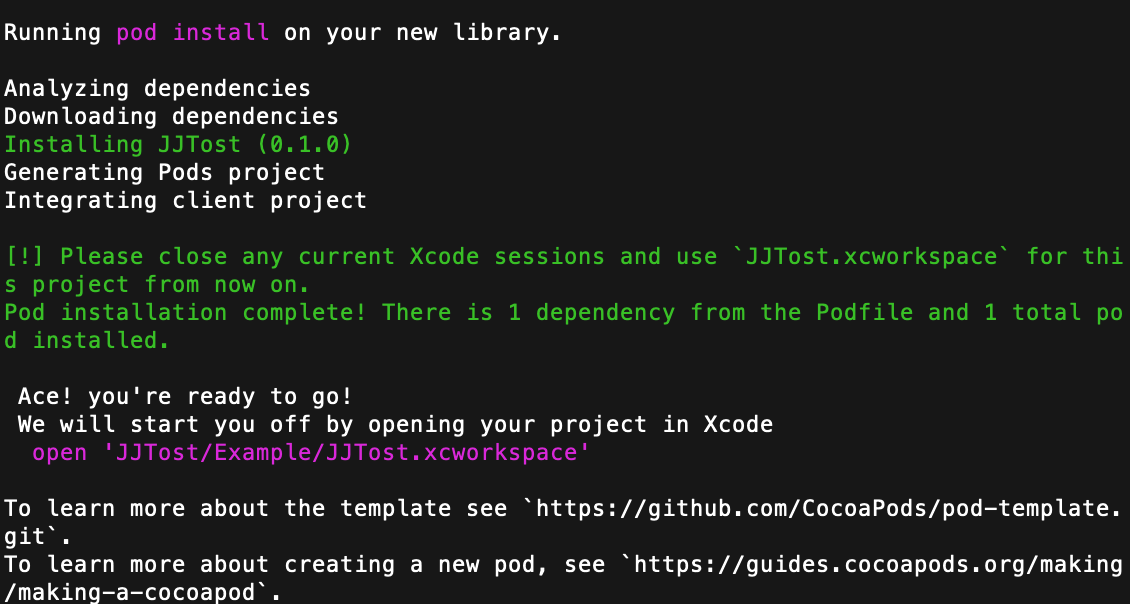
使用pod create JJTost 创建我们自己的组件库,等待pod创建项目骨架。
创建完成会自动用Xcode打开。
5、
终端页面,跳转到Example,写好组件库和导入好资源文件后,执行一下podinstall。
了解.podspec文件,它是pod工程配置文件.
里面包括组件名,组件发布地址等信息。
#
# Be sure to run `pod lib lint JJTost.podspec' to ensure this is a
# valid spec before submitting.
#
# Any lines starting with a # are optional, but their use is encouraged
# To learn more about a Podspec see https://guides.cocoapods.org/syntax/podspec.html
#

Pod::Spec.new do |s|
  s.name             = 'JJTost' #组件名
  s.version          = '0.1.0'  #组件版本号
  s.summary          = 'A short description of JJTost.' #组件的再要信息

# This description is used to generate tags and improve search results.
#   * Think: What does it do? Why did you write it? What is the focus?
#   * Try to keep it short, snappy and to the point.
#   * Write the description between the DESC delimiters below.
#   * Finally, don't worry about the indent, CocoaPods strips it!

# 组件的描述信息
  s.description      = <<-DESC
TODO: Add long description of the pod here.
                       DESC

# github地址
  s.homepage         = 'https://github.com/wjwdive/JJTost'
  # s.screenshots     = 'www.example.com/screenshots_1', 'www.example.com/screenshots_2'
  s.license          = { :type => 'MIT', :file => 'LICENSE' }
# 作者信息
  s.author           = { 'wjwdive' => 'wjwdive@163.com' }
# 仓库地址
  s.source           = { :git => 'https://github.com/wjwdive/JJTost.git', :tag => s.version.to_s }
  # s.social_media_url = 'https://twitter.com/<TWITTER_USERNAME>'
# 支持目标工程版本
  s.ios.deployment_target = '10.0'
# 源文件目录
  s.source_files = 'JJTost/Classes/**/*'

# 资源文件引入目录
  # s.resource_bundles = {
  #   'JJTost' => ['JJTost/Assets/*.png']
  # }

  # s.public_header_files = 'Pod/Classes/**/*.h'
  # s.frameworks = 'UIKit', 'MapKit'
  # s.dependency 'AFNetworking', '~> 2.3'
end
经过以上1-5不,本地工作基本完成。之后需要将我们的代码同步到gitee仓库
6、需要创建远程私有管理库。
在gitee或者github创建私有组件索引库。
6.1 在git创建一个repo_spec仓库:
6.2 使用命令: pod repo add repo_spec仓库地址。添加私有索引库到repo.
pod repo add jj_pod_repo_specs https://gitee.com/wjwdive/jj_pod_repo_specs.git
Cloning spec repo `jj_pod_repo_specs` from `https://gitee.com/wjwdive/jj_pod_repo_specs.git`
6.3 使用命令:pod repo 查看已关联的索引库.
pod repo

jj_pod_repo_specs
- Type: git (master)
- URL:  https://gitee.com/wjwdive/jj_pod_repo_specs.git
- Path: /Users/wjw/.cocoapods/repos/jj_pod_repo_specs

trunk
- Type: CDN
- URL:  https://cdn.cocoapods.org/
- Path: /Users/wjw/.cocoapods/repos/trunk

2 repos
7、创建私有库(组件)
本地的操作就是1~5步,类似的步骤,但是呢需要远端创建一个仓库。
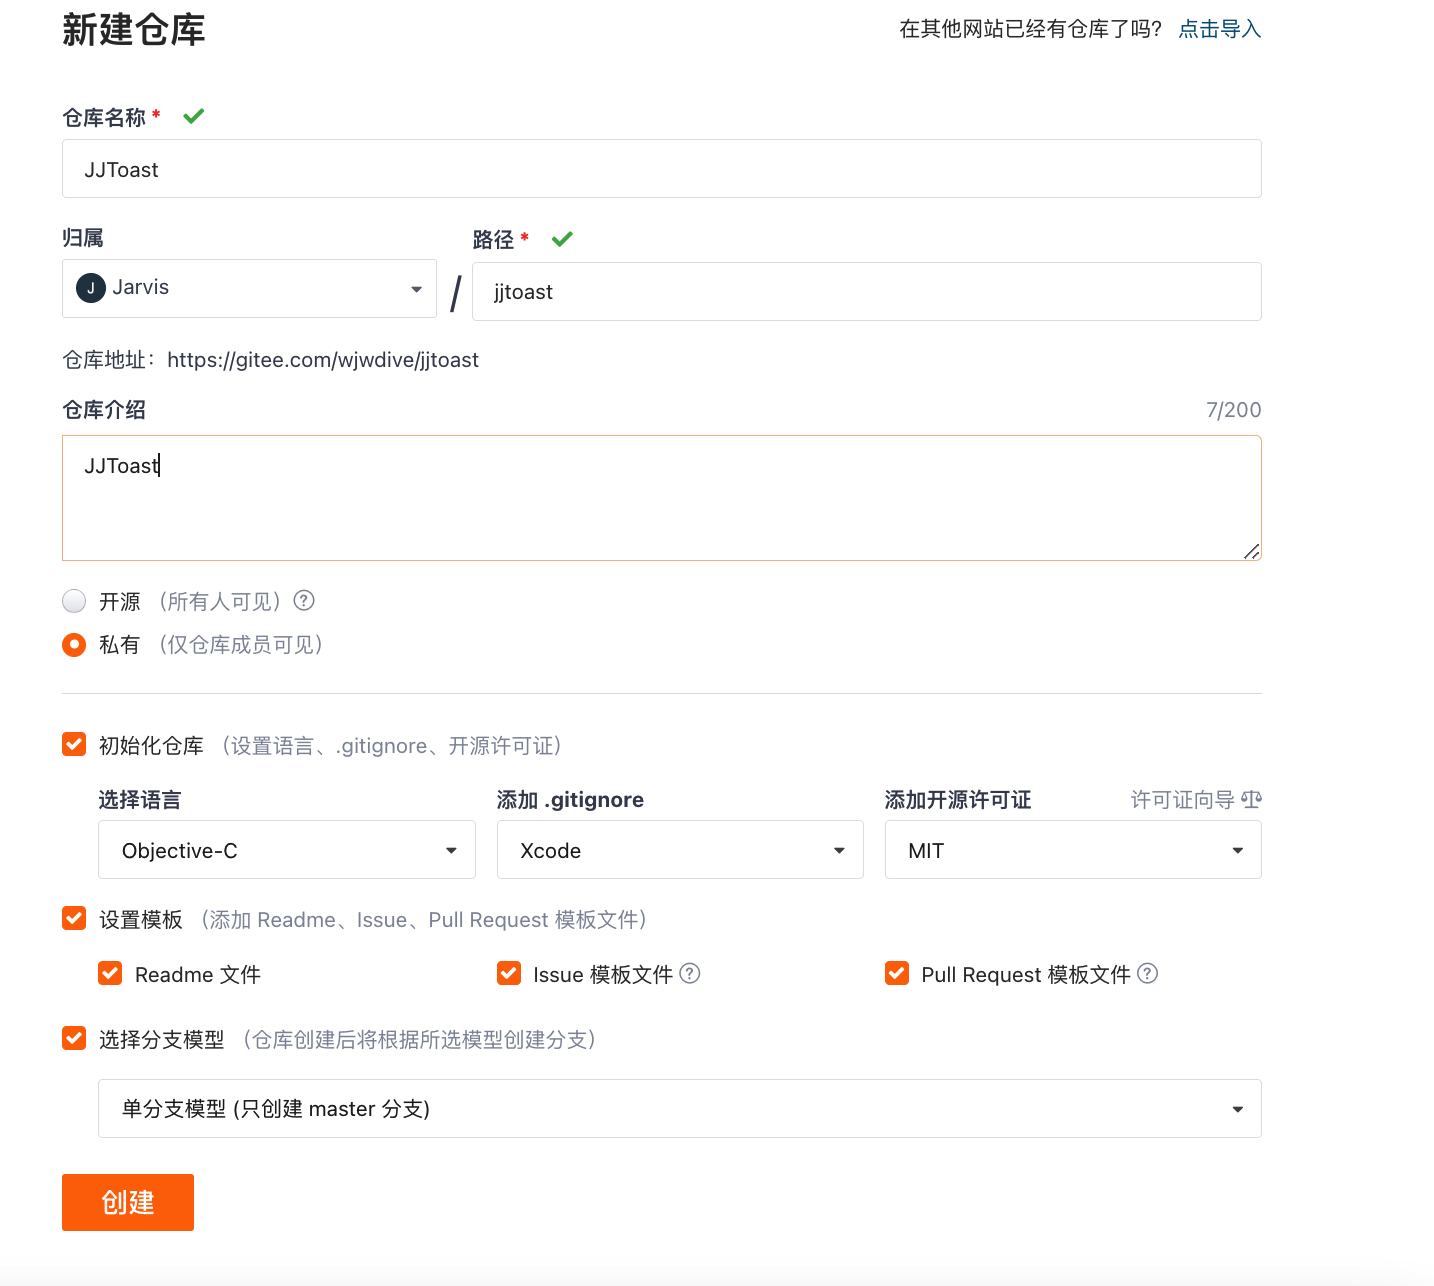
之后将本地代码提交
cd ..
git add .
git commit -m "初始化组件代码"
//管理远程仓库
git remote add origin https://gitee.com/wjwdive/jjtoast.git
//推送代码前,拉去一次
git pull origin master
如果有警告,报错,同时远端确实存在仓库。
强制拉去一次:
git pull origin master -f
//
可能会让你关联分支,使用下面命令
 git branch --set-upstream-to=origin/<branch> master
然后推送
git push origin master -f

打tag
git tag '0.1.0'

推送tag
git push --tags
8、配置.podspec文件
修改s.homepage,s.source 为私有库地址
  s.homepage         = 'https://gitee.com/wjwdive/jjtoast'
  s.source         = 'https://gitee.com/wjwdive/jjtoast.git'
修改完成之后保存,验证下组件是否可以提交成功。
pod spec lint --verbose
//如果有爆红, 不用理会,已经提交成功。
"
[!] The spec did not pass validation, due to 1 warning (but you can use `--allow-warnings` to ignore it).
"
//或用这个命令,重新提交
pod spec lint --verbose --allow-warnings

//见到以下命令,就ok了
    ** BUILD SUCCEEDED **

   Testing with `xcodebuild`.
 -> JJTost (0.1.0)
    - WARN  | summary: The summary is not meaningful.
    - NOTE  | url: The URL (https://gitee.com/wjwdive/jjtoast) is not reachable.
    - NOTE  | xcodebuild:  note: Using new build system
    - NOTE  | xcodebuild:  note: Using codesigning identity override: -
    - NOTE  | xcodebuild:  note: Build preparation complete
    - NOTE  | [iOS] xcodebuild:  note: Planning
    - NOTE  | [iOS] xcodebuild:  note: Building targets in parallel
    - NOTE  | [iOS] xcodebuild:  warning: Capabilities for Signing & Capabilities may not function correctly because its entitlements use a placeholder team ID. To resolve this, select a development team in the App editor. (in target 'App' from project 'App')

Analyzed 1 podspec.
9、使用我们制作好的远程组件库
9.1 直接在宿主项目中,Podfile文件中配置。
use_frameworks!
source "https://gitee.com/wjwdive/jj_pod_repo_specs.git"
platform :ios, '10.0'

target 'JJTost_Example' do
  # 本地私有组件
  #pod 'JJToast', :path => '../'
  pod 'JJToast'
  target 'JJTost_Tests' do
    inherit! :search_paths

  end
end
之后使用命令,把私有库推送到远程私有索引库。
%pod repo push jj_pod_repo_specs JJToast.podspec --allow-warnings
//
% pod repo push jj_pod_repo_specs JJTost.podspec --allow-warnings


Validating spec
 -> JJTost (0.1.0)
    - WARN  | summary: The summary is not meaningful.
    - NOTE  | url: The URL (https://gitee.com/wjwdive/jjtoast) is not reachable.
    - NOTE  | xcodebuild:  note: Using new build system
    - NOTE  | xcodebuild:  note: Using codesigning identity override: -
    - NOTE  | xcodebuild:  note: Build preparation complete
    - NOTE  | [iOS] xcodebuild:  note: Planning
    - NOTE  | [iOS] xcodebuild:  note: Building targets in parallel
    - NOTE  | [iOS] xcodebuild:  warning: Capabilities for Signing & Capabilities may not function correctly because its entitlements use a placeholder team ID. To resolve this, select a development team in the App editor. (in target 'App' from project 'App')

Updating the `jj_pod_repo_specs' repo


Adding the spec to the `jj_pod_repo_specs' repo

 - [Add] JJTost (0.1.0)

Pushing the `jj_pod_repo_specs' repo
// - [Add] JJTost (0.1.0) 代表成功。
10、私有库的升级
组件库有新的代码更新之后,重复第7-9步。
此内容由惯性聚合(RSS阅读器)自动聚合整理,仅供阅读参考。 原文来自 — 版权归原作者所有。