



“多对多”关系不像“一对多”那么“单纯”,它内部涉及到“连接实体”(Join Entity)的概念。咱们先放下这个概念不表,来了解一下多对多数据表为什么需要一个“辅助表”来建立关系。
假设有两张表:一张表示学生,一张表示选修课。那么,这里头的关系是你可以选多门课,而一门课可以被多人选。这是多对多关系,没问题吧。
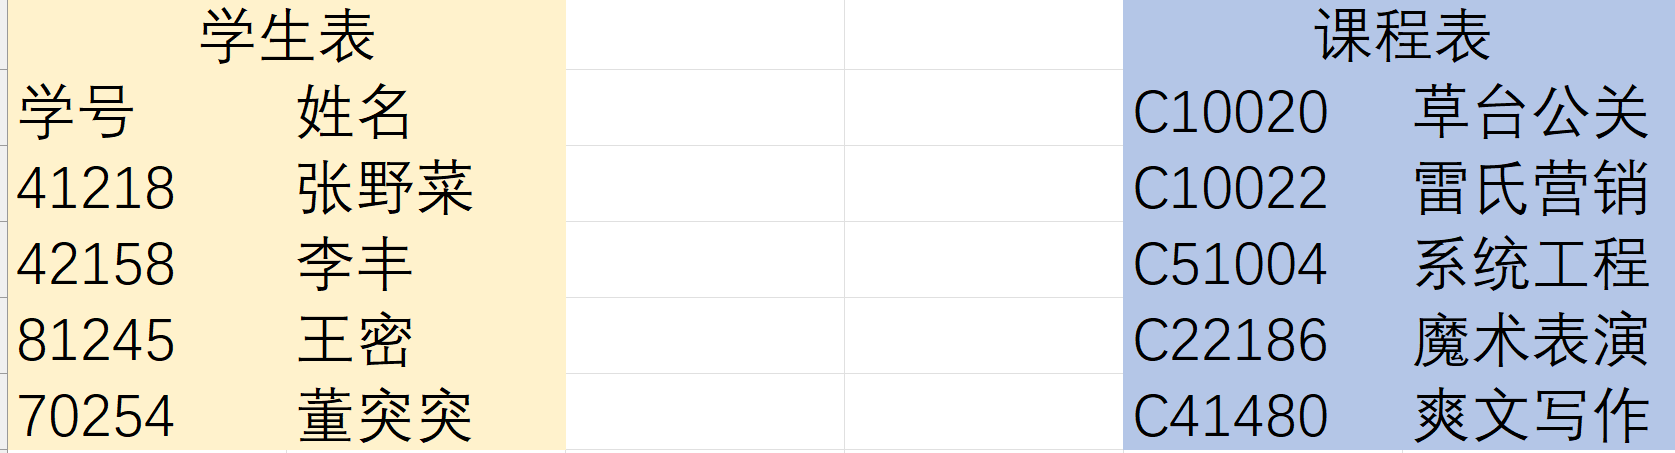
按照数据库存储的原则,学生表中每位学生的信息都不应重复,而课程表也是如此。这么一看,多对多的关系不能直接在这两个表中创建了。
那就只能引入第三个表,专门保存前两个表的信息了。

经过这样处理后,多对多的关系被拆解成两个一对多关系:
左边:学生(1)--- 中间表(N);
右边:课程(1)--- 中间表(N)。
这个中间表负责”连接“两个数据表。转换为实体类开,这个中间表就是”连接实体“了。
------------------------------------------------------------------------------------------------------------------------
接下来先弄个开胃菜,一个很简单的例子
1、定义实体。
public class Student
{
    public int Id { get; set; }
    public string Name { get; set; } = null!;
    public string Code { get; set; } = null!;
    public string? Email { get; set; }

    // 注意这个属性
    public IList<Course> SelectedCourses { get; set; } = new List<Course>();
}

public class Course
{
    public Guid Id { get; set; }
    public string Name { get; set; } = null!;
    public string? Tags { get; set; }

    // 注意这个属性
    public IList<Student> Students { get; set; } = new List<Student>();
}
实体类没什么,就是一个学生类,一个课程类。不过,请留意一下被标记的属性,后面会考。
2、定义数据库上下文。
public class TestContext : DbContext
{
    protected override void OnConfiguring(DbContextOptionsBuilder ob)
    {
        ob.UseSqlServer("server=(localdb)\\mssqllocaldb;database=MySchool");
    }

    #region 数据集合
    public DbSet<Student> StudentSet { get; set; }
    public DbSet<Course> CourseSet { get; set; }
    #endregion
}
上下文这样就可以了,这里可以不写配置数据库模型的代码,因为 EF Core 内置的约定类会帮我们自动完成。
a、通过 DbContext 或子类定义的 DbSet 类型的属性,自动向模型添加 Student、Course 实体;
b、通过上面标记的特殊属性(你看,考点来了),自动识别出这是多对多的关系。
Student 类的 SelectedCourses 属性导航到 Course;
Course 类的 Students 属性导航到 Student。
两个导航属性都是集合类型,因此两者的关系是多对多。此处,SelectedCourses 和 Students 属性有个专用名字,叫“跳跃导航”(Skip Navigation)。这里不应该翻译为“跳过导航”,因为那样翻译意思就不太好理解,所以应取“跳跃”。
解释一下为什么会跳跃。还记得前文的分析吗?两个表如果是多对多关系,那么它们需要一个“连接”表来存储对应关系。也就是说,正常情况下,Student 类的导航属性应该指向中间实体(映射到连接表),Course 实体的导航属性也应该指向中间实体,再通过中间实体把二者连接起来。可是我们再回头看看示例,Student 的导航属性直接指向了 Course,而 Course 实体的导航属性也直接指向了 Student 实体。即它们都跨过(跳过)中间实体,两者直接连接起来了。
老周画了一个不专业的简图。

这里也产生了一个疑问:我们没创建中间实体啊,难道是 EF Core 帮我们创建了?还真是,不妨打印一下数据库模型。
static void Main(string[] args)
{
    using var context = new TestContext();
    // 获取数据库模型
    IModel model = context.Model;
    // 打印
    Console.WriteLine(model.ToDebugString());
}
然后,运行代码,看看输出什么。
Model:
  EntityType: Course
    Properties:
      Id (Guid) Required PK AfterSave:Throw ValueGenerated.OnAdd
      Name (string) Required
      Tags (string)
    Skip navigations:
      Students (IList<Student>) CollectionStudent Inverse: SelectedCourses
    Keys:
      Id PK
  EntityType: CourseStudent (Dictionary<string, object>) CLR Type: Dictionary<string, object>
    Properties:
      SelectedCoursesId (no field, Guid) Indexer Required PK FK AfterSave:Throw
      StudentsId (no field, int) Indexer Required PK FK Index AfterSave:Throw
    Keys:
      SelectedCoursesId, StudentsId PK
    Foreign keys:
      CourseStudent (Dictionary<string, object>) {'SelectedCoursesId'} -> Course {'Id'} Required Cascade
      CourseStudent (Dictionary<string, object>) {'StudentsId'} -> Student {'Id'} Required Cascade
    Indexes:
      StudentsId
  EntityType: Student
    Properties:
      Id (int) Required PK AfterSave:Throw ValueGenerated.OnAdd
      Code (string) Required
      Email (string)
      Name (string) Required
    Skip navigations:
      SelectedCourses (IList<Course>) CollectionCourse Inverse: Students
    Keys:
      Id PK
有没有发现多了一个实体,叫 CourseStudent。虽然我们在代码中没有定义这样的类,但 EF Core 的 ManyToManyJoinEntityTypeConvention 约定类会自动给数据库模型添加一个实体,类型是共享的 Dictionary<string, object>。这可是个万能实体类型,当你不想给项目定义一堆实体类时,你甚至可以把所有实体全注册为字典类型。当然,这样做对于面向对象,对阅读你代码的人来说就不友好了。
 protected virtual void CreateJoinEntityType(
     string joinEntityTypeName,
     IConventionSkipNavigation skipNavigation)
 {
     var model = skipNavigation.DeclaringEntityType.Model;

     // DefaultPropertyBagType 就是字典类型
     var joinEntityTypeBuilder = model.Builder.SharedTypeEntity(joinEntityTypeName, Model.DefaultPropertyBagType)!;

     var inverseSkipNavigation = skipNavigation.Inverse!;
     CreateSkipNavigationForeignKey(skipNavigation, joinEntityTypeBuilder);
     CreateSkipNavigationForeignKey(inverseSkipNavigation, joinEntityTypeBuilder);
 }
可以看看 DefaultPropertyBagType 字段在 Model 类中的定义(Model 类从用途上不对外公开,但类本身是 public 的)。
public static readonly Type DefaultPropertyBagType = typeof(Dictionary<string, object>);
那这个自动添加的中间实体怎么命名呢?继续看源代码。
protected virtual string GenerateJoinTypeName(IConventionSkipNavigation skipNavigation)
{
    var inverseSkipNavigation = skipNavigation.Inverse;
    Check.DebugAssert(
        inverseSkipNavigation?.Inverse == skipNavigation,
        "Inverse's inverse should be the original skip navigation");

    var declaringEntityType = skipNavigation.DeclaringEntityType;
    var inverseEntityType = inverseSkipNavigation.DeclaringEntityType;
    var model = declaringEntityType.Model;
    var joinEntityTypeName = !declaringEntityType.HasSharedClrType
        ? declaringEntityType.ClrType.ShortDisplayName()
        : declaringEntityType.ShortName();
    var inverseName = !inverseEntityType.HasSharedClrType
        ? inverseEntityType.ClrType.ShortDisplayName()
        : inverseEntityType.ShortName();
    joinEntityTypeName = StringComparer.Ordinal.Compare(joinEntityTypeName, inverseName) < 0
        ? joinEntityTypeName + inverseName
        : inverseName + joinEntityTypeName;

    if (model.FindEntityType(joinEntityTypeName) != null)
    {
        var otherIdentifiers = model.GetEntityTypes().ToDictionary(et => et.Name, _ => 0);
        joinEntityTypeName = Uniquifier.Uniquify(
            joinEntityTypeName,
            otherIdentifiers,
            int.MaxValue);
    }

    return joinEntityTypeName;
}
乱七八糟一大段,总结起来就是:
1、分别获取跳跃导航两端的类型,即多对多关系中的两实体(Student 和 Course);
2、将两实体的名称按字符排序,排在前面的作为前半段名字,排序在后面的作为后半段名字。比如,Student 与 Course 排序,字母 C 在 S 前面,所以,中间实体的名字就是 CourseStudent;
3、向中间实体添加两个属性,两个属性共同构成主键。同时,它们也是外键,一个指向 Student,一个指向 Course。即这两个属性同时是主键和外键。
从中间实体到 Student 的导航叫“左边”,从中间实体到 Course 实体的导航叫 “右边”。
如果咱们不想用 EF Core 约定的中间实体,也可以自己去定义。
public class StudentCourseJoin
{
    public Student TheStudent { get; set; } = null!;
    public Course TheCourse { get; set; } = null!;
}
有大伙伴会说了,你这实体没有作为外键的属性啊。没事,外键属性可以作为影子属性(Shadow Property)来添加,反正有 TheStudent 等导航属性,不需要借助外键属性也可以引用其实体。
下面是非常复杂的配置代码,各位可以先让时间停止然后慢慢看。
public class TestContext : DbContext
{
    ……

    protected override void OnModelCreating(ModelBuilder modelBuilder)
    {
        modelBuilder.Entity<Student>()
                // 一个学生选多门课
                .HasMany(s => s.SelectedCourses)
                // 一门课多位学生选
                .WithMany(c => c.Students)
                // 中间实体
                .UsingEntity<StudentCourseJoin>(
                    // 右边:StudentCourseJoin >>> Course
                    // 一个 StudentCourseJoin 只引用一个 Course
                    right => right.HasOne(e => e.TheCourse)
                                // 一个Course可引用多个StudentCourseJoin
                                // 但此处省略了
                                .WithMany()
                                // 外键
                                .HasForeignKey("Course_ID"),
                    // 左边:StudentCourseJoin >>> Student
                    // 一个StudentCourseJoin引用一个Student
                    left => left.HasOne(e => e.TheStudent)
                                // 一个Student可引用多个StudentCourseJoin
                                // 但这里省略了
                                .WithMany()
                                // 外键
                                .HasForeignKey("Student_ID"),

                    ent =>
                    {
                        // 因为这两个是影子属性,必须显式配置
                        // 否则找不到属性,会报错
                        ent.Property<int>("Student_ID");
                        ent.Property<Guid>("Course_ID");
                        // 两个属性都是主键
                        ent.HasKey("Student_ID", "Course_ID");
                    }
                );
    }
}
最外层调用 modelBuilder.Entity<Student>() 的代码就是配置 Student 和 Course 的关系的,相信各位都懂的。复杂的部分是 UsingEntity 方法开始的,配置中间实体(连接实体)的。
首先,咱们把中间实体的关系拆开:
A、Student 对中间实体:一对多,左边;
B、Course 对中间实体:一对多,右边。
所以,UsingEntity 方法的第一个委托配置右边。
right => right.HasOne(e => e.TheCourse)
            // 一个Course可引用多个StudentCourseJoin
            // 但此处省略了
            .WithMany()
            // 外键
            .HasForeignKey("Course_ID")
不要问为什么,因为微软定义这个方法就是先右后左的。HasOne 就是从中间实体(StudentCourseJoin)出发,它引用了几个 Course?一个吧,嗯,所以是One嘛;然后 WithMany 反过来,Curse 可以引用几个中间实体?多个吧(不明白的可以想想,中间表里面是不是可以重复出现课程?)。因为 Course 类没有定义导航属性去引用中间实体,所以 WithMany 参数空白。最后是设置外键,谁引用谁?是中间实体引用 Course 吧,所以,需要一个叫 Course_ID 属性来保存课程ID。
好了,右边干完了,到左边了。
left => left.HasOne(e => e.TheStudent)
            // 一个Student可引用多个StudentCourseJoin
            // 但这里省略了
            .WithMany()
            // 外键
            .HasForeignKey("Student_ID")
左边是谁跟谁?从中间实体出发,它可以引用几个 Student?一个吧,所以是 HasOne;反过来,Student 可以引用几个中间实体?由于学生可以多次出现在中间实体中,所以是 WithMany,但 Student 类没有指向中间实体的导航属性,所以参数空。最后是外键,谁引用谁?是中间实体引用 Student 类吧?所以,中间实体要有一个 Student_ID 属性来保存学生ID。
可是,Student_ID 和 Course_ID 在中间实体中是没有定义的属性,如果不手动配置,EF Core 是找不到的。
ent =>
{
    // 因为这两个是影子属性,必须显式配置
    // 否则找不到属性,会报错
    ent.Property<int>("Student_ID");
    ent.Property<Guid>("Course_ID");
    // 两个属性都是主键
    ent.HasKey("Student_ID", "Course_ID");
}
这两个属性因为实体类中没有定义,所以要作为影子属性用,然后是两个属性都是主键。完事了。
这个代码你要是看懂了,说明你学习 EF Core 的境界又提高了。
此内容由惯性聚合(RSS阅读器)自动聚合整理,仅供阅读参考。 原文来自 — 版权归原作者所有。