





TUN/TAP是操作系统内核中的虚拟网络设备,可以完成用户空间与内核空间的数据的交互。网络协议栈中的数据通过该设备可以进入到用户空间中,而用户空间中的程序通过该设备空间进入到内核空间的网络协议栈。
TUN模拟的是三层设备,操作三层的数据包,而TAP模拟的二层设备,操作二层的数据包。
物理网卡与虚拟网卡的区别是,物理网卡是外界与内核空间的网络协议栈数据交互的门户,而虚拟网卡是用户空间和内核空间交互的门户。
/dev/net/tun是linux提供的字符设备,写入该设备的数据会发送到虚拟网卡中,而发送到虚拟网卡中的数据也会出现在字符设备中。
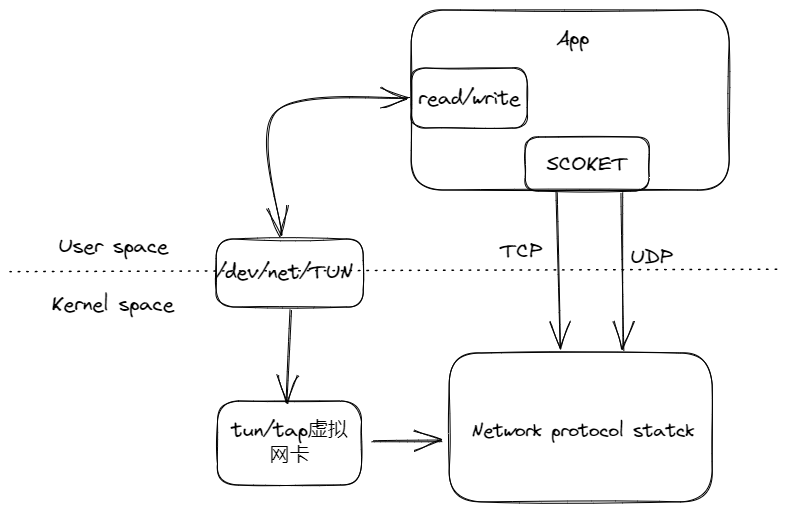
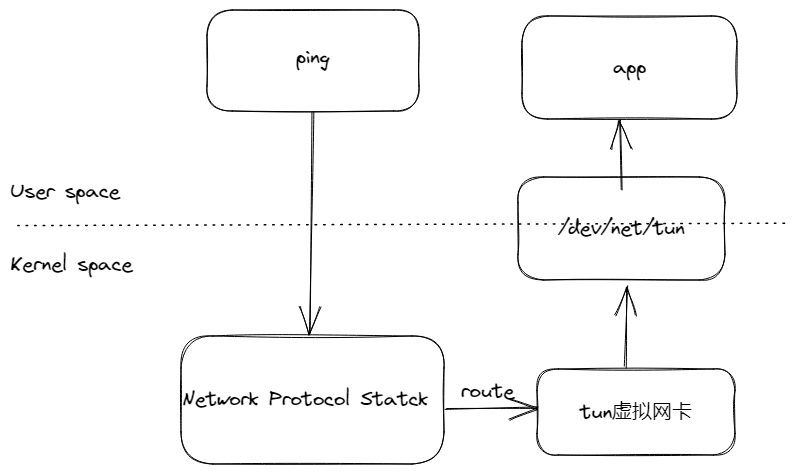
app程序通过打开tun字符设备创建出tun虚拟网卡。然后通过ping命令发送ICMP数据包到网络协议栈中,这个过程是从用户空间到内核空间,再通过路由将数据包转发到tun虚拟网卡中,因为tun网卡特性,会进入到打开该tun设备用户空间app程序中。
app程序代码如下:
import os
import struct
from fcntl import ioctl

BUFFER_SIZE = 4096

# 完成虚拟网卡的注册
TUNSETIFF = 0x400454ca

# 设备模式
IFF_TUN = 0x0001
IFF_TAP = 0x0002


def create_tunnel(tun_name='tun%d', tun_mode=IFF_TUN):
    # 以读写的方式打开字符设备tun,获取到设备描述符
    tun_fd = os.open("/dev/net/tun", os.O_RDWR)

    # 对该设备进行配置,设备名称和设备模式。
    ifn = ioctl(tun_fd, TUNSETIFF, struct.pack(b"16sH", tun_name.encode(), tun_mode))

    # 获取到设备名称
    tun_name = ifn[:16].decode().strip("\x00")
    return tun_fd, tun_name


def main():
    tun_fd, tun_name = create_tunnel()

    while True:
        data = os.read(tun_fd, BUFFER_SIZE)
        print(f"get data from tun. data size = {len(data)}")


if __name__ == '__main__':
    main()
1
2
3
4
5
6
7
8
9
10
11
12
13
14
15
16
17
18
19
20
21
22
23
24
25
26
27
28
29
30
31
32
33
34
35
36
运行后输出:
# python3 tun_demo.py
Open tun/tap device: tun0 for reading...
1
2
通过ip a命令发现tun设备已经创建,但其状态为DOWN
# ip a | grep -C tun
45: tun0: <POINTOPOINT,MULTICAST,NOARP> mtu 1500 qdisc noop state DOWN group default qlen 500
    link/none
1
2
3
对其设置一个ip并将它状态设置为UP
ip a add 192.37.1.2/24 dev tun0
ip link set tun0 up
1
2
配置好ip后,会发现自动配置了如下路由:
...
192.37.1.0/24 dev tun0 proto kernel scope link src 192.37.1.2
...
1
2
3
再次查看tun设备,发现已经配置好
# ip a | grep tun0
45: tun0: <POINTOPOINT,MULTICAST,NOARP,UP,LOWER_UP> mtu 1500 qdisc pfifo_fast state UNKNOWN group default qlen 500
    inet 192.37.1.1/24 scope global tun0
1
2
3
并且这时会发现tun0已经接收到了3个数据包
# python3 tun_demo.py
Open tun/tap device: tun0 for reading...
get data from tun. data size = 52
get data from tun. data size = 52
get data from tun. data size = 52
1
2
3
4
5
这时候使用tcpdump监听tun0,执行ping 192.37.1.2,是有回包的,但是tcpdump却没有抓到任何包。
ping命令会根据目标IP地址和子网掩码来判断数据包的目的地,如果目的地在本地网络中,ping命令会直接将数据包发送到本地网络,而不是通过TUN设备发送。
# tcpdump -i tun0 -n
...

# ping 192.37.1.2 -c 3
PING 192.37.1.2 (192.37.1.2) 56(84) bytes of data.
64 bytes from 192.37.1.2: icmp_seq=1 ttl=64 time=0.148 ms
64 bytes from 192.37.1.2: icmp_seq=2 ttl=64 time=0.114 ms
64 bytes from 192.37.1.2: icmp_seq=3 ttl=64 time=0.316 ms

--- 192.37.1.2 ping statistics ---
3 packets transmitted, 3 received, 0% packet loss, time 1999ms
rtt min/avg/max/mdev = 0.114/0.192/0.316/0.089 ms
1
2
3
4
5
6
7
8
9
10
11
12
13
改为ping 192.37.1.3,可以看到程序收到了收到了数据包,tcpdump也抓到了包,但是因为没有做任何的处理也没有回包,所以ping命令看到不到回包。
# python3 tun_demo.py
Open tun/tap device: tun0 for reading...
get data from tun. data size = 52
get data from tun. data size = 52
get data from tun. data size = 52

get data from tun. data size = 88
get data from tun. data size = 88
get data from tun. data size = 88

# tcpdump -i tun0 -n
tcpdump: verbose output suppressed, use -v or -vv for full protocol decode
listening on tun0, link-type RAW (Raw IP), capture size 262144 bytes
22:56:41.018149 IP 192.37.1.2 > 192.37.1.3: ICMP echo request, id 22559, seq 1, length 64
22:56:42.018871 IP 192.37.1.2 > 192.37.1.3: ICMP echo request, id 22559, seq 2, length 64
22:56:43.022732 IP 192.37.1.2 > 192.37.1.3: ICMP echo request, id 22559, seq 3, length 64
1
2
3
4
5
6
7
8
9
10
11
12
13
14
15
16
使用tun设备基于UDP完成容器跨节点通信。如下图所示:
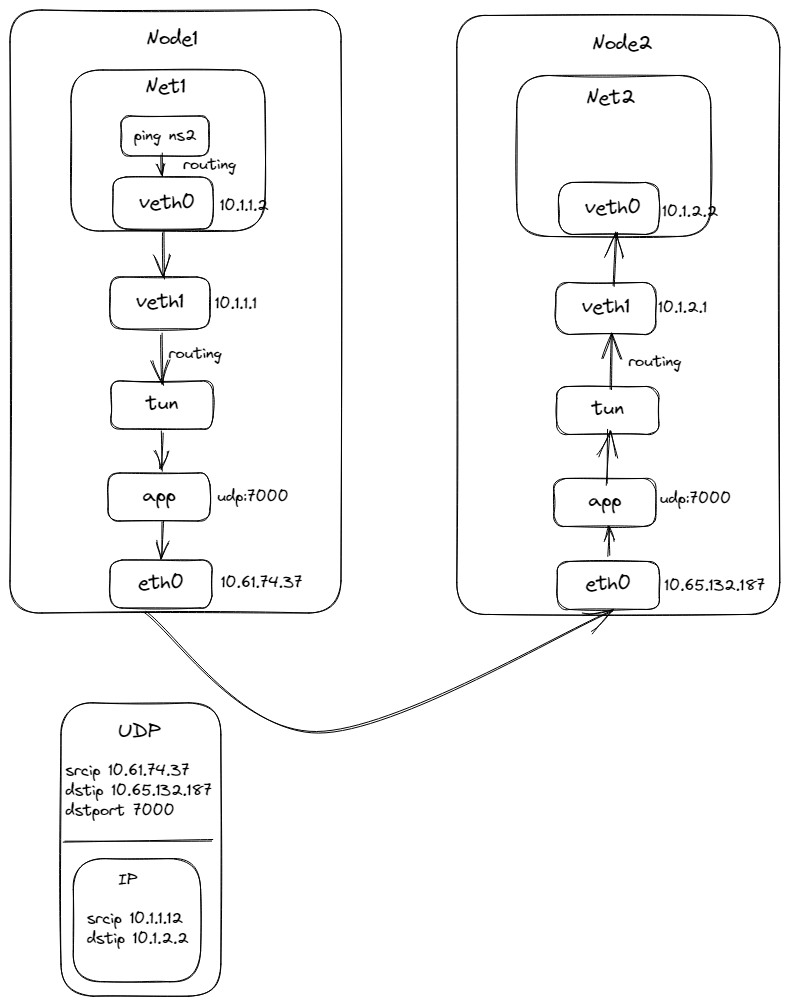
通信流程是,在Node1中的NS1进行ping Node2中NS2的veth0网卡的IP,ICMP的IP包会通过veth0到达veth1中,并进入到宿主机的网络协议栈,通过路由配置达到tun设备,这时app服务从tun设备中读取到IP包数据,然后将其封装在UDP包中,并通过eth0网卡发送到Node2的eth0网卡上,通过网络协议栈解包达到app程序中,拿到里面的IP包,将其写入到tun设备中,进入到网络协议栈中,通过路由达到veth1中,然后到达net ns1的veth0网卡。
app程序简单实现如下:
import os
import socket
import struct
import threading
from fcntl import ioctl
import click

BIND_ADDRESS = ('0.0.0.0', 7000)
BUFFER_SIZE = 4096

TUNSETIFF = 0x400454ca
IFF_TUN = 0x0001
IFF_TAP = 0x0002


def create_tunnel(tun_name='tun%d', tun_mode=IFF_TUN):
    tun_fd = os.open("/dev/net/tun", os.O_RDWR)
    ifn = ioctl(tun_fd, TUNSETIFF, struct.pack(b"16sH", tun_name.encode(), tun_mode))
    tun_name = ifn[:16].decode().strip("\x00")
    return tun_fd, tun_name


def start_tunnel(tun_name):
    os.popen(f"ip link set {tun_name} up")


def udp_server(udp_socket, tun_fd):
    while True:
        data, addr = udp_socket.recvfrom(2048)
        print("get data from udp.")
        if not data:
            break

        os.write(tun_fd, data)


@click.command()
@click.option("--peer_node_ip", "-p", required=True, help="对端节点IP")
def main(peer_node_ip):
    peer_node_addr = (peer_node_ip, 7000)

    tun_fd, tun_name = create_tunnel()
    start_tunnel(tun_name)

    udp_socket = socket.socket(socket.AF_INET, socket.SOCK_DGRAM)
    udp_socket.bind(BIND_ADDRESS)

    t = threading.Thread(target=udp_server, args=(udp_socket, tun_fd))
    t.daemon = True
    t.start()

    while True:
        data = os.read(tun_fd, BUFFER_SIZE)
        print(f"get data from tun. data size = {len(data)}")
        udp_socket.sendto(data, peer_node_addr)


if __name__ == '__main__':
    main()
1
2
3
4
5
6
7
8
9
10
11
12
13
14
15
16
17
18
19
20
21
22
23
24
25
26
27
28
29
30
31
32
33
34
35
36
37
38
39
40
41
42
43
44
45
46
47
48
49
50
51
52
53
54
55
56
57
58
59
在Node1中运行该程序,设置Node2 IP
python3 tun_app.py -p 10.65.132.187
1
可以看到已经创建了tun设备
# ip link show tun0
...
109: tun0: <POINTOPOINT,MULTICAST,NOARP,UP,LOWER_UP> mtu 1500 qdisc pfifo_fast state UNKNOWN group default qlen 500
    link/none
    inet6 fe80::8e98:91a4:6537:d77a/64 scope link flags 800
       valid_lft forever preferred_lft forever
...
1
2
3
4
5
6
7
在Node1中创建Network Namespace命名为net1,使用它来完成模拟容器网络。
然后创建veth pair,它们是一对网卡,分别为命名为veth0和veth1
ip link add veth0 type veth peer name veth1
1
将其一端接入到net1中,并设置好其IP地址为10.1.1.2/24
ip link set dev veth0 netns net1
ip netns exec net1 ip addr add 10.1.1.2/24 dev veth0
ip netns exec net1 ip link set dev veth0 up
1
2
3
开启在宿主机上的veth1网卡,并设置其IP为10.1.1.1/24
ip a add 10.1.1.1/24 dev veth1
ip link set dev veth1 up
1
2
再将net1中的默认路由设置成都走veth0,这样,ping Node2中net2的网络包可以到veth1中,也就进入到了宿主机的网络协议栈中。
ip netns exec net1 ip r add default via 10.1.1.1 dev veth0
1
在宿主机上还需要添加路由,访问Node2中net2时都路由到tun0设备
ip r add 10.1.2.0/24 dev tun0
1
这时,在Node1 net1中ping Node2 net2时,正常来说是可以在app中看到从tun收到IP包的,虽然没有回包,那是因为app程序收到包后没有做任何回包操作。
# ip netns exec net1 ping 10.1.2.2 -c 3
PING 10.1.2.2 (10.1.2.2) 56(84) bytes of data.
--- 10.1.2.2 ping statistics ---
3 packets transmitted, 0 received, 100% packet loss, time 2001ms
1
2
3
4
我们通过tcpdump抓取veth1网卡,可以看到收到了ARP请求,想要获取10.1.2.2的MAC地址,但是一直获取不到,所以导致IP包无法通过路由达到TUN设备
# tcpdump -i veth1 -n
00:45:13.988076 ARP, Request who-has 10.1.2.2 tell 10.1.1.2, length 28
1
2
这个时候需要开启veth1的arp代理,将veth1的MAC地址作为ARP的回复。
echo 1 > /proc/sys/net/ipv4/conf/veth1/proxy_arp
1
再次ping Node2 net2时,可以看到tcpdump看到ARP中回复的MAC地址为veth1的地址。
# tcpdump -i veth1 -n
00:45:13.988076 ARP, Request who-has 10.1.2.2 tell 10.1.1.2, length 28
00:45:13.988100 ARP, Reply 10.1.2.2 is-at 4e:7c:bf:fe:4d:0f, length 28

# ip a | grep -C 3 veth1
...
107: veth1@if108: <BROADCAST,MULTICAST,UP,LOWER_UP> mtu 1500 qdisc noqueue state UP group default qlen 1000
    link/ether 4e:7c:bf:fe:4d:0f brd ff:ff:ff:ff:ff:ff link-netnsid 3
    inet 10.1.1.1/24 scope global veth1
       valid_lft forever preferred_lft forever
...
1
2
3
4
5
6
7
8
9
10
11
并且app程序中也从tun设备中获取到了IP包。
# python3 tun_app.py -p 10.65.132.187
get data from tun. data size = 52
get data from tun. data size = 52
get data from tun. data size = 52
get data from tun. data size = 88
get data from tun. data size = 88
get data from tun. data size = 88
1
2
3
4
5
6
7
到这一步,Node1的基本配置完成,接下来配置Node2,配置的方法与Node1一致,在Node2执行命令如下:
# 开启app程序
python3 tun_app.py -p 10.61.74.37

# 新增network namespace net2
ip netns add net2

# 新增veth pair设备
ip link add veth0 type veth peer name veth1

# 配置veth pair设备
ip link set dev veth0 netns net2
ip netns exec net2 ip addr add 10.1.2.2/24 dev veth0
ip netns exec net2 ip link set dev veth0 up

ip a add 10.1.2.1/24 dev veth1
ip link set dev veth1 up

# 添加默认路由
ip netns exec net2 ip r add default via 10.1.2.1 dev veth0

# 添加tun0设备路由
ip r add 10.1.1.0/24 dev tun0

# 开启arp代理
echo 1 >  /proc/sys/net/ipv4/conf/veth1/proxy_arp
1
2
3
4
5
6
7
8
9
10
11
12
13
14
15
16
17
18
19
20
21
22
23
24
25
配置完成后,在Node1的net1中ping Node2的net2,可以ping通有回包。
# ip netns exec net1 ping 10.1.2.2
PING 10.1.2.2 (10.1.2.2) 56(84) bytes of data.
64 bytes from 10.1.2.2: icmp_seq=1 ttl=62 time=5.46 ms
64 bytes from 10.1.2.2: icmp_seq=2 ttl=62 time=4.67 ms
64 bytes from 10.1.2.2: icmp_seq=3 ttl=62 time=5.52 ms
1
2
3
4
5
此内容由惯性聚合(RSS阅读器)自动聚合整理,仅供阅读参考。 原文来自 — 版权归原作者所有。