





这是什么?怎么使用?请看上一篇 Duplicacy CLI 备份工具基本使用笔记
对于一个 Repository,排除/包含过滤器适用于 Duplicacy 的备份 (backup) 和恢复 (restore) 命令
.duplicacy 目录下的 filters 文件这样设计是合理的,备份一般会被设置为自动化的定时任务,读取文件或目录过滤规则会很方便; 恢复操作一般是用户手动操作,备份的时候设置好了过滤规则,恢复的时候就无需再使用过滤器
Duplicacy 的过滤器支持 (*)通配符匹配 和 正则表达式,可以单独使用任一种或是将两种结合起来使用。
模式的顺序很重要,通过模式匹配路径的时候,Duplicacy 对模式按照 路径顺序 一级一级的匹配,若发现该路径与包含模式匹配,表示该路径被包含在内且不再比较;同理,若发现该路径与排除模式相匹配也不再进一步比较。找不到匹配的时候,如果所有模式都是包含,该路径将被排除,否则将被包含。
注意: 路径相对于当前 Repository,区分大小写,在所有系统上路径都没有前导符号 /。
Duplicacy 的排除/包含过滤器相当强大和灵活,但是实际使用的时候,可能会让您有点困扰。保持简单的原则,我们举几个简单的例子,然后使用命令来测试过滤器(这实际并不会真的备份),它会告诉我们这个过程过滤器是如何工作的。
duplicacy -d -log backup -enum-only
编写过滤器规则时,可以执行上面的测试命令来验证过滤器是否正确工作。
包含模式 以 + 开头,排除模式 以 - 开头;所有模式都可以使用 * 通配符匹配任意长度的路径字符串,使用 ? 匹配单个字符;\ 和 ? 支持匹配包括 / 在内的任何字符。
以 / 结尾的模式仅适用于目录,文件不以 / 结尾;以 \ 和 ? 结尾的模式适用于目录或文件,当一个目录被排除时,该目录下所有文件和子目录都会被排除,所以要包含某个子目录,必须明确包含其所有父目录。
演示的文件目录树如下:
tree -L 3 -a
.
├── .DS_Store
├── .duplicacy
│   ├── .DS_Store
│   ├── cache
│   │   ├── .DS_Store
│   │   └── default
│   ├── filters
│   ├── odb-token.json
│   └── preferences
├── LICENSE
├── README.md
├── config.json
├── docs
│   ├── contribute.md
│   ├── deploy.md
│   ├── develop.md
│   └── get-start.md
├── foo
│   ├── bar
│   │   ├── 1-1.md
│   │   ├── 2-2.md
│   │   └── 3-3.md
│   └── po
│       └── hello.md
├── tmp
│   ├── .DS_Store
│   ├── download.tmp
│   └── upload.tmp
└── upload
    ├── telegram-upload
    └── gpg-fingerprint-filter-gpu

9 directories, 22 files
情景 1 只想要备份 foo/bar/ 目录,我们可能会这样写:
# 错误示例
+foo/bar/*
-foo/po/
-*
看起来似乎没问题,但是 Duplicacy 并不会如期工作,它的过滤器按照 路径顺序 一级一级匹配,当它匹配到 -* 排除所有目录的时候,就会把 foo/ 目录直接排除(第一级在同一级),foo/ 的子目录 bar/ 根本就不会被访问到(直接被排除了).
我们要确保 foo/ 先被包含,然后它下面的 bar/ 目录才会被包含,就像这样:
# 正确示例
+foo/
+foo/bar/*
-foo/po/
-*
测试过滤器工作过程
INFO SNAPSHOT_FILTER Parsing filter file /Users/xvoes/Space/clink/.duplicacy/filters
DEBUG REGEX_DEBUG There are 0 compiled regular expressions stored
INFO SNAPSHOT_FILTER Loaded 4 include/exclude pattern(s)
TRACE SNAPSHOT_PATTERN Pattern: +foo/
TRACE SNAPSHOT_PATTERN Pattern: +foo/bar/*
TRACE SNAPSHOT_PATTERN Pattern: -foo/po/
TRACE SNAPSHOT_PATTERN Pattern: -*
DEBUG LIST_ENTRIES Listing
DEBUG PATTERN_EXCLUDE .DS_Store is excluded by pattern -*
DEBUG PATTERN_EXCLUDE LICENSE is excluded by pattern -*
DEBUG PATTERN_EXCLUDE README.md is excluded by pattern -*
DEBUG PATTERN_EXCLUDE config.json is excluded by pattern -*
DEBUG PATTERN_EXCLUDE docs/ is excluded by pattern -*
DEBUG PATTERN_INCLUDE foo/ is included by pattern +foo/
DEBUG CHUNK_CACHE Chunk af8a4271e55cc0617ce5e5c31b9e8a0419cd6e6322f79e138213dcdf7c15c952 has been loaded from the snapshot cache
DEBUG PATTERN_EXCLUDE tmp/ is excluded by pattern -*
DEBUG PATTERN_EXCLUDE upload/ is excluded by pattern -*
DEBUG LIST_ENTRIES Listing foo/
DEBUG PATTERN_INCLUDE foo/bar/ is included by pattern +foo/bar/*
DEBUG PATTERN_EXCLUDE foo/po/ is excluded by pattern -foo/po/
DEBUG LIST_ENTRIES Listing foo/bar/
DEBUG PATTERN_INCLUDE foo/bar/1-1.md is included by pattern +foo/bar/*
DEBUG PATTERN_INCLUDE foo/bar/2-2.md is included by pattern +foo/bar/*
DEBUG PATTERN_INCLUDE foo/bar/3-3.md is included by pattern +foo/bar/*
情景 2 只包含 foo/ 并且排除里面的 po/ 子目录:
-foo/bar/
-foo/po/
+foo/*
-*
情景 3 包含 upload/ 目录并排除里面的所有文件
情景 4 只包含 foo/ 排除里面所有的子目录
情景 4 只包含所有 .md 文件
测试过滤器,可以看到正确工作了
INFO SNAPSHOT_FILTER Parsing filter file /Users/xvoes/Space/clink/.duplicacy/filters
DEBUG REGEX_DEBUG There are 0 compiled regular expressions stored
INFO SNAPSHOT_FILTER Loaded 5 include/exclude pattern(s)
TRACE SNAPSHOT_PATTERN Pattern: -?*.DS_Store
TRACE SNAPSHOT_PATTERN Pattern: +docs/
TRACE SNAPSHOT_PATTERN Pattern: +foo/
TRACE SNAPSHOT_PATTERN Pattern: +?*.md
TRACE SNAPSHOT_PATTERN Pattern: -*
DEBUG LIST_ENTRIES Listing
DEBUG PATTERN_EXCLUDE .DS_Store is excluded by pattern -*
DEBUG PATTERN_EXCLUDE LICENSE is excluded by pattern -*
DEBUG PATTERN_INCLUDE README.md is included by pattern +?*.md
DEBUG PATTERN_EXCLUDE config.json is excluded by pattern -*
DEBUG PATTERN_INCLUDE docs/ is included by pattern +docs/
DEBUG PATTERN_INCLUDE foo/ is included by pattern +foo/
DEBUG PATTERN_EXCLUDE tmp/ is excluded by pattern -*
DEBUG PATTERN_EXCLUDE upload/ is excluded by pattern -*
DEBUG LIST_ENTRIES Listing docs/
DEBUG PATTERN_INCLUDE docs/contribute.md is included by pattern +?*.md
DEBUG PATTERN_INCLUDE docs/deploy.md is included by pattern +?*.md
DEBUG PATTERN_INCLUDE docs/develop.md is included by pattern +?*.md
DEBUG PATTERN_INCLUDE docs/get-start.md is included by pattern +?*.md
DEBUG LIST_ENTRIES Listing foo/
DEBUG PATTERN_EXCLUDE foo/bar/ is excluded by pattern -*
DEBUG PATTERN_EXCLUDE foo/po/ is excluded by pattern -*
包含模式 以 i: 开头,排除模式 以 e: 开头,过滤器规则顺序和前面一样,正则表达式更为强大,Duplicacy 使用标准 正则表达式
,如果没接触过需要学习一下。
# 包含 SQLite 数据库文件
i:\.sqlite$
# 排除 SQLite 临时文件
e:\.sqlite-.*$
默认过滤器文件是 .duplicacy/filters,还可以使用 @ 导入其他的过滤器文件,比如:
@/path/to/the/one-filters-file
@/path/to/the/two-filters-file
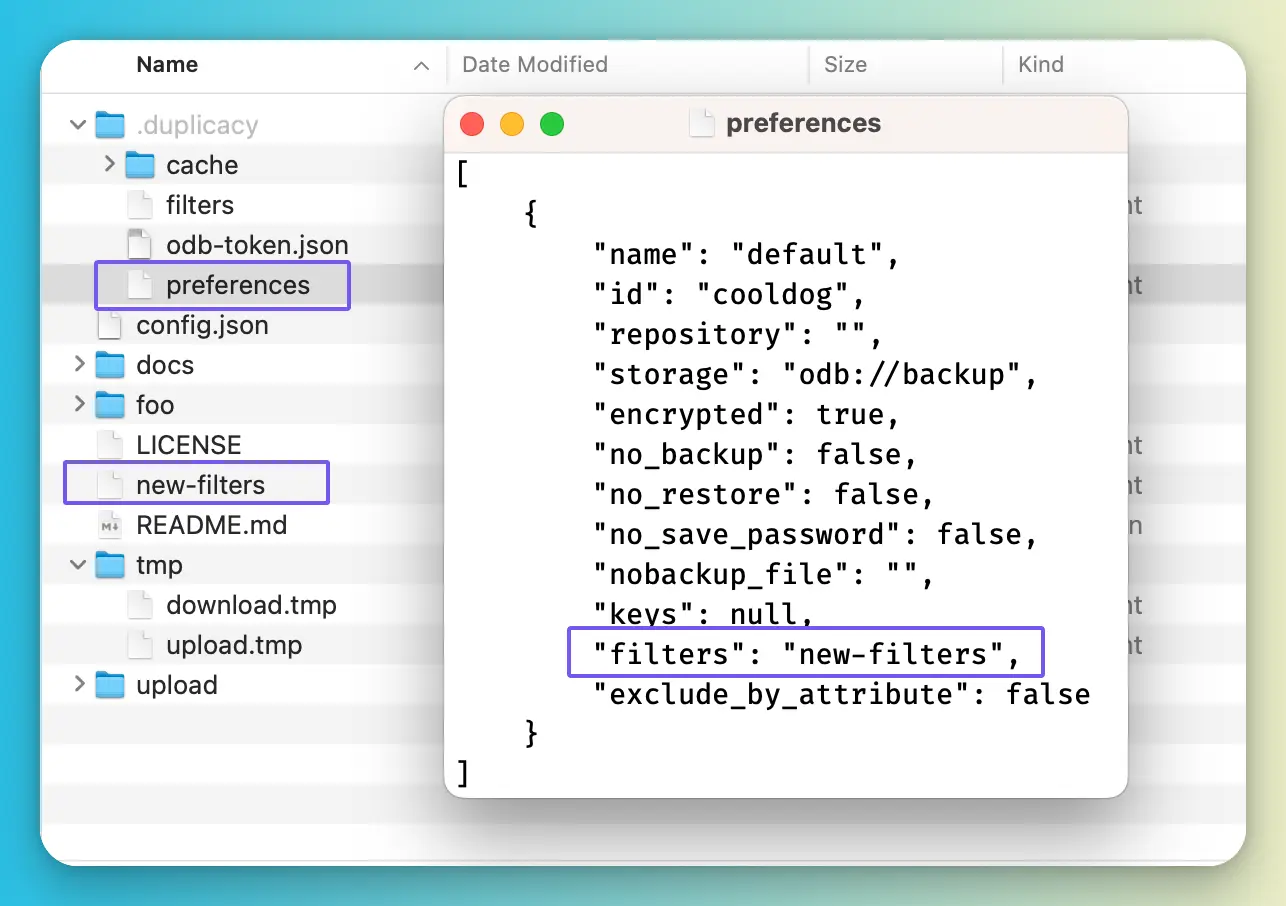
修改 Repository 默认的过滤器文件位置
duplicacy set -filters new-filters
New options for storage odb://backup have been saved
直接修改 preference 里的配置也是可以的 😂
大多数桌面操作系统有一个 Keyring/Keychain 保险库,默认情况 1,Duplicacy 使用它存储用户输入的密码和 Storage 服务的相关机密信息。
Duplicacy 在 macOS 上使用 Keychain,在 Linux 上仅支持 Gome-Keyring2,在 Windows 上使用一组加密/解密 API 处理凭据并保存到 .duplicacy/keyring 文件里。
一般服务器上很少使用桌面环境,自然也没有 Duplicacy 支持的密码凭据保险库。这就导致每次用户执行 duplicacy 命令都需要输入加密密码、Storage 的相关凭据,这对我们之后的自动化任务是很不利的3。Duplicacy 提供了两种方法来保存密码凭据,一种是将密码凭据暴露到环境变量4,各种不同的密码凭据 环境变量名称 可以在 Wiki 页面 查看。
在终端使用 export 将密码凭据导入当前终端会话里5,需要注意的是, 环境变量名称都应该全大写(即使您的 Storage 名称是小写),比如:
export DUPLICACY_PASSWORD="Your-Repository-Encrypt-Password"
export DUPLICACY_S3_ID="Your-S3-API-ID"
export DUPLICACY_S3_SECRET="Your-S3-API-Secret"

# 比如将 Azure Access Key 保存到一个文本文件
export DUPLICACY_AZURE_KEY="cat /home/ubuntu/azure_access_password"
另一种方法是将密码凭据相关的信息存储到 .duplicacy/preferences 文件里,这是本文推荐的方法,可以在多个 Repository 之间独立分离密码凭据
└── .duplicacy
    ├── cache
    ├── filters
    └── preferences
为了安全,在 Linux 服务器上应该禁止 root 用户直接登录,日常使用普通用户,需要 root 权限的时候用 sudo 命令进行提权。在这个前提下,要确保 .duplicacy/ 目录仅能被 root 用户读写,普通用户不可读写,虽谈不上有多么安全,但至少比环境变量保存密码凭据要好得多。
下面操作的普通用户是 xvoes,Repository 即将在 xvoes 的 container/example 里初始化,使用的存储是 Cloudflare R2 对象存储(兼容 S3 API)
# 当前用户路径
pwd
/home/xvoes

# 进入目标目录 (注意修改)
cd container/example

# 初始化 Repository
sudo duplicacy init -e -storage-name r2 vaultwarden s3://[email protected]/xxx
接下来把密码凭据保存到 .duplicacy/preferences 里 6
sudo duplicacy set -key r2_s3_id -value "xxxxxxxxxxx"
sudo duplicacy set -key r2_s3_secret -value "xxxxxxxxxxxxxxx"
sudo duplicacy set -key password -value "xxxxxxxxxxxxx"
创建排除/包含过滤器规则文件并测试
cd .duplicacy/ && \
touch filters && \
vim filters

# 编辑完成后,测试过滤器规则
sudo duplicacy -d -log backup -enum-only
控制密码凭据父目录仅 root 用户可读写
sudo chmod -R 0700 .duplicacy
进行第一次备份,应该不需要输入任何凭据或密码了,否则请检查
sudo duplicacy -log backup -stats
在 Linux 上使用 Cron 运行定时任务是个比较简单高效的方案,我们的任务很简单,写个 .sh 脚本定时用 Cron 执行,将执行时间和日志保存到指定位置,简单的示例:
#!/bin/sh
# backup-example.sh (示例脚本名称)
cd /home/xvoes/container/example  # 修改为您的 Repository 路径
echo "`date -Iseconds`" Started backing up $PWD ...
sudo duplicacy -log backup -stats
echo "`date -Iseconds`" Stopped backing up $PWD ...
给脚本 backup-example.sh 可执行权限
sudo chmod +x backup-example.sh
建议运行一次脚本测试一下
确认没问题就可以设置 Cron 定时任务了
sudo crontab -e

# 编辑 Ctontab 任务
# 以每天的 3 点 33 分执行任务脚本,并将日志以时间格式保存到指定位置 (注意修改路径)
33 3 * * * cd /home/xvoes/ && ./backup-example.sh > /home/xvoes/duplicacy/logs/backup-example_`date "+\%Y-\%m-\%d-\%H-\%M"`.log 2>&1
上面是一台服务器上的单个备份任务,这次操作在另一台服务器上,定时备份多个任务,已知:
就像这样:
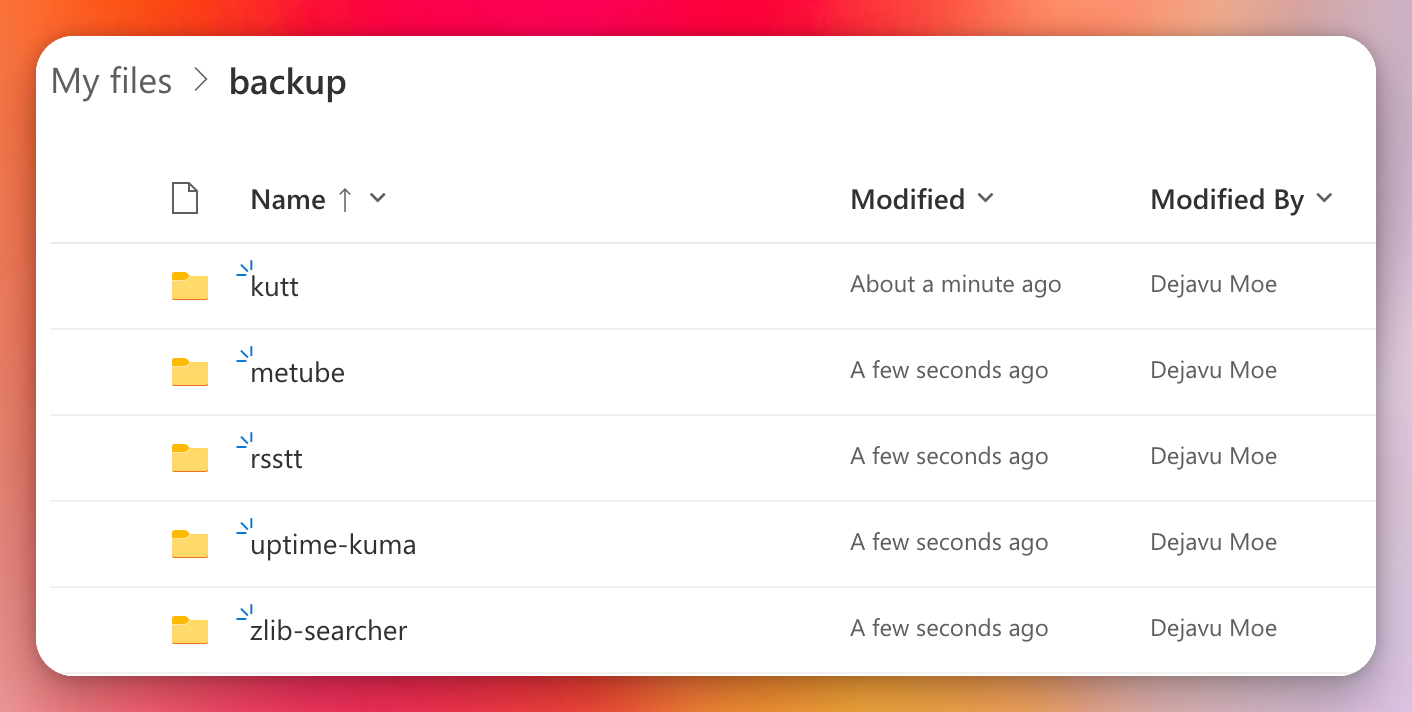
当前起始路径是用户 ubuntu 的用户目录
pwd
/home/ubuntu

# 将 OneDrive 的 odb-token.json 上传到当前用户目录下
.
├── kutt
├── metube
├── odb-token.json
├── rsstt
├── uptime-kuma
└── zlib-searcher
初始化 kutt
cd kutt && \
sudo duplicacy init -e -storage-name odb kutt odb://backup/kutt
# 输入 odb-token.json 路径
Enter the path of the OneDrive token file (downloadable from https://duplicacy.com/one_start):../odb-token.json
Enter storage password for odb://backup/kutt:****************  # 加密密码
Re-enter storage password:****************  # 重复加密密码
/home/ubuntu/kutt will be backed up to odb://backup/kutt with id kutt
初始化 metube
cd && \
cd metube && \
sudo duplicacy init -e -storage-name odb metube odb://backup/metube
初始化 rsstt
cd && \
cd rsstt && \
sudo duplicacy init -e -storage-name odb rsstt odb://backup/rsstt
初始化 uptime-kuma
cd && \
cd uptime-kuma && \
sudo duplicacy init -e -storage-name odb uptime-kuma odb://backup/uptime-kuma
初始化 zlib-searcher
cd && \
cd zlib-searcher && \
sudo duplicacy init -e -storage-name odb zlib-searcher odb://backup/zlib-searcher
指定 OneDrive Business 访问令牌文件路径和每个 Repository 加密密码
# for kutt repo
cd && \
cd kutt && \
sudo cp ../odb-token.json .duplicacy/odb-token.json && \
sudo duplicacy set -key odb_odb_token -value .duplicacy/odb-token.json && \
sudo duplicacy set -key password -value "****************"

# for metube repo
cd && \
cd metube && \
sudo cp ../odb-token.json .duplicacy/odb-token.json && \
sudo duplicacy set -key odb_odb_token -value .duplicacy/odb-token.json && \
sudo duplicacy set -key password -value "****************"

# for rsstt repo
cd && \
cd rsstt && \
sudo cp ../odb-token.json .duplicacy/odb-token.json && \
sudo duplicacy set -key odb_odb_token -value .duplicacy/odb-token.json && \
sudo duplicacy set -key password -value "****************"

# for uptime-kuma repo
cd && \
cd uptime-kuma && \
sudo cp ../odb-token.json .duplicacy/odb-token.json && \
sudo duplicacy set -key odb_odb_token -value .duplicacy/odb-token.json && \
sudo duplicacy set -key password -value "****************"

# for zlib-searcher repo
cd && \
cd zlib-searcher && \
sudo cp ../odb-token.json .duplicacy/odb-token.json && \
sudo duplicacy set -key odb_odb_token -value .duplicacy/odb-token.json && \
sudo duplicacy set -key password -value "****************"
在每个 Repository 创建排除/包含过滤器文件,并测试过滤器规则
保护对每个 Repository 配置目录的访问
cd && \
cd kutt &&
sudo chmod -R 0700 .duplicacy && \
cd && \
cd metube &&
sudo chmod -R 0700 .duplicacy && \
cd && \
cd rsstt &&
sudo chmod -R 0700 .duplicacy && \
cd && \
cd uptime-kuma &&
sudo chmod -R 0700 .duplicacy && \
cd && \
cd zlib-searcher &&
sudo chmod -R 0700 .duplicacy
# 脚本目录和日志输出目录
cd && \
mkdir dup && \
cd dup && \
touch backup.sh && \
mkdir logs
编辑 backup.sh
#!/bin/sh
# backup kutt
cd /home/ubuntu/kutt
echo "`date -Iseconds`" Started backing up $PWD ...
/usr/local/bin/duplicacy -log backup -stats
echo "`date -Iseconds`" Stopped backing up $PWD ...
# backup metube
cd /home/ubuntu/metube
echo "`date -Iseconds`" Started backing up $PWD ...
/usr/local/bin/duplicacy -log backup -stats
echo "`date -Iseconds`" Stopped backing up $PWD ...
# backup rsstt
cd /home/ubuntu/rsstt
echo "`date -Iseconds`" Started backing up $PWD ...
/usr/local/bin/duplicacy -log backup -stats
echo "`date -Iseconds`" Stopped backing up $PWD ...
# backup uptime-kuma
cd /home/ubuntu/uptime-kuma
echo "`date -Iseconds`" Started backing up $PWD ...
/usr/local/bin/duplicacy -log backup -stats
echo "`date -Iseconds`" Stopped backing up $PWD ...
# backup zlib-searcher
cd /home/ubuntu/zlib-searcher
echo "`date -Iseconds`" Started backing up $PWD ...
/usr/local/bin/duplicacy -log backup -stats
echo "`date -Iseconds`" Stopped backing up $PWD ...
# finish backup
# restart cloudflared daemon
systemctl restart cloudflared
赋予脚本可执行权限
这台服务器系统时钟是 UTC 时间,为了方便我们睡觉的时候执行备份,可以在系统时间上加 8 个小时
sudo crontab -e

# 编辑 Crontab 任务
# 每天 3 点 33 分执行任务脚本,并将日志以时间格式保存到指定位置 (注意修改路径)
# 3 + 24 - 8 = 19 (服务器时区 UTC,管理员时区 UTC+8)
33 19 * * * cd /home/ubuntu/dup/ && ./backup.sh > /home/ubuntu/dup/logs/backup_`date "+\%Y-\%m-\%d-\%H-\%M"`.log 2>&1
上面的脚本、Cron 表达式、目录都可以根据个人需求自行修改,恢复和定期修剪备份也可以使用类似的方式进行。
参考信息
此内容由惯性聚合(RSS阅读器)自动聚合整理,仅供阅读参考。 原文来自 — 版权归原作者所有。