惯性聚合 高效追踪和阅读你感兴趣的博客、新闻、科技资讯
阅读原文 在惯性聚合中打开

推荐订阅源

WordPress大学
WordPress大学
MyScale Blog
MyScale Blog
freeCodeCamp Programming Tutorials: Python, JavaScript, Git & More
人人都是产品经理
人人都是产品经理
C
Check Point Blog
宝玉的分享
宝玉的分享
B
Blog RSS Feed
博客园 - 三生石上(FineUI控件)
量子位
Martin Fowler
Martin Fowler
酷 壳 – CoolShell
酷 壳 – CoolShell
Jina AI
Jina AI
IT之家
IT之家
阮一峰的网络日志
阮一峰的网络日志
博客园 - 叶小钗
J
Java Code Geeks
The Cloudflare Blog
Cyber Security Advisories - MS-ISAC
腾讯CDC
P
Proofpoint News Feed
美团技术团队
H
Help Net Security
B
Blog
博客园_首页

Comments for TrueNAS – Open Enterprise Storage

How to Set Up and Install TrueNAS CORE Yes, You Can (Still) Virtualize TrueNAS TrueNAS enables Container Storage and Kubernetes | TrueNAS - Open Enterprise Storage TrueNAS 12.0-U2 is Released | TrueNAS - Open Enterprise Storage OpenZFS 2.0 Ships First on TrueNAS | TrueNAS - Open Enterprise Storage TrueNAS 12.0-U1 is Scheduled for early December | TrueNAS - Open Enterprise Storage iXsystems TrueNAS M60 Recognized as SDC Awards Storage Hardware Innovation of the Year Finalist | TrueNAS - TrueNAS 12.0 is Released! The TrueNAS Mini X and Mini X+ are here! Cross-Site Disaster Recovery with TrueNAS TrueNAS SCALE Release Plan | TrueNAS - Open Enterprise Storage iXsystems Unveils Industry's Fastest OpenZFS Storage System with Launch of TrueNAS M60 | TrueNAS - Open TrueNAS 12.0 BETA2 Showcases Performance Improvements | TrueNAS - Open Enterprise Storage Be One of the First to Test Drive TrueNAS 12.0 BETA | TrueNAS - Open Enterprise Storage TrueNAS is Multi-OS New-New TrueNAS Logo Unveiled | TrueNAS - Open Enterprise Storage Recession Proof Storage | FreeNAS 11.3-U3.1 Now Available - Issue #80 | TrueNAS - Open Enterprise Storage Open Source Infrastructure is Recession-Proof | TrueNAS - Open Enterprise Storage Understanding How OpenZFS Keeps Your Data Safe | TrueNAS - Open Enterprise Storage You Can Influence the TrueNAS CORE Roadmap! | TrueNAS - Open Enterprise Storage TrueNAS CORE is the new FreeNAS Setting Up Users, Permissions, and ACLs on FreeNAS | TrueNAS - Open Enterprise Storage TrueNAS Updates for VMware vSphere 7 | TrueNAS - Open Enterprise Storage FreeNAS and TrueNAS are Unifying Introducing the FreeNAS Mini E+ and All-Flash Minis | TrueNAS - Open Enterprise Storage Plex Permissions in FreeNAS 11.3 | TrueNAS - Open Enterprise Storage Latest TrueNAS and FreeNAS Release Delivers Wizards, Plugins, and Accelerated Replication | TrueNAS - Open How To Back Up Google Drive to FreeNAS | TrueNAS How To Enable Wireguard on FreeNAS 11.3 | TrueNAS - Open Enterprise Storage The Official FreeNAS Hardware Guide | TrueNAS - Open Enterprise Storage
How to Set Up Windows SMB Shares on FreeNAS | TrueNAS - O...
iX Team · 2020-03-12 · via Comments for TrueNAS – Open Enterprise Storage

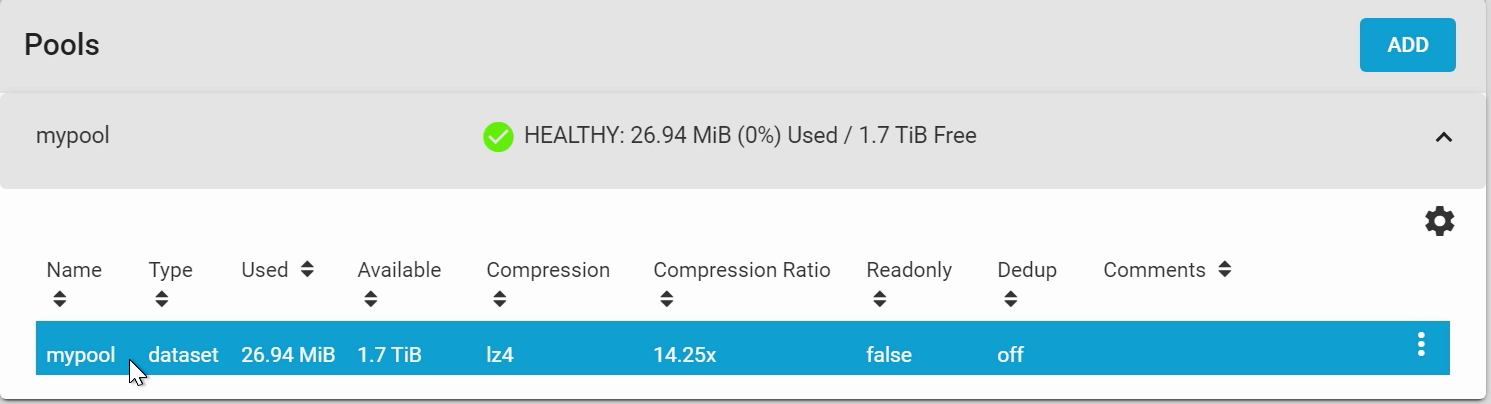
In this tutorial, we are going to show you how to set up an SMB share on your FreeNAS machine. To share data with Windows clients, FreeNAS uses CIFS, also known as SMB or Samba. SMB shares are also compatible with macOS offering great flexibility for client operating systems. Before you get started, you should already have a pool configured in FreeNAS. To learn how to configure a pool, see our FreeNAS ZFS Pools Overview tutorial.
Setting up a FreeNAS User Account
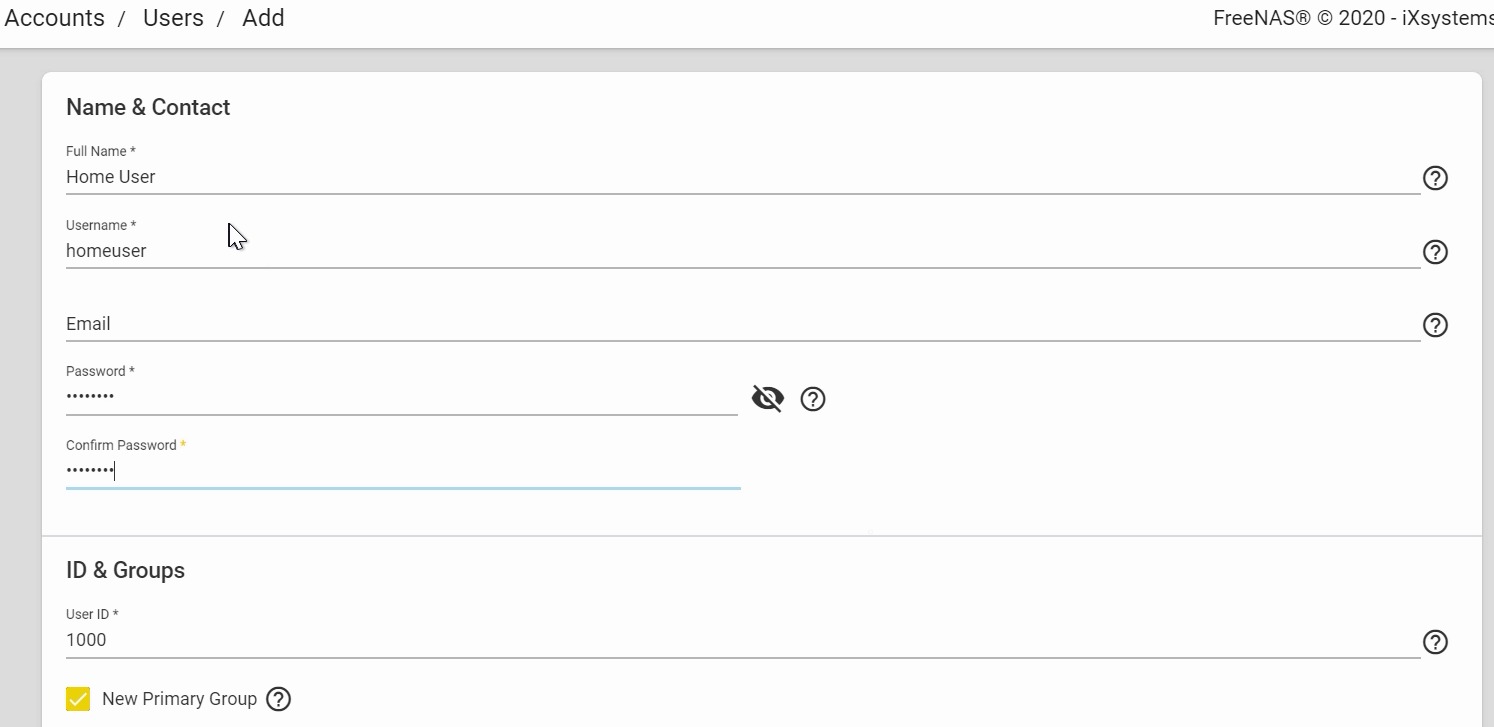
First, we will go ahead and set up a FreeNAS user account, which allows you to securely access your shares. Go to “Accounts” then “Users” on the left menu. I’ll be creating a new user called “homeuser” and adding a new primary group with it. I’ll be configuring the new share to use this user and group, but be sure to substitute your own users and groups as needed.
Setting up a Windows (SMB) Share
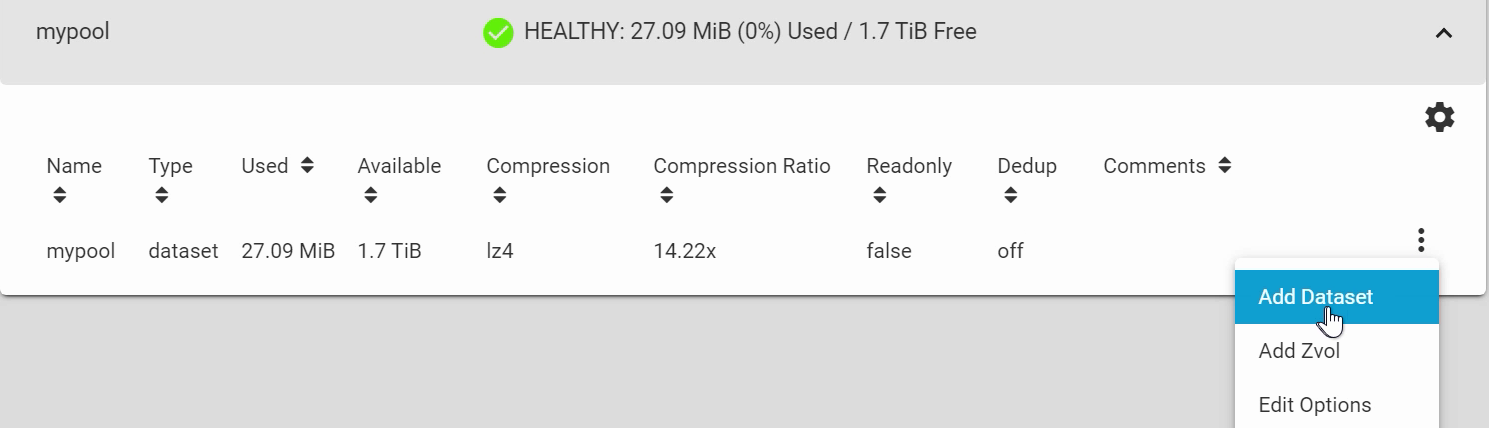
Go to “Storage” then “Pools” on the left hand side. Open the pool options by clicking the 3 dots on the right of the pool then, “Add Dataset

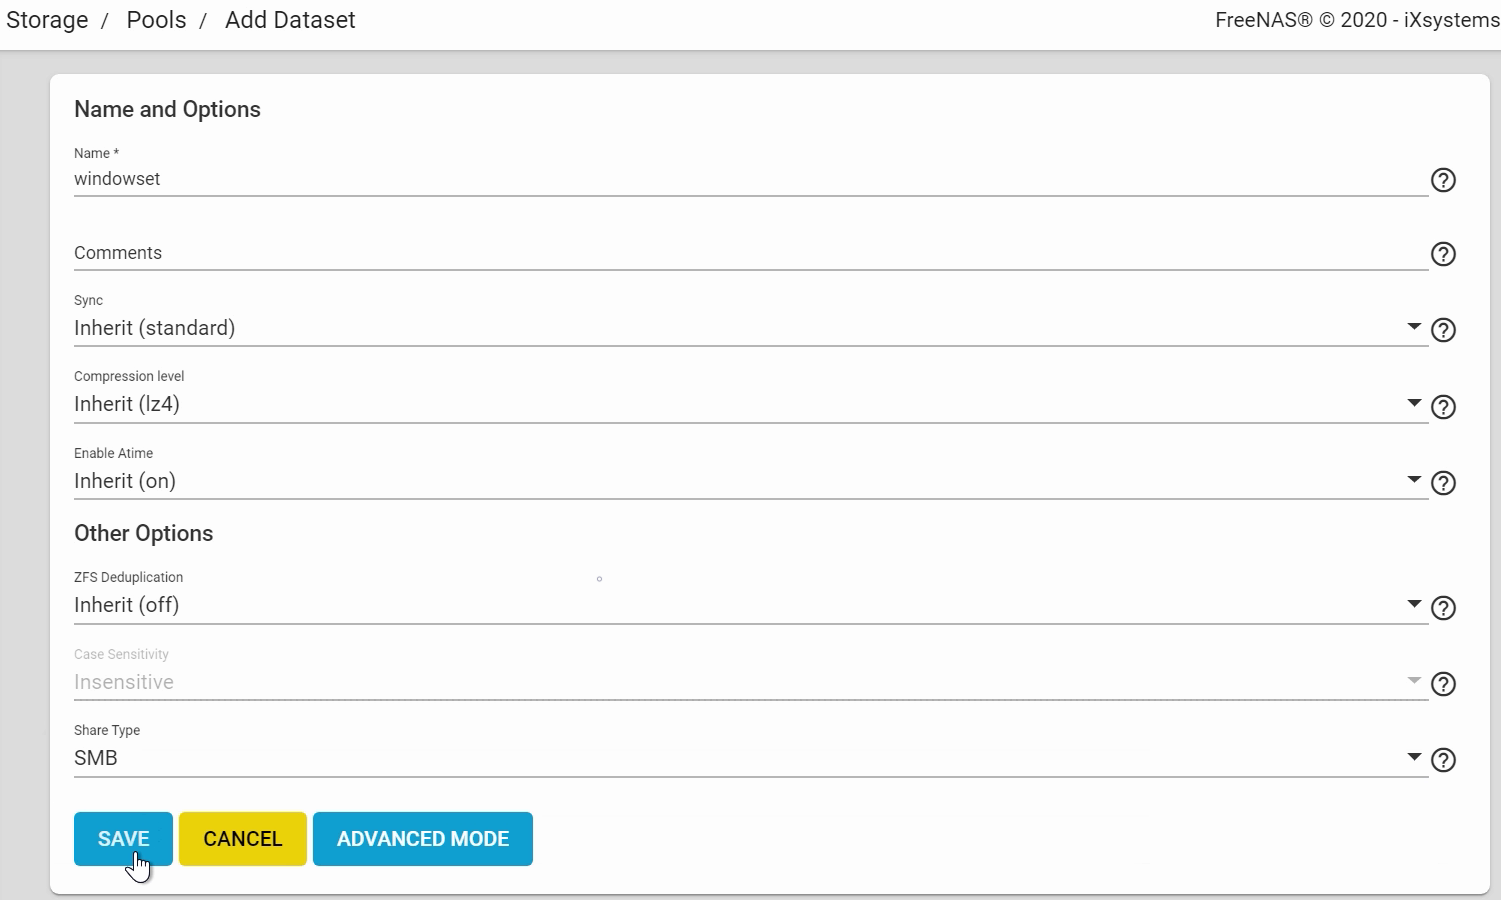
  • I’m calling this ‘windowset’ and setting the share type to ‘SMB’. Click “SAVE” when done.


Next, we’ll create the Windows Share. Go to “Sharing”, and “Windows Shares (SMB)”.
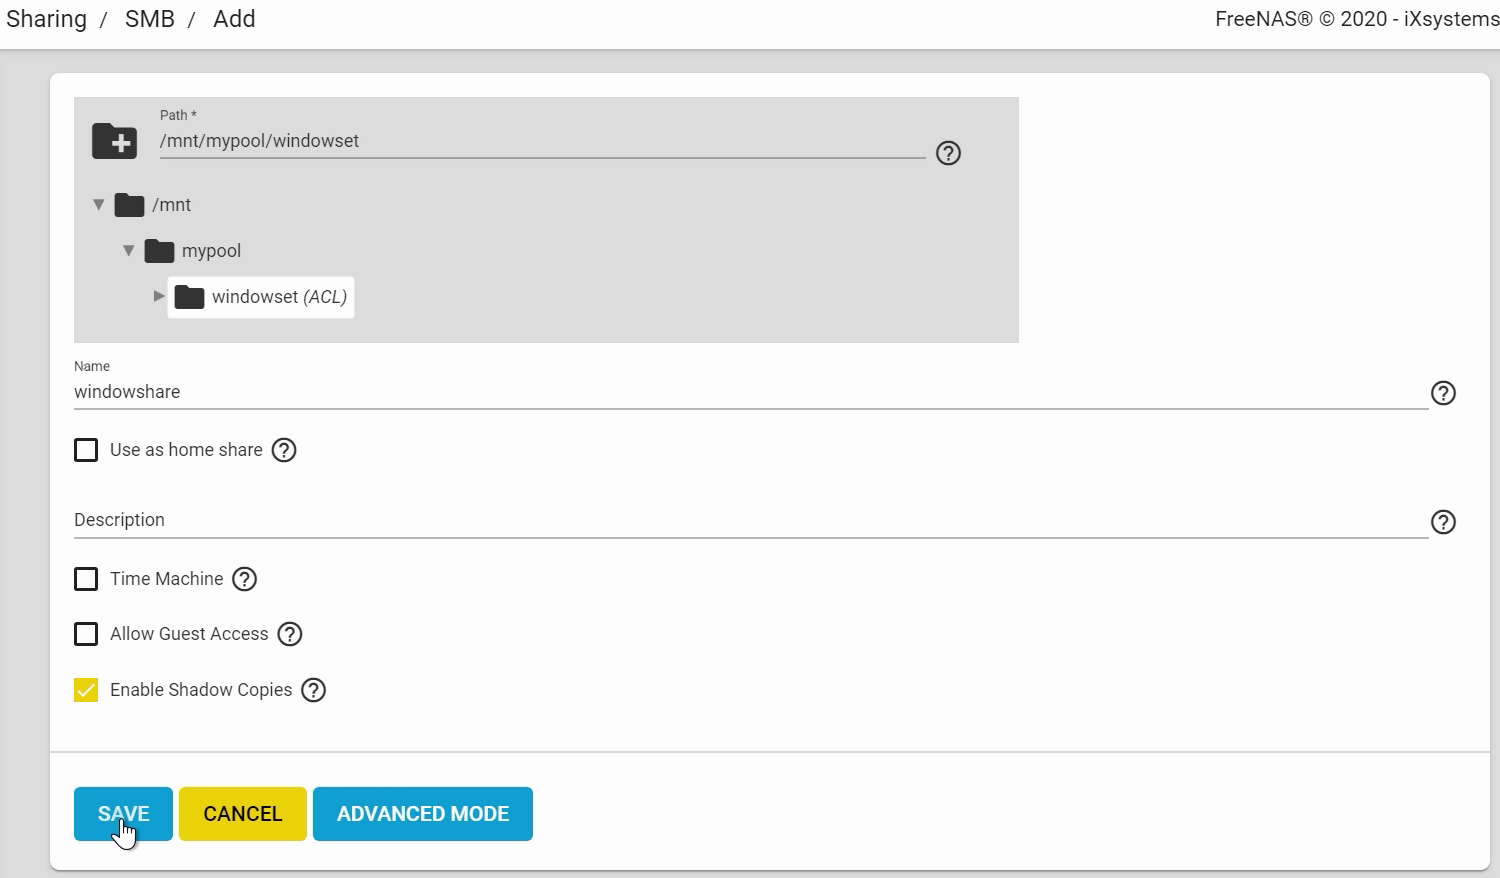
  • Click “ADD
  • Click the folder icon, and browse to the path of the dataset you want to share, which was “windowset
  • Give your share a name. Let’s call this one “windowshare
  • Select Allow Guest Access if you would like guests to view your files without a password *Note that some Windows 10 and Server systems have Guest Access disabled by default, and on MacOS you will need to set the “Connect as:” option to “Guest”.
  • Click “SAVE” when done. It will ask you to “Enable Service” for the SMB protocol.


Editing ACLs
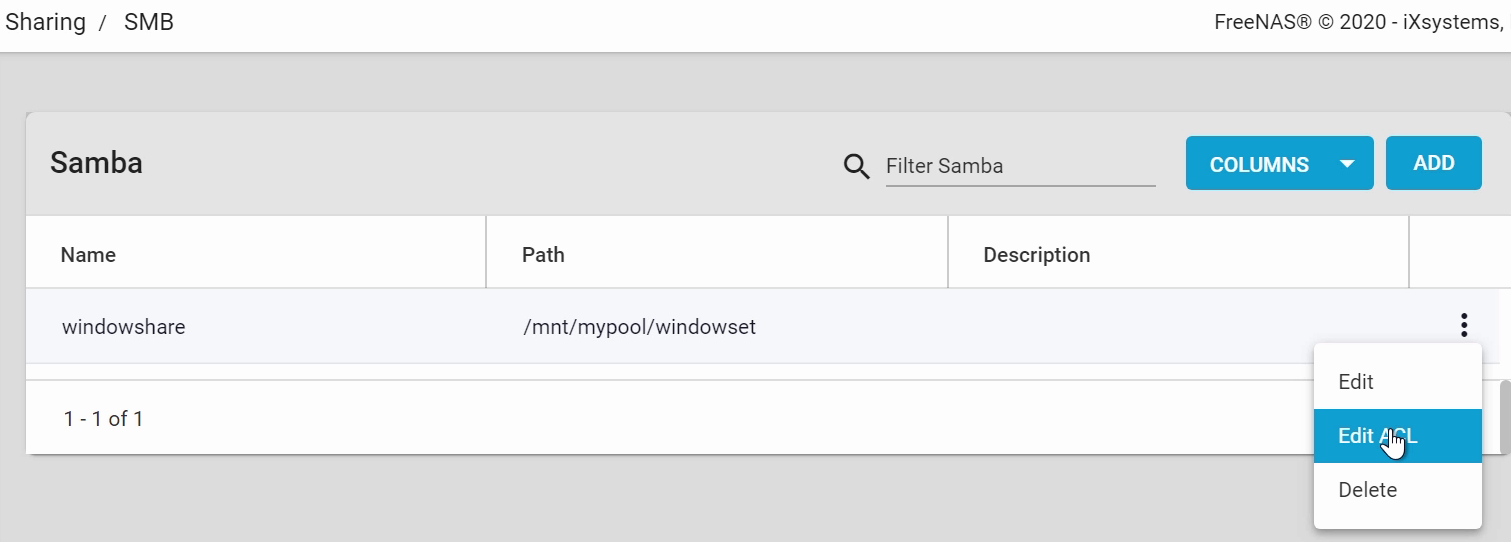
For this next step, we’ll need to assign the user we created earlier with the Share. From the SMB window, open the share options by clicking the 3 dots on the right, and “Edit ACL”.
On the left side, leave “root” and “wheel” as the original owners of the dataset. To give another user ownership permissions, click “Add ACL Item”, then choose “User” for the “Who” field, and “homeuser” for the “User” field. You may copy the same settings as the ACL items above.
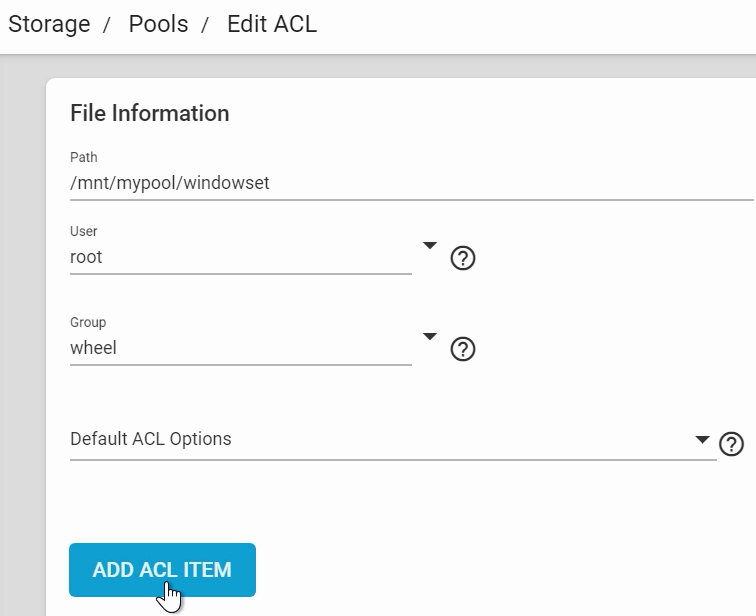
These settings on the right side allow you to configure the dataset’s Access Control List according to your network and security needs. Note that when we set the Share Type to “SMB” earlier, the ACL options will default to that specific configuration, which is shown there. Refer to the FreeNAS documentation for configuration recommendations for ACLs.
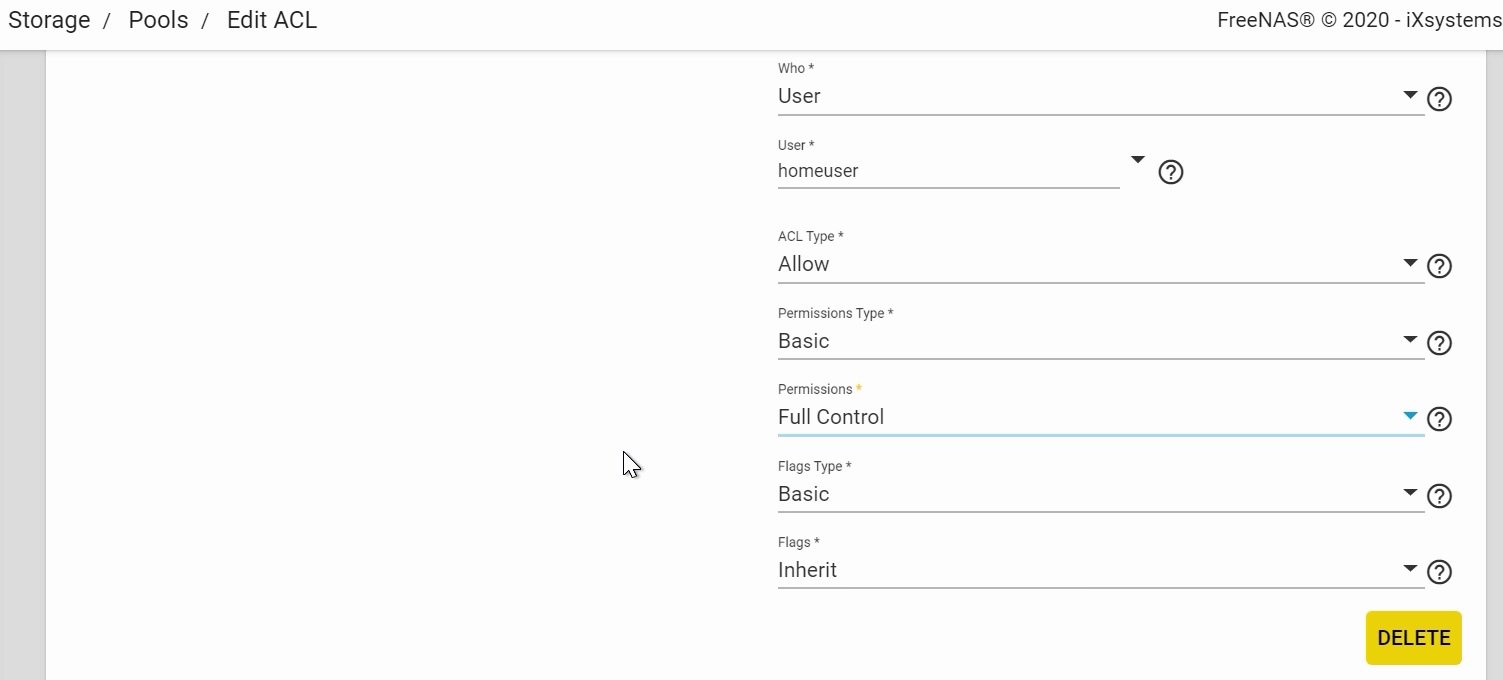
Click “SAVE” when that is done.

Enabling SMB Services
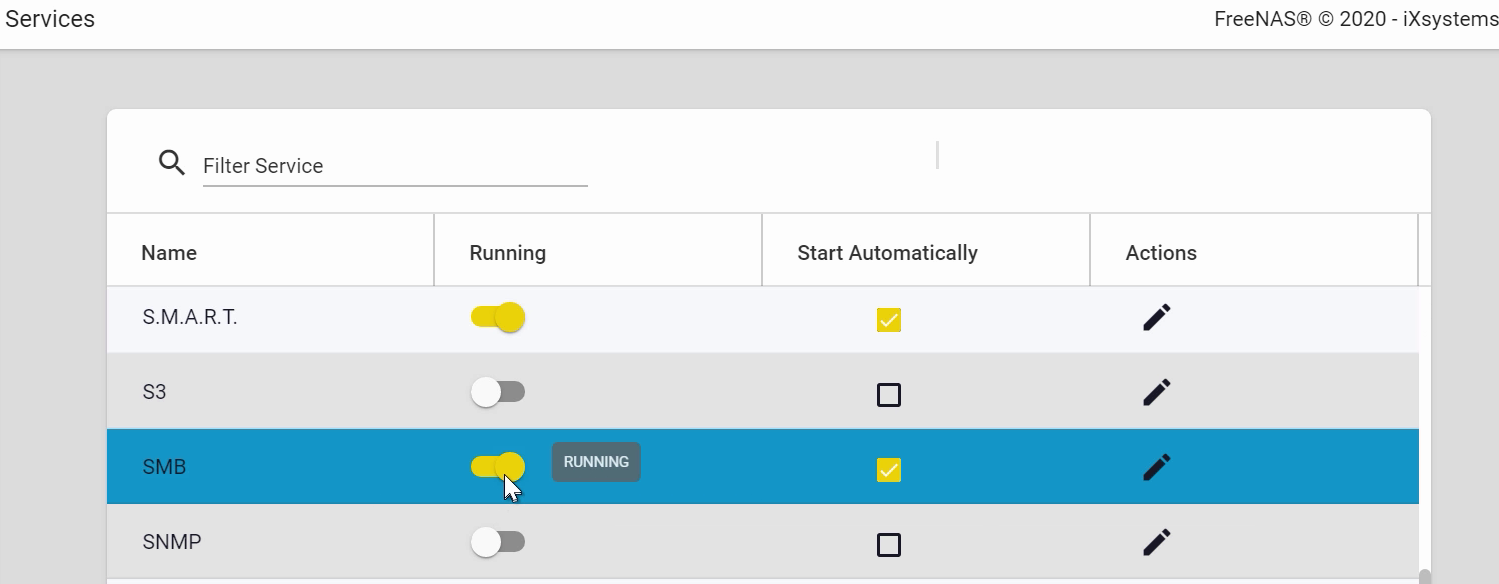
Go to the Services page, and make sure “Running” is enabled next to SMB. To ensure that SMB is always running after FreeNAS reboots, check “Start Automatically”. For additional options to configure the SMB service, you can click the “Edit” icon here. More information about these options can be found in the documentation, but the default values will work fine.
Accessing SMB Share from Windows
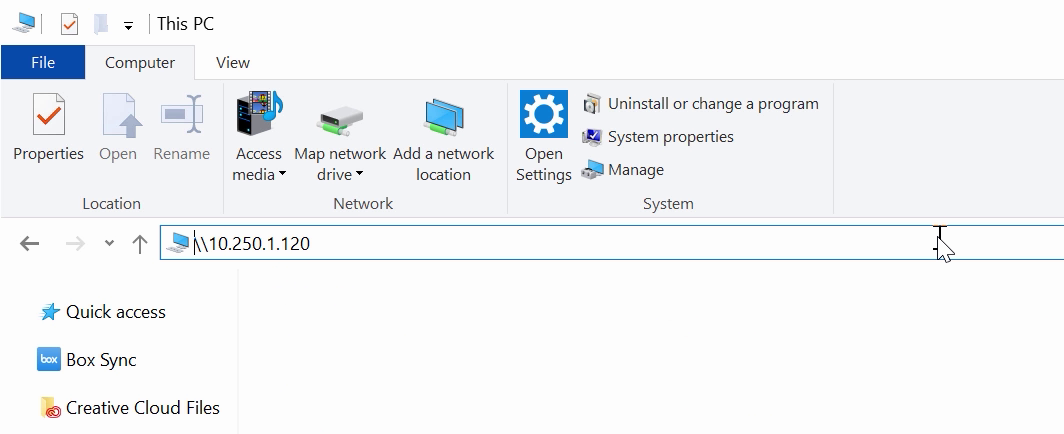
Head on over to your Windows machine.
  • Open up File Explorer, and type in “\\” followed by your FreeNAS IP address
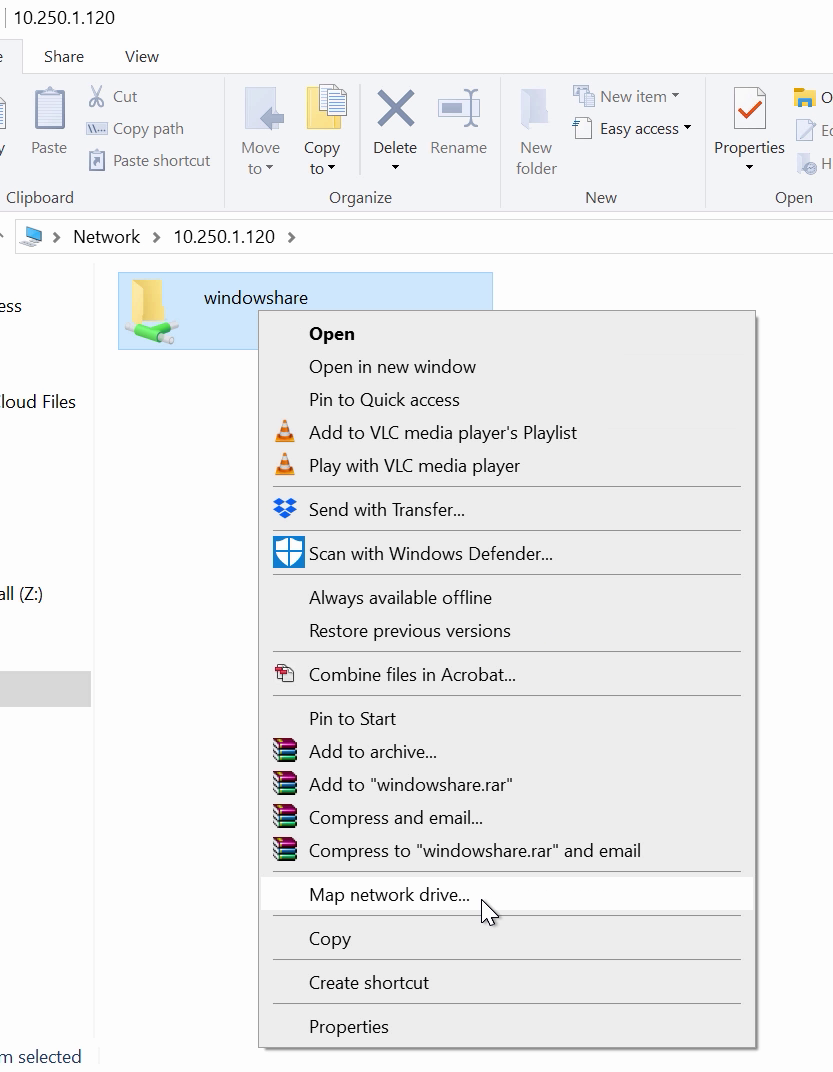
  • You should be able to see your share here.
  • Right click that shared folder and click “Map Network Drive”.
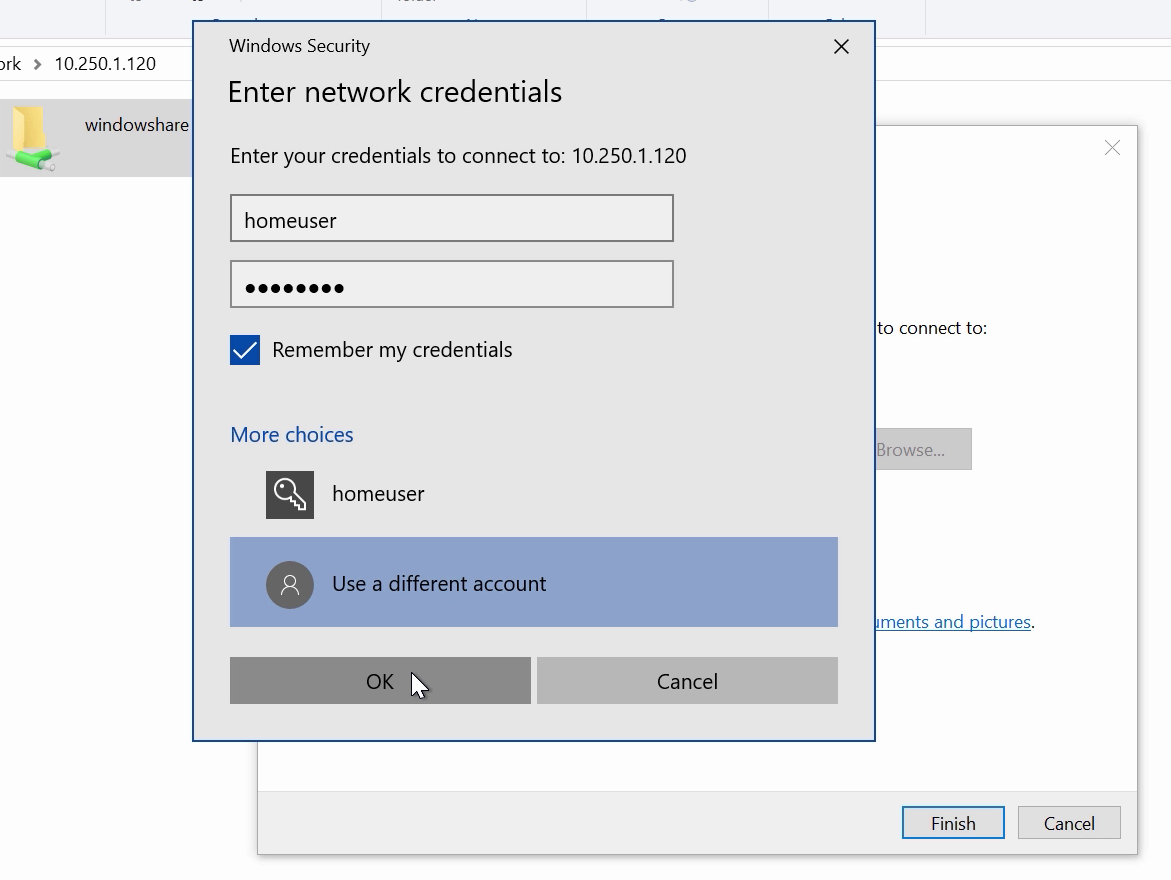
  • Check the box “Connect using different credentials” then click “Finish”.
  • Enter the login details of the account you created in the beginning, which was “homeuser”.
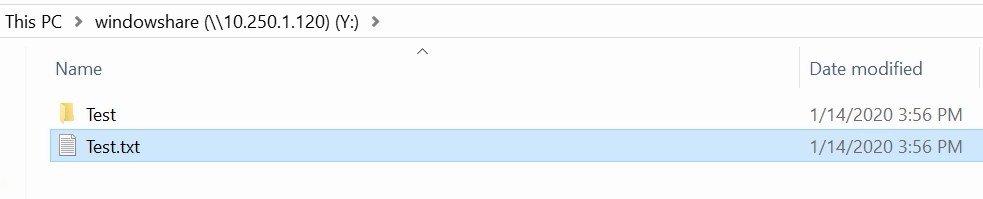
  • You should now be able to add, delete, and create files or folders.


Thank you for reading this tutorial! Be sure to check out our other tutorials and videos on our YouTube channel.