

惯性聚合 高效追踪和阅读你感兴趣的博客、新闻、科技资讯
阅读原文 在惯性聚合中打开

推荐订阅源

云风的 BLOG
云风的 BLOG
钛媒体:引领未来商业与生活新知
钛媒体:引领未来商业与生活新知
J
Java Code Geeks
freeCodeCamp Programming Tutorials: Python, JavaScript, Git & More
Engineering at Meta
Engineering at Meta
OSCHINA 社区最新新闻
OSCHINA 社区最新新闻
小众软件
小众软件
博客园 - 聂微东
酷 壳 – CoolShell
酷 壳 – CoolShell
月光博客
月光博客
Last Week in AI
Last Week in AI
博客园_首页
I
InfoQ
T
Tailwind CSS Blog
爱范儿
爱范儿
雷峰网
雷峰网
Recent Announcements
F
Fortinet All Blogs
B
Blog
WordPress大学
WordPress大学
A
About on SuperTechFans
V
Visual Studio Blog
有赞技术团队
有赞技术团队
P
Proofpoint News Feed

TrueNAS – Open Enterprise Storage

What We Heard at NAB 2026 | TrueNAS - Open Enterprise Storage TrueNAS V160 Launched: High Performance, No All-Flash Tax TrueNAS 26 Is Here: What's New in This Major Release TrueNAS Connect: Enterprise Features on Your Own Hardware TrueNAS Immutability: Multi-Layered Data Protection & Ransomware Defense TrueNAS CEO Note to Community: We Are All TrueNAS TrueNAS 25.10.2 Goldeye: 100+ Fixes & What's New TrueNAS Names Brett Davis CEO for Enterprise Growth TrueNAS Plans for 2026: TrueNAS 26 & OpenZFS 2.4 Roadmap TrueNAS Connect Plus Now Available for All Community Users TrueNAS R60: High-Speed NVMe Storage for AI Workloads Introducing TrueNAS WebShare: Secure Web-Based File Sharing TrueNAS 25.10.1: Goldeye Matures, Performs, and Connects TrueNAS & Veeam v13: Turnkey Cyber‑Resilient Backups Customer Advantages of the TrueNAS Open Core Model TrueNAS Named Data Storage Company of the Year 2025 TrueNAS 25.10: Smarter, Streamlined Updates & Tools TrueNAS F-Series Shines at IBC with Two “Best of Show” Awards TrueNAS 25.10 “Goldeye”: NVMe‑oF, Unified, Simplified Storage Introducing TrueNAS Connect: Secure Monitoring & Alerts The ESG Advantage of Open Enterprise Architecture: Why TrueNAS Is the Sustainable Choice | TrueNAS - Open TrueNAS 25.10-RC1: New Features, Fixes & OpenZFS 2.3.4 Seamless Setup: Exploring TrueNAS Web-Driven Installation | TrueNAS - Open Enterprise Storage TrueNAS 25.10 “Goldeye” BETA is Available TrueNAS 25.10 “Goldeye” Highlights TrueNAS 25.04.2: Fangtooth restores Virtualization iXsystems Rebrands as TrueNAS to Reflect Market Momentum in Enterprise Storage | TrueNAS - Open Enterprise June 1 - Apps Migration Deadline for TrueNAS 24.04 and 23.10 TrueNAS 25.04.1: Fangtooth Unification Gains Momentum TrueNAS 24.10.2.2 Prepares for IP Addressing of Apps
How To Enable Wireguard on FreeNAS 11.3 | TrueNAS - Open ...
iX Team · 2020-01-21 · via TrueNAS – Open Enterprise Storage

WireGuard is quickly gaining popularity in the VPN marketplace due to its speed, simplicity, and modern cryptography standards. Starting with FreeNAS version 11.3-RC1, it is possible to connect your NAS directly to a WireGuard network with a few easy steps.
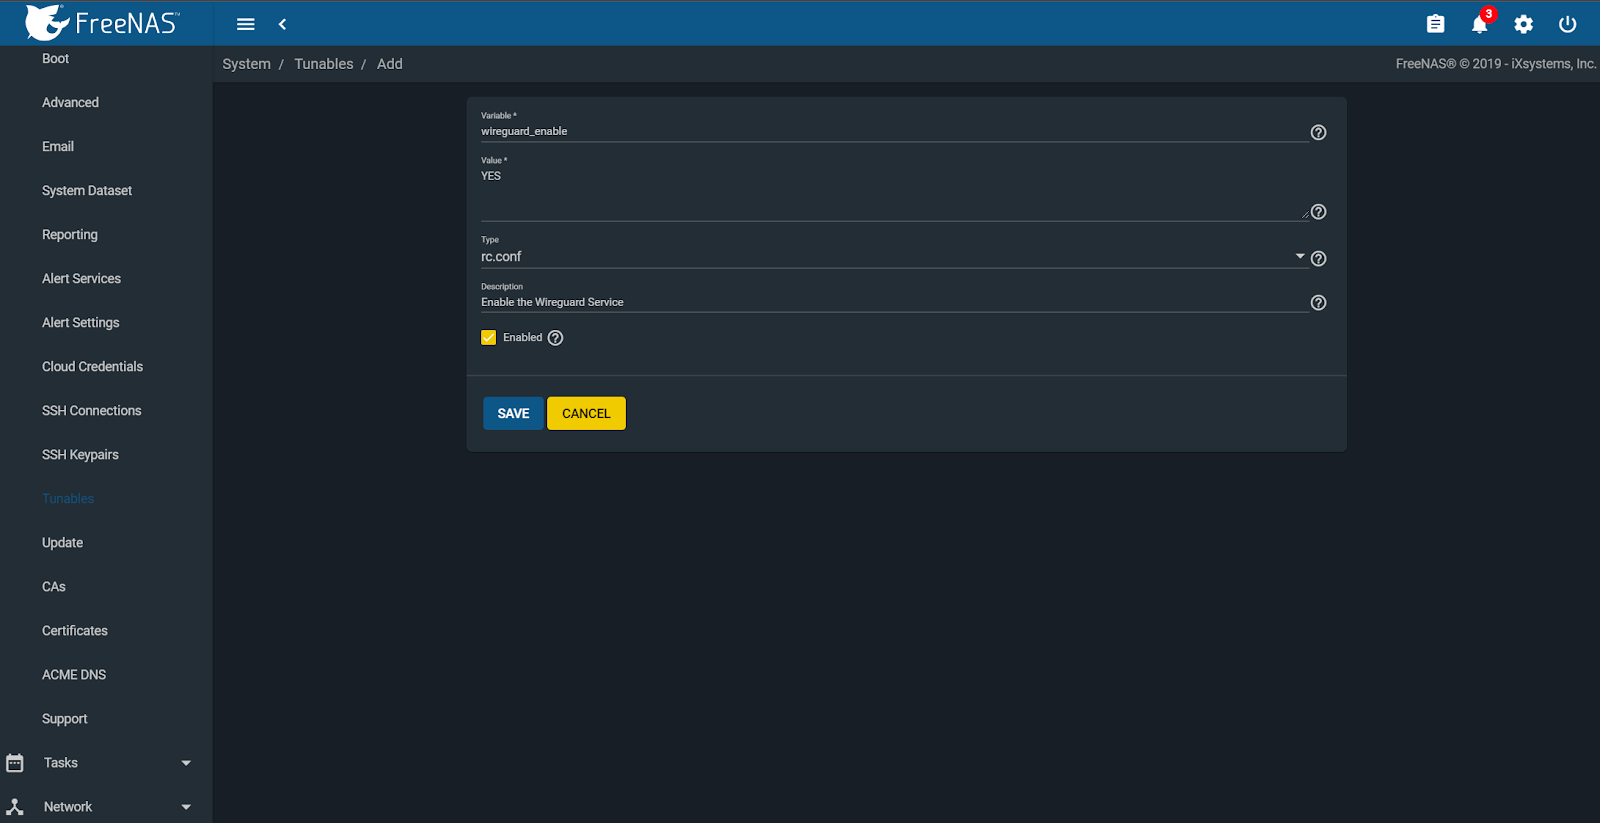
We get started on this by creating some custom tunables to enable the WireGuard service and give it a default interface. To do this you must first navigate to System -> Tunables -> Add.
Enable the WireGuard service by adding “wireguard_enable” -> “YES” in rc.conf.
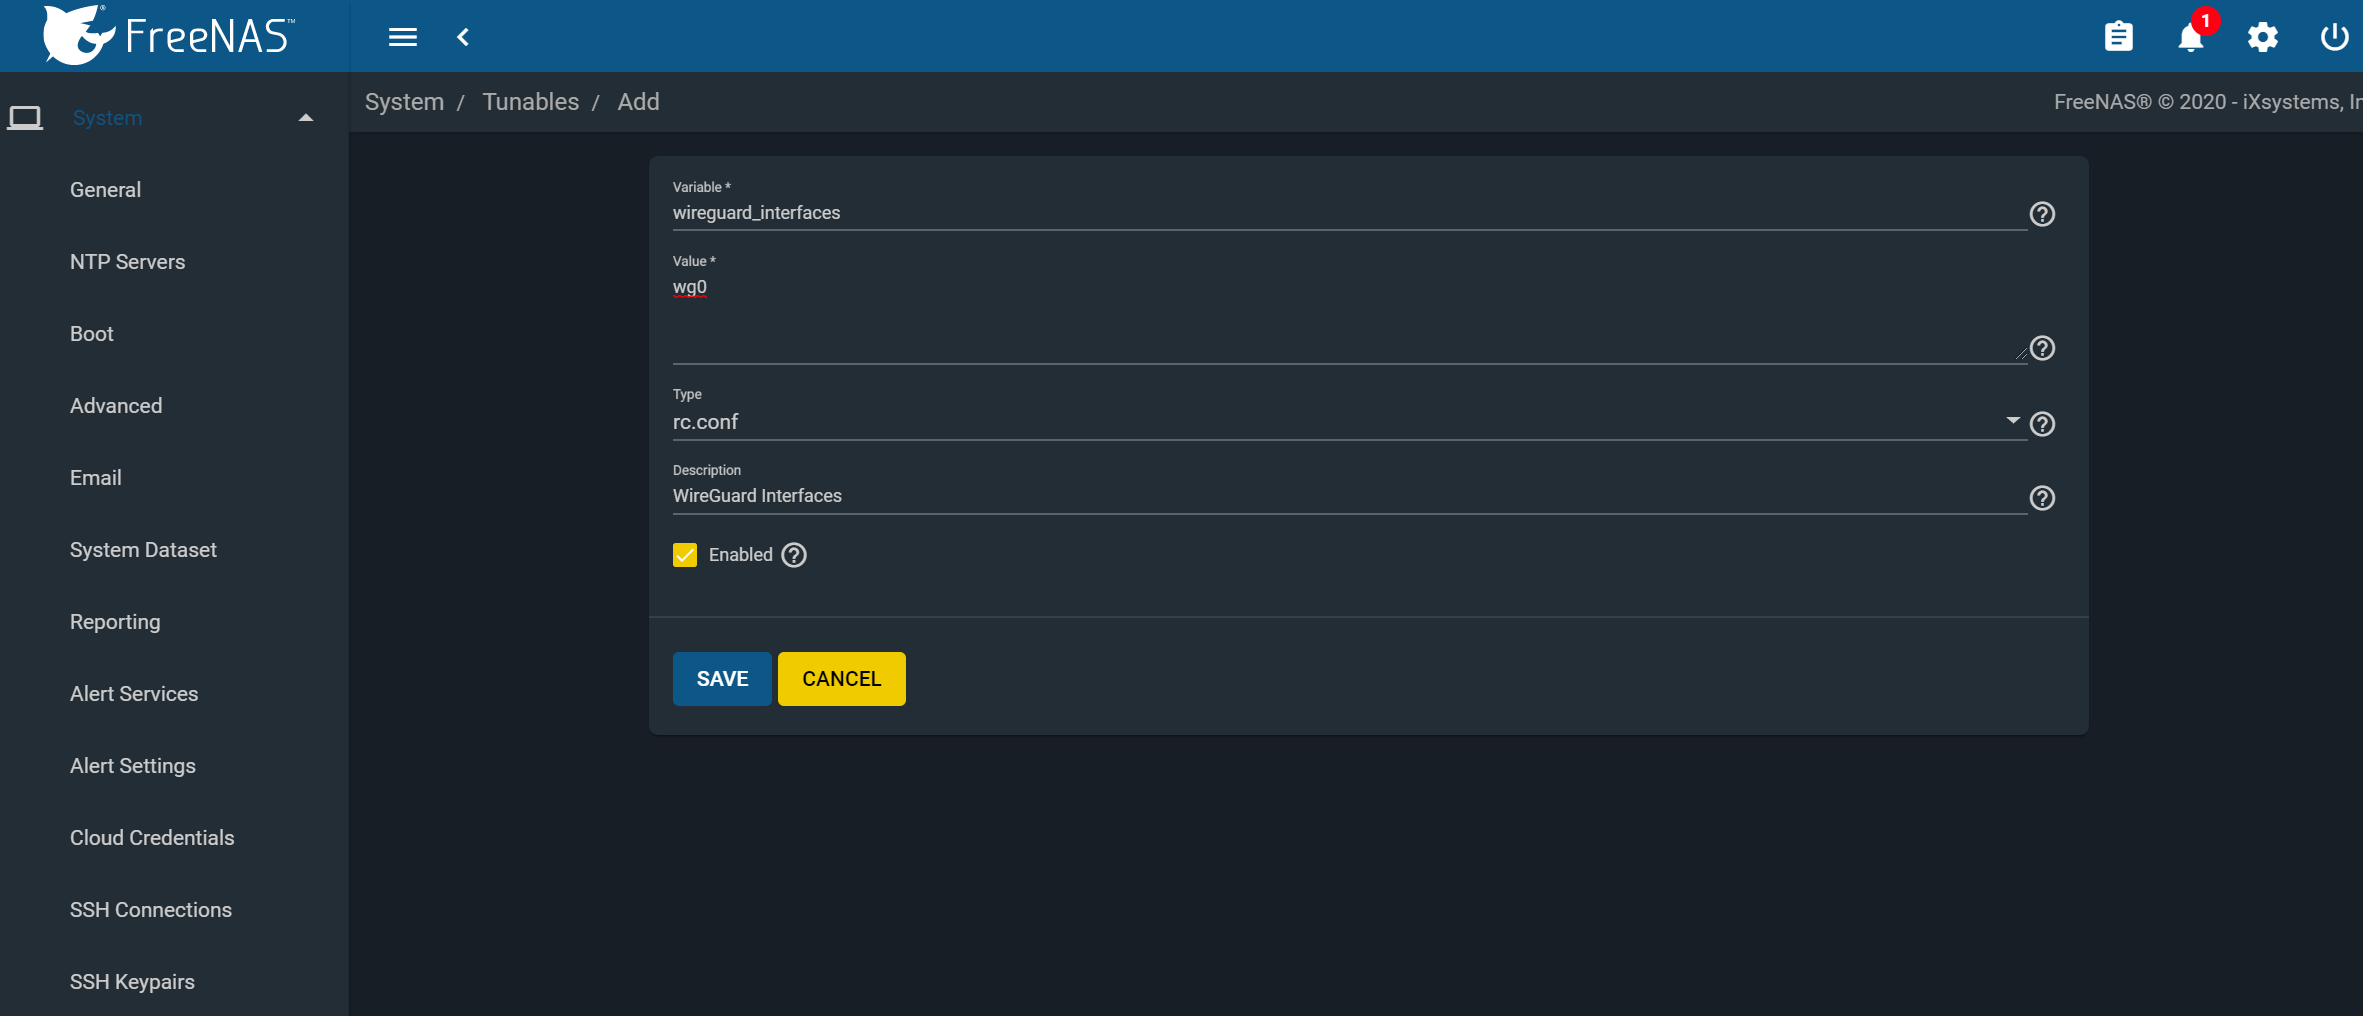
Next, create another tunable and add “wireguard_interfaces” -> “wg0” in rc.conf.
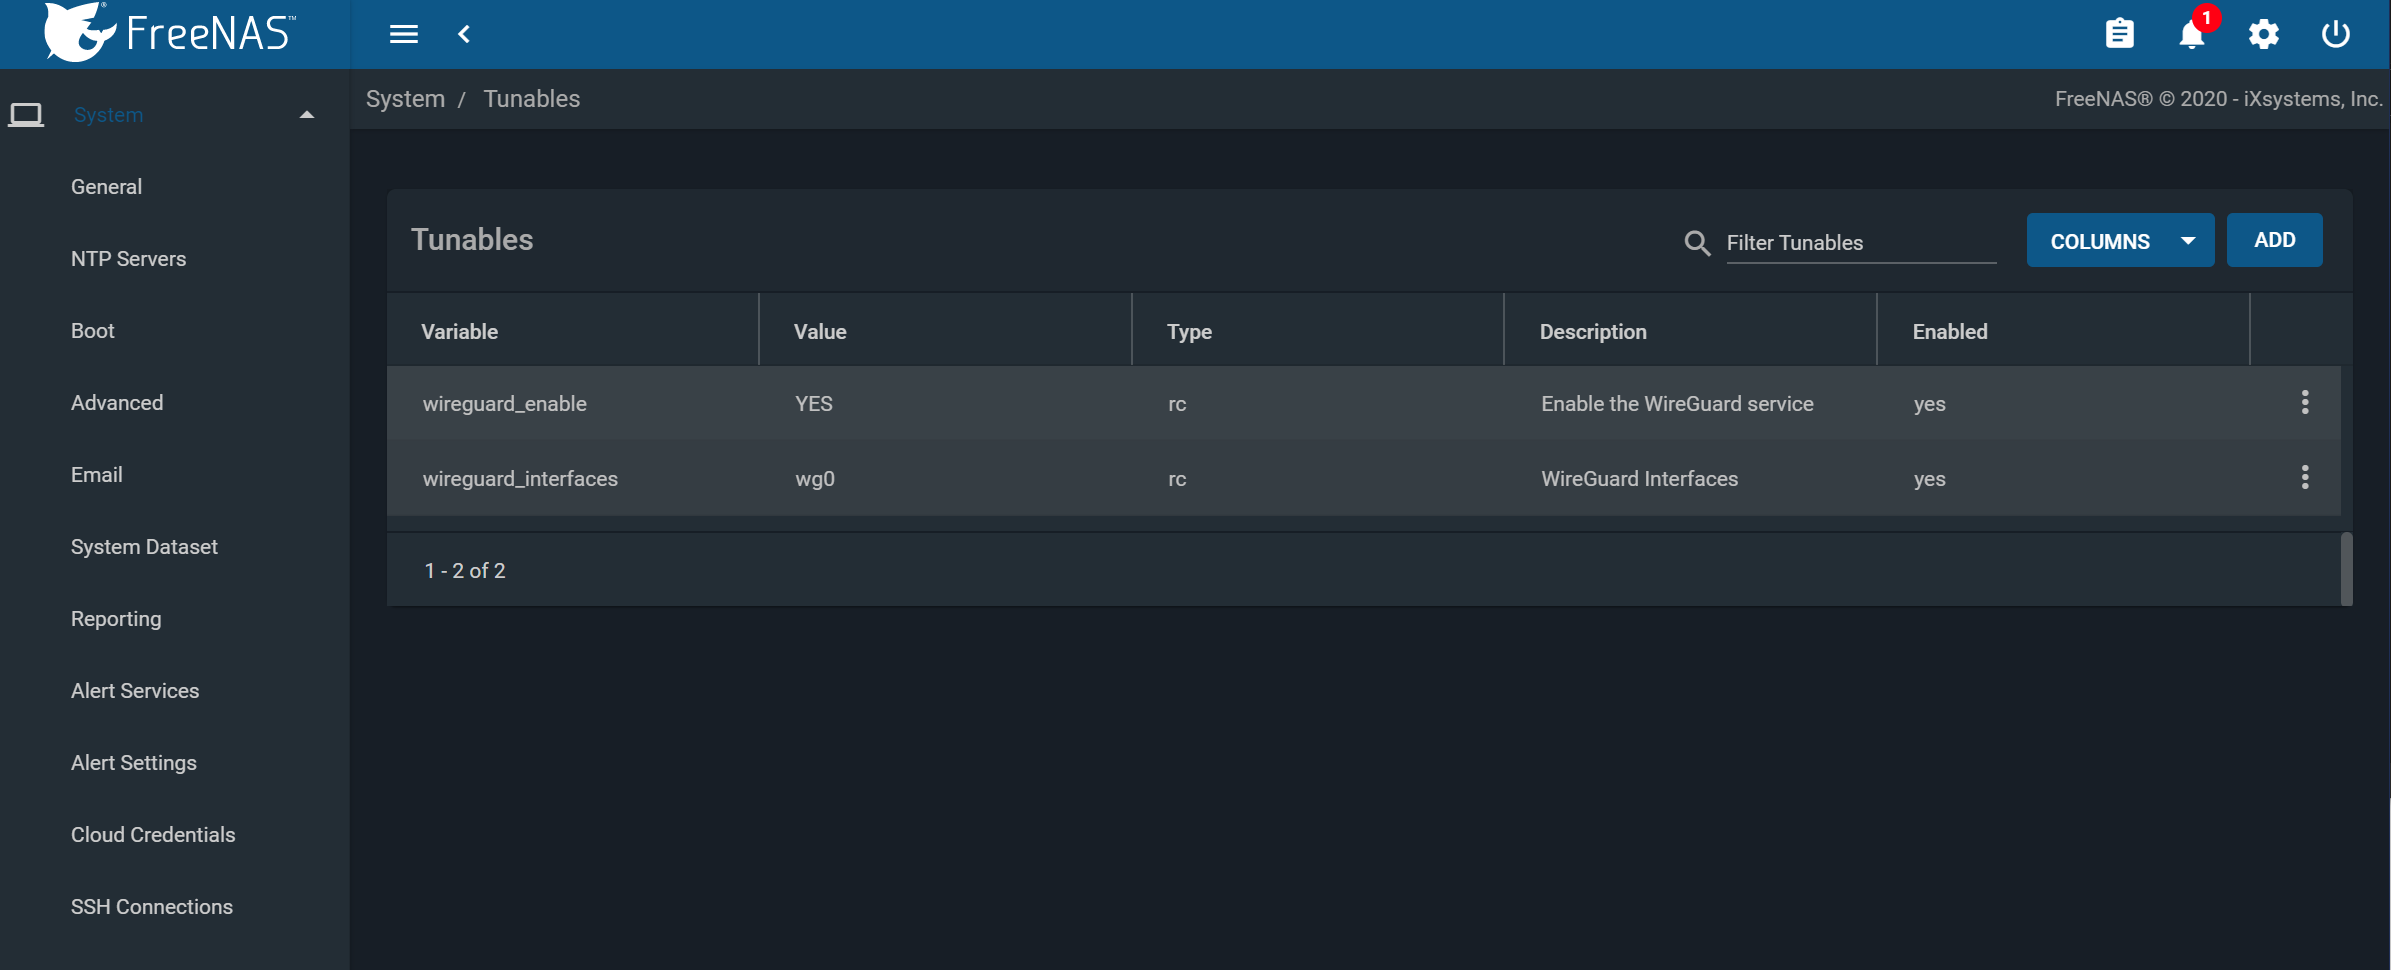
When finished, you should have the following two variables set and enabled.
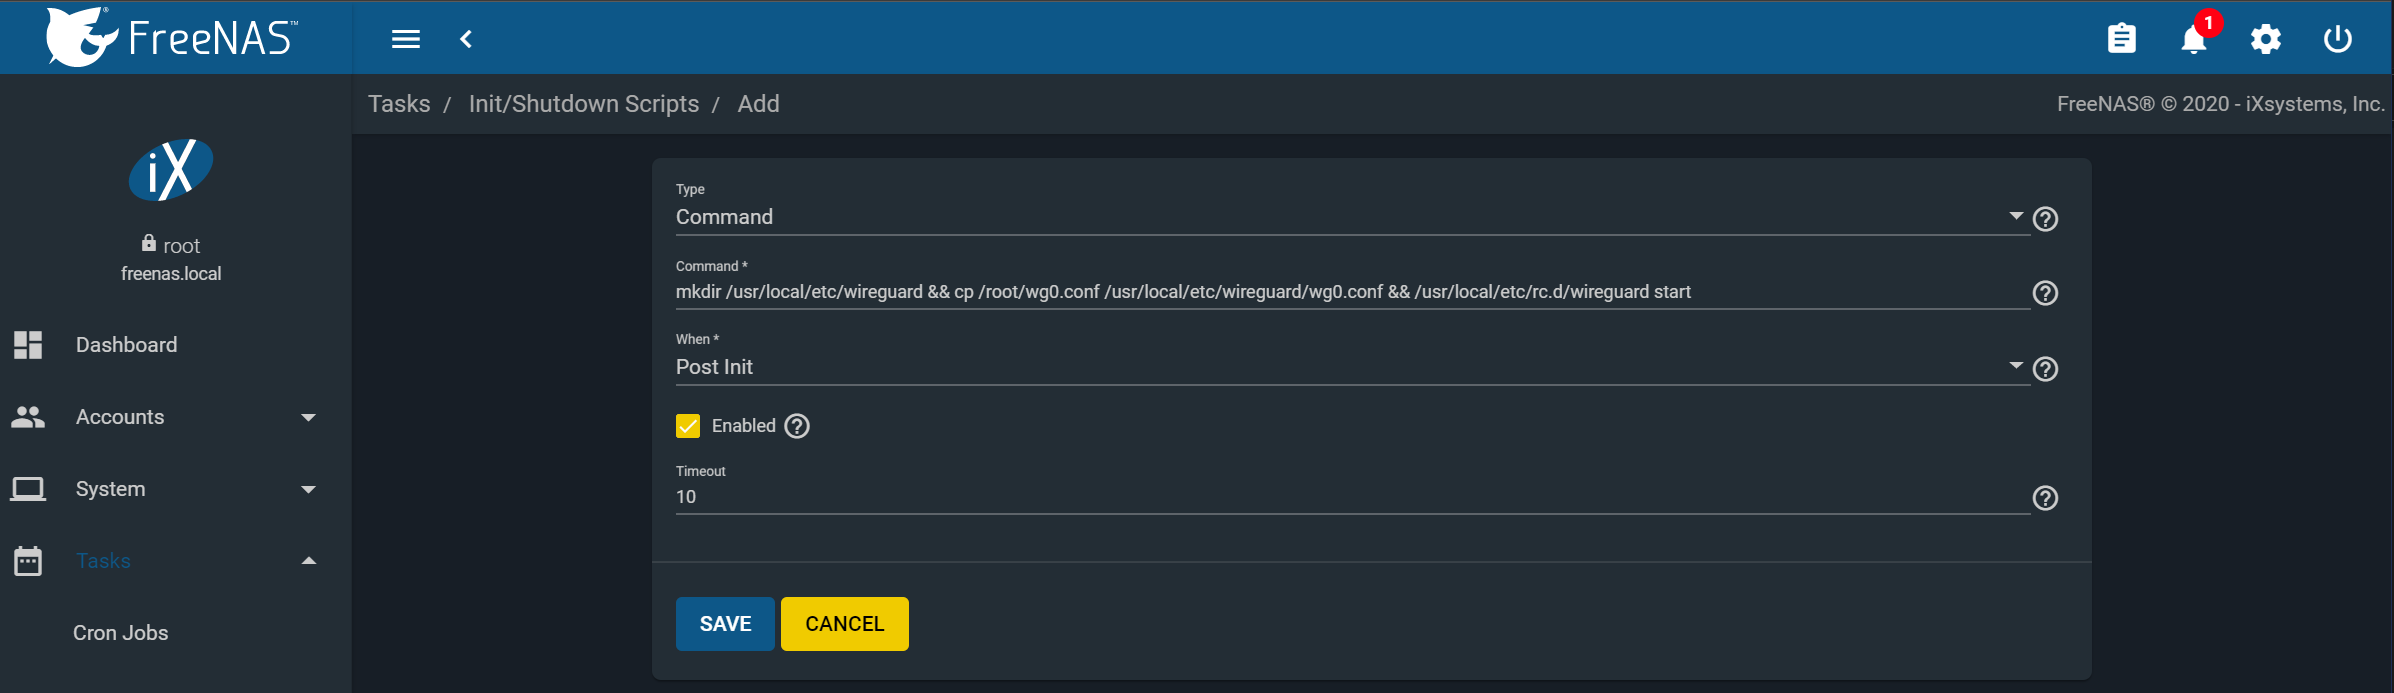
Next, we will need to create a post-init script that will place the WireGuard config into the correct location at startup. Navigate to Tasks -> Init/Shutdown Scripts -> Add.
Create the following command and set it to run at post-init:
“mkdir /usr/local/etc/wireguard && cp /root/wg0.conf /usr/local/etc/wireguard/wg0.conf && /usr/local/etc/rc.d/wireguard start”
You can configure the /root/wg0.conf file and apply a WireGuard configuration to attach to whatever WireGuard network you define. It can be a single point-to-point to anything running WG, or even with full routing. Example use cases are:
  • Access data on a NAS from your Remote Laptop
  • Linking NAS to NAS for replication
  • Attaching a managed NAS to a remote network
  • Access to your NAS from your smartphone


We need to create the /root/wg0.conf which will contain the specific WireGuard configuration to apply at boot. This configuration is beyond the scope of this article, but there are quickstart guides and tutorials available online as well as the built-in ‘wg-quick’manpage.
Once you have a valid /root/wg0.conf, rebooting the system should bring up the WireGuard interface, and you’ll see a ‘wg0’ device in the output of ‘ifconfig’.
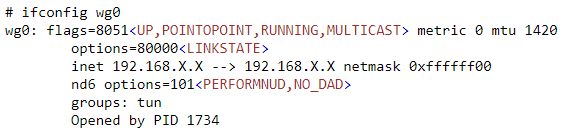
Congratulations, you have successfully linked your FreeNAS system to a secure WireGuard tunnel!