惯性聚合 高效追踪和阅读你感兴趣的博客、新闻、科技资讯
阅读原文 在惯性聚合中打开

推荐订阅源

博客园 - 聂微东
D
Darknet – Hacking Tools, Hacker News & Cyber Security
P
Privacy International News Feed
NISL@THU
NISL@THU
Know Your Adversary
Know Your Adversary
G
GRAHAM CLULEY
The Hacker News
The Hacker News
P
Privacy & Cybersecurity Law Blog
S
Schneier on Security
T
Troy Hunt's Blog
Attack and Defense Labs
S
Secure Thoughts
S
Security Affairs
WordPress大学
WordPress大学
T
Tailwind CSS Blog
博客园 - Franky
T
The Exploit Database - CXSecurity.com
雷峰网
雷峰网
S
SegmentFault 最新的问题
奇客Solidot–传递最新科技情报
奇客Solidot–传递最新科技情报
让小产品的独立变现更简单 - ezindie.com
P
Proofpoint News Feed
S
Securelist
A
Arctic Wolf
C
Cyber Attacks, Cyber Crime and Cyber Security
有赞技术团队
有赞技术团队
爱范儿
爱范儿
Help Net Security
Help Net Security
Apple Machine Learning Research
cs.CV updates on arXiv.org
博客园 - 三生石上(FineUI控件)
C
CERT Recently Published Vulnerability Notes
C
Cisco Blogs
阮一峰的网络日志
阮一峰的网络日志
C
Cybersecurity and Infrastructure Security Agency CISA
Spread Privacy
Spread Privacy
Last Week in AI
Last Week in AI
S
Security @ Cisco Blogs
博客园 - 司徒正美
博客园_首页
Exploit-DB.com RSS Feed
罗磊的独立博客
博客园 - 叶小钗
K
KPMG report finds enterprise disconnect between AI and its ROI | CIO
大猫的无限游戏
大猫的无限游戏
Jina AI
Jina AI
J
Java Code Geeks
T
Threatpost
钛媒体:引领未来商业与生活新知
钛媒体:引领未来商业与生活新知
量子位

Dr34m's Blog

I Expect You To Die(我希望你死) 1,2,3 完整中文攻略 Linux换国内源 && docker安装 && 换加速镜像 Vue3 + Element-Plus 极简速查 随笔 pyinstaller打包的程序执行报错Failed to extract xxxx decompression resulted in return code -1 taoSync排除项简易教程 apscheduler的cron配置项 如何在绿联NAS中使用TaoSync同步我的文件到各个网盘 GB28181抓包记录 JS计算字节大小,把字节转换为KB/MB/GB/TB等 在Python中使用onvif管理摄像头,包括设备发现,获取RTSP地址,获取设备信息,截图,云台控制与缩放,设置时间 编写bat脚本实现对vue项目构建并压缩 内网穿透工具frp快速使用 CentOS 7.9 安装基础开发环境jdk redis nacos nginx mysql Pyinstaller 逆向 VUE实现复制与粘贴_获取剪切板内容 Electron + xterm.js + node-pty + vue 实现本地终端 child_process exec 中文乱码 Windows&Linux 解决方法 yum 更新 gcc CentOS安装并使用conda 将fluid主题博客的静态资源由第三方改为本地存储 一个上手即用的通用公众号/小程序/h5/app框架 python批量转化doc到docx SpringBoot单元测试注入空指针 TensorFlow 预测出现NaN的一种可能以及解决方法 随笔 python归一化数据 windows下python安装sasl遇到的问题及解决 将对象List中的某个字段放到新的List中[转载] Python http.server 本地服务支持跨域 TensorFlow入门 Flink学习笔记 windows本地配置spark开发环境 dataX使用 hadoop学习笔记 element-ui 自带事件添加自定义参数 windows 11安装安卓应用程序 centos7安装zookeeper centos7安装jdk8 用idea开发spring项目过程中热重启 docker学习笔记 CentOS7安装k8s集群 通过Github Actions部署静态网站到腾讯云COS,并自动刷新CDN 用Typora编写Hexo博客时图片的处理 Hexo + Github Actions 提交代码自动部署 云服务器 腾讯云COS github-pages 常用的Linux进程基本命令 python实现微信jsapi签名 VsCode开发Python常用配置 mysql获取当期日期是该年第几周 LocalDate获取当前周周一日期 删除node_modules重新安装 基于firewalld端口转发 pip 安装 tensorflow MemoryError Java过滤html标签 mysql清空表,并让自增从0开始 JavaScript获取当前周或下n周的周n的日期 java复制不同实体类中相同的字段 前端下载二进制文件 mysql获取最近一段时间数据 python - pip换源 svn提交后jenkins自动部署 常见nginx反向代理配置 h5实现一种自动滚动的告警列表 nginx代理网站子目录到本地目录 centos下hexo + svn + jenkins实现博客自动部署 centos中jenkins配置环境变量 centos安装jenkins centos安装svn服务器 Ubuntu 20.04 换国内源 Vs Code编写md文件实现实时预览 Python自动处理依赖 海滨校园助手api使用文档 hexo-yilia主题相册 Java实现文件重命名,Java文件追加写入,java读取图片尺寸 Hexo安装配置并托管至github 新起点,新征程 在ubuntu安装jdk并配置环境变量 一个不到300行的C语言消灭敌机游戏 搭建L(Linux)+A(Apache)+M(MySQL)+P(PHP)网站环境,并安装Discuz 搭建L(Linux)+N(Nginx)+M(MySQL)+P(PHP)网站环境,并安装Wordpress NSA工具包验证之RDP漏洞利用 NSA工具包验证之IIS6.0漏洞利用 NSA工具包验证之SMB漏洞利用 SEO Ultimate 7.6.5.9汉化版(中文版)免费下载 在腾讯云服务器搭建FBCTF平台 FBCTF汉化简体中文免费下载,FBCTF更新缓存代码 wordpress发送邮件设置以及常见问题解决 短网址 一个小白的自学建站史(菜鸟建站入门) 危山 水调歌头 水调歌头
Apache Hive 学习笔记
Dr3@m · 2022-01-06 · via Dr34m's Blog

本文基于B站视频教程2022最新黑马程序员大数据Hadoop入门视频教程,最适合零基础自学的大数据Hadoop教程,p51-p83,本文软件版本,行文顺序等可能与视频略有不同

所需安装包等可以关注【黑马程序员】公众号,回复【hadoop】获取

一. Hive理解

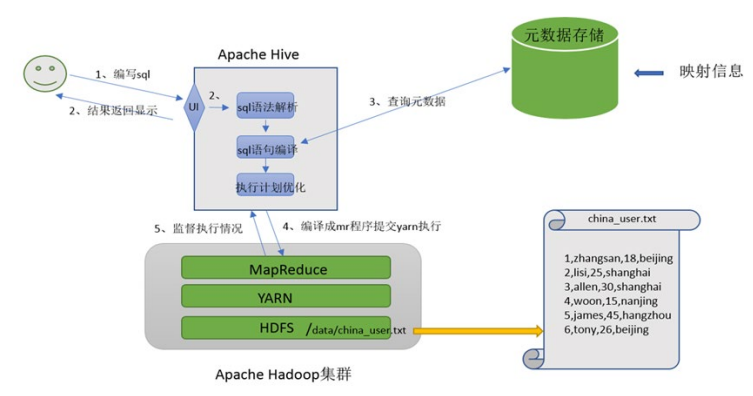
  • Hive能将数据文件映射成为一张表

    • 映射指文件和表之间的对应关系
  • 功能职责

    • SQL语法解析编译成MapReduce

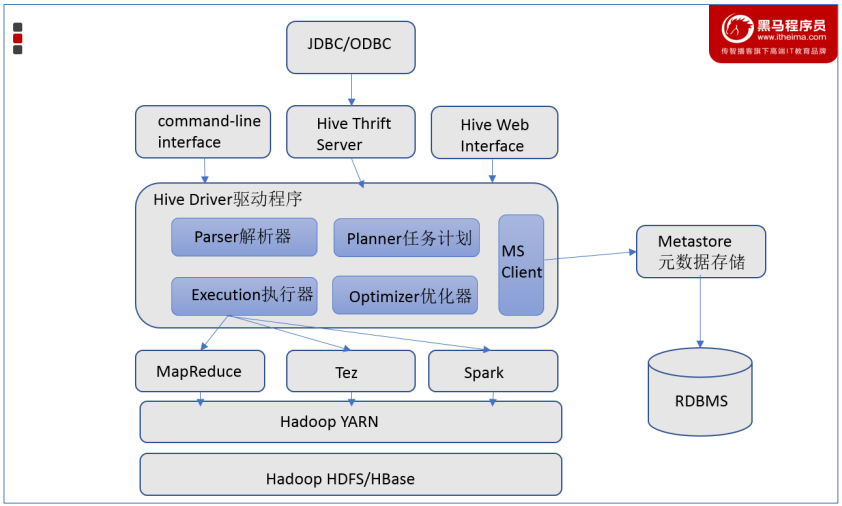
架构图

二、 安装

1.安装MySQL

1.1 卸载mariadb

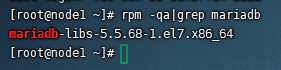
卸载Centos7自带的mariadb,先查找已经安装的mariadb

1
rpm -qa|grep mariadb

卸载

1
rpm -e mariadb-libs-5.5.68-1.el7.x86_64 --nodeps

1.2 安装MySQL

1
2
3
4
5
6
7
mkdir /export/software/mysql
#上传mysql-5.7.29-1.el7.x86_64.rpm-bundle.tar 到上述文件夹下 解压
cd /export/software/mysql
tar xvf mysql-5.7.29-1.el7.x86_64.rpm-bundle.tar
yum -y install libaio
yum -y install net-tools
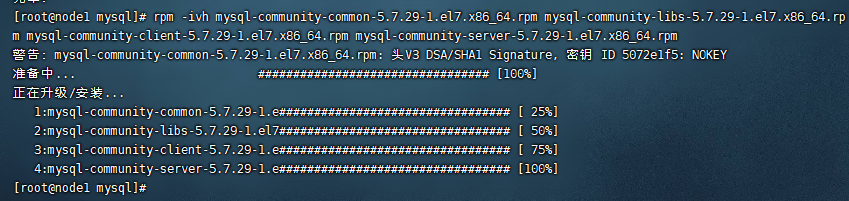
rpm -ivh mysql-community-common-5.7.29-1.el7.x86_64.rpm mysql-community-libs-5.7.29-1.el7.x86_64.rpm mysql-community-client-5.7.29-1.el7.x86_64.rpm mysql-community-server-5.7.29-1.el7.x86_64.rpm

1.3 MySQL初始化设置

1
2
3
4
5
6
7
8
9
10
11
12
#初始化
mysqld --initialize

#更改所属组
chown mysql:mysql /var/lib/mysql -R

#启动mysql
systemctl start mysqld.service

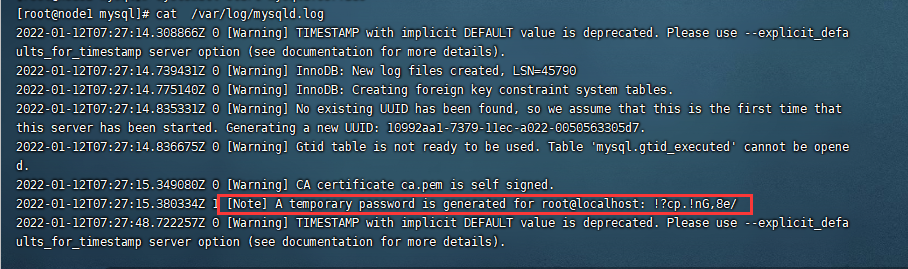
#查看生成的临时root密码
cat /var/log/mysqld.log
# [Note] A temporary password is generated for root@localhost: !?cp.!nG,8e/

1.4 准备使用

修改root密码 授权远程访问 设置开机自启动

1
mysql -u root -p

然后输入上边生成的密码,回车,通过下边的命令修改root密码为hadoop

1
alter user user() identified by "hadoop";

授权

1
2
3
use mysql;
GRANT ALL PRIVILEGES ON *.* TO 'root'@'%' IDENTIFIED BY 'hadoop' WITH GRANT OPTION;
FLUSH PRIVILEGES;

Ctrl+D退出MySQL命令界面。

MySQL启、停、状态命令

1
2
3
systemctl stop mysqld
systemctl status mysqld
systemctl start mysqld

设置开机启动

1
systemctl enable mysqld

1.5 干净卸载

CentOS7 干净卸载MySQL 5.7

1
2
3
4
5
6
7
8
9
10
11
12
13
14
15
16
17
18
19
20
21
22
23
24
25
26
27
28
29
# 关闭mysql服务
systemctl stop mysqld.service

# 查找安装mysql的rpm包
[root@node3 ~]# rpm -qa | grep -i mysql
mysql-community-libs-5.7.29-1.el7.x86_64
mysql-community-common-5.7.29-1.el7.x86_64
mysql-community-client-5.7.29-1.el7.x86_64
mysql-community-server-5.7.29-1.el7.x86_64

# 卸载
[root@node3 ~]# yum remove mysql-community-libs-5.7.29-1.el7.x86_64 mysql-community-common-5.7.29-1.el7.x86_64 mysql-community-client-5.7.29-1.el7.x86_64 mysql-community-server-5.7.29-1.el7.x86_64

# 查看是否卸载干净
rpm -qa | grep -i mysql

# 查找mysql相关目录 删除
[root@node1 ~]# find / -name mysql
/var/lib/mysql
/var/lib/mysql/mysql
/usr/share/mysql

[root@node1 ~]# rm -rf /var/lib/mysql
[root@node1 ~]# rm -rf /var/lib/mysql/mysql
[root@node1 ~]# rm -rf /usr/share/mysql

# 删除默认配置 日志
rm -rf /etc/my.cnf
rm -rf /var/log/mysqld.log

2. 安装Hive

2.1 上传安装包

上传Hive安装包到【/export/server/】目录下,然后解压

1
2
cd /export/server/
tar zxvf apache-hive-3.1.2-bin.tar.gz

解决Hive与Hadoop之间guava版本差异

1
2
3
cd /export/server/apache-hive-3.1.2-bin/
rm -f lib/guava-19.0.jar
cp /export/server/hadoop-3.3.0/share/hadoop/common/lib/guava-27.0-jre.jar ./lib/

2.2 修改配置文件

  • hive-env.sh

    1
    2
    3
    cd /export/server/apache-hive-3.1.2-bin/conf
    mv hive-env.sh.template hive-env.sh
    vim hive-env.sh

    结尾追加

    1
    2
    3
    export HADOOP_HOME=/export/server/hadoop-3.3.0
    export HIVE_CONF_DIR=/export/server/apache-hive-3.1.2-bin/conf
    export HIVE_AUX_JARS_PATH=/export/server/apache-hive-3.1.2-bin/lib
  • hive-site.xml

    直接vim打开新文件

    1
    vim hive-site.xml

    编辑如下

点击展开配置内容
1
2
3
4
5
6
7
8
9
10
11
12
13
14
15
16
17
18
19
20
21
22
23
24
25
26
27
28
29
30
31
32
33
34
35
36
37
38
39
40
<configuration>
<!-- 存储元数据mysql相关配置 -->
<property>
<name>javax.jdo.option.ConnectionURL</name>
<value>jdbc:mysql://node1:3306/hive3?createDatabaseIfNotExist=true&amp;useSSL=false&amp;useUnicode=true&amp;characterEncoding=UTF-8</value>
</property>

<property>
<name>javax.jdo.option.ConnectionDriverName</name>
<value>com.mysql.jdbc.Driver</value>
</property>

<property>
<name>javax.jdo.option.ConnectionUserName</name>
<value>root</value>
</property>

<property>
<name>javax.jdo.option.ConnectionPassword</name>
<value>hadoop</value>
</property>

<!-- H2S运行绑定host -->
<property>
<name>hive.server2.thrift.bind.host</name>
<value>node1</value>
</property>

<!-- 远程模式部署metastore metastore地址 -->
<property>
<name>hive.metastore.uris</name>
<value>thrift://node1:9083</value>
</property>

<!-- 关闭元数据存储授权 -->
<property>
<name>hive.metastore.event.db.notification.api.auth</name>
<value>false</value>
</property>
</configuration>

2.3 上传驱动

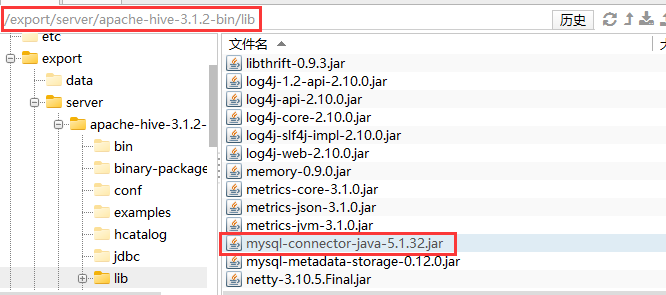
上传MySQL jdbc驱动到Hive安装包lib下

2.4 初始化元数据

1
2
3
cd /export/server/apache-hive-3.1.2-bin/
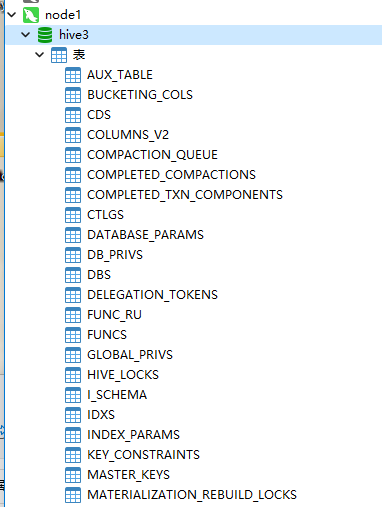
bin/schematool -initSchema -dbType mysql -verbos
#初始化成功会在mysql中创建74张表

2.5 解决注释信息中文乱码

MySQL中执行以下语句

1
2
3
4
5
6
use hive3;
alter table hive3.COLUMNS_V2 modify column COMMENT varchar(256) character set utf8;
alter table hive3.TABLE_PARAMS modify column PARAM_VALUE varchar(4000) character set utf8;
alter table hive3.PARTITION_PARAMS modify column PARAM_VALUE varchar(4000) character set utf8;
alter table hive3.PARTITION_KEYS modify column PKEY_COMMENT varchar(4000) character set utf8;
alter table hive3.INDEX_PARAMS modify column PARAM_VALUE varchar(4000) character set utf8;

2.6 创建Hive存储目录

在HDFS创建Hive存储目录(如存在则不用操作)

1
2
3
4
hadoop fs -mkdir /tmp
hadoop fs -mkdir -p /user/hive/warehouse
hadoop fs -chmod g+w /tmp
hadoop fs -chmod g+w /user/hive/warehouse

三、 使用

1. 启动Hive

1.1 启动metastore服务

1
2
3
4
5
6
7
#前台启动  关闭ctrl+c
/export/server/apache-hive-3.1.2-bin/bin/hive --service metastore

#前台启动开启debug日志
/export/server/apache-hive-3.1.2-bin/bin/hive --service metastore --hiveconf hive.root.logger=DEBUG,console
#后台启动 进程挂起 关闭使用jps+ kill -9
nohup /export/server/apache-hive-3.1.2-bin/bin/hive --service metastore &

1.2 启动hiveserver2服务

1
2
nohup /export/server/apache-hive-3.1.2-bin/bin/hive --service hiveserver2 &
#注意 启动hiveserver2需要一定的时间 不要启动之后立即beeline连接 可能连接不上

2. beeline客户端连接

拷贝node1安装包到node3上

1
scp -r /export/server/apache-hive-3.1.2-bin/ node3:/export/server/

连接

1
2
3
4
5
/export/server/apache-hive-3.1.2-bin/bin/beeline

beeline> ! connect jdbc:hive2://node1:10000
beeline> root
beeline> 直接回车

3. DataGrip连接Hive(略)

4. 库表语法

4.1 库

  • 查看库

    1
    show databases;
  • 创建库

    1
    create database [if not exists] ifnxs [comment "库描述"] [with dbproperties ('createdBy'='dr34m')];
    • with dbproperties 用于指定一些数据库的属性配置

    • location 可以指定数据库在HDFS存储位置,默认/user/hive/warehouse/dbname.db

    • 1
      create database test;
  • 使用库

    1
    use ifnxs;
  • 删除库

    1
    drop database [if exists] test [cascade];
    • cascade表示强制删除,默认为restrict,这意味着仅在数据库为空时才删除它

4.2 表

  • 查看表

    1
    show tables [in xxx];
  • 创建表

    1
    2
    3
    create table [if not exists] [xxx.]zzz (col_name data_type [comment "字段描述"], ...)
    [comment "表描述"]
    [row format delimited ...];
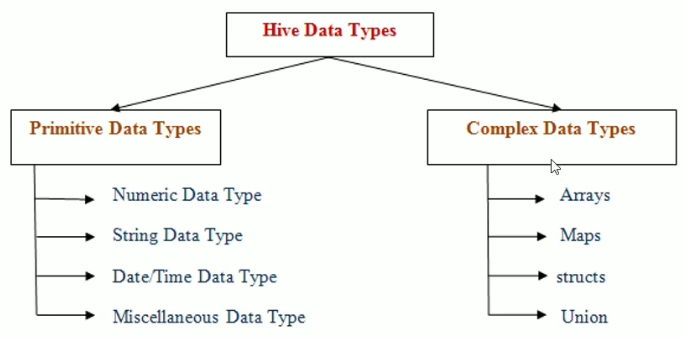
    • 数据类型

      • 最常用stringint
    • 分隔符

    • 1
      2
      3
      4
      5
      6
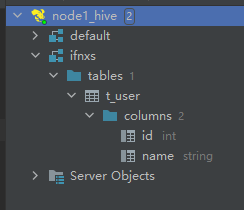
      create table ifnxs.t_user (
      id int comment "编号",
      name string comment "姓名"
      ) comment "用户表"
      row format delimited
      fields terminated by "\t"; -- 字段之间的分隔符
    • 从select创建表

      1
      create table xxx as select id,name from ifnxs.t_user;
  • 查看表结构

    1
    desc formatted xxx;
  • 删除表

    1
    drop table [if exists] xxx;

5. DML语法与函数

5.1 Load语法规则

1
LOAD DATA [LOCAL] INPATH 'filepath' [OVERWRITE] INTO TABLE tablename;
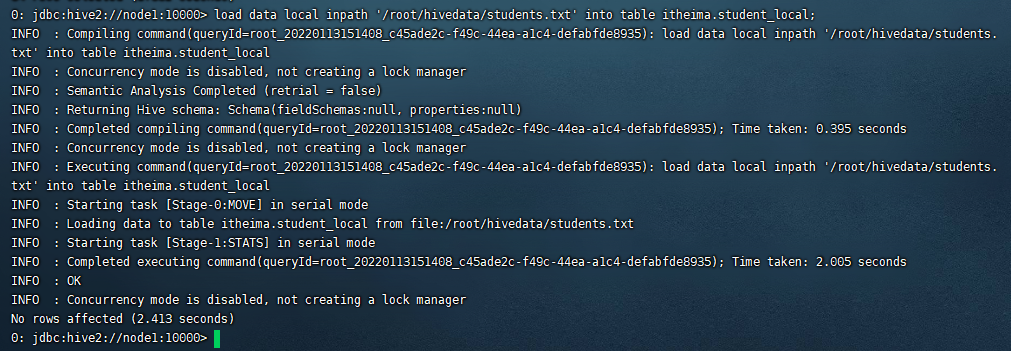
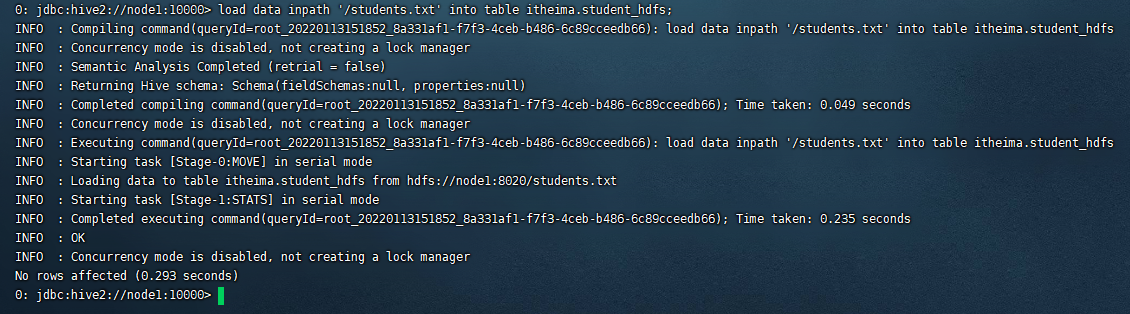
  • LOCAL指Hiveserver2服务所在机器的本地Linux文件系统

  • 例-本地(复制操作)

    1
    load data local inpath '/root/hivedata/students.txt' into table itheima.student_local;
  • 例-HDFS(移动操作)

    1
    load data inpath '/students.txt' into table itheima.student_hdfs;

5.2 Insert语法

Hive推荐清洗数据成为结构化文件,再使用Load语法加载数据到表中

insert+select例

1
insert into user select id,name from student;

5.3 select语法

1
2
3
4
5
6
SELECT [ALL|DISTINCT] select_expr, select_expr, ...
FROM table_reference
[WHERE where_condition]
[GROUP BY col_list]
[ORDER BY col_list]
[LIMIT [offset,] rows];
1
2
3
4
5
6
7
8
9
10
11
12
13
14
15
-- 查询所有字段或者指定字段
select * from t_usa_covid19;
select county, cases, deaths from t_usa_covid19;

-- 查询常数返回 此时返回的结果和表中字段无关
select 1 from t_usa_covid19;

-- 查询当前所属数据库
select current_database(); -- 省去from关键字

-- 返回所有匹配的行 去除重复的结果
select distinct state from t_usa_covid19;

-- 多个字段distinct 整体去重
select distinct county,state from t_usa_covid19;

5.3.1 where条件

  • 比较运算符 = > < <= >= != <>(不等于)

    1
    2
    3
    4
    5
    -- 找出来自于California州的疫情数据
    select * from t_usa_covid19 where state = 'California';

    -- where条件中使用函数 找出州名字母长度超过10位的有哪些
    select * from t_usa_covid19 where length(state) >10;

  • 逻辑运算 and or

    1
    select * from t_usa_covid19 where length(state)>10 and length(state)<20;
  • 空值判断 is null

    1
    select * from t_usa_covid19 where fips is null;
  • between...and

    1
    select * from t_usa_covid19 where length(state) between 10 and 20;
  • in

    1
    select * from t_usa_covid19 where length(state) in (10,11,13);

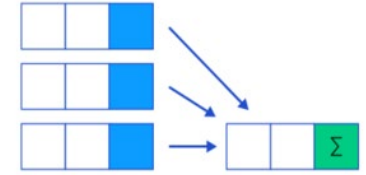
5.3.2 聚合操作

count sum max min avg

1
2
3
4
5
6
7
8
9
10
11
12
13
14
15
-- 统计美国总共有多少个县county
-- 学会使用as 给查询返回的结果起个别名
select count(county) as county_cnts from t_usa_covid19;

-- 去重distinct
select count(distinct county) as county_cnts from t_usa_covid19;

-- 统计美国加州有多少个县
select count(county) from t_usa_covid19 where state = "California";

-- 统计德州总死亡病例数
select sum(deaths) from t_usa_covid19 where state = "Texas";

-- 统计出美国最高确诊病例数是哪个县
select max(cases) from t_usa_covid19;

5.3.3 GROUP BY

GROUP BY语句用于结合聚合函数,根据一个或多个列对结果集进行分组

1
2
3
4
5
6
7
8
-- 根据state州进行分组 统计每个州有多少个县county
select count(county) from t_usa_covid19 where count_date = "2021-01-28" group by state;

-- 想看一下统计的结果是属于哪一个州的
select state,count(county) as county_nums from t_usa_covid19 where count_date = "2021-01-28" group by state;

-- 被聚合函数应用
select state,count(county),sum(deaths) from t_usa_covid19 where count_date = "2021-01-28" group by state;

5.3.4 HAVING

由于SQL执行顺序决定where在分组前执行,所以where中不能使用聚合函数,比如下边的错误示范

1
2
-- 错误示范-统计2021-01-28死亡病例数大于10000的州
select state,sum(deaths) from t_usa_covid19 where count_date = "2021-01-28" and sum(deaths) >10000 group by state;

1
2
3
4
5
-- 先where分组前过滤,再进行group by分组, 分组后每个分组结果集确定 再使用having过滤
select state,sum(deaths) from t_usa_covid19 where count_date = "2021-01-28" group by state having sum(deaths) > 10000;

-- 这样写更好 即在group by的时候聚合函数已经作用得出结果 having直接引用结果过滤 不需要再单独计算一次了
select state,sum(deaths) as cnts from t_usa_covid19 where count_date = "2021-01-28" group by state having cnts> 10000;

5.3.6 ORDER BY

1
2
3
4
5
6
7
8
-- 根据确诊病例数升序排序 查询返回结果
select * from t_usa_covid19 order by cases;

-- 不写排序规则 默认就是asc升序
select * from t_usa_covid19 order by cases asc;

-- 根据死亡病例数倒序排序 查询返回加州每个县的结果
select * from t_usa_covid19 where state = "California" order by cases desc;

5.3.7 LIMIT

1
2
3
4
5
6
7
8
9
-- 没有限制返回2021.1.28 加州的所有记录
select * from t_usa_covid19 where count_date = "2021-01-28" and state ="California";

-- 返回结果集的前5条
select * from t_usa_covid19 where count_date = "2021-01-28" and state ="California" limit 5;

-- 返回结果集从第1行开始 共3行
select * from t_usa_covid19 where count_date = "2021-01-28" and state ="California" limit 2,3;
-- 注意 第一个参数偏移量是从0开始的

5.3.8 执行顺序

  • from > where > group(含聚合)> having > order > select

  • 聚合语句(sum,min,max,avg,count)要比having子句优先执行

  • where子句在查询过程中执行优先级别优先于聚合语句(sum,min,max,avg,count)

5.4 JOIN

  • join_table

    1
    2
    3
    table_reference [INNER] JOIN table_factor [join_condition]

    | table_reference {LEFT} [OUTER] JOIN table_reference join_condition

  • join_condition:

    1
    ON expression

5.4.1 inner join 内连接

其中inner可以省略:inner join == join

1
2
3
4
5
6
7
8
9
10
11
12
13
14
select e.id,e.name,e_a.city,e_a.street
from employee e inner join employee_address e_a
on e.id =e_a.id;

-- 等价于 inner join=join
select e.id,e.name,e_a.city,e_a.street
from employee e join employee_address e_a
on e.id =e_a.id;

-- 等价于 隐式连接表示法
select e.id,e.name,e_a.city,e_a.street
from employee e, employee_address e_a
where e.id =e_a.id;

5.4.2 left join 左连接

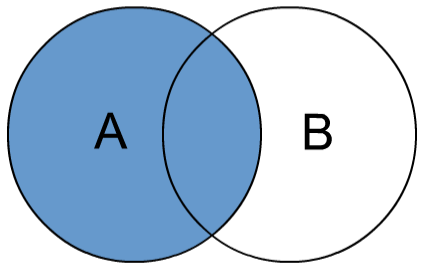
左外连接(Left Outer Join)或者左连接,其中outer可以省略

1
2
3
4
5
6
7
8
select e.id,e.name,e_conn.phno,e_conn.email
from employee e left join employee_connection e_conn
on e.id =e_conn.id;

-- 等价于 left outer join
select e.id,e.name,e_conn.phno,e_conn.email
from employee e left outer join employee_connection e_conn
on e.id =e_conn.id;

5.5 函数

5.5.1 概述

  • 查看所有可用函数

    1
    show functions;
  • 描述函数用法

    1
    describe function extended xxxx;

    1
    describe function extended count;
  • 分类

5.5.2 常用内置函数

官网

String Functions 字符串函数
1
2
3
4
5
6
7
8
9
10
11
12
13
14
15
select length("itcast");
select reverse("itcast");

select concat("angela","baby");
-- 带分隔符字符串连接函数:concat_ws(separator, [string | array(string)]+)
select concat_ws('.', 'www', array('itcast', 'cn'));

-- 字符串截取函数:substr(str, pos[, len]) 或者 substring(str, pos[, len])
select substr("angelababy",-2); -- pos是从1开始的索引,如果为负数则倒着数
select substr("angelababy",2,2);
-- 分割字符串函数: split(str, regex)
-- split针对字符串数据进行切割 返回是数组array 可以通过数组的下标取内部的元素 注意下标从0开始的
select split('apache hive', ' ');
select split('apache hive', ' ')[0];
select split('apache hive', ' ')[1];

Date Functions 日期函数
1
2
3
4
5
6
7
8
9
10
11
12
13
14
15
16
17
18
19
20
21
22
23
24
-- 获取当前日期: current_date
select current_date();

-- 获取当前UNIX时间戳函数: unix_timestamp
select unix_timestamp();

-- 日期转UNIX时间戳函数: unix_timestamp
select unix_timestamp("2011-12-07 13:01:03");

-- 指定格式日期转UNIX时间戳函数: unix_timestamp
select unix_timestamp('20111207 13:01:03','yyyyMMdd HH:mm:ss');

-- UNIX时间戳转日期函数: from_unixtime
select from_unixtime(1618238391);
select from_unixtime(0, 'yyyy-MM-dd HH:mm:ss');

-- 日期比较函数: datediff 日期格式要求'yyyy-MM-dd HH:mm:ss' or 'yyyy-MM-dd'
select datediff('2012-12-08','2012-05-09');

-- 日期增加函数: date_add
select date_add('2012-02-28',10);

-- 日期减少函数: date_sub
select date_sub('2012-01-1',10);

相比视频额外扩展,工作中常用

1
2
3
4
-- 日期格式化
select date_format(current_date(), 'yyyy-MM');
-- 筛选在2022年1月创建的用户
select * from userlist where date_format(create_time, 'yyyy-MM') = '2022-01';
Mathematical Functions 数学函数
1
2
3
4
5
6
7
8
-- 取整函数: round  返回double类型的整数值部分 (遵循四舍五入)
select round(3.1415926);
-- 指定精度取整函数: round(double a, int d) 返回指定精度d的double类型
select round(3.1415926,4);
-- 取随机数函数: rand 每次执行都不一样 返回一个0到1范围内的随机数
select rand();
-- 指定种子取随机数函数: rand(int seed) 得到一个稳定的随机数序列
select rand(3);
Conditional Functions 条件函数
1
2
3
4
5
6
7
8
9
10
11
-- if条件判断: if(boolean testCondition, T valueTrue, T valueFalseOrNull)
select if(1=2,100,200);
select if(sex ='男','M','W') from student limit 3;

-- 条件转换函数: CASE a WHEN b THEN c [WHEN d THEN e]* [ELSE f] END
select case 100 when 50 then 'tom' when 100 then 'mary' else 'tim' end;
select case sex when '男' then 'male' else 'female' end from student limit 3;

-- 空值转换函数: nvl(T value, T default_value)
select nvl("allen","itcast");

select nvl(null,"itcast");