插播一条广告,专业承接 discourse 开发,包含不限于主题,插件等功能自定义开发,需要的可以关注我的公众号,私信我。
最近一个月的工作都集中在公司要搭建一个 Gamer Community 上,经过多个角度,多种开源,商业方案对比,最终选择了 discourse。
多说一句对于一个论坛技术选型,以前没有这方面的储备,最终的选择也是 AI 推荐的。领导下发任务用 AI 拆分,作为员工的我们,利用 AI 完成我们的方案调研和工作汇报,完美闭环!这么想,工资就白嫖来的!
由于官方社区没有 docker 镜像,快速部署会有一点点麻烦,目前我推荐的 Discourse 有两种方式:
官方社区方案 VMware 旗下bitnami/discourse
最快速的方案推荐 bitnami,一个 docker-compose.yml 一条命令就可以跑起来。
1
2
3
4
5
6
7
8
9
10
11
12
13
14
15
16
17
18
19
20
21
22
23
24
25
26
27
28
29
30
31
32
33
34
35
36
37
38
39
40
41
42
43
44
45
46
47
48
49
50
51
52
53
54
55
56
57
58
59
60
61
62
services: postgresql: image: bitnami/postgresql:latest volumes: - "postgresql_data:/bitnami/postgresql" environment: # ALLOW_EMPTY_PASSWORD is recommended only for development. - ALLOW_EMPTY_PASSWORD=yes - POSTGRESQL_USERNAME=bn_discourse - POSTGRESQL_DATABASE=bitnami_discourse redis: image: bitnami/redis:latest environment: # ALLOW_EMPTY_PASSWORD is recommended only for development. - ALLOW_EMPTY_PASSWORD=yes volumes: - "redis_data:/bitnami/redis" discourse: image: bitnami/discourse:3 ports: - "80:3000" volumes: - "discourse_data:/bitnami/discourse" depends_on: - postgresql - redis environment: # ALLOW_EMPTY_PASSWORD is recommended only for development. - ALLOW_EMPTY_PASSWORD=yes - DISCOURSE_HOST=127.0.0.1 - DISCOURSE_DATABASE_HOST=postgresql - DISCOURSE_DATABASE_PORT_NUMBER=5432 - DISCOURSE_DATABASE_USER=bn_discourse - DISCOURSE_DATABASE_NAME=bitnami_discourse - DISCOURSE_REDIS_HOST=redis - DISCOURSE_REDIS_PORT_NUMBER=6379 sidekiq: image: bitnami/discourse:3 depends_on: - discourse volumes: - "sidekiq_data:/bitnami/discourse" command: /opt/bitnami/scripts/discourse-sidekiq/run.sh environment: # ALLOW_EMPTY_PASSWORD is recommended only for development. - ALLOW_EMPTY_PASSWORD=yes - DISCOURSE_HOST=127.0.0.1 - DISCOURSE_DATABASE_HOST=postgresql - DISCOURSE_DATABASE_PORT_NUMBER=5432 - DISCOURSE_DATABASE_USER=bn_discourse - DISCOURSE_DATABASE_NAME=bitnami_discourse - DISCOURSE_REDIS_HOST=redis - DISCOURSE_REDIS_PORT_NUMBER=6379 volumes: postgresql_data: driver: local redis_data: driver: local discourse_data: driver: local sidekiq_data: driver: local
启动命令:docker compose up -ddocker compose down --volumes
1
2
3
4
sudo -s git clone https://github.com/discourse/discourse_docker.git /var/discourse cd /var/discourse chmod 700 containers
安装向导,初始化配置文件
基于模板为配置启动一个容器
1 ./launcher bootstrap app
如果需要 db 和应用分离的话,那么新增一个 data.yml 模板。数据库定义端口和密码可以通过修改 redis.template.yml 和 postgres.template.yml 实现。
直接修改 templates/redis.template.yml
1
2
3
4
5
6
7
8
9
10
11
12
13
14
15
16
17
18
params: redis_io_threads: "1" redis_port: "6379" redis_password: "*******" run: #..... # Add port configuration - replace: filename: "/etc/redis/redis.conf" from: /^port.*$/ to: "port $redis_port" # Add password configuration - replace: filename: "/etc/redis/redis.conf" from: /^# requirepass.*$/ to: "requirepass $redis_password"
直接修改 templates/postgres.template.yml
1
2
3
4
5
6
7
8
9
10
params: db_port: "5432" run: #...... # 配置端口 - replace: filename: "/etc/postgresql/15/main/postgresql.conf" from: /#?port *=.*/ to: "port = $db_port"
进去容器内部修改账户密码
1 su postgres -c "psql $db_name -c \"ALTER USER postgres WITH PASSWORD 'your_new_password'\";
data.yml 配置文件
1
2
3
4
5
6
7
8
9
10
11
12
13
14
15
16
17
18
19
20
21
22
23
24
25
26
27
28
29
30
31
32
33
34
35
36
37
38
39
40
41
42
43
44
45
46
47
48
49
50
# A container for all things Data, be sure to set a secret password for # discourse account, SOME_SECRET is just an example # templates: - "templates/postgres.template.yml" - "templates/redis.template.yml" # any extra arguments for Docker? # docker_args: params: db_default_text_search_config: "pg_catalog.english" ## Set db_shared_buffers to a max of 25% of the total memory. ## will be set automatically by bootstrap based on detected RAM, or you can override #db_shared_buffers: "256MB" ## can improve sorting performance, but adds memory usage per-connection #db_work_mem: "40MB" expose: - "5432:5432" # http - "6379:6379" # https env: # ensure locale exists in container, you may need to install it LC_ALL: en_US.UTF-8 LANG: en_US.UTF-8 LANGUAGE: en_US.UTF-8 #......省略 volumes: - volume: host: /var/discourse/shared/data guest: /shared - volume: host: /var/discourse/shared/data/log/var-log guest: /var/log # TODO: SOME_SECRET to a password for the discourse user hooks: after_postgres: - exec: stdin: | alter user discourse with password 'SOME_SECRET'; cmd: su - postgres -c 'psql discourse' raise_on_fail: false
基于 data.yml 模板搭建 db 容器
1
2
3
4
5
6
7
8
9
10
11
12
13
14
15
16
17
18
19
20
Usage: launcher COMMAND CONFIG [--skip-prereqs] [--docker-args STRING] Commands: start: Start/initialize a container stop: Stop a running container restart: Restart a container destroy: Stop and remove a container enter: Open a shell to run commands inside the container logs: View the Docker logs for a container bootstrap: Bootstrap a container for the config based on a template run: Run the given command with the config in the context of the last bootstrapped image rebuild: Rebuild a container (destroy old, bootstrap, start new) cleanup: Remove all containers that have stopped for > 24 hours start-cmd: Generate docker command used to start container Options: --skip-prereqs Don't check launcher prerequisites --docker-args Extra arguments to pass when running docker --skip-mac-address Don't assign a mac address --run-image Override the image used for running the container
重新构建一个容器
启动/停止应用
1
2
./launcher start app ./launcher stop app
进入容器
创建管理员账户
官方文档
例如我们要使用https://www.example.com/forum 访问论坛,这种就属于子路径部署。
在 app.yml 文件中添加相应信息,重新编译就可以了。
1 2 3 4 5 6 7 8 9 10 11 12 13 14 15 16 17 18 19 20 21 22 23 24 25 26 27 28 29 30 31 env: ... DISCOURSE_RELATIVE_URL_ROOT: /forum run: - exec: cd: $home cmd: - mkdir -p public/forum - cd public/forum && ln -s ../uploads && ln -s ../backups - replace: global: true filename: /etc/nginx/conf.d/discourse.conf from: proxy_pass http://discourse; to: | rewrite ^/(.*)$ /forum/$1 break; proxy_pass http://discourse; - replace: filename: /etc/nginx/conf.d/discourse.conf from: etag off; to: | etag off; location /forum { rewrite ^/forum/?(.*)$ /$1; } - replace: filename: /etc/nginx/conf.d/discourse.conf from: $proxy_add_x_forwarded_for to: $http_your_original_ip_header global: true
部署好以后,就可以访问了,如果存在本地上传的静态文件,就需要修改一下文件路径。
1 2 ./launcher enter app RAILS_ENV=production bundle exec script/discourse remap '/uploads' '/forum/uploads'
注意:如果你的路径为/demo/forum 那么需要将以上内容中的/forum替换为/demo/forum,run 中还需要调整一个相对路径cd public/demo/forum && ln -s ../../uploads && ln -s ../../backups,因为是两级目录,这里需要注意一下,避免找不到静态文件。
1 2 3 4 5 6 7 8 env: ... http_proxy: http://xxxx https_proxy: http://xxxx no_proxy: "127.0.0.1,localhost,.demo.com" HTTPS_PROXY: http://xxxx HTTP_PROXY: http://xxxx NO_PROXY: "127.0.0.1,localhost,.demo.com"
1 2 3 4 5 6 7 8 9 10 hooks: before_exec: - exec: "ulimit -v 2097152" after_code: - exec: cd: $home/plugins cmd: - git clone https://github.com/discourse/discourse-oauth2-basic - git clone https://github.com/discourse/discourse-restricted-replies - git clone https://github.com/discourse/discourse-templates
官方文档
1 2 3 4 5 6 7 8 9 10 11 12 13 14 env: ... DISCOURSE_USE_S3: true DISCOURSE_S3_REGION: us-east1 DISCOURSE_S3_INSTALL_CORS_RULE: false FORCE_S3_UPLOADS: 1 DISCOURSE_S3_ENDPOINT: https://storage.googleapis.com DISCOURSE_S3_ACCESS_KEY_ID: myaccesskey DISCOURSE_S3_SECRET_ACCESS_KEY: mysecretkey DISCOURSE_S3_CDN_URL: https://falcoland-files-cdn.falco.dev DISCOURSE_S3_BUCKET: falcoland-files #DISCOURSE_S3_BACKUP_BUCKET: falcoland-files/backup #DISCOURSE_BACKUP_LOCATION: s3
其中 DISCOURSE_S3_CDN_URL 代表将 js 等资源也上传到云上,如果没有该配置只会上传文件。
如果启用,还需要添加上传 js 等资源。每次编译都会上传。
1 2 3 4 5 6 7 8 hooks: after_assets_precompile: - exec: cd: $home cmd: - sudo -E -u discourse bundle exec rake s3:upload_assets # - sudo -E -u discourse bundle exec rake s3:expire_missing_assets --trace 正常来说需要该步操作,但是目前执行会报错,可以手动在页面上删除。
关注速率限制有 3 个地方:
是 web.ratelimited.template.yml
环境变量 网站 /admin/config/rate-limits
环境变量
1 2 3 DISCOURSE_MAX_REQS_PER_IP_MODE: none DISCOURSE_MAX_ADMIN_API_REQS_PER_MINUTE: 600000
文档可以查看 bitnami/discourse
所有操作都需要在工作目录,开始前需要提前配置代理等信息
1 2 3 4 cd /opt/bitnami/discourse git config --global http.sslVerify false export http_proxy=http://xxxxxxxxx:1080 export https_proxy=http://xxxxxxxxx:1080
1 2 RAILS_ENV=production bundle exec rake plugin:install repo=https://github.com/discourse/discourse-oauth2-basic RAILS_ENV=production bundle exec rake assets:precompile
1 2 3 4 5 echo "redditish: url: https://github.com/discourse/discourse-redditish-theme add_to_all_themes: true" | tee my_theme.yml > /dev/null RAILS_ENV=production bundle exec rake themes:install > my_theme.yml RAILS_ENV=production bundle exec rake themes:update assets:precompile
有可能安装失败,原因未知。
API 文档 https://docs.discourse.org/
Ruby API https://github.com/discourse/discourse_api
逆向 API https://meta.discourse.org/t/reverse-engineer-the-discourse-api/20576?silent=true
查询所有的 Category
1 https://{host}/categories.json
查询 subcatefory
1 2 https://{host}/c/{id}.json https://{host}/c/10.json
查询网站信息
1 https://{host}/about.json
1.删除顶部 getting started
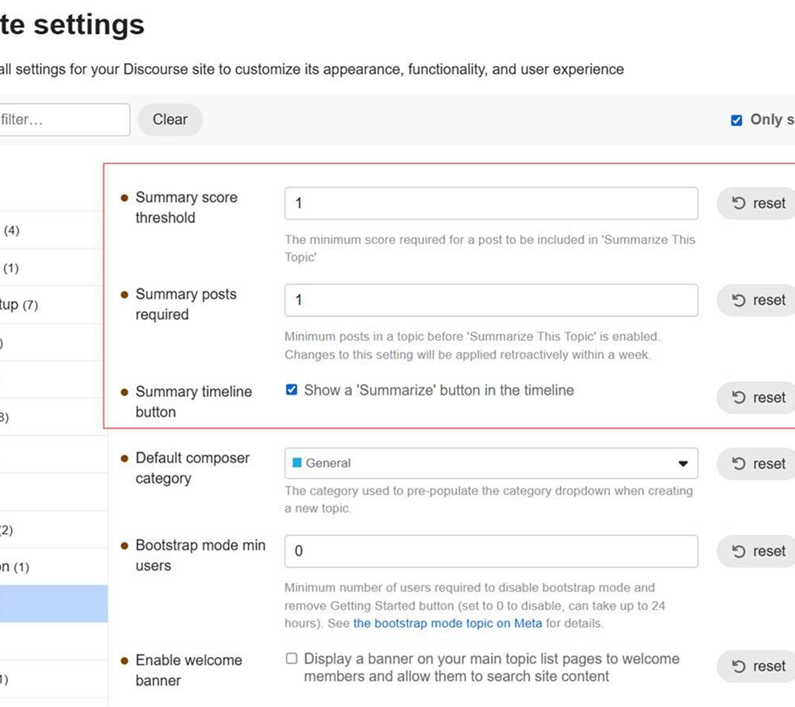
2.Summarize this topic button
这个功能默认是存在的,只是需要达到一个计算分数,具体详见:https://meta.discourse.org/t/summarize-this-topic-button/132790/17
3.外链新打开 tab 页
Default other external links in new tab
变更管理员邮箱
1 2 3 4 5 6 7 8 SELECT * FROM users WHERE admin = true; SELECT id, email FROM user_emails WHERE user_id = 1;--user@example.com UPDATE user_emails SET email = 'user@example.com', updated_at = NOW() WHERE user_id = 1;
1.修改备份包内容
1 2 gzip gamer-community-2025-04-09-052308-v20250321143553-1.tar.gz tar -zczvf gamer-community-2025-04-09-052308-v20250321143553-1.tar.gz ./*
2.导出/导入所有站点设置
参考文档
1 2 3 4 rake site_settings:export > saved_settings.yml rake site_settings:import < saved_settings.yml
3.导入/导出类别
1 2 3 rake export:category_structure rake import:file["category-structure-export-2025-05-09-025650.json"]
本文是在 wsl 环境中配置,参考官方文档 。
1 2 git clone https://github.com/discourse/discourse.git cd discourse
在开始前根据自己环境选择是否修改镜像仓库地址和增加代理,由于在公司内部网络限制,因此我在开始前有做以上两个操作,代理地址是添加在 docker run 中。
1 2 3 4 5 6 7 8 9 10 11 d/boot_dev --init # wait while: # - dependencies are installed, # - the database is migrated, and # - an admin user is created (you'll need to interact with this) # In one terminal: d/rails s # And in a separate terminal d/ember-cli
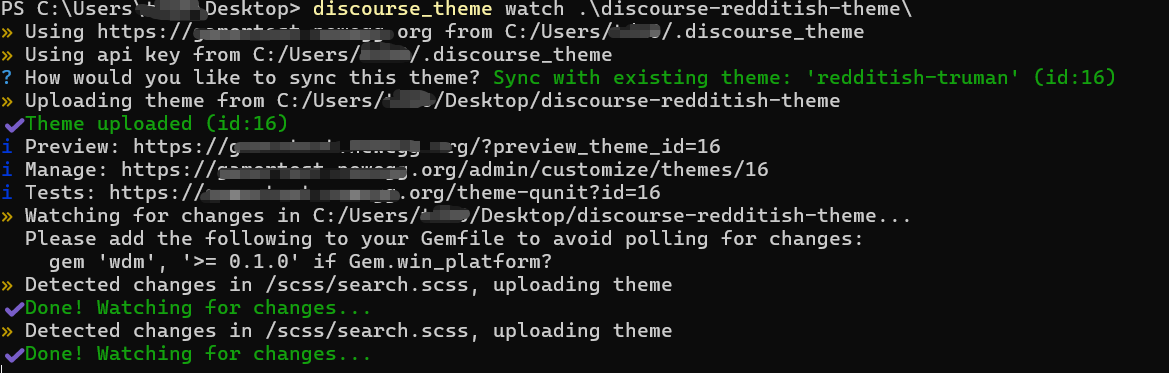
可以通过本地开发实时渲染更新到网站上,这种方式可以大大提高主题开发效率。具体文档详见:https://meta.discourse.org/t/install-the-discourse-theme-cli-console-app-to-help-you-build-themes/82950/1
通过 discourse_theme 命令可以将本地开发好的主题直接上传到网站上,同时还可以实时渲染看到更改效果!
首先安装 Ruby,通过Ruby Installer 很容易安装
然后通过命令安装 discourse cli gem install discourse_theme
使用 clidiscourse_theme new YOUR_DIR_NAMEdiscourse_theme watch YOUR_DIR_NAME
.discourse_theme 配置信息可以参考我本地:
1 2 3 4 5 6 7 8 --- C:/Users/truman/Desktop/discourse-redditish-theme: url: https://gamertest.xxxx.org components: none theme_id: 16 api_keys: https://gamertest.xxxx.org: xxxxxxxxxxxxx
使用命令:discourse_theme watch .\discourse-redditish-theme\
可以参考:https://github.com/discourse/discourse-profile-custom-link
settings.yml 用来设置配置信息
common/common.scss 设置公共样式
javascripts/discourse/connectors 设置插槽入口
locales/en.yml 设置国际化
javascripts/discourse/components 用来添加前端组件
举个例子,这里开发一个调用后端 api 获取相应数据。
1 2 3 4 5 6 7 8 9 10 11 12 13 14 15 16 17 18 19 20 21 22 23 24 25 26 27 28 29 30 31 32 33 34 35 36 37 export default class ProfileCustomLink extends Component { @service site; @service api; @tracked customLinkUrl; @tracked customLinkFieldId; @tracked showCustomLink = false; @tracked user = this.args.model.username; @tracked userId = this.args.model.id; @tracked userFields = this.args.model.user_fields; constructor() { super(...arguments); console.info("[Custom Profile Link] model", this.args.model); this.fetchExternalIds().then((oauth2BasicId) => { const url = settings.profile_custom_link_prefix + (oauth2BasicId == null ? '' : oauth2BasicId); this.customLinkUrl = url; this.showCustomLink = true; }); } async fetchExternalIds() { try { const response = await ajax(`/admin/users/${this.userId}.json`, { headers: { "Api-Key": settings.profile_custom_link_api_key, "Api-Username": settings.profile_custom_link_api_username } }); const oauth2BasicId = response.external_ids?.oauth2_basic; return oauth2BasicId } catch (error) { console.error("[Custom Profile Link] Error fetching external IDs:", error); } } }
可以都过脚本来插入按钮,隐藏功能,由于 discourse 前端路由问题,可以通过 plugin api 来修改部分内容。
1 2 3 4 5 6 7 8 9 import { apiInitializer } from "discourse/lib/api"; export default apiInitializer((api) => { api.onPageChange(() =>{ customFuntion(); }); });
onPageChange 是在页面切换后触发。更多 api 详见连接
在主题中获取配置信息和插件存在差异,主题配置信息在settings.yml 文件中,在 template 和 gjs 中可以直接获取settings对象,不需要导入。
template 中例子:
1 {{log "Theme settings:" settings}}
js 代码块中例子:
1 2 3 get mappings() { console.log("Bullet points mappings:", settings.bullet_points_mappings); }
更多用法详见官网文档
在settings.yml中不需要声明client: true, settings 信息测试仅能在 gjs 文件中使用。
进去主题目录,压缩文件不含包文件夹名,还需要排除 git 目录。
插件和主题的 components 有点类似,但部分使用又有点区别,可以首先参考discourse-plugin-skeleton 骨架项目创建一个插件项目。
开发文档:Developing Discourse Plugins - Part 1 - Create a basic plugin
以下来解释一下项目目录:
1 2 3 4 5 6 7 8 9 10 11 12 13 14 15 16 17 18 19 20 21 22 23 24 25 26 27 28 29 30 31 32 33 34 35 36 37 38 39 40 41 42 43 44 . ├── Gemfile ├── Gemfile.lock ├── LICENSE ├── README.md ├── app │ └── controllers # 增加后端API 入口 │ └── discourse_profile │ └── profile_controller.rb ├── assets │ ├── javascripts │ │ └── discourse │ │ ├── components # 前端组件 │ │ │ └── profile-link.js │ │ ├── connectors # 页面注入槽点 │ │ │ ├── user-card-post-names # 槽点 │ │ │ │ └── profile-link.hbs │ │ │ └── user-location-and-website # 槽点 │ │ │ └── profile-link.hbs │ │ └── templates │ │ └── components │ │ └── profile-link.hbs # 页面模板文件 │ └── stylesheets │ └── common │ └── profile.scss ├── config │ ├── locales │ │ └── client.en.yml # 国际化 │ ├── routes.rb # 路由配置 │ └── settings.yml # 配置参数 ├── db ├── eslint.config.mjs ├── lib │ └── profile_link │ └── engine.rb ├── package.json ├── plugin.rb # 插件注册和配置的入口 ├── pnpm-lock.yaml ├── spec │ └── system │ └── core_features_spec.rb ├── stylelint.config.mjs └── test └── javascripts
在 plugin.rb 文件开头增加插件配置信息,主要用来声明插件信息。
1 2 3 4 5 # name: discourse-profile # about: Add Profile Link to User Profile # version: 1.0.0 # authors: Truman # url: https://xxxxx.xxxx.xxxxx
在 settings.yml 中设置插件可用配置信息,如下为我最近写的一个例子:
1 2 3 4 5 6 7 8 9 10 11 plugins: profile_link_enabled: default: true type: bool client: true profile_link_label: default: "Truman Profile" client: true type: text ......
官网文档 plugins 为 plugin name ,但是国际化中还需要额外增加信息,我看很多插件都是使用 plugins,目前测试没有问题,存在在管理页面无法打开插件的设置页面,必须点设置才能修改。
如果想让前端获取该配置信息,一定要增加client: true,布尔值需要添加默认值
同时还需要在 plugin.rb 中启用,使用如下:
1 2 enabled_site_setting :profile_link_enabled
除此以外还需要初始化注册(非必须)
1 2 3 4 5 6 7 8 9 10 11 after_initialize do # 注册设置 settings = %w[ label debug ] settings.each do |setting| SiteSetting.set("profile_link_#{setting}", SiteSetting.defaults["profile_link_#{setting}"] || nil) end end
前端页面获取配置信息
1 2 3 4 5 6 7 8 9 10 import Component from "@glimmer/component"; import { inject as service } from "@ember/service"; export default class ProfileLink extends Component { @service siteSettings; get linkLabel() { return this.siteSettings.profile_link_label; } }
其中切记一定要增加@service siteSettings;,负责 js 和 hbs 中都无法获取配置信息。
模板文件 hbs 中
1 {{this.siteSettings.profile_link_label}}
后端 rb 代码获取配置信息
1 SiteSetting.profile_link_label
这里再给一个最新版的配置信息 demo,获取配置信息一致,这种方式应该是最新推荐的,使用这种方式支持在管理页面直接访问设置页面。
settings.yml
1 2 3 4 5 category_resources: category_resources_enabled: default: true client: true description: "启用分类资源边栏功能"
client.en.yml
1 2 3 4 5 6 7 8 9 10 en: admin_js: admin: site_settings: categories: category_resources: "Category Resources" js: category_resources: title: Category Resources
不用再在 plugin.rb 中初始化配置信息。
在assets/stylesheets/common目录下增加自己插件的样式信息,要求为 scss
1 2 3 4 5 6 7 8 9 10 11 12 13 14 .user-card-location-and-website-outlet { margin-inline: 0.5em; .external-user-link { a { color: var(--primary); text-decoration: underline; } svg { margin-right: 0.25em; } } }
同时还需要在 plugin.rb 中启用,使用如下:
1 register_asset "stylesheets/common/profile.scss"
前端代码都是在assets/javascripts/discourse/下,以下用…替代
前端组件及模板
ProfileLink 组件在.../components/下
1 2 3 4 5 6 7 8 9 10 11 import Component from "@glimmer/component"; import { service } from '@ember/service'; export default class ProfileLink extends Component { @service siteSettings; get linkLabel() { return this.siteSettings.profile_link_label; } }
以上写法为历史写法,可能存在告警,最新推荐将组件和模板写在一个 gjs 文件中,例如:
1 2 3 4 5 6 7 8 9 10 11 12 13 14 15 16 17 18 19 20 21 22 23 24 25 26 27 28 29 30 31 32 33 34 35 36 37 38 39 40 import Component from "@glimmer/component"; import { inject as service } from "@ember/service"; import { hbs } from "ember-cli-htmlbars"; export default class CategoryResources extends Component { @service router; @service siteSettings; constructor() { super(...arguments); } get categoryResources() { try { .... } catch (error) { console.error("...", error); return []; } } <template> <div class="resources-grid"> {{#each this.categoryResources as |resource|}} <a href={{resource.url}} target="_blank" rel="noopener noreferrer" class="resource-item" title={{resource.description}}> {{resource.name}} </a> {{/each}} </div> </template> }
前端注入点
.../connectors/user-card-post-names/link.hbs
其中user-card-post-names 为 discourse 前端插槽,又称注入点。
link.hbs 例如:
1 <ProfileLink @user={{@outletArgs.user}}/>
在源码中能发现更多的注入点:https://github.com/search?q=repo%3Adiscourse%2Fdiscourse+PluginOutlet+%40name%3D&type=code
在 Discourse 插件开发中,使用 Engine 定义自己插件空间,隔离一些信息。
在 plugin.rb 中引入定义,定义模块
1 2 3 4 5 require_relative "lib/profile_link/engine" module ::DiscourseProfile PLUGIN_NAME = "discourse-profile" end
engine.rb
1 2 3 4 5 6 7 8 # frozen_string_literal: true module ::DiscourseProfile class Engine < ::Rails::Engine engine_name PLUGIN_NAME isolate_namespace DiscourseProfile end end
在config/routes.rb中声明路由
1 2 3 4 5 6 7 8 9 # frozen_string_literal: true DiscourseProfile::Engine.routes.draw do get "/profile_link/:user_id" => "profile#show", as: :profile_link end Discourse::Application.routes.draw do mount ::DiscourseProfile::Engine, at: "profile_link" end
这里声明了一个 get 请求/profile_link/:user_id,后端对应放在在 controllers 中
例如app/controllers/discourse-profile/profile_cpmtroller.rb
1 2 3 4 5 6 7 8 9 10 11 12 13 14 15 16 17 18 19 20 21 22 23 24 25 26 27 28 29 30 31 32 33 module DiscourseProfile class ProfileController < ::ApplicationController requires_plugin DiscourseProfile::PLUGIN_NAME def show if SiteSetting.profile_link_debug Rails.logger.info "Processing profile request for user_id: #{params[:user_id]}" end raise Discourse::InvalidAccess.new unless current_user user = User.find_by(id: params[:user_id]) raise Discourse::NotFound unless user result = fetch_profile(user) render json: result end private def fetch_profile(user) { profile_url: 'test_url' username: user.username, nid: nid } end end end