惯性聚合 高效追踪和阅读你感兴趣的博客、新闻、科技资讯
阅读原文 在惯性聚合中打开

推荐订阅源

阮一峰的网络日志
阮一峰的网络日志
Hugging Face - Blog
Hugging Face - Blog
Recent Announcements
MongoDB | Blog
MongoDB | Blog
OSCHINA 社区最新新闻
OSCHINA 社区最新新闻
G
Google Developers Blog
L
LangChain Blog
The GitHub Blog
The GitHub Blog
酷 壳 – CoolShell
酷 壳 – CoolShell
GbyAI
GbyAI
MyScale Blog
MyScale Blog
让小产品的独立变现更简单 - ezindie.com
U
Unit 42
Martin Fowler
Martin Fowler
Cyber Security Advisories - MS-ISAC
H
Hackread – Cybersecurity News, Data Breaches, AI and More
Apple Machine Learning Research
爱范儿
爱范儿
博客园 - 聂微东
大猫的无限游戏
大猫的无限游戏
M
MIT News - Artificial intelligence
A
About on SuperTechFans
Stack Overflow Blog
Stack Overflow Blog
V
V2EX

陈少文的网站

巨变与机遇的未来十年 Kubernetes 平台管理软件压力测试方案 使用镜像部署 Hexo 静态页面 终于等到你 - GitHub 镜像仓库服务(ghcr.io) 一起来学 Go --(6)Interface 一起来学 Go --(5)Goroutine 和 Channel 什么是函数式编程 如何在 Kubernetes 集群集成 Kata 柯里化与偏函数 使用 PyGithub 自动创建 Label 软件产品是团队能力的输出 Helm 2 、Helm 3 比较 IoT 变现 Kubernetes 中的 DNS 服务 国内的 Helm 镜像源 Harbor 使用自签证书支持 Https 访问 DevOps 工具链之 Prow 如何使用 kfctl 安装 Kubeflow VS Code 无法下载 Go 插件的工具包 工程师更应具有服务精神 你不知道的 Docker 使用技巧 使用 Docker 运行 Tensorflow 论中国 什么是左移 如何清空 Git 仓库全部历史记录 一禅小和尚 有风吹过厨房 时间的玫瑰 如何在 CentOS 安装 GPU 驱动 开发 Tips(19)
使用 Nodejs 代理 Https 请求到依赖的研发服务
微信公众号 · 2023-06-24 · via 陈少文的网站

Please enable Javascript to view the contents

1. 背景

微服务架构下,服务与服务的依赖关系复杂。在开发过程中,多个服务之间经常需要联调。此时有两种方式:

  • 将服务部署到线上开发环境 Kubernetes 集群

使用 telepresence 打通本地与线上集群的通信,这样能获得一个比较稳定的联调环境。

缺点是,需要生成足够权限的凭证、需要研发人员熟悉 Kubernetes 的使用。每人一套成本又比较高。

  • 直接在办公网开发机之间互相调用

内网是互通的,直接调用也是可行的。但有些服务依赖是写死 Https 和 域名的,这样就需要在本地搭建一个 Https 代理服务。

本篇主要是介绍如何使用 Nodejs 搭建一个 Https 代理服务,用于转发依赖的服务请求。

2. 代理逻辑

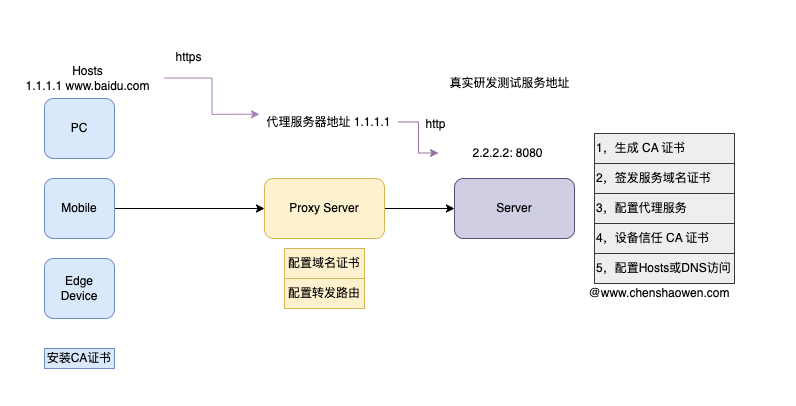
如上图,是代理 Https 请求的示意图。主要步骤如下:

  1. 生成 CA 证书

  2. 签发服务域名证书

  3. 配置代理服务

  4. 设备信任 CA 证书

  5. 配置 Hosts 或 DNS 访问

生成 CA 证书、签发服务域名证书的具体操作,可以参考 Harbor 使用自签证书支持 Https 访问

3. 配置代理

  • 安装依赖
1
npm install express http-proxy-middleware
  • 配置 proxy.js
 1
 2
 3
 4
 5
 6
 7
 8
 9
10
11
12
13
14
15
16
17
18
19
20
21
22
23
const https = require("https");
const express = require("express");
const { createProxyMiddleware } = require("http-proxy-middleware");
const fs = require("fs");

const options = {
  cert: fs.readFileSync("www.baidu.com.cert"),
  key: fs.readFileSync("www.baidu.com.key"),
};

const app = express();

app.use(
  "/",
  createProxyMiddleware({
    target: "http://2.2.2.2:8080",
    changeOrigin: true,
  }),
);

https.createServer(options, app).listen(443, () => {
  console.log("Proxy server listening on port 443");
});
  • 启动代理服务

此时,通过配置 Hosts 或 DNS (1.1.1.1 www.baidu.com) 访问 https://www.baidu.com,就能访问到 http://2.2.2.2:8080 服务了。

  • 指定 target 域名及解析

如果你想 tagert 配置成域名,并且解析也自行指定,那么可以加上 DNS 片段,仅在当前服务生效。

 1
 2
 3
 4
 5
 6
 7
 8
 9
10
11
12
13
const dns = require("dns");

const customLookup = (hostname, options, callback) => {
  const customIP = "2.2.2.2";
  const family = options.family || 4;

  if (hostname === "target.domain.com") {
    const address = family === 6 ? "::1" : customIP;
    return callback(null, address, family);
  }
  dns.lookup(hostname, options, callback);
};
dns.lookup = customLookup;

微信公众号