转载自简书本文链接地址: Springboot事件监听
先看一个demo,加入依赖
1
2
3
4
5
6
7
8
9
10
11
12
13
14
15
16
17
18
| <properties>
<project.build.sourceEncoding>UTF-8</project.build.sourceEncoding>
<maven.compiler.source>1.8</maven.compiler.source>
<maven.compiler.target>1.8</maven.compiler.target>
</properties>
<parent>
<groupId>org.springframework.boot</groupId>
<artifactId>spring-boot-starter-parent</artifactId>
<version>1.5.4.RELEASE</version>
</parent>
<dependencies>
<dependency>
<groupId>org.springframework.boot</groupId>
<artifactId>spring-boot-starter</artifactId>
</dependency>
</dependencies>
|
定义一个自定义事件,继承ApplicationEvent类
1
2
3
4
5
6
7
8
9
10
11
12
|
public class MyApplicationEvent extends ApplicationEvent {

    private static final long serialVersionUID = 1L;

    public MyApplicationEvent(Object source) {
        super(source);
    }
}
|
定义一个事件监听器MyApplicationListener实现ApplicationListener接口,
1
2
3
4
5
6
7
8
9
10
11
| package com.zhihao.miao;
import org.springframework.context.ApplicationListener;
public class MyApplicationListener implements ApplicationListener<MyApplicationEvent> {
public void onApplicationEvent(MyApplicationEvent event) {
System.out.println("接收到事件:"+event.getClass());
}
}
|
主测试类:
1
2
3
4
5
6
7
8
9
10
11
12
13
14
15
16
17
18
19
| package com.zhihao.miao;
import org.springframework.boot.SpringApplication;
import org.springframework.boot.autoconfigure.SpringBootApplication;
import org.springframework.context.ConfigurableApplicationContext;
@SpringBootApplication
public class Application {
public static void main(String[] args) {
SpringApplication application = new SpringApplication(Application.class);
application.addListeners(new MyApplicationListener());
ConfigurableApplicationContext context =application.run(args);
context.publishEvent(new MyApplicationEvent(new Object()));
context.close();
}
}
|
打印结果:

总结:
springboot事件监听的流程:
- 自定义事件,一般是继承ApplicationEvent抽象类。
- 定义事件监听器,一般是实现ApplicationListener接口。
- 配置监听器,启动的时候,需要把监听器加入到spring容器中。
- 发布事件。
其中第三步(将监听器纳入到spring容器)除了上面的方法之外,
1
| application.addListeners(new MyApplicationListener());
|
还有三种方法
第二种方式
直接在MyApplicationListener类上加上@Component注解,纳入spring容器管理
1
2
3
4
5
6
7
8
9
10
11
12
13
| package com.zhihao.miao;
import org.springframework.context.ApplicationListener;
import org.springframework.stereotype.Component;
@Component
public class MyApplicationListener implements ApplicationListener<MyApplicationEvent> {
public void onApplicationEvent(MyApplicationEvent event) {
System.out.println("接收到事件:"+event.getClass());
}
}
|
主类测试:
1
2
3
4
5
6
7
8
9
10
11
12
13
14
15
16
17
| package com.zhihao.miao;
import org.springframework.boot.SpringApplication;
import org.springframework.boot.autoconfigure.SpringBootApplication;
import org.springframework.context.ConfigurableApplicationContext;
@SpringBootApplication
public class Application {
public static void main(String[] args) {
SpringApplication application = new SpringApplication(Application.class);
ConfigurableApplicationContext context =application.run(args);
context.publishEvent(new MyApplicationEvent(new Object()));
context.close();
}
}
|

第三种方式
在配置文件中配置
1
| context.listener.classes=com.zhihao.miao.MyApplicationListener
|
源码分析:
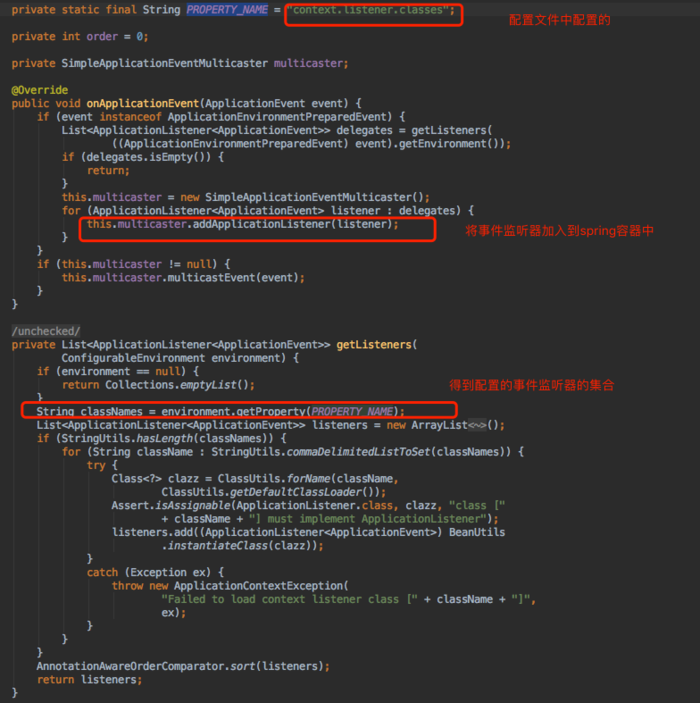
进入DelegatingApplicationListener类中的onApplicationEvent方法,getListeners是获取当前项目中的所有事件监听器。
第四种方式
使用@EventListener注解
1
2
3
4
5
6
7
8
9
10
11
12
13
14
15
16
17
18
19
| package com.zhihao.miao;
import org.springframework.context.event.EventListener;
import org.springframework.stereotype.Component;
@Component
public class MyEventHandle {
@EventListener
public void event(Object event){
System.out.println("MyEventHandle 接收到事件:" + event.getClass());
}
}
|
主类测试:
1
2
3
4
5
6
7
8
9
10
11
12
13
14
15
16
17
| package com.zhihao.miao;
import org.springframework.boot.SpringApplication;
import org.springframework.boot.autoconfigure.SpringBootApplication;
import org.springframework.context.ConfigurableApplicationContext;
@SpringBootApplication
public class Application {
public static void main(String[] args) {
SpringApplication application = new SpringApplication(Application.class);
ConfigurableApplicationContext context =application.run(args);
context.publishEvent(new MyApplicationEvent(new Object()));
context.close();
}
}
|
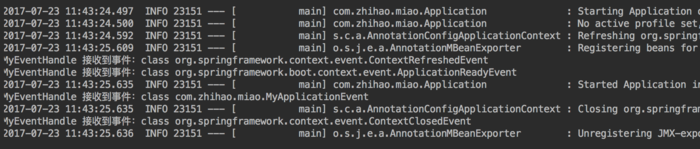
打印结果:
源码分析:
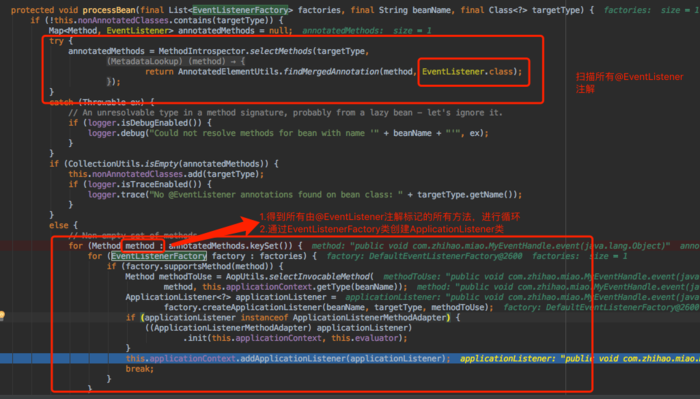
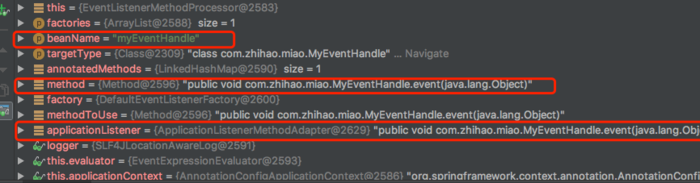
进入@EventListener注解,文档说明中处理@EventListener是依靠EventListenerMethodProcessorbean,然后进入EventListenerMethodProcessorbean中,我们大概看一下流程,可以自己调试
总结:
配置事件监听器的四种方法
- SpringApplication.addListeners 添加监听器
- 把监听器纳入到spring容器中管理
- 使用context.listener.classes配置项配置(详细内容参照:DelegatingApplicationListener)
- 使用@EventListener注解,在方法上面加入@EventListener注解,且该类需要纳入到spring容器中管理(详细内容参照:EventListenerMethodProcessor,EventListenerFactory)
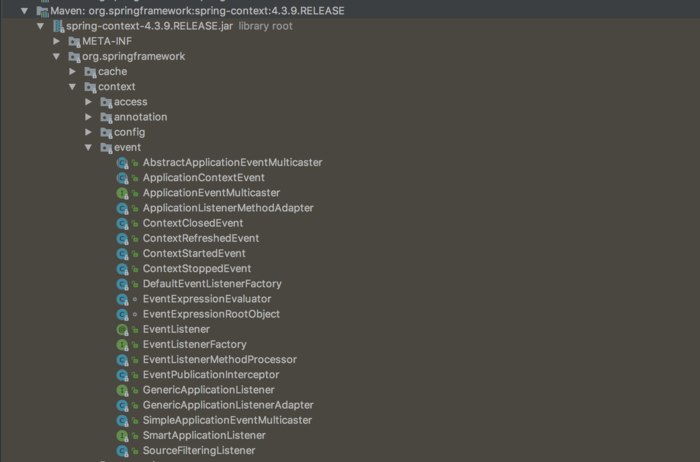
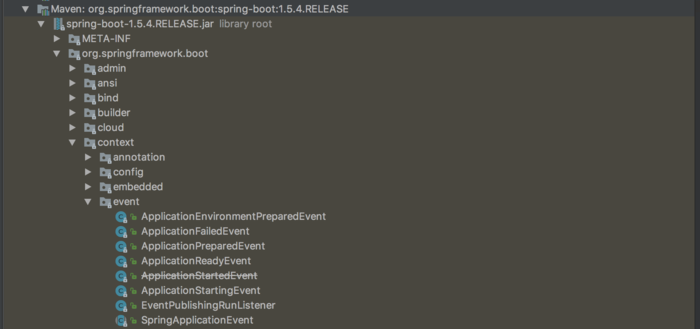
spring及springboot已经定义好的事件
spring的事件
springboot的事件
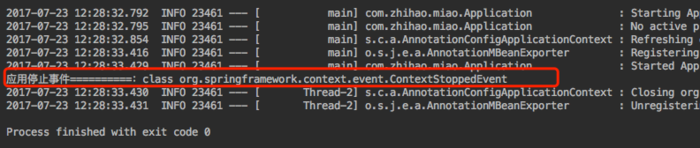
测试一下spring自带的事件:
1
2
3
4
5
6
7
8
9
10
11
12
| @Component
public class MyEventHandle {
@EventListener
public void eventStop(ContextStoppedEvent event){
System.out.println("应用停止事件==========:"+event.getClass());
}
}
|
主类测试:
1
2
3
4
5
6
7
| @SpringBootApplication
public class Application {
public static void main(String[] args) {
ConfigurableApplicationContext context = SpringApplication.run(Application.class,args);
context.stop();
}
}
|
测试:
作者:二月_春风
链接:https://www.jianshu.com/p/5f57f2aa5e2c
來源:简书
著作权归作者所有。商业转载请联系作者获得授权,非商业转载请注明出处。






