







https://blog.csdn.net/June_FlyingFrost/article/details/89790656
Spring cloud是一个基于Spring Boot实现的服务治理工具包,在微服务架构中用于管理和协调服务的
微服务:就是把一个单体项目,拆分为多个微服务,每个微服务可以独立技术选型,独立开发,独立部署,独立运维.并且多个服务相互协调,相互配合,最终完成用户的价值.
Spring Cloud是一系列框架的有序集合。它利用Spring Boot的开发便利性巧妙地简化了分布式系统基础设施的开发,如服务发现注册、配置中心、消息总线、负载均衡、断路器、数据监控等,都可以用Spring Boot的开发风格做到一键启动和部署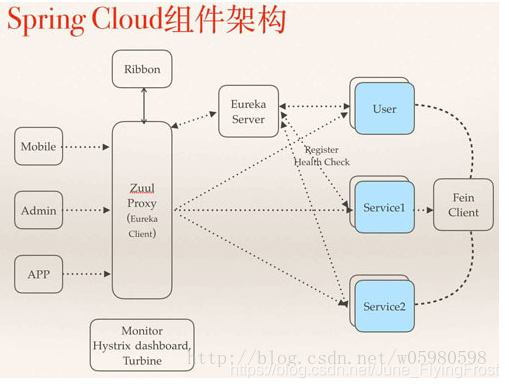
五大重要组件
服务发现——Netflix Eureka
客服端负载均衡——Netflix Ribbon/Feign
服务网关——Netflix Zuul
断路器——Netflix Hystrix
分布式配置——Spring Cloud Config
<properties>
    <project.build.sourceEncoding>UTF-8</project.build.sourceEncoding>
    <project.reporting.outputEncoding>UTF-8</project.reporting.outputEncoding>
    <java.version>1.8</java.version>
    <spring-cloud.version>Finchley.SR1</spring-cloud.version>
    <springboot.version>2.0.5.RELEASE</springboot.version>
</properties>

<dependencyManagement>
    <dependencies>
	    <dependency>
		    <groupId>org.springframework.cloud</groupId>
		    <artifactId>spring-cloud-dependencies</artifactId>
		    <version>${spring-cloud.version}</version>
		    <type>pom</type>
		    <scope>import</scope>
	    </dependency>
	    <dependency>
		    <groupId>org.springframework.boot</groupId>
		    <artifactId>spring-boot-dependencies</artifactId>
		    <version>${springboot.version}</version>
		    <type>pom</type>
		    <scope>import</scope>
	    </dependency>
    </dependencies>
</dependencyManagement>
Eureka是netflix的一个子模块,也是核心模块之一,Eureka是一个基于REST的服务,用于定位服务,以实现云端中间层服务发现和故障转移
服务注册与发现对于微服务架构来说是非常重要的,有了服务发现和注册,只需要使用服务的标识符,就可以访问到服务,而不需要修改服务,而不需要修改服务调用的配置文件了
<!--springboot支持-->
<dependency>
    <groupId>org.springframework.boot</groupId>
    <artifactId>spring-boot-starter-web</artifactId>
</dependency>
<dependency>
    <groupId>org.springframework.boot</groupId>
    <artifactId>spring-boot-starter-test</artifactId>
</dependency>

<!--Eureka服务端支持-->
<dependency>
    <groupId>org.springframework.cloud</groupId>
    <artifactId>spring-cloud-starter-netflix-eureka-server</artifactId>
</dependency>
server:
  port: 7001
eureka:
  instance:
    hostname: localhost
  client:
      registerWithEureka: false #是否要注册到eureka
      fetchRegistry: false #表示是否从Eureka Server获取注册信息
serviceUrl:
  defaultZone: http://${eureka.instance.hostname}:${server.port}/eureka/ #单机配置
@SpringBootApplication
@EnableEurekaServer//标识是eureka服务端
public class EnrekaServerApplication_7001 {
public static void main(String[] args) {
        SpringApplication.run(EnrekaServerApplication_7001.class);
    }
}
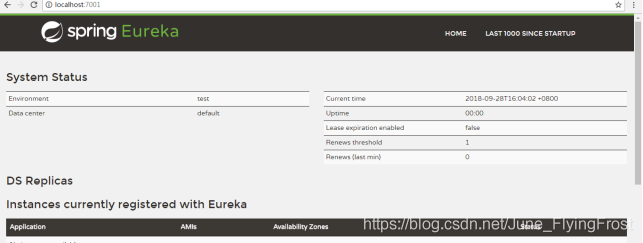
例: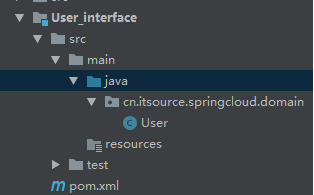
<dependencies>
    <!--公共代码依赖-->
    <dependency>
	    <groupId>cn.itsource.springcloud</groupId>
	    <artifactId>User_interface</artifactId>
	    <version>1.0-SNAPSHOT</version>
    </dependency>

    <!--springboot支持-->
    <dependency>
	    <groupId>org.springframework.boot</groupId>
	    <artifactId>spring-boot-starter-web</artifactId>
    </dependency>
    <dependency>
	    <groupId>org.springframework.boot</groupId>
	    <artifactId>spring-boot-starter-test</artifactId>
    </dependency>

    <!--eureka客户端支持 -->
    <dependency>
	    <groupId>org.springframework.cloud</groupId>
	    <artifactId>spring-cloud-starter-netflix-eureka-client</artifactId>
    </dependency>
</dependencies>
server:
  port: 8001
spring:
  application:
     name: USER-PROVIDER #不要使用下划线
eureka:
  client:
    service-url:
      defaultZone: http://localhost:7001/eureka #告诉服务提供者要把服务注册到哪儿
instance:
    prefer-ip-address: true #显示客户端真实ip
@SpringBootApplication
@EnableEurekaClient //表示是eureka的客户端
public class UserProviderApplication_8001 {
public static void main(String[] args) {
        SpringApplication.run(UserProviderApplication_8001.class);
    }
}
@RestController
@RequestMapping("/provider")
public class UserController {

@Autowired
private IUserService userService;

@RequestMapping("/user/{id}") //user/1
public User getUser(@PathVariable("id") Long id) {

// 正常应该调用service获取用户,现在模拟一下
return new User(id, "zs");
    }
}
<!--公共代码依赖-->
<dependency>
    <groupId>cn.itsource.springcloud</groupId>
    <artifactId>User_interface</artifactId>
    <version>1.0-SNAPSHOT</version>
</dependency>

<!--springboot支持-->
<dependency>
    <groupId>org.springframework.boot</groupId>
    <artifactId>spring-boot-starter-web</artifactId>
</dependency>
<dependency>
    <groupId>org.springframework.boot</groupId>
    <artifactId>spring-boot-starter-test</artifactId>
</dependency>
server:
  port: 9001
spring:
  application:
    name: USER_CONSUMER
@SpringBootApplication
public class UserConsumerAppliction_9001 {
public static void main(String[] args) {
        SpringApplication.run(UserConsumerAppliction_9001.class);
    }
}
@Configuration // <beans></beans>
public class CfgBean {

    @Bean //<bean class="org.springframework.web.client.RestTemplate"></bean>
    public RestTemplate getRestTemplate(){
    return new RestTemplate();
        }
}
@RestController
@RequestMapping("/consumer")
public class UserController {

    //多个方法调用只需改一处就ok
    public static  final String URL_PREFIX = "http://localhost:8001";

    @Autowired
    private RestTemplate restTemplate;

    @RequestMapping("/user/{id}")
    public User getUser(@PathVariable("id")Long id){
	    //调用远程服务 http请求
	    String url = URL_PREFIX+"/provider/user/"+id;
	    return restTemplate.getForObject(url,User.class );
	}
}
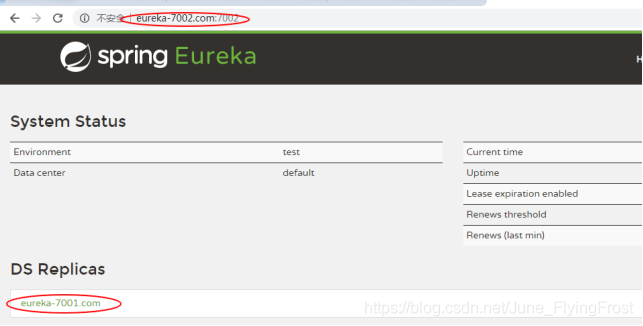
如果只有一个注册中心服务器,会存在单点故障所以要集群
127.0.0.1       eureka-7001.com
127.0.0.1       eureka-7002.com
7001项目的application.yml
 server:
      port: 7001
    eureka:
      instance:
        hostname: eureka-7001.com
      client:
        registerWithEureka: false #是否要注册到eureka
        fetchRegistry: false #表示是否从Eureka Server获取注册信息
        serviceUrl:
          #defaultZone: http://${eureka.instance.hostname}:${server.port}/eureka/ #单机配置
          defaultZone: http://eureka-7002.com:7002/eureka/ #集群配置,如果有多个,有逗号分割,不要包含自己
7002项目的application.yml
server:
  port: 7002
eureka:
  instance:
    hostname: eureka-7002.com
  client:
    registerWithEureka: false #是否要注册到eureka
    fetchRegistry: false #表示是否从Eureka Server获取注册信息
    serviceUrl:
      #defaultZone: http://${eureka.instance.hostname}:${server.port}/eureka/ #单机配置
      defaultZone: http://eureka-7001.com:7001/eureka/ #集群配置,如果有多个,有逗号分割,不要包含自己
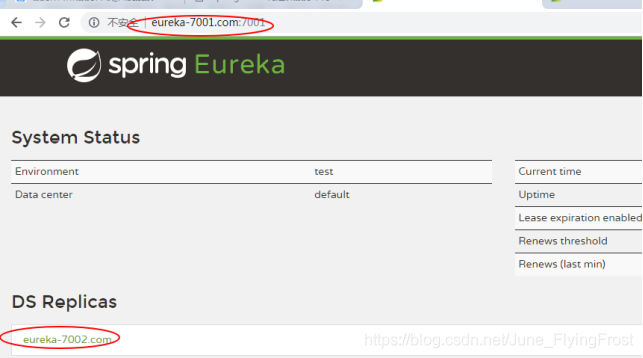
server:
  port: 8001
spring:
  application:
name: user-provider #不要使用下划线
eureka:
  client:
    service-url:
      #defaultZone: http://localhost:7001/eureka #告诉服务提供者要把服务注册到哪儿
      defaultZone: http://eureka-7001.com:7001/eureka,http://eureka-7002.com:7002/eureka
instance:
  prefer-ip-address: true #显示客户端真实ip
为了提供并发量,有时同一个服务提供者可以部署多个。这个客户端在调用时要根据一定的负责均衡策略完成负载调用
Ribbon是Netflix发布的云中间层服务开源项目,主要功能是提供客户端负载均衡算法。Ribbon客户端组件提供一系列完善的配置项,如,连接超时,重试等
<!--客户端负载均衡实现 ribbon-->
<dependency>
    <groupId>org.springframework.cloud</groupId>
    <artifactId>spring-cloud-starter-ribbon</artifactId>
</dependency>
<dependency>
    <groupId>org.springframework.cloud</groupId>
    <artifactId>spring-cloud-starter-config</artifactId>
</dependency>
<dependency>
    <groupId>org.springframework.cloud</groupId>
    <artifactId>spring-cloud-starter-netflix-eureka-client</artifactId>
</dependency>
server:
  port: 9001
eureka:
  client:
    registerWithEureka: false #不注册到Eureka,不在注册中心显示
    service-url:
      #defaultZone: http://localhost:7001/eureka
      defaultZone: http://eureka-7001.com:7001/eureka,http://eureka-7002.com:7002/eureka
@SpringBootApplication
@EnableEurekaClient
public class UserConsumerApplicaton_9001 {
public static void main(String[] args) {
        SpringApplication.run(UserConsumerApplicaton_9001.class);
    }
}
@Configuration
public class CfgBean {

@Bean
 @LoadBalanced //开启负载均衡
public RestTemplate getRestTemplate(){
return  new RestTemplate();
    }
}
@RestController
@RequestMapping("/consumer")
public class UserController {

//多个方法调用只需改一处就ok
    //public static  final String URL_PREFIX = "http://localhost:8001";
public static  final String URL_PREFIX ="http://USER-PROVIDER"; //通过服务名从注册中心获取服务列表,通过负载均衡调用

@Autowired
private RestTemplate restTemplate;

@RequestMapping("/user/{id}")
public User getUser(@PathVariable("id")Long id){
//调用远程服务 http请求
String url = URL_PREFIX+"/provider/user/"+id;
return restTemplate.getForObject(url,User.class );
    }
}
前面的可以发现当我们通过RestTemplate调用其它服务的API时,所需要的参数须在请求的URL中进行拼接,如果参数少的话或许我们还可以忍受,一旦有多个参数的话,这时拼接请求字符串就会效率低下,并且显得好傻
Feign是以接口方式进行调用,而不是通过RestTemplate来调用,feign底层还是ribbo,它进行了封装,
<dependencies>
    <!--公共代码依赖-->
    <dependency>
	    <groupId>cn.itsource.springcloud</groupId>
	    <artifactId>User_interface</artifactId>
	    <version>1.0-SNAPSHOT</version>
    </dependency>

    <!--springboot支持-->
    <dependency>
	    <groupId>org.springframework.boot</groupId>
	    <artifactId>spring-boot-starter-web</artifactId>
    </dependency>
    <dependency>
	    <groupId>org.springframework.boot</groupId>
	    <artifactId>spring-boot-starter-test</artifactId>
    </dependency>

    <!--eureka客户端,服务消费者也要从注册中心获取可用服务列表-->
    <dependency>
	    <groupId>org.springframework.cloud</groupId>
	    <artifactId>spring-cloud-starter-netflix-eureka-client</artifactId>
    </dependency>

    <!--feign的支持-->
    <dependency>
	    <groupId>org.springframework.cloud</groupId>
	    <artifactId>spring-cloud-starter-openfeign</artifactId>
    </dependency>
</dependencies>
server:
  port: 9002
eureka:
  client:
    registerWithEureka: false #不注册到Eureka,不在注册中心显示
    service-url:
      #defaultZone: http://localhost:7001/eureka
      defaultZone: http://eureka-7001.com:7001/eureka,http://eureka-7002.com:7002/eureka
@SpringBootApplication
@EnableEurekaClient
@EnableFeignClients(basePackages = "cn.itsource.microservice") //不在当前包下面
public class UserConsumerFeign9002Application {

	public static void main(String[] args) {
		SpringApplication.run(UserConsumerFeign9002Application.class, args);
	}
}
//调用服务名字
@FeignClient(value = "USER-PROVIDER")
public interface UserCilent {
    @RequestMapping("/provider/user/{id}") //user/1
    User getUser(@PathVariable("id") Long id);
}
@RestController
@RequestMapping("/consumer")
public class UserController {

    @Autowired
    private UserCilent userCilent;

    @RequestMapping("/user/{id}")
    public User getUser(@PathVariable("id")Long id){
            System.out.println(userCilent.getClass());
    		return userCilent.getUser(id);
    }
}
此内容由惯性聚合(RSS阅读器)自动聚合整理,仅供阅读参考。 原文来自 — 版权归原作者所有。