





修改Feature.xml . 執行:

得到以下內容. 修改其中的標識部分. GUID 可以用"Tools"-->"Create GUID" 來獲取一個新的.

修改後內容如下:
<?xml version="1.0" encoding="utf-8"?>
<!-- _lcid="1033" _version="12.0.3111" _dal="1" -->
<!-- _LocalBinding -->
<!-- Insert Feature.xml Code Snippet here. To do this:
1) Right click on this page and select "Insert Snippet" (or press Ctrl+K, then X)
2) Select Snippets->SharePoint Workflow->Feature.xml Code -->
<Feature Id="{8F474C2D-D062-4a48-871B-D12CA1F7E033}"
Title="MarketingCampaign Default Title"
Description="This feature is a workflow that MarketingCampaign"
Version="12.0.0.0"
Scope="Site"
ReceiverAssembly="Microsoft.Office.Workflow.Feature, Version=12.0.0.0, Culture=neutral, PublicKeyToken=71e9bce111e9429c"
ReceiverClass="Microsoft.Office.Workflow.Feature.WorkflowFeatureReceiver"
xmlns="http://schemas.microsoft.com/sharepoint/">
<ElementManifests>
<ElementManifest Location="workflow.xml" />
</ElementManifests>
<Properties>
<Property Key="GloballyAvailable" Value="true" />
<!-- Value for RegisterForms key indicates the path to the forms relative to feature file location -->
<!-- if you don't have forms, use *.xsn -->
<Property Key="RegisterForms" Value="*.xsn" />
</Properties>
</Feature>
修改workflow.xml
按鼠標右鍵, 選擇"Insert Snippet" -->"Sharepoint Server Workflow"-->"Workflow.xml code".

得到以下內容. 修改其中的標識部分. GUID 可以用"Tools"-->"Create GUID" 來獲取一個新的.
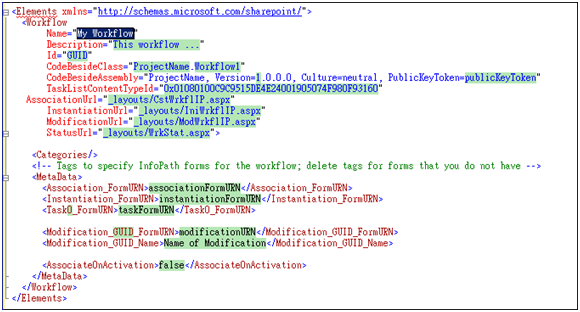
修改後內容如下:
<?xml version="1.0" encoding="utf-8" ?>
<!-- _lcid="1033" _version="12.0.3015" _dal="1" -->
<!-- _LocalBinding -->
<!-- Insert Workflow.xml Code Snippet here. To do this:
1) Right click on this page and select "Insert Snippet" (or press Ctrl+K, then X)
2) Select Snippets->SharePoint Workflow->Workflow.xml Code -->
<Elements xmlns="http://schemas.microsoft.com/sharepoint/">
<Workflow
Name="My MarketingCampaign "
Description="This workflow ...MarketingCampaign"
Id="{354A35F1-E4B9-4e1f-B33E-5B4BD7E8A607}"
CodeBesideClass="MarketingCampaign.MarketingCampaign"
CodeBesideAssembly="MarketingCampaign, Version=1.0.0.0, Culture=neutral, PublicKeyToken=de22c7d3fb8c503c"
TaskListContentTypeId="0x01080100C9C9515DE4E24001905074F980F93160"
InstantiationUrl="_layouts/IniWrkflIP.aspx"
ModificationUrl="_layouts/ModWrkflIP.aspx">
<Categories/>
<!-- Tags to specify InfoPath forms for the workflow; delete tags for forms that you do not have -->
<MetaData>
<Instantiation_FormURN>urn:schemas-microsoft-com:office:infopath:InitForm:-myXSD-2008-05-20T01-19-28</Instantiation_FormURN>
<Task0_FormURN>urn:schemas-microsoft-com:office:infopath:TaskForm:-myXSD-2008-05-20T01-25-44</Task0_FormURN>
<StatusPageUrl>_layouts/WrkStat.aspx</StatusPageUrl>
</MetaData>
</Workflow>
</Elements>
修改Install.bat , 內容如下:
:: Before running this file, sign the assembly in Project properties
::
:: To customize this file, find and replace
:: a) "MarketingCampaign" with your own feature name
:: b) "[IP_FORM_FILENAME]" with InfoPath form that needs to be uploaded (add additional lines for multiple forms)
:: b) "feature.xml" with the name of your feature.xml file
:: c) "workflow.xml" with the name of your workflow.xml file
:: d) "http://localhost" with the name of the site you wish to publish to
echo Copying the feature...
rd /s /q "%CommonProgramFiles%\Microsoft Shared\web server extensions\12\TEMPLATE\FEATURES\MarketingCampaign"
mkdir "%CommonProgramFiles%\Microsoft Shared\web server extensions\12\TEMPLATE\FEATURES\MarketingCampaign"
copy /Y DeploymentFiles\FeatureFiles\feature.xml "%CommonProgramFiles%\Microsoft Shared\web server extensions\12\TEMPLATE\FEATURES\MarketingCampaign\"
copy /Y DeploymentFiles\FeatureFiles\workflow.xml "%CommonProgramFiles%\Microsoft Shared\web server extensions\12\TEMPLATE\FEATURES\MarketingCampaign\"
xcopy /s /Y *.xsn "%programfiles%\Common Files\Microsoft Shared\web server extensions\12\TEMPLATE\FEATURES\MarketingCampaign\"
echo Adding assemblies to the GAC...
"%programfiles%\Microsoft Visual Studio 8\SDK\v2.0\Bin\gacutil.exe" -uf MarketingCampaign
"%programfiles%\Microsoft Visual Studio 8\SDK\v2.0\Bin\gacutil.exe" -if bin\Debug\MarketingCampaign.dll
:: Note: 64-bit alternative to lines above; uncomment these to install on a 64-bit machine
::"%programfiles% (x86)\Microsoft Visual Studio 8\SDK\v2.0\Bin\gacutil.exe" -uf MarketingCampaign
::"%programfiles% (x86)\Microsoft Visual Studio 8\SDK\v2.0\Bin\gacutil.exe" -if bin\Debug\MarketingCampaign.dll
echo Verifying InfoPath Forms...
::Note: Verify InfoPath forms; copy line for each form
::"%programfiles%\common files\microsoft shared\web server extensions\12\bin\stsadm" -o verifyformtemplate -filename [IP_FORM_FILENAME]
"%programfiles%\common files\microsoft shared\web server extensions\12\bin\stsadm" -o verifyformtemplate -filename InitForm.xsn
"%programfiles%\common files\microsoft shared\web server extensions\12\bin\stsadm" -o verifyformtemplate -filename TaskForm.xsn
echo Activating the feature...
pushd %programfiles%\common files\microsoft shared\web server extensions\12\bin
::Note: Uncomment these lines if you've modified your deployment xml files or IP forms
stsadm -o deactivatefeature -filename MarketingCampaign\feature.xml -url http://cmmsgsps03/ -force
stsadm -o uninstallfeature -filename MarketingCampaign\feature.xml -force
stsadm -o installfeature -filename MarketingCampaign\feature.xml -force
stsadm -o activatefeature -filename MarketingCampaign\feature.xml -url http://cmmsgsps03/
echo Doing an iisreset...
popd
:: iisreset
pause
執行Install.bat. OK.
此内容由惯性聚合(RSS阅读器)自动聚合整理,仅供阅读参考。 原文来自 — 版权归原作者所有。