The first thing we must do before upgrading the kernel is to upgrade all packages to the latest version. Update the repository and all packages to latest versions with the yum command below.
yum -y update
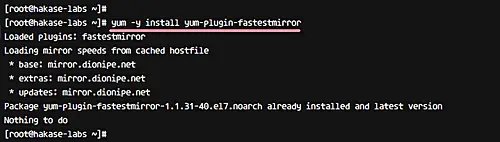
Now install the following package to make installation and updating process fast.
yum -y install yum-plugin-fastestmirror
CentOS 7 System updated and all packages upgraded to latest versions.
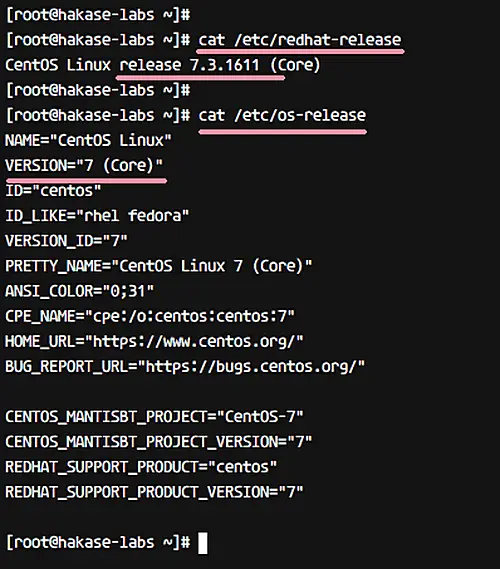
In this tutorial, we will use CentOS 7.3 with default kernel 3.10. Check your CentOS version with the following commands.
cat /etc/redhat-release
cat /etc/os-release
You will get the system info as shown below.
For checking the kernel version, you can use the uname command.
uname -msr
The output will show your machine's Linux kernel version as well system architecture.

Before installing new kernel version, we need to add new repository ELRepo repository. That's because we want to use the kernel version from the ELRepo community.
Add ELRepo gpg key to the system.
rpm --import https://www.elrepo.org/RPM-GPG-KEY-elrepo.org
Now add new ELRepo repository with rpm command.
rpm -Uvh http://www.elrepo.org/elrepo-release-7.0-2.el7.elrepo.noarch.rpm
Next, check all repositories enabled on the system, and make sure ELRepo is on the list.
yum repolist
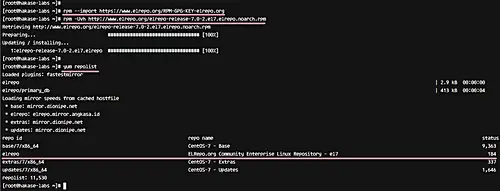
ELRepo repository has been added to the CentOS 7 server.
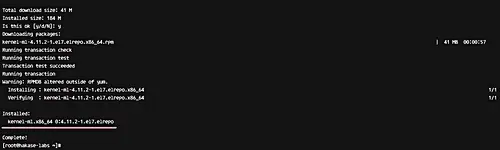
In this step, we will install latest kernel version (4.11.2 - the Latest stable version on kernel.org) from the ELRepo repository.
Use the following yum command for this.
yum --enablerepo=elrepo-kernel install kernel-ml
--enablerepo is an option to enable specific repository on CentOS system. By default, 'elrepo' repository is enabled, but for our case, we needed 'elrepo-kernel'.
You can check all of the available repositories on the system (enabled as well as disabled) with the following command.
yum repolist all

At step 4, we've already installed a new kernel 4.11.2 to the system. Now we will show you how to make it the default kernel version that will load when the system is starting.
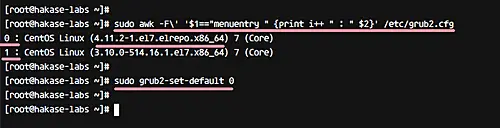
Check all available kernel versions with the awk command below.
sudo awk -F\' '$1=="menuentry " {print i++ " : " $2}' /etc/grub2.cfg
In the output, you'll see that we've two kernel versions - 3.10 and 4.11.2.
We want to use kernel 4.11 as our default, so you can use the following command to make this happen.
sudo grub2-set-default 0
0 - it's from the awk command on the top. Kernel 4.11.2 = 0, and Kernel 3.10 = 1. When you want to revert back to the old kernel, you can change the value of the grub2-set-default command to 1.
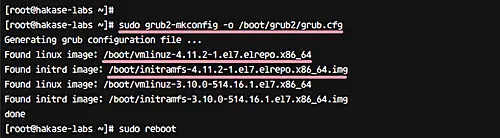
Next, generate the grub2 config with 'gurb2-mkconfig' command, and then reboot the server.
sudo grub2-mkconfig -o /boot/grub2/grub.cfg
sudo reboot
Please login to the server again, and check currently used kernel.
uname -msr
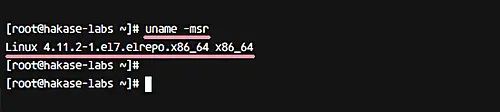
The result should be that the kernel version 4.11.2 is being used on your system.
This is an optional step that we think you need in order to get more free space. In this step, we will show you how to remove an old kernel from your CentOS 7 system. This can be done when you have several kernel versions installed on the server.
For this purpose, we need to install the yum-utils utility from the repository.
yum install yum-utils
Now clean your old kernel with the following command.
package-cleanup --oldkernels
If you get the result below.
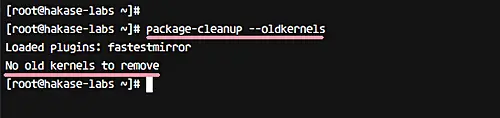
That means you've only 2 or 3 versions of kernel installed. If you have more than 3 version installed, the command will automatically remove old kernel from your system.
CentOS 7 Kernel has been updated to the latest stable using ELRepo kernel version.
此内容由惯性聚合(RSS阅读器)自动聚合整理,仅供阅读参考。 原文来自 — 版权归原作者所有。