
惯性聚合 高效追踪和阅读你感兴趣的博客、新闻、科技资讯
阅读原文 在惯性聚合中打开

推荐订阅源

酷 壳 – CoolShell
酷 壳 – CoolShell
H
Hacker News: Front Page
P
Palo Alto Networks Blog
T
ThreatConnect
Apple Machine Learning Research
博客园_首页
T
True Tiger Recordings
P
Privacy & Cybersecurity Law Blog
B
Blog
IT之家
IT之家
Last Week in AI
Last Week in AI
F
Full Disclosure
Hacker News: Ask HN
Hacker News: Ask HN
C
Comments on: Blog
Microsoft Azure Blog
C
Cybersecurity and Infrastructure Security Agency CISA
Microsoft Security Blog
博客园 - 【当耐特】
N
News and Events Feed by Topic
NISL@THU
NISL@THU
腾讯CDC
雷峰网
雷峰网
Security Latest
Security Latest
李成银的技术随笔
M
Microsoft Research Blog - Microsoft Research
L
LangChain Blog
L
Lohrmann on Cybersecurity
cs.CL updates on arXiv.org
C
Check Point Blog
Y
Y Combinator Blog
Recent Announcements
博客园 - Franky
N
News | PayPal Newsroom
V
V2EX
A
About on SuperTechFans
The Register - Security
月光博客
月光博客
奇客Solidot–传递最新科技情报
奇客Solidot–传递最新科技情报
Google Online Security Blog
MyScale Blog
MyScale Blog
Cisco Talos Blog
Cisco Talos Blog
Vercel News
Vercel News
WordPress大学
WordPress大学
C
Cyber Attacks, Cyber Crime and Cyber Security
The Hacker News
The Hacker News
IntelliJ IDEA : IntelliJ IDEA – the Leading IDE for Professional Development in Java and Kotlin | The JetBrains Blog
爱范儿
爱范儿
A
Arctic Wolf
L
LINUX DO - 最新话题
freeCodeCamp Programming Tutorials: Python, JavaScript, Git & More

博客园 - 倾听-静轩水月

Mysql优化笔记 Arthas使用 vue2.0和vue3.0同时使用 零基础尝试mybatis-plus读写分离 零基础尝试搭建docker和nacos环境 零基础尝试mysql主从复制 mybatis-plus 批量插入示例 找回windows应用商店 linux 开放端口 http转向https 内存不够导致编译报错:Information:java: java.lang.OutOfMemoryError: GC overhead limit exceeded docker常用命令 CentOS7使用命令行安装Oracle11GR2 使用Xshell连接VMware上的Linux虚拟机 mysql免安装版初次使用 微信小程序支付证书及SSL证书使用 SqlServer无备份下误删数据恢复 javaweb学习--javabean javaweb学习--jsp
小白零基础在 Centos 7 中安装 mysql
倾听-静轩水月 · 2023-05-22 · via 博客园 - 倾听-静轩水月

本文参考这三篇博文,安装修改配置修改密码。感谢大佬的分享

首先安装好Centos,并使用xshell连接

一、下载

   1、下载安装文件

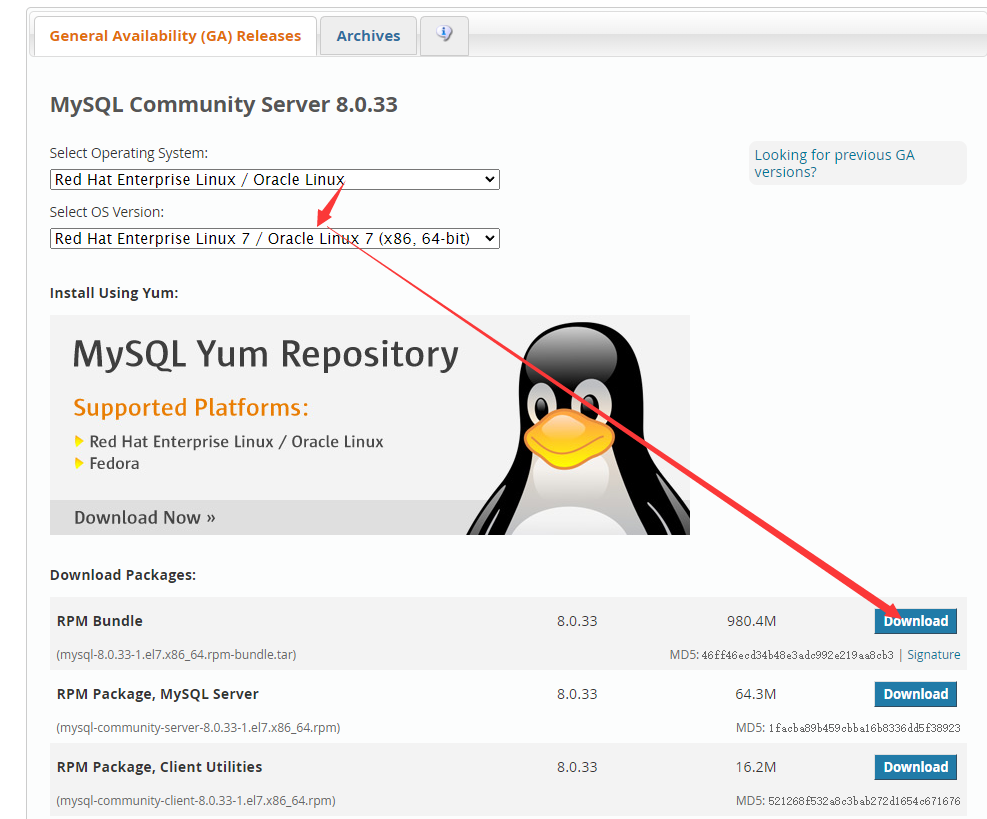
       建议自己到这个地址下载 https://dev.mysql.com/downloads/mysql/。选择以下版本
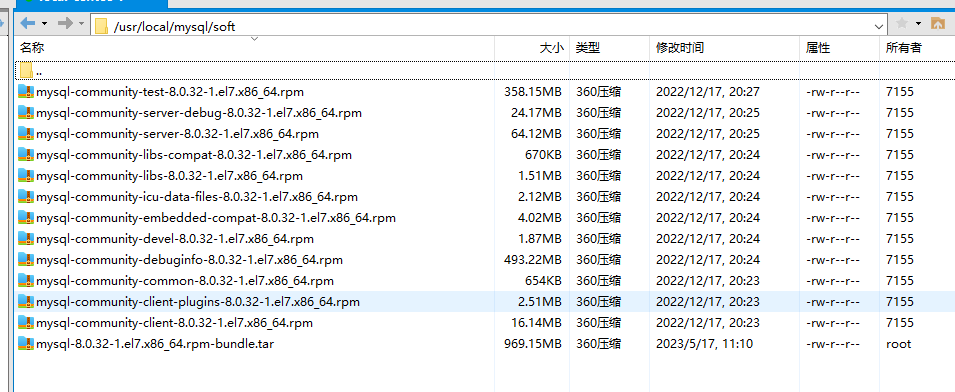
  2、下载完后上传到系统,并解压,可以用  tar -xvf 命令解压。解压完后有下面几个文件
       

二、安装

   1、检查系统中是否已经安装了mysql      

rpm -qa | grep mariadb

        如果有,则用下面这个命令卸载 

yum remove mariadb-libs-5.5.52-1.el7.x86_64 -y

        再使用上面的命令检查,直到没有为止

     2、按下面的几个命令,逐个执行安装     


rpm -ivh mysql-community-common-8.0.32-1.el7.x86_64.rpm
rpm -ivh mysql-community-client-plugins-8.0.32-1.el7.x86_64.rpm
rpm -ivh mysql-community-libs-8.0.32-1.el7.x86_64.rpm
rpm -ivh mysql-community-client-8.0.32-1.el7.x86_64.rpm
rpm -ivh mysql-community-icu-data-files-8.0.32-1.el7.x86_64.rpm
yum -y install perl.x86_64 //这步看情况,没报错的话就不用
yum -y install net-tools.x86_64 //这步看情况,没报错的话就不用
rpm -ivh mysql-community-server-8.0.32-1.el7.x86_64.rpm


        3、安装完成后,用下面的命令,查看版本号

mysql --version

   3.1、插一个要点,如果是高版本,以当前文章安装版本为例,默认区分大小写,需要在 my.cnf  文件先配置好如下参数

lower_case_table_names = 1

      3.2、插一个点,批量操作数据的时候,会提示数据太长,则可以修改  my.cnf 文件里配置 如下参数

max_allowed_packet = 200M

          注意,这个参数的最大值为 1 G

   4、启动mysql服务 注意:到这步千万别轻易修改 /etc/my.cnf 文件,容易出现启动不了的现象

== 每次开机都要手动启动mysql ==
systemctl start mysqld
== 开机时自动开启mysql ==
systemctl enable mysqld
== 停止mysql服务器==
service mysqld stop
==启动mysql服务器==
service mysqld start
== 查看mysql是否启动==
service mysqld status

三、登录及修改密码

    1、查找默认密码

          定位到 /var/log 中,使用命令     

grep -n password mysqld.log

          展示为:[Note] A temporary password is generated for root@localhost: 0x(g<n074&7W  ,加粗部分即为临时密码

     2、使用默认密码登录

mysql -u root -p

           如果出现 mysql>  则登录成功

     3、修改配置

         先把密码修改成临时的密码,尽量复杂一些

mysql> alter user 'root'@'localhost' identified by 'qaz,WSX_123456';

         查看mysql默认配置 

mysql> SHOW VARIABLES LIKE 'validate_password%';

         使用以下命令修改密码强度要求(0或low代表最低要求)

mysql> set global validate_password.policy=0;  #如果不行,就用下面这个
mysql> set global validate_password.policy=LOW;

         修改密码长度要求

mysql> set global validate_password.length=8;

      4、修改密码

mysql> alter user 'root'@'localhost' identified by '12345678';

      5、允许远程连接

           显示数据库信息     

mysql> show databases;

           切换使用mysql库    

mysql> use mysql;

       修改允许远程连接

mysql> update user set host = '%' where user='root';
mysql> flush privileges;

           至此,mysql可以正常使用了