















In the previous posts, we showed how to deploy a
Vision Transformers (ViT) modelfrom 🤗 Transformers locally and on a Kubernetes cluster. This post will show you how to deploy the same model on the
Vertex AI platform. You’ll achieve the same scalability level as Kubernetes-based deployment but with significantly less code.
This post builds on top of the previous two posts linked above. You’re advised to check them out if you haven’t already.
You can find a completely worked-out example in the Colab Notebook linked at the beginning of the post.
According to Google Cloud:
Vertex AI provides tools to support your entire ML workflow, across different model types and varying levels of ML expertise.
Concerning model deployment, Vertex AI provides a few important features with a unified API design:
Authentication
Autoscaling based on traffic
Model versioning
Traffic splitting between different versions of a model
Rate limiting
Model monitoring and logging
Support for online and batch predictions
For TensorFlow models, it offers various off-the-shelf utilities, which you’ll get to in this post. But it also has similar support for other frameworks like PyTorch and scikit-learn.
To use Vertex AI, you’ll need a billing-enabled Google Cloud Platform (GCP) project and the following services enabled:
Vertex AI
Cloud Storage
You’ll use the same ViT B/16 model implemented in TensorFlow as you did in the last two posts. You serialized the model with
corresponding pre-processing and post-processing operations embedded to
reduce training-serving skew.
Please refer to the first post that discusses
this in detail. The signature of the final serialized SavedModel looks like:
The given SavedModel SignatureDef contains the following input(s):
  inputs['string_input'] tensor_info:
      dtype: DT_STRING
      shape: (-1)
      name: serving_default_string_input:0
The given SavedModel SignatureDef contains the following output(s):
  outputs['confidence'] tensor_info:
      dtype: DT_FLOAT
      shape: (-1)
      name: StatefulPartitionedCall:0
  outputs['label'] tensor_info:
      dtype: DT_STRING
      shape: (-1)
      name: StatefulPartitionedCall:1
Method name is: tensorflow/serving/predict
The model will accept base64 encoded strings of images, perform
pre-processing, run inference, and finally perform the post-processing
steps. The strings are base64 encoded to prevent any
modifications during network transmission. Pre-processing includes
resizing the input image to 224x224 resolution, standardizing it to the
[-1, 1] range, and transposing it to the channels_first memory
layout. Postprocessing includes mapping the predicted logits to string
labels.
To perform a deployment on Vertex AI, you need to keep the model artifacts in a Google Cloud Storage (GCS) bucket. The accompanying Colab Notebook shows how to create a GCS bucket and save the model artifacts into it.
The figure below gives a pictorial workflow of deploying an already trained TensorFlow model on Vertex AI.
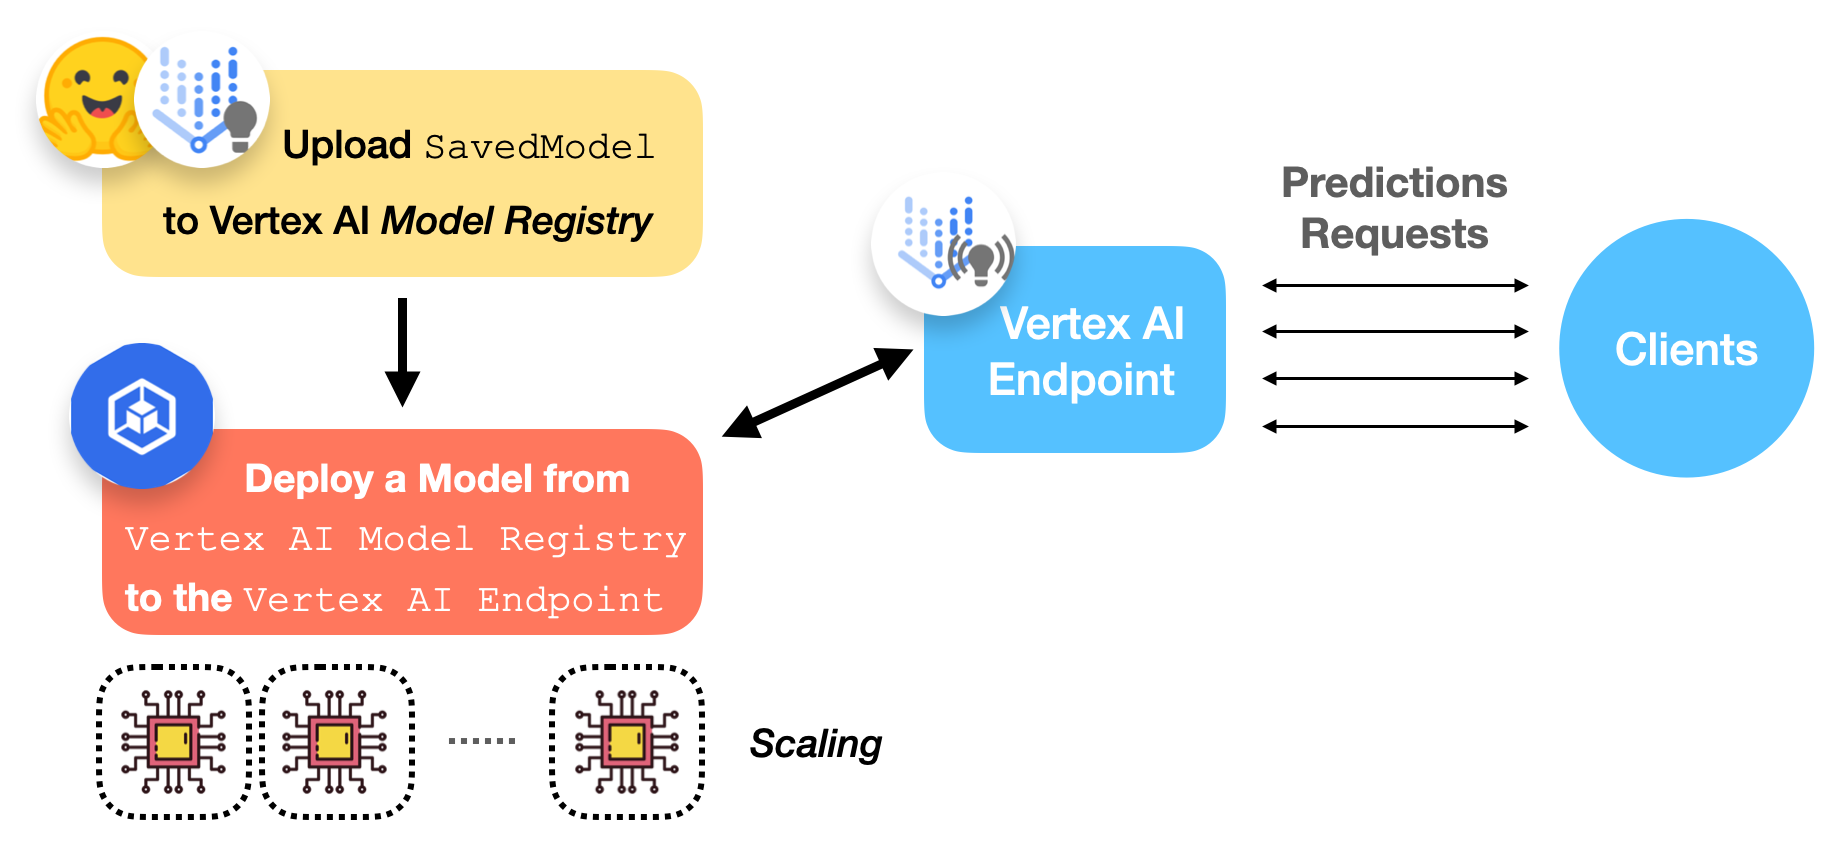
Let’s now discuss what the Vertex AI Model Registry and Endpoint are.
Vertex AI Model Registry is a fully managed machine learning model registry. There are a couple of things to note about what fully managed means here. First, you don’t need to worry about how and where models are stored. Second, it manages different versions of the same model.
These features are important for machine learning in production. Building a model registry that guarantees high availability and security is nontrivial. Also, there are often situations where you want to roll back the current model to a past version since we can not control the inside of a black box machine learning model. Vertex AI Model Registry allows us to achieve these without much difficulty.
The currently supported model types include SavedModel from
TensorFlow, scikit-learn, and XGBoost.
From the user’s perspective, Vertex AI Endpoint simply provides an endpoint to receive requests and send responses back. However, it has a lot of things under the hood for machine learning operators to configure. Here are some of the configurations that you can choose:
Version of a model
Specification of VM in terms of CPU, memory, and accelerators
Min/Max number of compute nodes
Traffic split percentage
Model monitoring window length and its objectives
Prediction requests sampling rate
The google-cloud-aiplatform
Python SDK provides easy APIs to manage the lifecycle of a deployment on
Vertex AI. It is divided into four steps:
Throughout these steps, you will
need ModelServiceClient, EndpointServiceClient, and
PredictionServiceClient modules from the google-cloud-aiplatform
Python SDK to interact with Vertex AI.
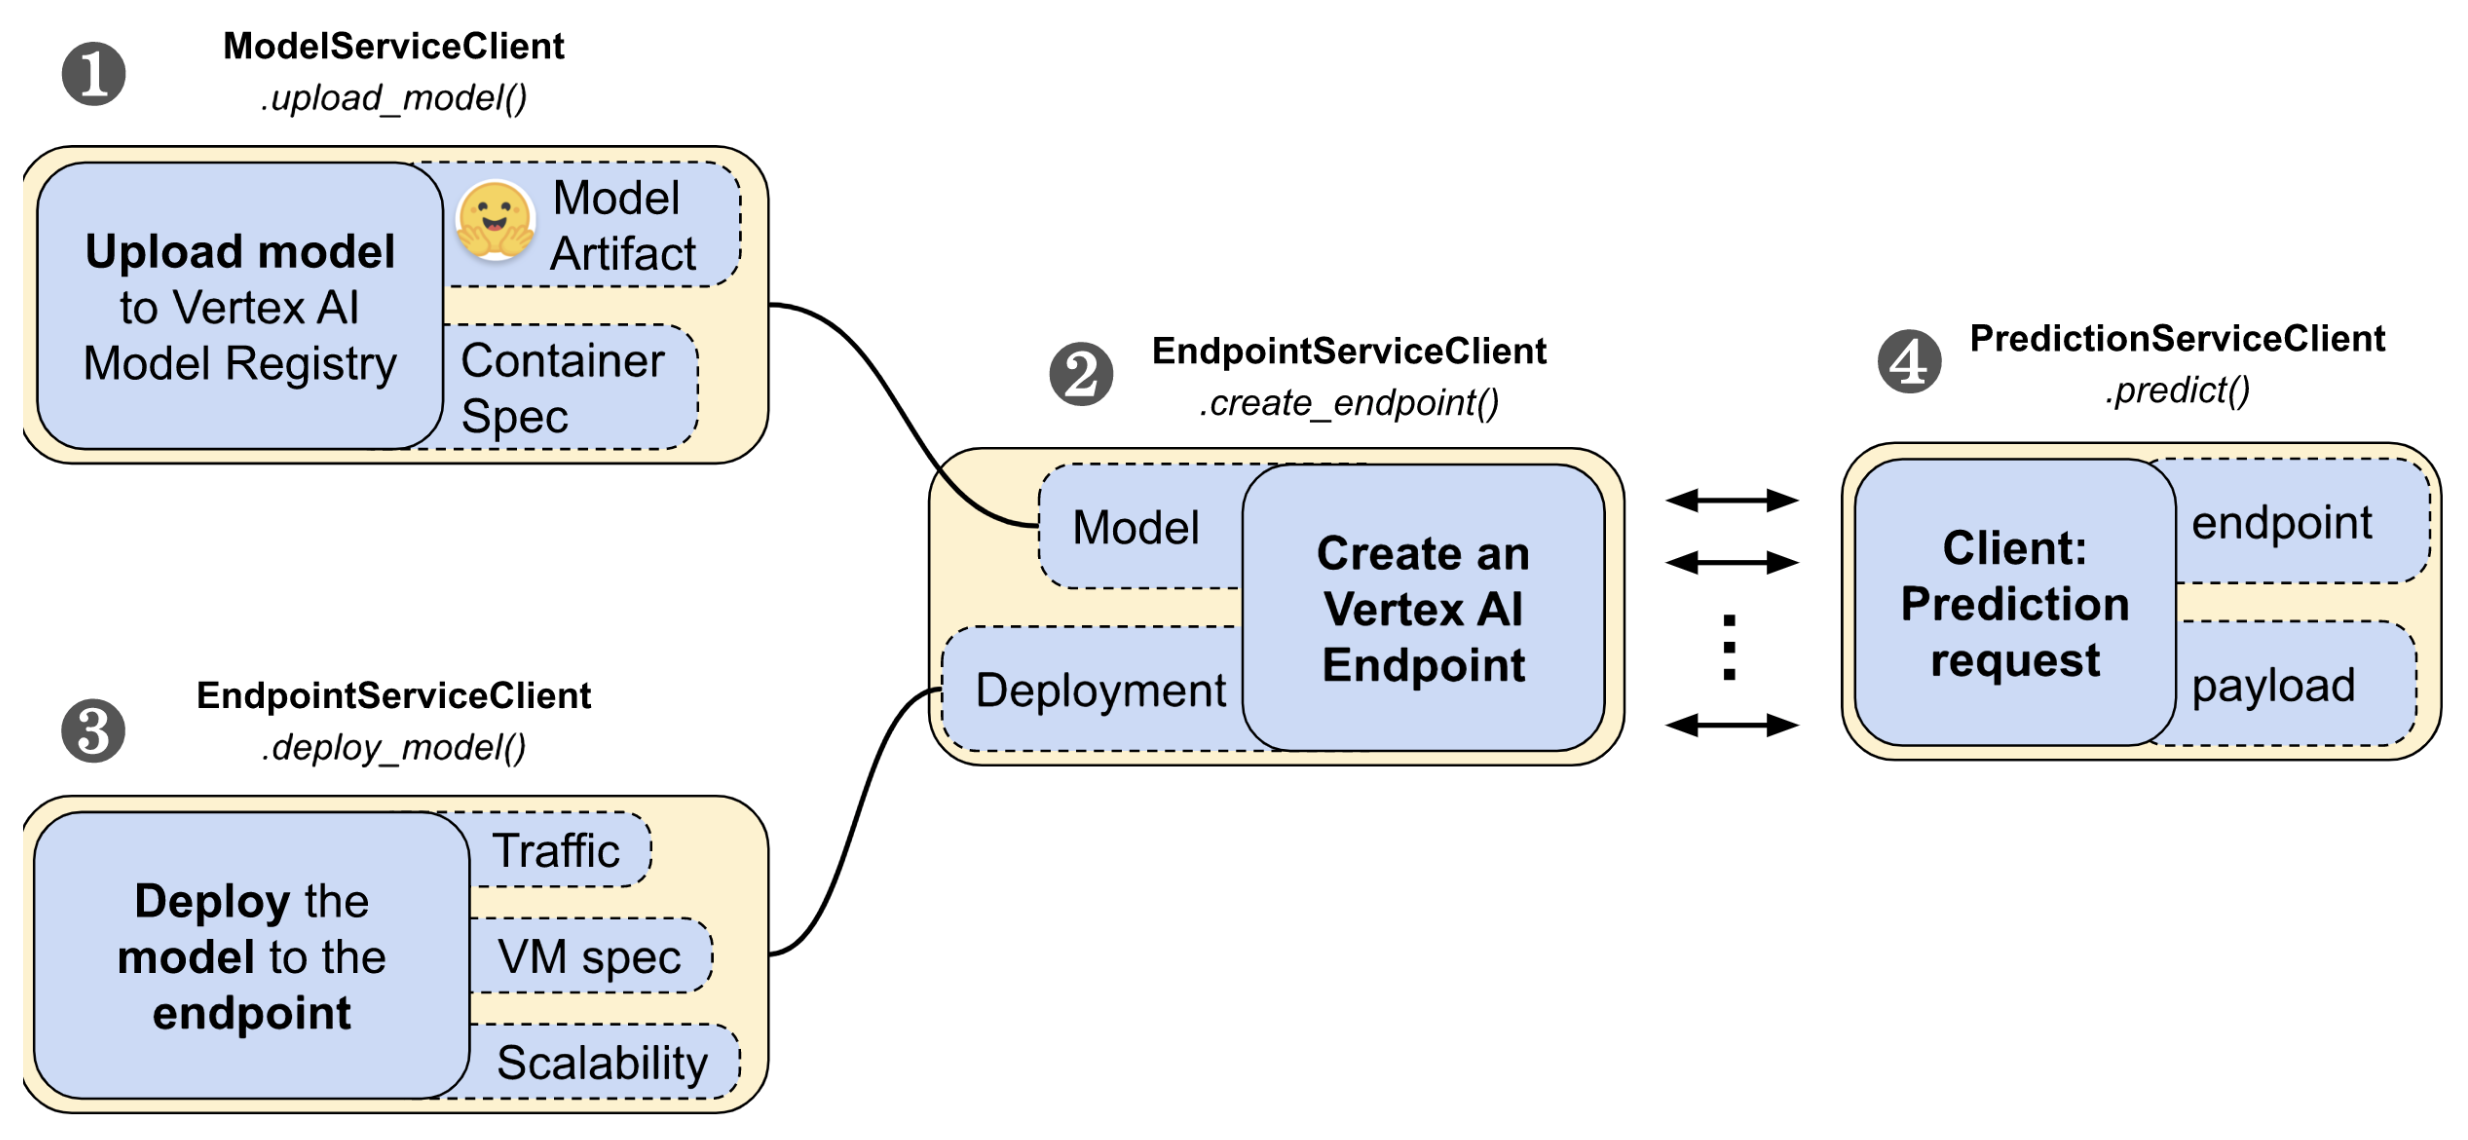
1. The first step in the workflow is to upload the SavedModel to
Vertex AI’s model registry:
tf28_gpu_model_dict = {
    "display_name": "ViT Base TF2.8 GPU model",
    "artifact_uri": f"{GCS_BUCKET}/{LOCAL_MODEL_DIR}",
    "container_spec": {
        "image_uri": "us-docker.pkg.dev/vertex-ai/prediction/tf2-gpu.2-8:latest",
    },
}
tf28_gpu_model = (
    model_service_client.upload_model(parent=PARENT, model=tf28_gpu_model_dict)
    .result(timeout=180)
    .model
)
Let’s unpack the code piece by piece:
GCS_BUCKET denotes the path of your GCS bucket where the model
artifacts are located (e.g., gs://hf-tf-vision).
In container_spec, you provide the URI of a Docker image that will
be used to serve predictions. Vertex AI
provides pre-built images to serve TensorFlow models, but you can also use your custom Docker images when using a different framework
(an example).
model_service_client is a
ModelServiceClient
object that exposes the methods to upload a model to the Vertex AI
Model Registry.
PARENT is set to f"projects/{PROJECT_ID}/locations/{REGION}"
that lets Vertex AI determine where the model is going to be scoped
inside GCP.
2. Then you need to create a Vertex AI Endpoint:
tf28_gpu_endpoint_dict = {
    "display_name": "ViT Base TF2.8 GPU endpoint",
}
tf28_gpu_endpoint = (
    endpoint_service_client.create_endpoint(
        parent=PARENT, endpoint=tf28_gpu_endpoint_dict
    )
    .result(timeout=300)
    .name
)
Here you’re using an endpoint_service_client which is an
EndpointServiceClient
object. It lets you create and configure your Vertex AI Endpoint.
3. Now you’re down to performing the actual deployment!
tf28_gpu_deployed_model_dict = {
    "model": tf28_gpu_model,
    "display_name": "ViT Base TF2.8 GPU deployed model",
    "dedicated_resources": {
        "min_replica_count": 1,
        "max_replica_count": 1,
        "machine_spec": {
            "machine_type": DEPLOY_COMPUTE, # "n1-standard-8"
            "accelerator_type": DEPLOY_GPU, # aip.AcceleratorType.NVIDIA_TESLA_T4
            "accelerator_count": 1,
        },
    },
}

tf28_gpu_deployed_model = endpoint_service_client.deploy_model(
    endpoint=tf28_gpu_endpoint,
    deployed_model=tf28_gpu_deployed_model_dict,
    traffic_split={"0": 100},
).result()
Here, you’re chaining together the model you uploaded to the Vertex AI
Model Registry and the Endpoint you created in the above steps. You’re
first defining the configurations of the deployment under
tf28_gpu_deployed_model_dict.
Under dedicated_resources you’re configuring:
min_replica_count and max_replica_count that handle the
autoscaling aspects of your deployment.
machine_spec lets you define the configurations of the deployment
hardware:
machine_type is the base machine type that will be used to run
the Docker image. The underlying autoscaler will scale this
machine as per the traffic load. You can choose one from the
supported machine types.
accelerator_type is the hardware accelerator that will be used
to perform inference.
accelerator_count denotes the number of hardware accelerators to
attach to each replica.
Note that providing an accelerator is not a requirement to deploy models on Vertex AI.
Next, you deploy the endpoint using the above specifications:
tf28_gpu_deployed_model = endpoint_service_client.deploy_model(
    endpoint=tf28_gpu_endpoint,
    deployed_model=tf28_gpu_deployed_model_dict,
    traffic_split={"0": 100},
).result()
Notice how you’re defining the traffic split for the model. If you had multiple versions of the model, you could have defined a dictionary where the keys would denote the model version and values would denote the percentage of traffic the model is supposed to serve.
With a Model Registry and a dedicated interface to manage Endpoints, Vertex AI lets you easily control the important aspects of the deployment.
It takes about 15 - 30 minutes for Vertex AI to scope the deployment. Once it’s done, you should be able to see it on the console.
If your deployment was successful, you can test the deployed Endpoint by making a prediction request.
First, prepare a base64 encoded image string:
import base64
import tensorflow as tf

image_path = tf.keras.utils.get_file(
    "image.jpg", "http://images.cocodataset.org/val2017/000000039769.jpg"
)
bytes = tf.io.read_file(image_path)
b64str = base64.b64encode(bytes.numpy()).decode("utf-8")
4. The following utility first prepares a list of instances (only
one instance in this case) and then uses a prediction service client (of
type PredictionServiceClient).
serving_input is the name of the input signature key of the served
model. In this case, the serving_input is string_input, which
you can verify from the SavedModel signature output shown above.
from google.protobuf import json_format
from google.protobuf.struct_pb2 import Value

def predict_image(image, endpoint, serving_input):
    # The format of each instance should conform to
    # the deployed model's prediction input schema.
    instances_list = [{serving_input: {"b64": image}}]
    instances = [json_format.ParseDict(s, Value()) for s in instances_list]

    print(
        prediction_service_client.predict(
            endpoint=endpoint,
            instances=instances,
        )
    )

predict_image(b64str, tf28_gpu_endpoint, serving_input)
For TensorFlow models deployed on Vertex AI, the request payload needs to be formatted in a certain way. For models like ViT that deal with binary data like images, they need to be base64 encoded. According to the official guide, the request payload for each instance needs to be like so:
{serving_input: {"b64": base64.b64encode(jpeg_data).decode()}}
The predict_image() utility prepares the request payload conforming
to this specification.
If everything goes well with the deployment, when you call
predict_image(), you should get an output like so:
predictions {
  struct_value {
    fields {
      key: "confidence"
      value {
        number_value: 0.896659553
      }
    }
    fields {
      key: "label"
      value {
        string_value: "Egyptian cat"
      }
    }
  }
}
deployed_model_id: "5163311002082607104"
model: "projects/29880397572/locations/us-central1/models/7235960789184544768"
model_display_name: "ViT Base TF2.8 GPU model"
Note, however, this is not the only way to obtain predictions using a Vertex AI Endpoint. If you head over to the Endpoint console and select your endpoint, it will show you two different ways to obtain predictions:
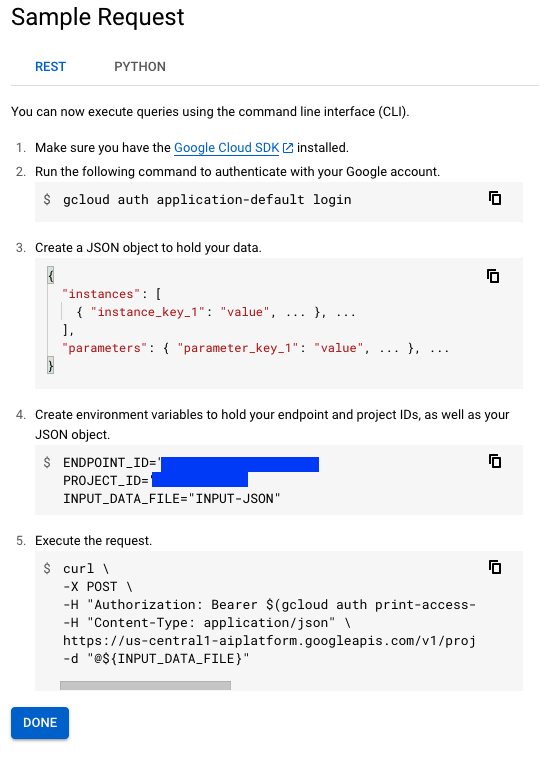
It’s also possible to avoid cURL requests and obtain predictions programmatically without using the Vertex AI SDK. Refer to this notebook to learn more.
Now that you’ve learned how to use Vertex AI to deploy a TensorFlow model, let’s now discuss some beneficial features provided by Vertex AI. These help you get deeper insights into your deployment.
Vertex AI also lets you monitor your model without any configuration. From the Endpoint console, you can get details about the performance of the Endpoint and the utilization of the allocated resources.
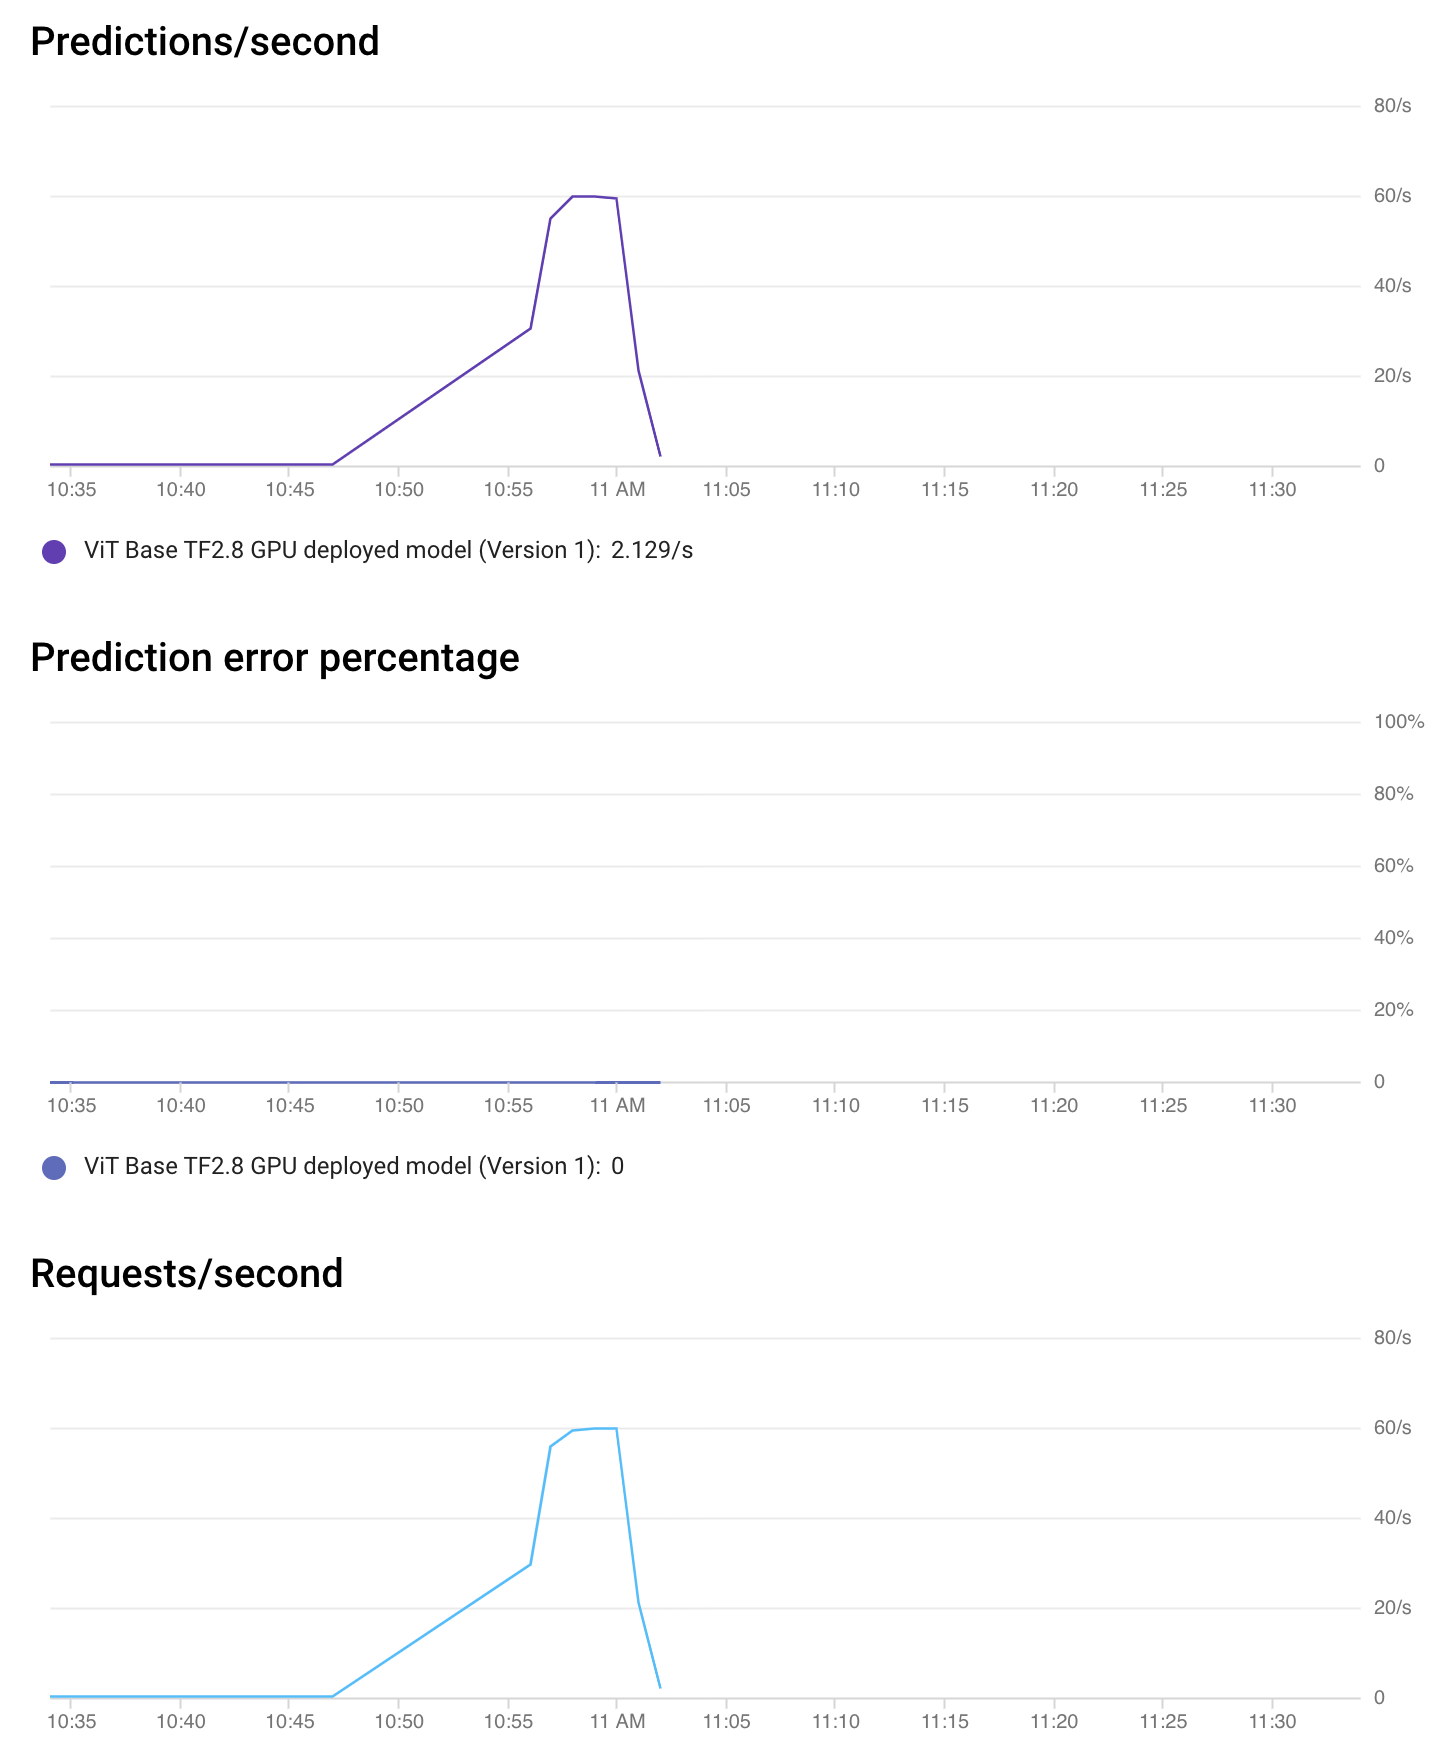
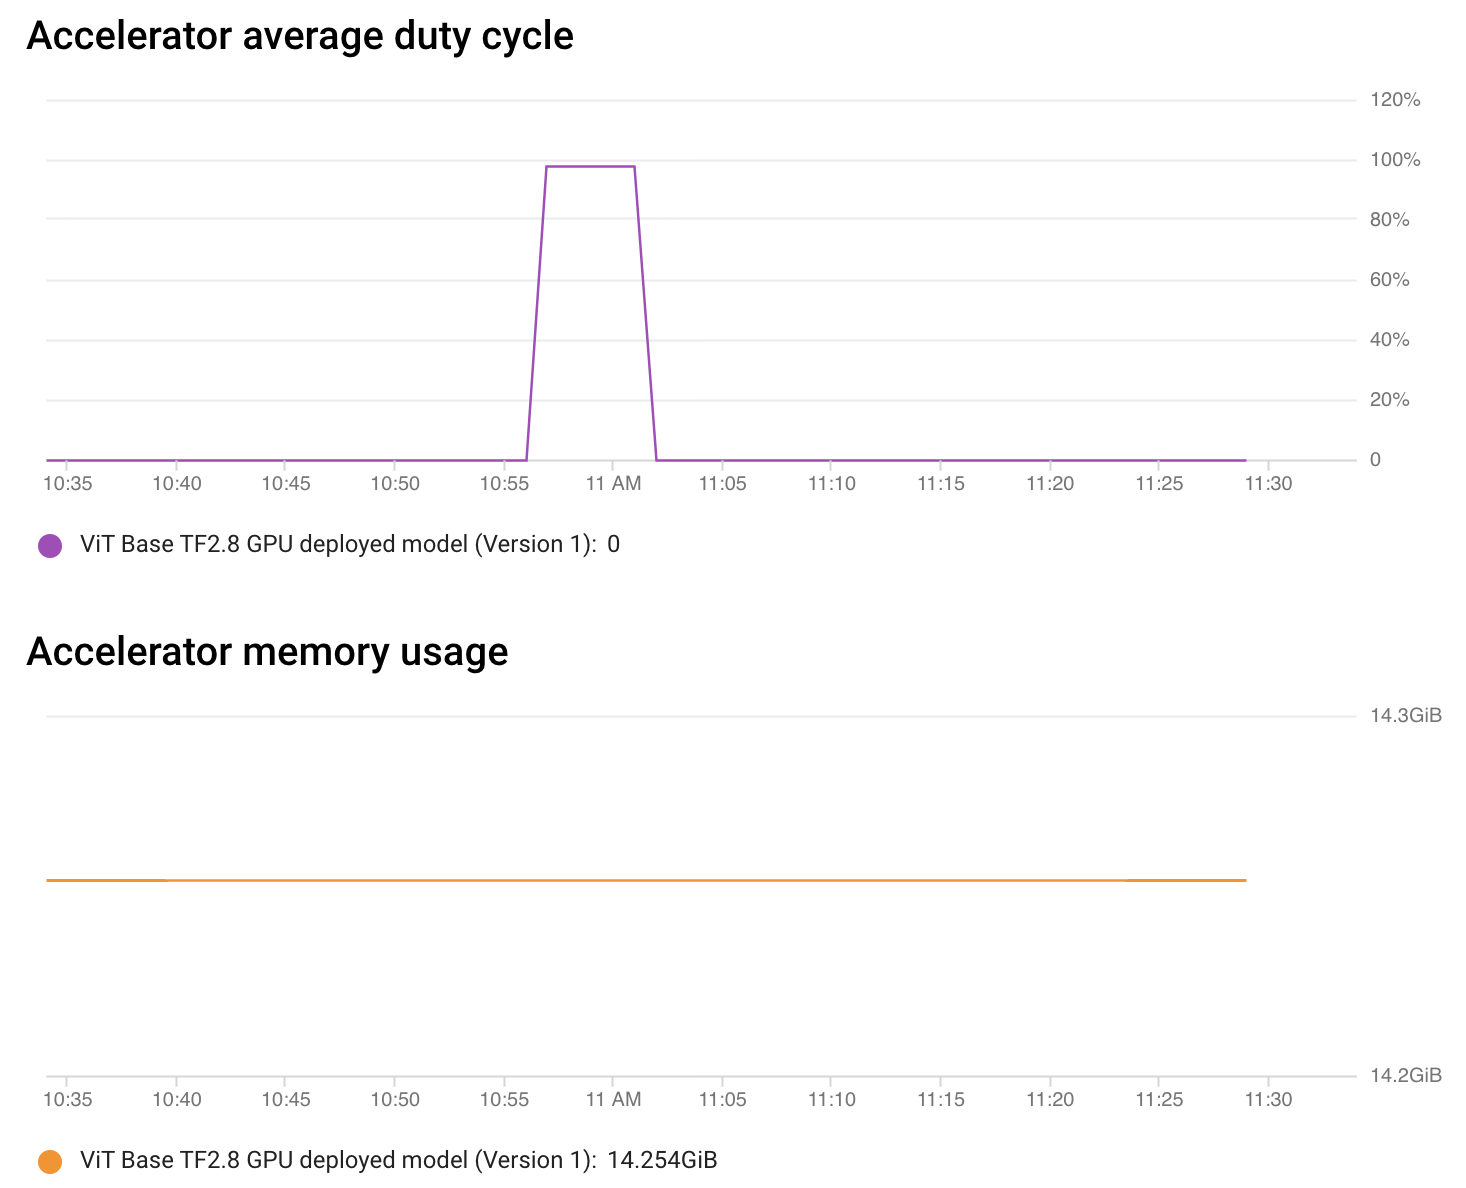
As seen in the above chart, for a brief amount of time, the accelerator duty cycle (utilization) was about 100% which is a sight for sore eyes. For the rest of the time, there weren’t any requests to process hence things were idle.
This type of monitoring helps you quickly flag the currently deployed Endpoint and make adjustments as necessary. It’s also possible to request monitoring of model explanations. Refer here to learn more.
We conducted a local load test to better understand the limits of the Endpoint with Locust. The table below summarizes the request statistics:

Among all the different statistics shown in the table, Average (ms)
refers to the average latency of the Endpoint. Locust fired off about
17230 requests, and the reported average latency is 646
Milliseconds, which is impressive. In practice, you’d want to simulate
more real traffic by conducting the load test in a distributed manner.
Refer here
to learn more.
This directory has all the information needed to know how we conducted the load test.
You can use the GCP cost estimator to estimate the cost of usage, and the exact hourly pricing table can be found here. It is worth noting that you are only charged when the node is processing the actual prediction requests, and you need to calculate the price with and without GPUs.
For the Vertex Prediction for a custom-trained model, we can choose
N1 machine types from n1-standard-2 to n1-highcpu-32.
You used n1-standard-8 for this post which is equipped with 8
vCPUs and 32GBs of RAM.
| Machine Type | Hourly Pricing (USD) |
|---|---|
| n1-standard-8 (8vCPU, 30GB) | $ 0.4372 |
Also, when you attach accelerators to the compute node, you will be
charged extra by the type of accelerator you want. We used
NVIDIA_TESLA_T4 for this blog post, but almost all modern
accelerators, including TPUs are supported. You can find further
information here.
| Accelerator Type | Hourly Pricing (USD) |
|---|---|
| NVIDIA_TESLA_T4 | $ 0.4024 |
The collection of TensorFlow vision models in 🤗 Transformers is growing. It now supports state-of-the-art semantic segmentation with SegFormer. We encourage you to extend the deployment workflow you learned in this post to semantic segmentation models like SegFormer.
In this post, you learned how to deploy a Vision Transformer model with the Vertex AI platform using the easy APIs it provides. You also learned how Vertex AI’s features benefit the model deployment process by enabling you to focus on declarative configurations and removing the complex parts. Vertex AI also supports deployment of PyTorch models via custom prediction routes. Refer here for more details.
The series first introduced you to TensorFlow Serving for locally deploying a vision model from 🤗 Transformers. In the second post, you learned how to scale that local deployment with Docker and Kubernetes. We hope this series on the online deployment of TensorFlow vision models was beneficial for you to take your ML toolbox to the next level. We can’t wait to see what you build with these tools.
Thanks to the ML Developer Relations Program team at Google, which provided us with GCP credits for conducting the experiments.
Parts of the deployment code were referred from this notebook of the official GitHub repository of Vertex AI code samples.
此内容由惯性聚合(RSS阅读器)自动聚合整理,仅供阅读参考。 原文来自 — 版权归原作者所有。