惯性聚合 高效追踪和阅读你感兴趣的博客、新闻、科技资讯
阅读原文 在惯性聚合中打开

推荐订阅源

小众软件
小众软件
量子位
博客园 - 叶小钗
Apple Machine Learning Research
U
Unit 42
IT之家
IT之家
F
Fortinet All Blogs
GbyAI
GbyAI
MongoDB | Blog
MongoDB | Blog
H
Hackread – Cybersecurity News, Data Breaches, AI and More
大猫的无限游戏
大猫的无限游戏
freeCodeCamp Programming Tutorials: Python, JavaScript, Git & More
The Register - Security
NISL@THU
NISL@THU
Webroot Blog
Webroot Blog
A
Arctic Wolf
钛媒体:引领未来商业与生活新知
钛媒体:引领未来商业与生活新知
V
Visual Studio Blog
Recent Announcements
Threat Intelligence Blog | Flashpoint
Blog — PlanetScale
Blog — PlanetScale
L
LangChain Blog
P
Palo Alto Networks Blog
Y
Y Combinator Blog
WordPress大学
WordPress大学
让小产品的独立变现更简单 - ezindie.com
AWS News Blog
AWS News Blog
有赞技术团队
有赞技术团队
Engineering at Meta
Engineering at Meta
C
Cybersecurity and Infrastructure Security Agency CISA
aimingoo的专栏
aimingoo的专栏
Know Your Adversary
Know Your Adversary
Cyberwarzone
Cyberwarzone
Martin Fowler
Martin Fowler
The Hacker News
The Hacker News
P
Privacy International News Feed
T
Threat Research - Cisco Blogs
G
GRAHAM CLULEY
宝玉的分享
宝玉的分享
博客园 - 聂微东
cs.CL updates on arXiv.org
Cyber Security Advisories - MS-ISAC
奇客Solidot–传递最新科技情报
奇客Solidot–传递最新科技情报
The GitHub Blog
The GitHub Blog
S
Securelist
T
The Exploit Database - CXSecurity.com
T
Threatpost
Microsoft Azure Blog
The Cloudflare Blog
F
Full Disclosure

NetBird - Networking Knowledge Hub - RSS Feed

NetBird Is Now on the Vultr Marketplace Native NetBird on the GL.iNet Comet Pro (GL-RM10) NetBird v0.71 - IPv6 Overlay Addressing NetBird Exit Nodes - Appear at Home, or Anywhere Else Reporting Bugs and Requesting Features in NetBird Setup and Use Local AdGuard Home Anywhere with NetBird DNS How to Set Up NetBird on PiKVM for Secure Remote KVM Access NetBird v0.69 - CrowdSec IP Reputation for the Reverse Proxy Cloudflare Mesh vs NetBird vs Tailscale: Performance Compared Self-Hosting Nextcloud with Docker and NetBird Implementing Zero Trust with NetBird NetBird v0.67 - Layer 4 Proxy Support for TCP, UDP, and TLS Solwr Enhances Remote Connectivity with NetBird Self-Hosting NetBird with Authentik Jellyfin Media Server - Self-Host Your Movies, TV, and Music Cloudflare Tunnels vs. NetBird Reverse Proxy INFITX Builds Zero-Touch Kubernetes Networking with NetBird NetBird v0.66 - Expose Local Services to the Internet from the CLI Pangolin vs. NetBird NetBird v0.65 - Built-in Reverse Proxy with Custom Domains Docker for Beginners - Everything You Need to Get Started NetBird for SOC 2 Compliance NetBird v0.63 - Custom DNS Zones for Private Network Resolution Vibecode This in a Weekend and Take 5% of the Company NetBird v0.62 - Built-in Local Users with Optional IdP Integration NetBird v0.61.0 - Granular SSH Access Control and Automatic Updates Top 5 Alternatives to OpenVPN Top 5 Open Source Alternatives to Tailscale Top 5 Alternatives to ZeroTier How to Set Up ZeroByte and REST Server for Backups with NetBird How to Install n8n v2.0 with NPM and PM2 ZeroTier vs. NetBird The Ultimate Immich Guide - Ditch Google and Amazon Photos for Good NetBird as Your Help with ISO 27001 Compliance NetBird and Huntress - Secure Network Access for MSPs How to Access Windows Shares from Anywhere with NetBird netgo Relies on Modern ZTNA with NetBird Connect to Your Homelab from Anywhere with a Raspberry Pi NetBird SSH - A New, Identity-Aware Approach The AI Mega Mesh: How to Connect 30+ GPU Cloud Providers Connect Multiple Ollama GPUs to OpenWebUI with NetBird Top 5 Tailscale Alternatives SSH and RDP, now in your browser NetBird–Acronis Integration: Empowering MSPs for Advanced Ransomware and Threat Defense Introducing the Control Center - Remote Access, Beautifully Visualized NetBird at MSP Global 2025 Understanding Overlay Networks - The Basics NetBird and SentinelOne Singularity™ - Automate Threat Response NetBird and Microsoft Intune - Enforcing Device Compliance for Zero Trust Rethinking Zero Trust Security with NetBird and pfSense Improving Unidirectional Access Control Proxmox VE for Beginners Guide with NetBird LXC Stronger Security: NetBird + GitHub Secure Open Source Fund NetBird's MSP Partner Program Signicat Enhances Cross-Cloud Accessibility with NetBird SonicWall SSL VPN NetExtender vs. NetBird NetBird Is Embracing the AGPLv3 License NetBird Profiles Have Landed - Manage Multiple Accounts Effortlessly Rethinking Access Control to Secure Your On-Premises SharePoint Servers Sport Alliance Increases Efficiency with Zero Trust Networking at Scale Rethinking Network Access: qwertiko Goes Zero Trust with NetBird Optimizing Network Efficiency with NetBird's Lazy Connections Use Port Ranges in Access Control Policies Generic HTTP Endpoint for Network Events Streaming NetBird’s Response to Spear-Phishing Campaign Targeting Financial Executives Zero-Trust Access to Internal Resources Without Installing Agents Enhance Network Visibility with NetBird’s Traffic Events Logging TrueNAS Made Easy - Install, Set Up, and Access From Anywhere Top 5 Alternatives for WireGuard Jump Hosts. Gateways for Remote Access NetBird Network Routes and Exit Nodes Security for All - SSO and MFA for Free Enhancing Network Access Control with NetBird's Identity Provider Feature Twingate vs. NetBird Limit Network Access Based on Running Applications FortiClient ZTNA vs. NetBird OpenVPN vs. NetBird Tailscale vs. NetBird Getting Started with an Azure Site-to-Site VPN Getting Started with an On-premise-to-AWS Site-to-Site VPN Secure Remote Access to VPCs, LANs, and Offices regreSSHion - A New OpenSSH Server Remote Code Execution Vulnerability Evolve Bank & Trust Data Breach. What Happened? What Is a Site-to-Site VPN? IPSec Tunneling Demystified. Enhancing Data Security Across Networks Understanding IPSec Tunnel and Transport Modes Understanding the Differences Between IKEv1 and IKEv2 Understanding the IKEv1 Protocol in IPSec ZeroTier versus NetBird - Which Should You Choose? AWS Lambda Serverless Security. Mistakes, Oversights, and Potential Vulnerabilities Using NetBird for Kubernetes Access Serverless Security Vulnerabilities and Best Practices to Mitigate Them Security Best Practices for Serverless Azure Functions A Guide to Remote Access Security for SMEs IoT Security Essentials. How to Achieve Secure Remote Access Open Source Zero Trust Networking Using SSH for Secure Remote Access How We Integrated Rosenpass in NetBird The First Quantum-Resistant Mesh VPN Using eBPF and XDP to Share Default DNS Port Between Multiple Resolvers
Home Assistant Setup Guide with EASY Remote Access
Written byBrandon Hopkins · 2026-02-19 · via NetBird - Networking Knowledge Hub - RSS Feed

Home Assistant is one of those tools where once you set it up, you wonder how you lived without it. All your smart home devices under one dashboard, automations that work across ecosystems, and everything stays local. No cloud dependency, no subscriptions, no third party knowing when you turn your lights on.

Home Assistant initial setup wizard

The one pain point has always been accessing it remotely. The usual options are port forwarding (exposes your home network), Cloudflare Tunnels (routes everything through Cloudflare), or a VPN (needs a client on every device). There's also Home Assistant Cloud (Nabu Casa) at $6.50/month, which handles remote access, voice assistants, and cloud backups. Your subscription funds Home Assistant development too, which is great. But if you prefer to self-host and keep full control, paying monthly for something you can do yourself feels unnecessary.

With NetBird's built-in reverse proxy , you can expose Home Assistant to the internet without opening a single port. Traffic goes through encrypted WireGuard tunnels, TLS is handled for you, and you can add SSO, password, or PIN authentication at the proxy layer. The person accessing it doesn't need a VPN client, they just open a browser.

In this guide, we'll install Home Assistant, connect it to a NetBird network, and expose it through the reverse proxy.

What is Home Assistant?

Home Assistant is a free, open source home automation platform that runs locally on your network. It supports thousands of devices from different manufacturers: Philips Hue, Ecobee, Ring, Zigbee sensors, Z-Wave locks, and a lot more.

The real value is in the automations. Instead of juggling five apps from five vendors, you control everything from one dashboard and build automations across ecosystems. Turn off all lights when everyone leaves. Lock the door when the alarm is armed. Get a notification when the garage has been open for 10 minutes. It all runs locally, so it's fast, private, and doesn't break when someone else's servers go down.

It also supports voice assistants, energy monitoring, and a huge ecosystem of community add-ons. It's easily the most capable smart home platform out there.

Installing Home Assistant

There are a few ways to install Home Assistant, but the recommended approach is Home Assistant Operating System (HAOS). It's a minimal Linux-based OS built specifically to run Home Assistant with full add-on support. Available for:

  • Home Assistant Green - A plug-and-play device with HAOS pre-installed. Easiest way to get started.
  • Home Assistant Yellow - A more advanced board with room for Zigbee/Thread radios and NVMe storage.
  • Raspberry Pi - Flash HAOS to an SD card or SSD and boot. A popular low-cost option.
  • Generic x86-64 hardware - Install HAOS on any Intel/AMD machine, including mini PCs and NUCs.
  • Virtual Machine - Run HAOS as a VM on Proxmox, VirtualBox, KVM, or other hypervisors.

There's also Home Assistant Container, which runs Home Assistant Core in Docker. More control over the underlying system, but no native add-on support. Since we need add-ons for the NetBird integration, we'll be using HAOS.

Note: Home Assistant Core and Supervised installation methods were deprecated in 2025 and are no longer supported as of the 2025.12 release. Stick with HAOS or Container for new installations.

Our Setup: Proxmox VM via Helper Scripts

We're installing HAOS as a VM on Proxmox using the community helper scripts. This is popular in the homelab community since it lets you run Home Assistant alongside other VMs and containers on the same hardware. If you need to get Proxmox set up first, check out our Proxmox Getting Started Guide .

Running Home Assistant on a Raspberry Pi, dedicated hardware, or something else? No problem. The NetBird steps are the same regardless of how you installed it. Skip ahead to Initial Setup .

The Proxmox VE Helper Scripts (originally created by tteck, now maintained by the community) make this a one-command process. In your Proxmox shell, run:


The script walks you through the setup. Defaults are fine for most people. It downloads the latest HAOS image, creates the VM, and configures the hardware. If you want to tweak disk cache, CPU type, or storage location, select "Advanced" when prompted.

Once the script completes, start the VM. You can check the console in Proxmox to find the IP address Home Assistant was assigned.

Home Assistant VM running on Proxmox

Initial Setup

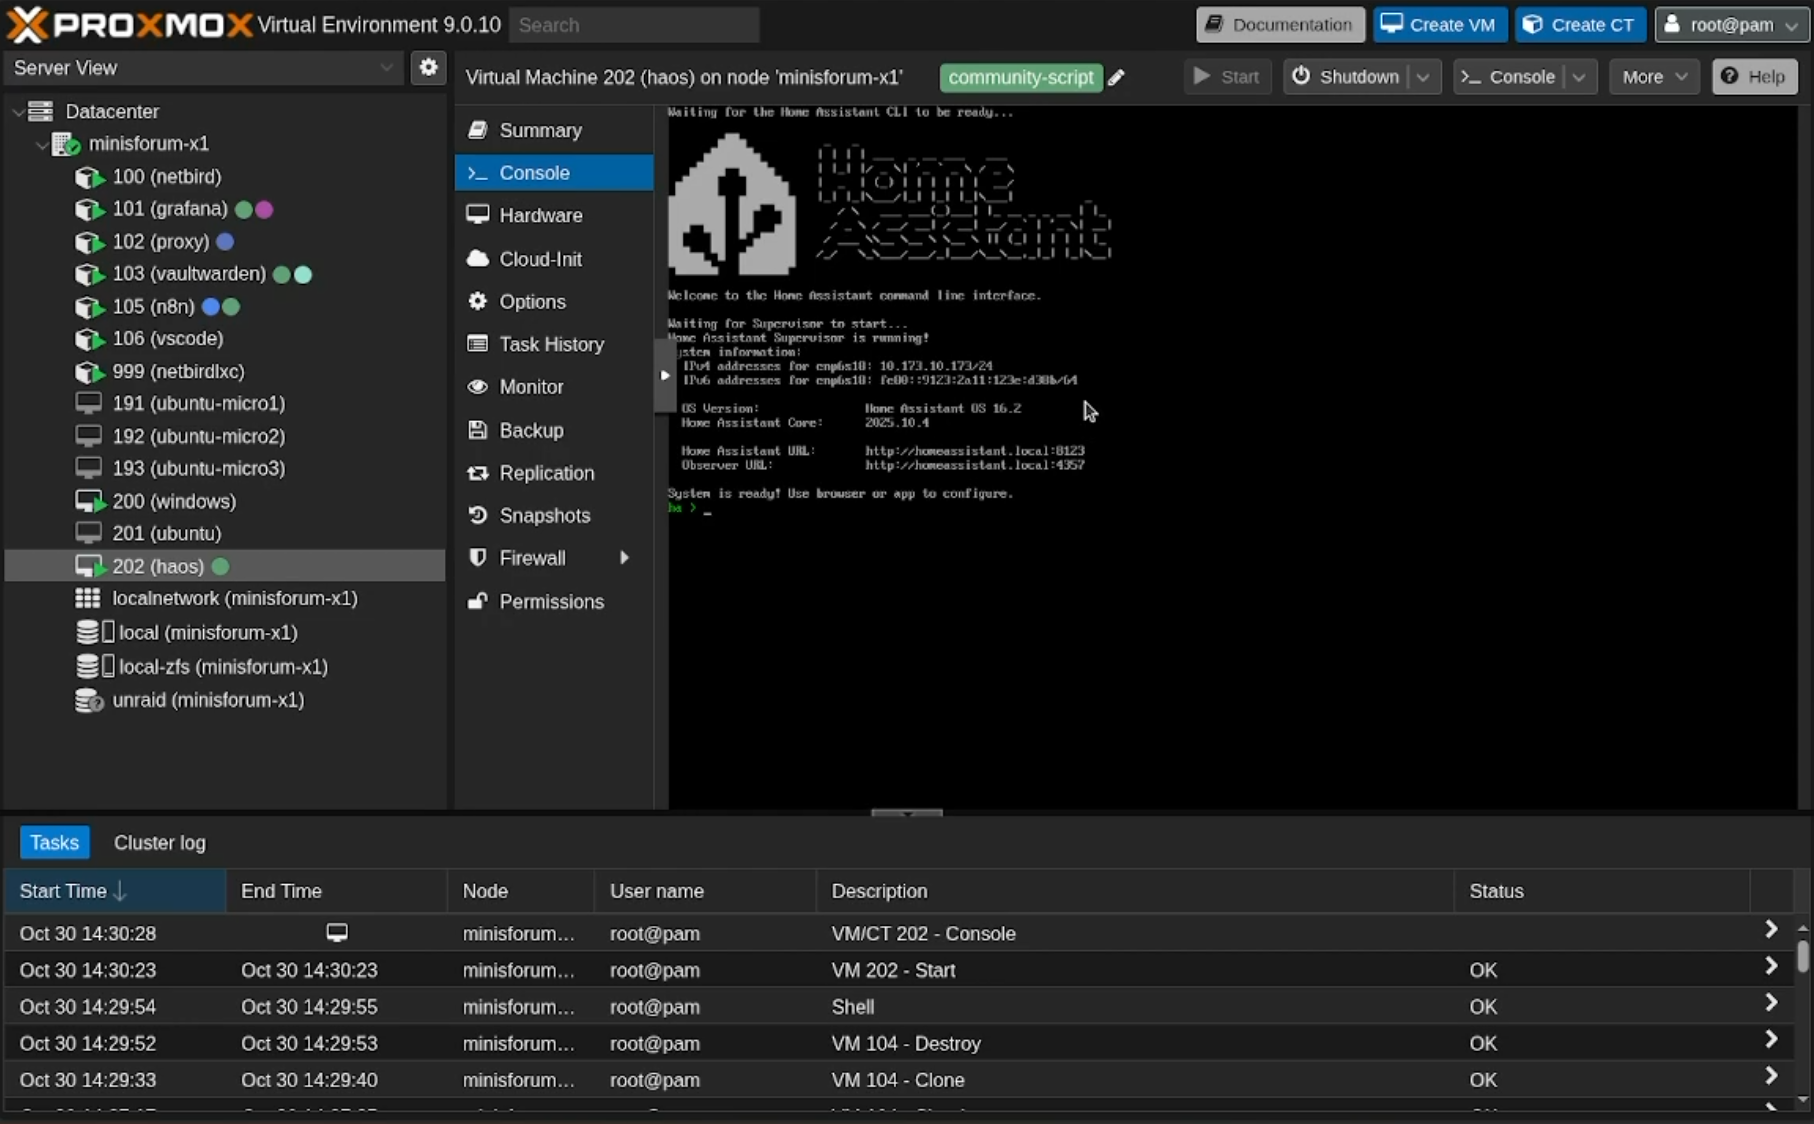
Open a browser and navigate to . The first boot can take a few minutes as Home Assistant downloads and installs the latest components, so be patient.

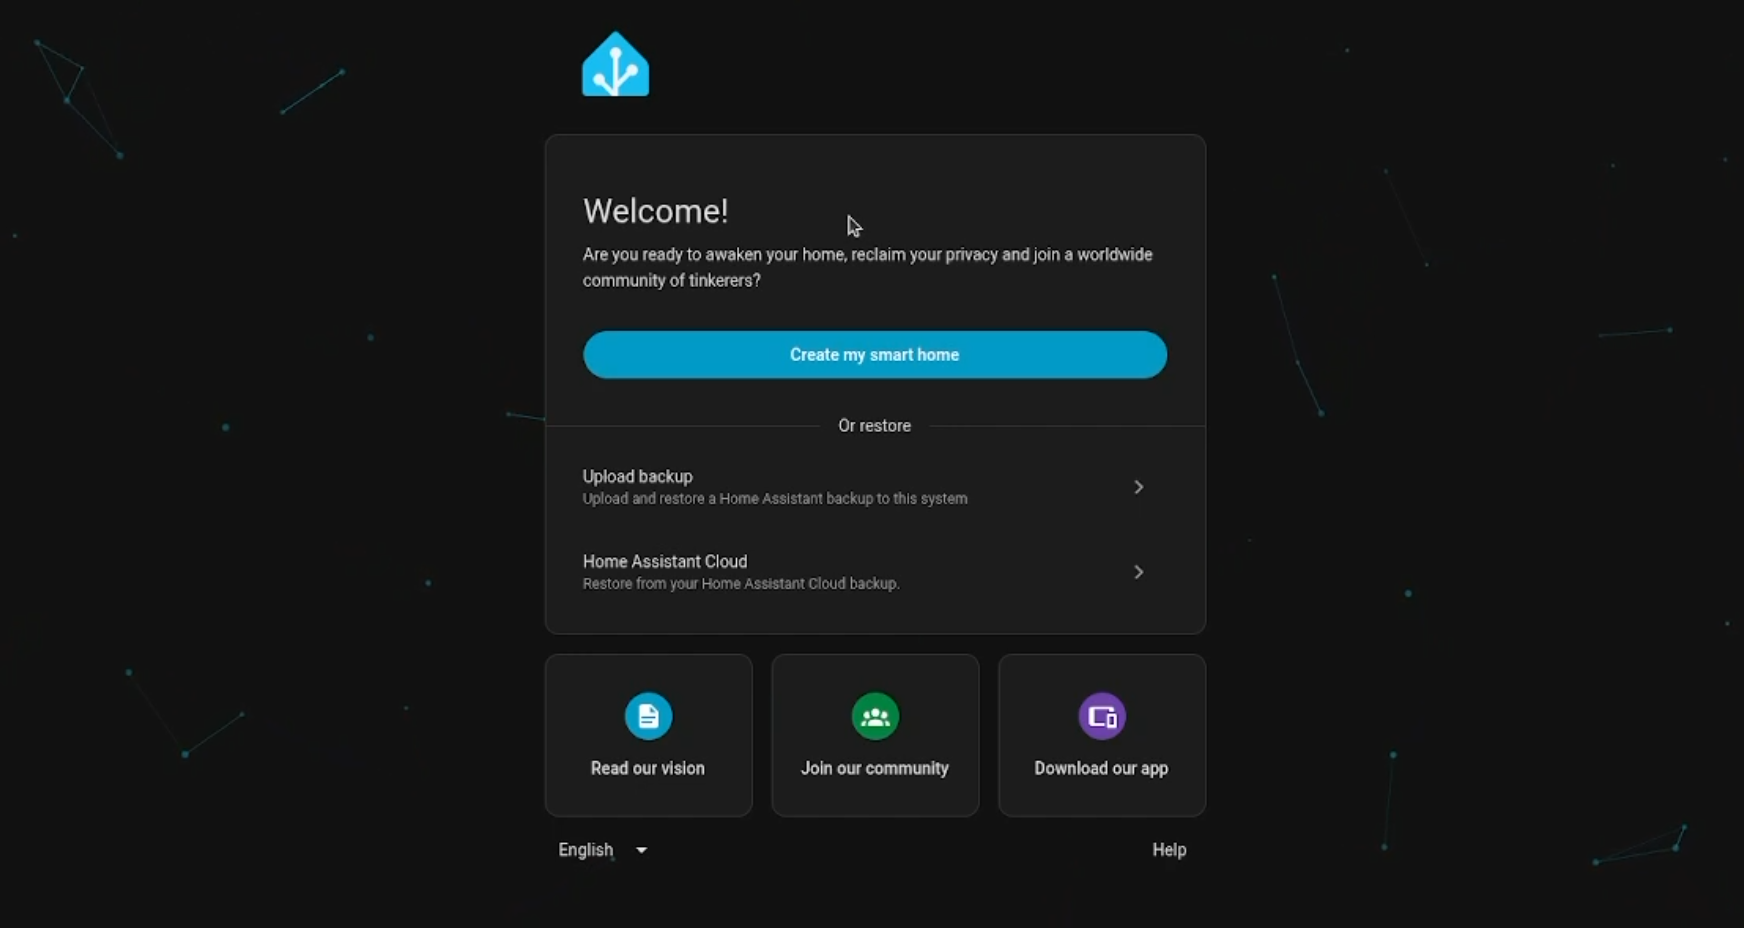
You'll be greeted with the onboarding wizard:

  1. Create your admin account with a name, username, and password
  2. Set your home location (used for time zone, weather, and sun-based automations)
  3. Choose your country and language
  4. Home Assistant will auto-discover any compatible devices on your network

Once you're through the wizard, you'll land on the dashboard. Home Assistant is up and running.

Set a Static IP Address

Before going further, give your Home Assistant instance a static IP so the address doesn't change. You can do this through your router's DHCP reservation, but Home Assistant also lets you set it directly in the UI.

  1. In Home Assistant, navigate to Settings > System > Network
  2. Under IPv4, click on your active network adapter
  3. Change from Automatic (DHCP) to Static
  4. Enter your desired IP address, subnet mask (typically or ), gateway (your router's IP), and DNS server
  5. Click Save

Setting a static IP in Home Assistant

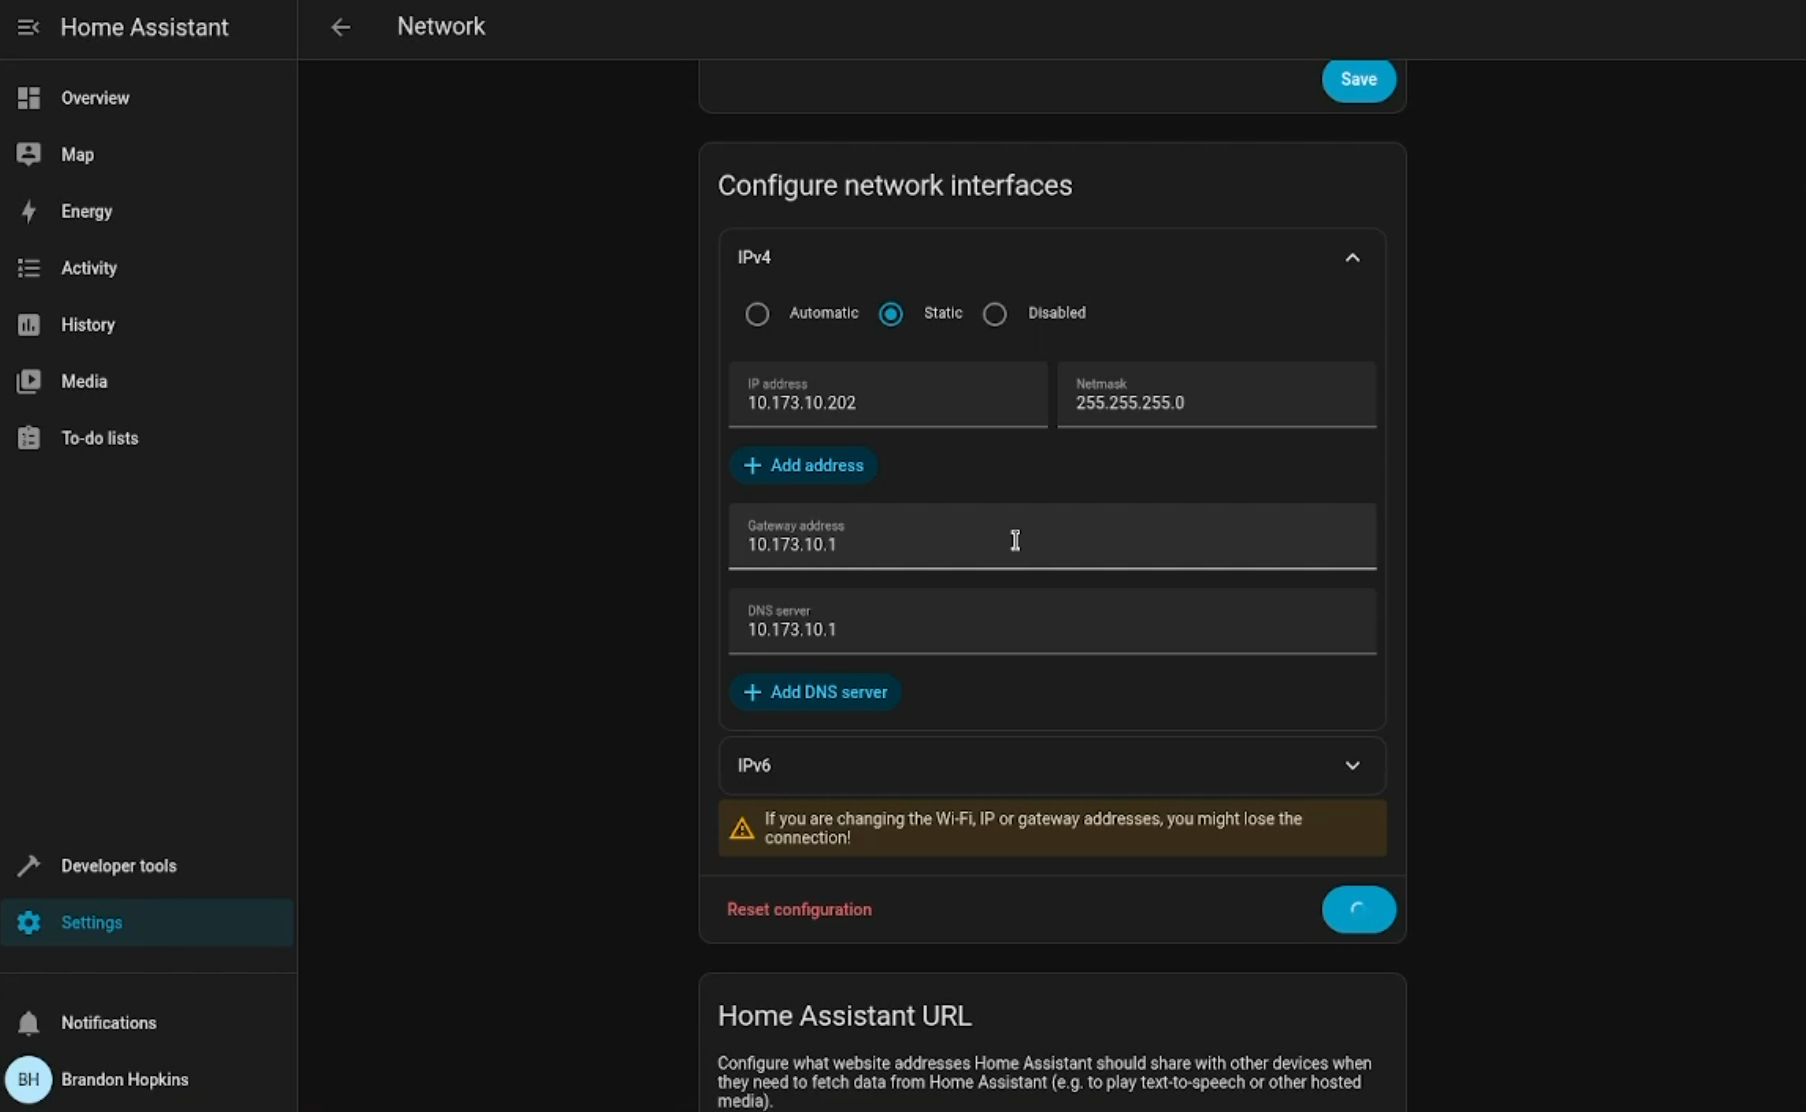
Tip: Choose an IP address outside your router's DHCP range to avoid conflicts. If your router assigns addresses from to , pick something like .

After saving, Home Assistant will switch to the new IP. If the address changed, you'll need to navigate to to continue.

Installing the NetBird Add-on

Next, we need to connect Home Assistant to your NetBird network so it shows up as a peer. This is what lets the reverse proxy route traffic to it.

Add the Repository

  1. In Home Assistant, navigate to Settings > Add-ons > Add-on Store
  2. Click the three dots in the top right corner and select Repositories
  3. Add the NetBird repository URL:
  4. Click Add and then Close

The NetBird add-on should now appear in the add-on store. If you don't see it, refresh the page.

Install and Configure

  1. Click on the NetBird add-on and click Install

NetBird add-on in Home Assistant 
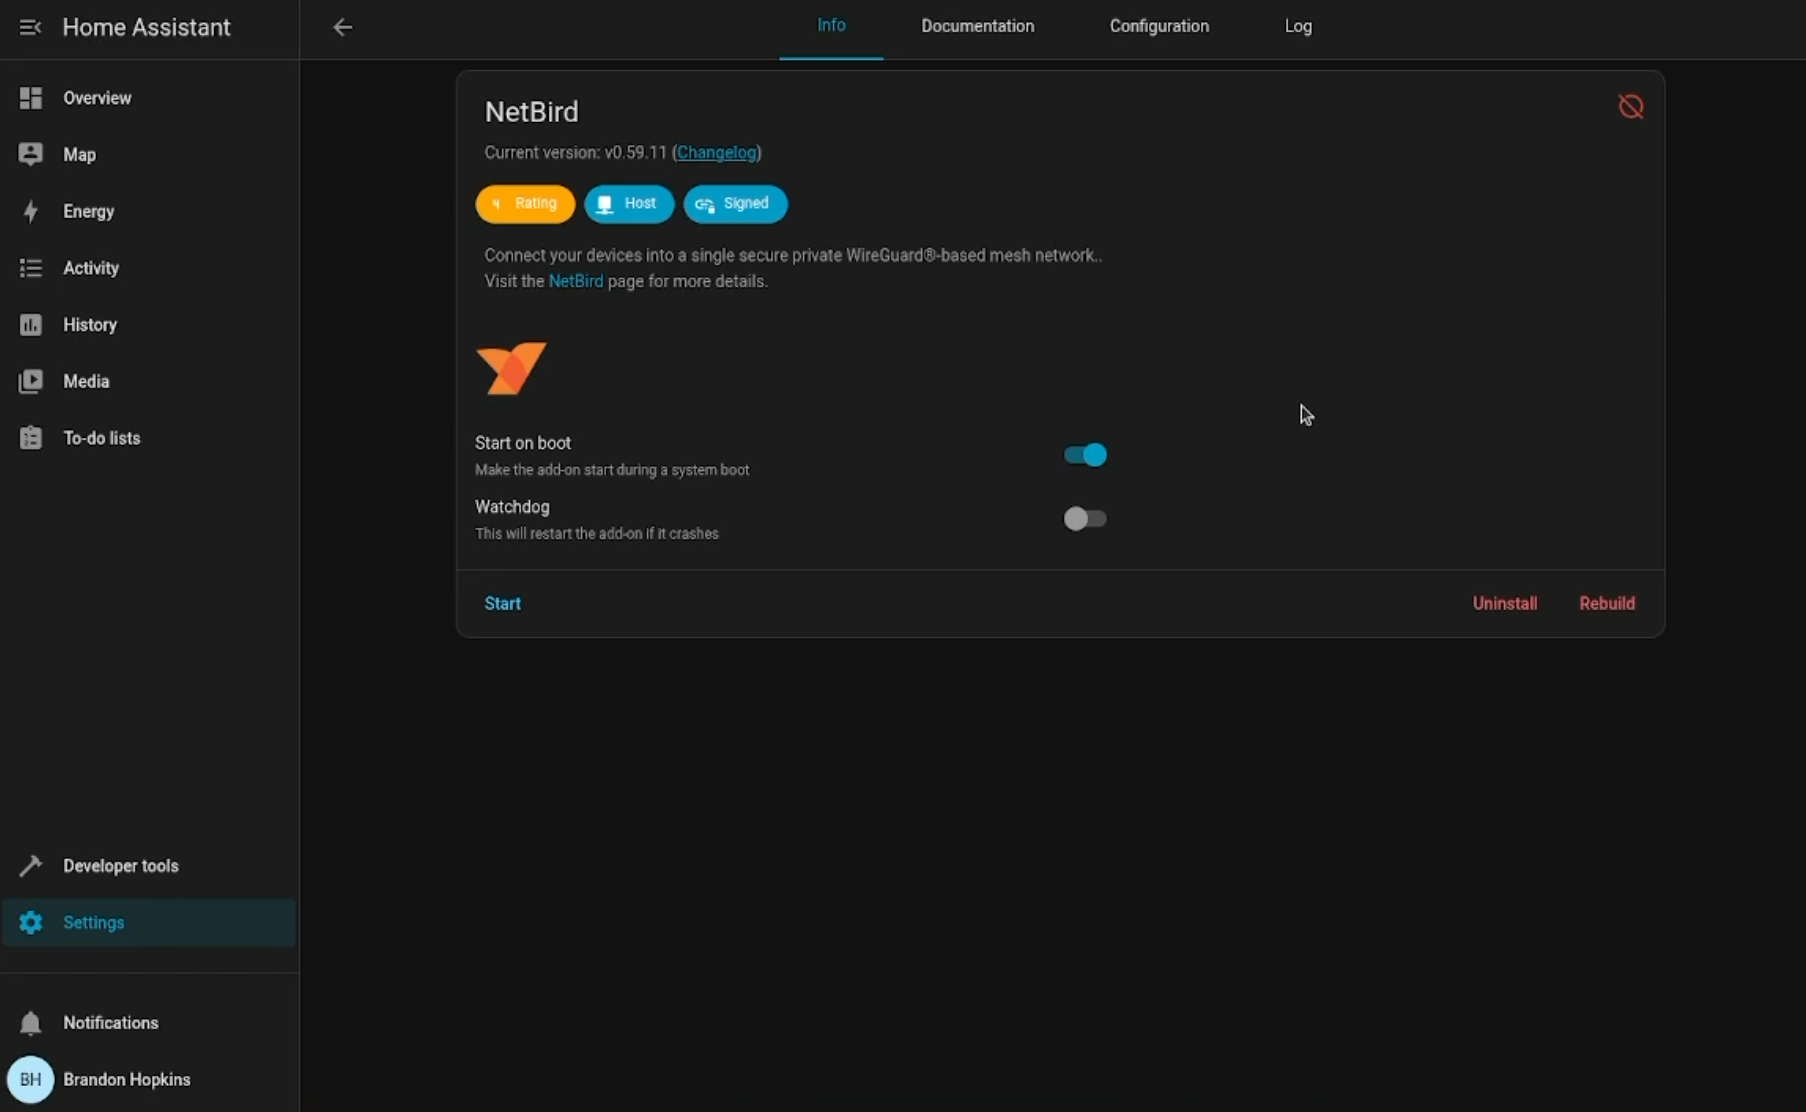
2. After installation, go to the Configuration tab 3. Set the following options:

NetBird setup key in the dashboard

If you're using NetBird Cloud:

  • setup_key: Paste a setup key from your NetBird dashboard (Setup Keys > Add Setup Key)

If you're using a self-hosted NetBird instance:

  • setup_key: Paste your setup key
  • admin_url: Your NetBird dashboard URL (e.g., )
  • management_url: Your NetBird management URL (e.g., )
  1. Optionally set a hostname to give your Home Assistant instance a recognizable name in the peer list (e.g., )
  2. Click Save and then Start the add-on
  3. Enable Start on boot so NetBird connects automatically when Home Assistant restarts

Check the add-on logs to confirm it connected successfully. You should also see the peer appear in your NetBird dashboard under Peers.

Configure Home Assistant for Proxy Connections

By default, Home Assistant doesn't accept reverse proxy connections. It needs to know which IPs are allowed to forward requests on behalf of users. Without this, you'll get 400 errors when trying to access it through the NetBird reverse proxy.

Edit Home Assistant's file. You can do this through the File Editor or Studio Code Server add-on, or via the command line if you have terminal access.

Add the following to your :


covers NetBird's WireGuard tunnel addresses and covers common Docker network ranges. This tells Home Assistant to trust the header from these ranges, which is how the proxy identifies the actual client.

Important: Be intentional about what you add to . Only include the IP ranges that your proxy traffic actually comes from. The ranges above are broad enough to cover typical NetBird setups, but you can narrow them down if you know your specific NetBird peer IP.

After saving, restart Home Assistant for the changes to take effect. Go to Settings > System > Restart.

Expose Home Assistant with NetBird Reverse Proxy

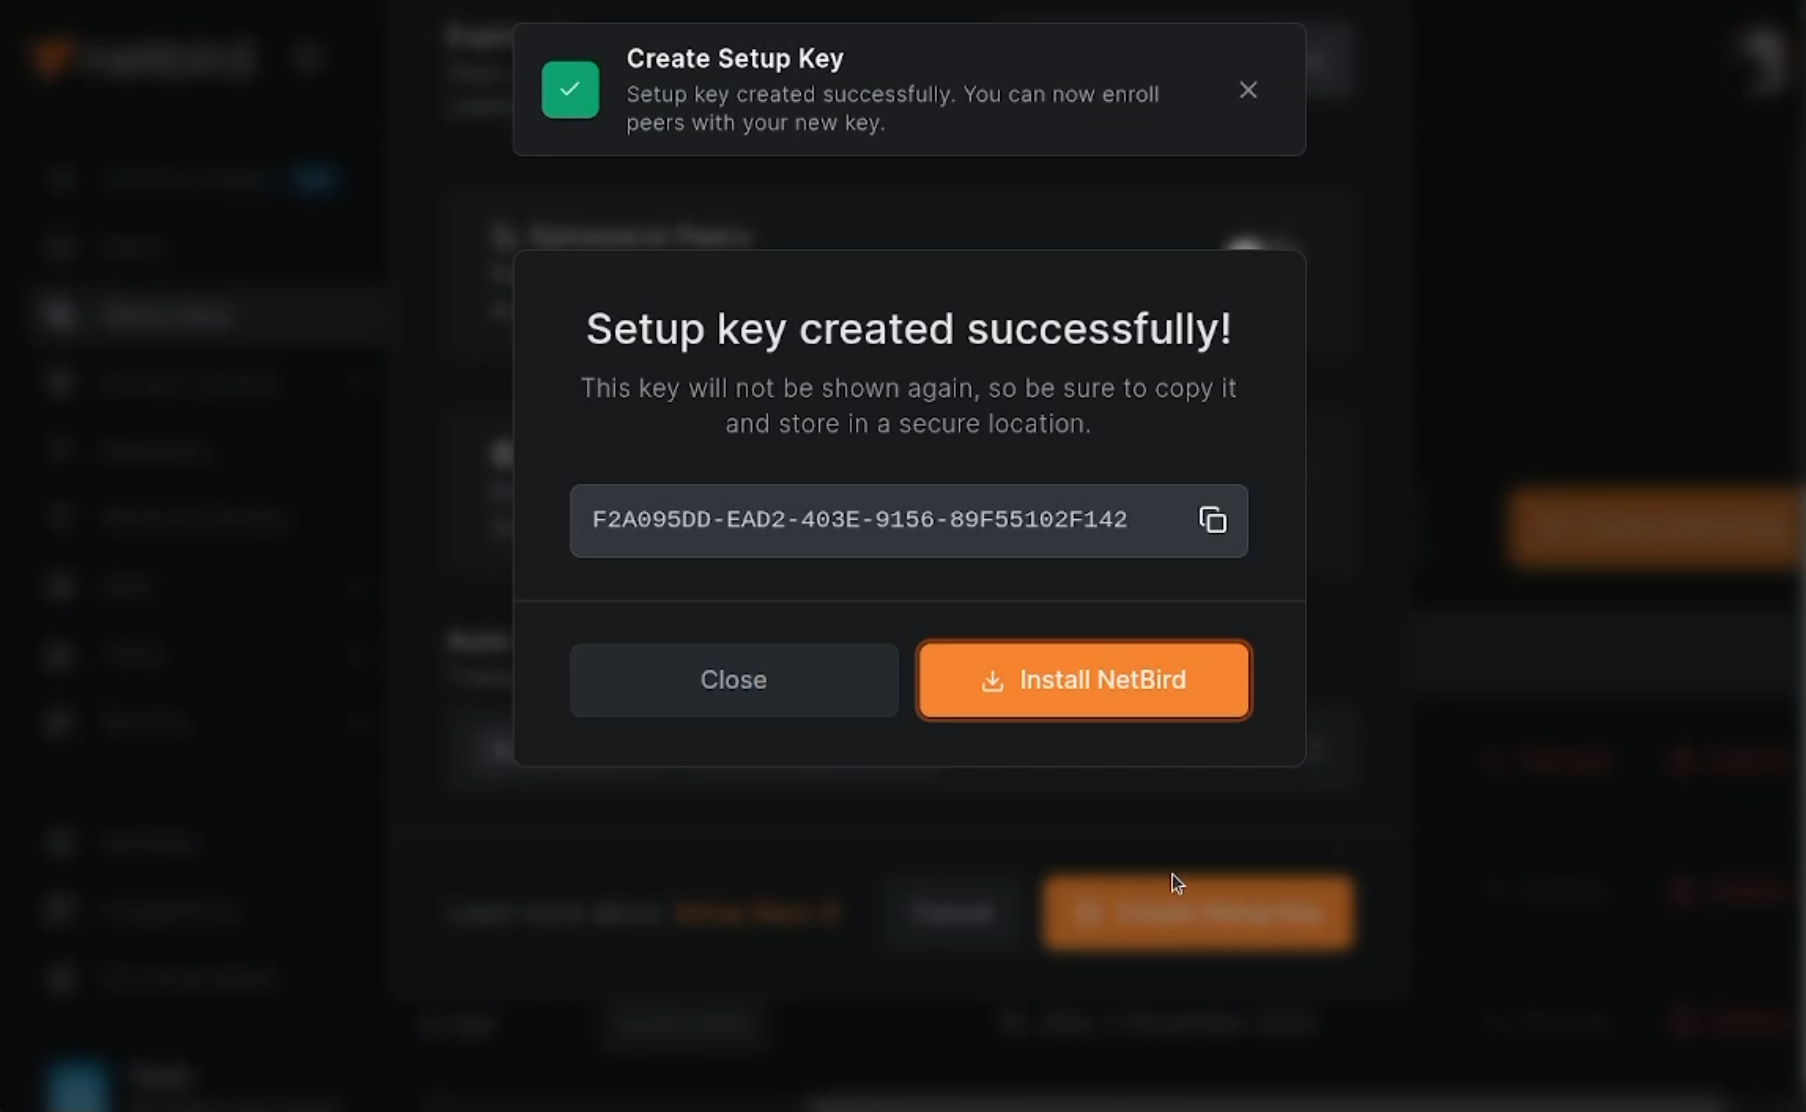
Now for the fun part. We're going to make Home Assistant accessible from anywhere using NetBird's reverse proxy .

  1. In the NetBird dashboard, navigate to Reverse Proxy > Services and click Add Service
  2. Enter a subdomain (e.g., ) and select your proxy domain

Adding a reverse proxy service in the NetBird dashboard

  1. Click Add Target and select the Home Assistant peer (or the network resource if you're using a routing peer)
  2. Set the protocol to HTTP and the port to 8123

Adding a target to the reverse proxy service

  1. Under the Settings tab, enable Pass Host Header and Rewrite Redirects
  2. Under the Authentication tab, configure authentication (see below)
  3. Click Add Service

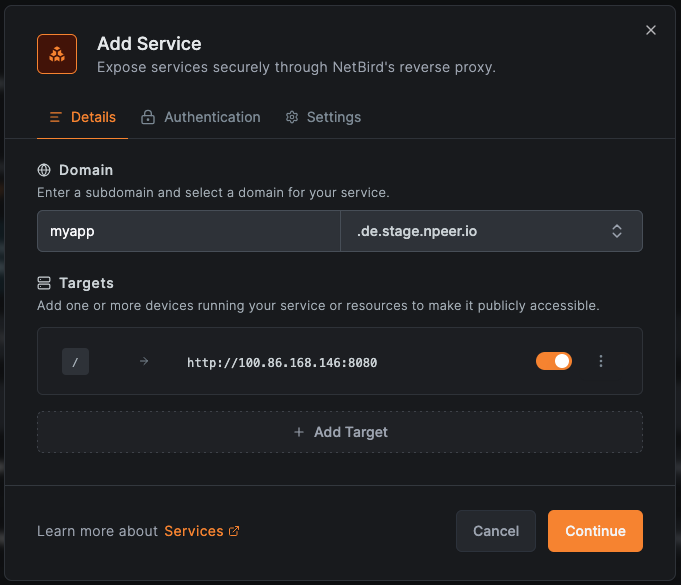
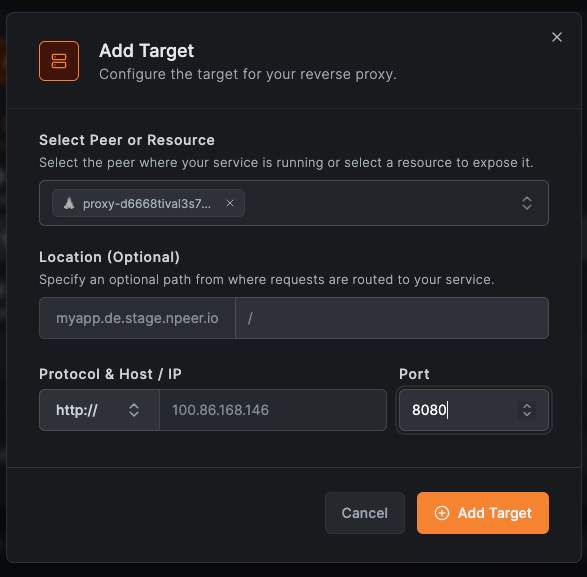
Wait for the status to show "active" and go to your new URL (e.g., ). You should see the Home Assistant login page. That's it. Home Assistant is on the internet with no ports open on your home network.

Authentication: What You Need to Know

NetBird's reverse proxy lets you add authentication in front of any service: SSO through your identity provider, a shared password, a PIN code, or a combination. For most services, we recommend it.

For Home Assistant, there's a catch. Adding NetBird auth means every request goes through an authentication check first. Great for browser access since nobody even sees the HA login page without authenticating. Useful if you're worried about brute force attempts.

But enabling NetBird authentication will break the companion apps. The Home Assistant mobile apps (iOS and Android) and third-party integrations expect to hit the API directly and handle auth through HA's own token system. They can't deal with an extra authentication prompt.

So practically:

  • Browser-only access? Enable NetBird SSO or password auth for the extra security layer.
  • Using companion apps? Leave NetBird authentication disabled. Home Assistant handles its own auth just fine, and traffic is still encrypted through WireGuard.

Either way, you're not sacrificing security. The connection is encrypted end-to-end through WireGuard, Home Assistant has its own login, and no ports are open. NetBird auth is an extra layer on top, not the only one.

What You've Got Now

Here's what we set up:

  • Home Assistant running locally for device control and automation
  • A NetBird peer connection via the official add-on
  • A public URL that routes through encrypted WireGuard tunnels to your HA instance
  • Automatic TLS certificates, zero open ports
  • Optional proxy-layer authentication for browser access

No port forwarding, no Cloudflare, no VPN client needed. Just a URL in a browser.