Docker is widely used for almost everything; media servers, analytics, web services, download clients, and more. In this guide, we'll cover the why, the how, and the basics you need to start using Docker on your network.
But first, what is it? Docker is a platform that allows you to build, spin up, and work with containerized applications. A container is an isolated environment that generally has a single primary application running inside. Containers allow developers and system administrators to create and deploy reproducible images that are similar to packages from a distro's package manager. However, containers don't rely at all on libraries or dependencies from the host system–they come with everything required to run a given application in a known working configuration.
In addition to the dependency benefit, using Docker and containers makes it really simple to deploy and manage services. Since they are isolated from the host system, whether that's bare metal or a VM, containers also make tearing down and cleaning up easy, so they're a great way to experiment and play with various software and services. In this guide we will focus on using pre-exisiting images as oppsoded to building our own.
So, how do you get started using Docker? Docker can run on many platforms. It's often shipped with many NAS or Homelab specific operating systems like UNRAID (via its applications page) or TrueNAS. Or you can install it directly on bare metal Linux, or VMs.
For this guide we will be istalling Docker on an Ubuntu server as it is straightforward; you can install it with or use the "convenience script" directly from Docker for one of the easiest ways to install it on your system. Once that's done, any future updates will also be available through . Here are the commands to install using the script:
Regardless of how you install Docker on Ubuntu, the Docker systemd service will automatically start and enable. So, Docker will start automatically if the system is ever rebooted. You can check to see if it is running with the following command:
One step in the Linux post-installation steps is to manage Docker as a non-root user. To do this, you can add your user account to the group. This allows you to run Docker commands without using them every time. However, it is important to note that adding a user to the group grants them significant privileges, as Docker allows direct access to the host system. Therefore, exercise caution when granting Docker access to non-root users, as it can potentially lead to security vulnerabilities if not properly managed and monitored.
If you want to do this, run the following commands:
After that, a way to test that everything is working properly is to run the "hello world" container like this:
Docker's command takes the name of a Docker image as its argument; in this case . It downloads the image if needed and then creates and runs a container based on that image.
Downloading images is known as "pulling", and you can also pull an image manually using the "pull" command. This can be useful for getting a newer version of an image or initiating the download of a large image for later use.
For example, this command pulls the latest Ubuntu container image:
Then, we can run an Ubuntu container with an interactive session using the argument. Since the image is already pulled, this container will start automatically.
This drops into a bash shell running in a fresh Ubuntu container. There's a full Linux file system and basic commands are available. To exit the container, hit ctrl-d.
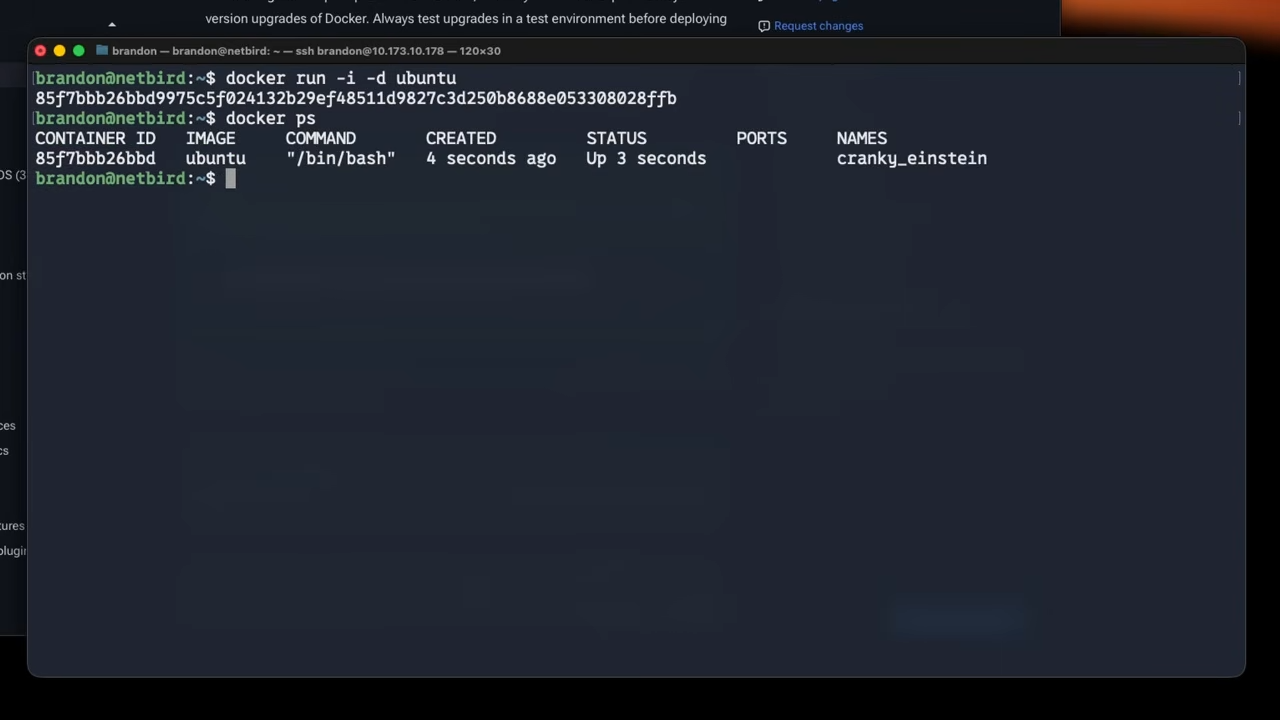
The command gives a view of the containers that Docker is currently managing. By default, it only shows running containers, so the Ubuntu container won't show up since it's now stopped. By adding the flag, all containers will be shown:
One thing to know about containers is that just creating a container doesn't take up any extra space. Docker works by creating layers on top of the image as files are added or modified. Removing old containers is still a nice way to keep things tidy, and that can be done by running with the container ID or the name of the container shown by earlier:
When you don't add a name variable to running a container it will randomly generate one. You can assign a name when running a container with to make it easier to manage. For example:
Containers can only be removed when they are stopped, so it's sometimes necessary to stop a running container before removing it, using docker stop:
If stopping doesn't work, killing the container may also sometimes be necessary:
This can be compared to closing out an application versus ending the task in Task Manager.
When we remove the Ubuntu container, the hello-world container remains. We'll cover how to clean up old containers more efficiently later.
When containers are removed, any changes to them, including stored data, will be lost. In general, containers are considered disposable, and they are expected to be periodically replaced, such as during updates. So, any important data that the container uses or generates should be stored separately.
Docker provides two main mechanisms for storing data persistently on the host system: volumes and bind mounts. Volumes provide a dedicated storage space that can be referenced by name for later use. Bind mounts, on the other hand, are a way of giving a container access to a limited scope of a file system on the host. Bind mounts are common when you need to share host directories (e.g. media or config) with containers—for instance, multiple containers can use identical bind paths to access the same data.
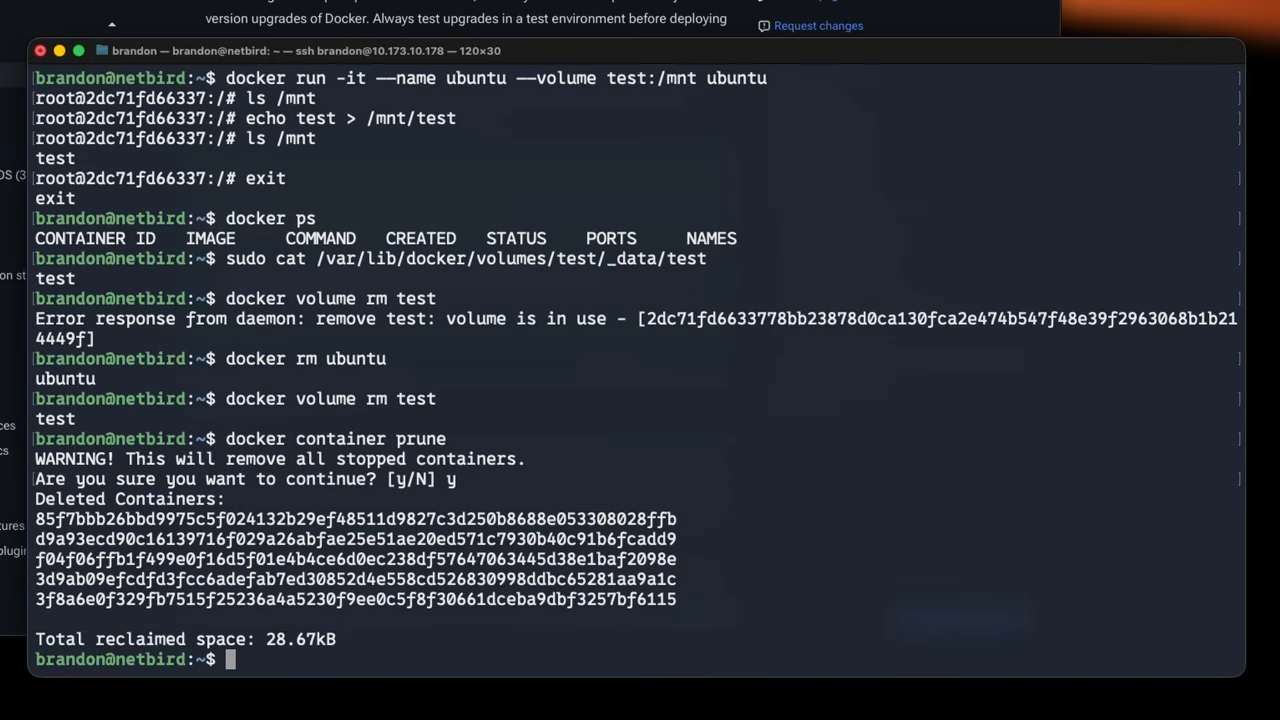
First, let us touch on volumes. These can be added to a container by adding the flag (or for short) to a docker run command. Here's an example:
This adds a volume named "test" to a new Ubuntu container and mounts it at . Now that we are in the container shell, we can create a file inside the volume:
After exiting the container shell with ctrl-d, we can see the created volume by listing Docker's volumes with:
By default, Docker stores volumes on your host system in the subdirectories of , and you can access the contents like any other file. You'd need in this case, if you're not already root:
Anytime we give the same volume name to a future Docker command, it will use the same volume and the same data will be available. The volume can also be removed like this:
In this case, the volume is in use. You can see the last few containers if you list all stopped containers. The volume is associated with the Ubuntu container, so the volume must be removed first. You can remove a single container with , or remove all stopped containers with a prune command:
It will prompt for confirmation; this command affects all stopped containers, so use it with care. The prune command also works with images, volumes, networks, and everything else.
Here's another example of how bind mounts work. In this case, you'll mount the root user's home directory. The invocation is very similar; substitute the host path in place of a volume name:
Now, inside the home folder, it will be available under inside the container:
The contents of the host path (e.g. the home directory) appear under inside the container:
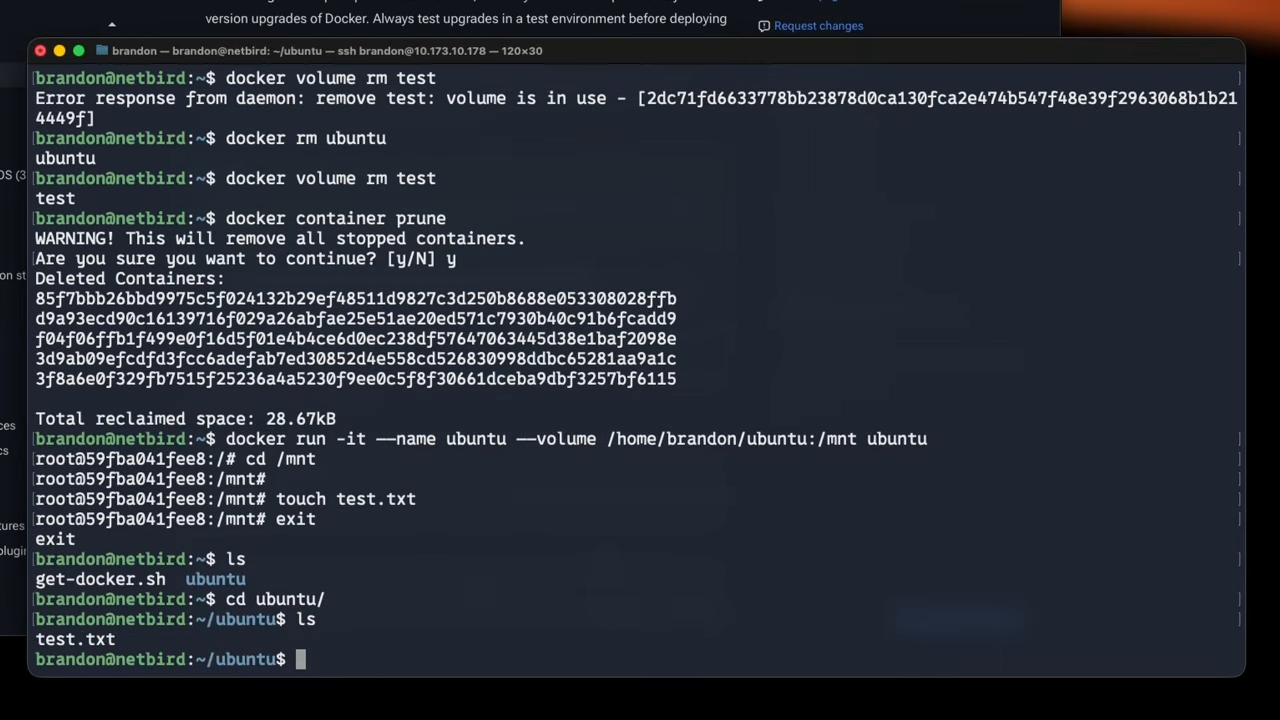
Be careful with bind mounts since any changes the container makes will also be permanently made on the host system. Generally, giving containers access to the minimum necessary set of files and folders from the host is a good idea.
So now, moving on to the network side. Docker provides a networking stack that can isolate containers from each other and the host system on the network level. By default, containers are added to a default "bridge" network where they can communicate with each other but can't reach the host system or any other devices in the host network.
Ports from specific containers can also be exposed to the outside world. If that port is also open in the host system's firewall, it becomes a service available on the host's network. When using "docker run", a port can be exposed using the -p option like this:
The two numbers separated by the colon are port numbers. In this case, port 8080 on the host is mapped to port 80 inside the container. To check that it's working, open a web browser and enter or in the address bar (or for a remote server, after opening the firewall for Nginx, replace localhost with the server's IP address or domain). If everything is working right, the welcome page from Nginx should load.
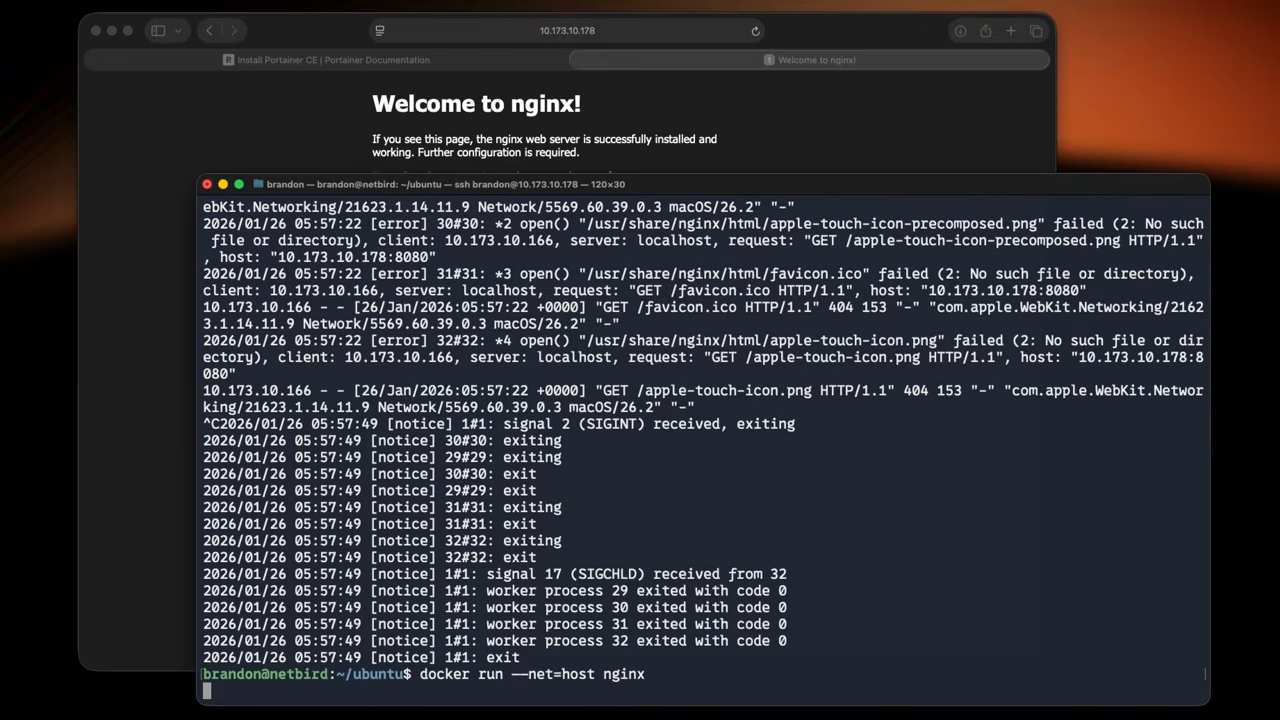
Docker's other primary network driver is called "host" networking, which gives containers direct access to the host's network stack. This mode provides some benefits that are especially helpful when high-performance or low-level networking operations are required. It's also conceptually simpler but less flexible and potentially less secure since the containers aren't isolated.
Here's the previous example again with host networking:
In this case, nginx will bind directly to port 80 on the host, so it should be reachable from a web browser just by typing "localhost" or the host machine's IP address.
Now, when you go to spin up a container, you may see normal Docker commands like this in their documentation, but you may see instructions for Docker Compose instead. Compose is primarily a system for orchestrating groups of containers that work together, but it can also be used with single containers.
For example, a web application might include a database and a web server. Each can run in separate containers as part of a single Docker Compose deployment managed as a single unit.
When using Compose, containers in the same deployment by default share a single Docker bridge mode network that's separate from the usual default network. Each container gets an IP address in a subnet unique to that network. Docker also provides a DNS system so containers can resolve the IP address of other containers using their container name.
Each group of containers managed by compose is defined in a file. In the simplest form, this file specifies names for each container and which image they use. Networking, volumes, and many other options can also be specified to control the containers' behavior and how they work together.
Many Docker Compose files are available online, and they are easy to get started with. Just download the or the file, navigate to the folder where you saved the yaml file. Or create your own with in the directory you'd like the stack to be saved in. Here is an example of what this looks like with the service:
After any necessary edits, save the file with and run:
This single command will set up everything defined in the yaml file. The flag tells Docker to run the deployment in the background and return control of the shell. Logs for the containers won't be printed to the console in this case, but they can be accessed with:
To stop a Compose deployment later, just run:
This will stop and remove all of the containers. By default, the data stored in volumes is retained. You can also remove the volume data by adding the flag:
The basic method for updating a container is to pull a newer version of the container image, remove the container, and then start a new container using the new image version. This is one reason storing data inside volumes is important—it's the only way data can survive this process.
Watchtower is a service for keeping containers up to date, which runs inside a container. It detects whenever a new version is available and automatically replaces containers with the new version using the same settings they were created with. It's straightforward to set up. See the Watchtower documentation for details.
Managing Docker from the command line works well once you're comfortable with it, but a web interface can make day-to-day tasks—inspecting containers, viewing logs, managing volumes and networks, and deploying stacks—much quicker. Portainer is a lightweight management UI that runs in a container and connects to your Docker daemon.
What is Portainer? Portainer is a web-based UI for Docker (and Kubernetes). The Community Edition (CE) is free and open source. You install it as a single container that talks to Docker on the host via the Docker socket, so you get a dashboard for your containers, images, volumes, and networks without leaving the browser.
Why it's helpful: You can start, stop, and remove containers with a few clicks; browse and pull images; view live logs and shell into containers; create and manage Docker Compose stacks; and manage volumes and networks—all from one place. It's especially useful when you're learning Docker or when multiple people need to manage the same host.
Portainer CE needs access to the Docker socket on the host and a volume to store its data. The steps below assume you've already installed Docker and (if desired) added your user to the group so you can run without .
Open the UI: In a browser, go to (or ). Accept the self-signed certificate warning if prompted. On first load, you'll create an admin username and password.
Select "Get Started" when asked to connect to an environment—choose the local Docker environment that Portainer detects. You'll then see the dashboard with your containers, images, volumes, and networks.
To update Portainer later, pull the new image, remove the existing container, and run the same command again (the volume keeps your settings). For more options and documentation, see Portainer's official docs .
此内容由惯性聚合(RSS阅读器)自动聚合整理,仅供阅读参考。 原文来自 — 版权归原作者所有。