


Let’s build an MCP server and deploy it to Netlify!
Model Context Protocol (MCP) provides a standardized way for AI agents to seamlessly interact with external tools, data sources, and APIs, greatly enhancing their context-awareness and capability. MCP is fundamental to a site’s agent experience (AX), which is the holistic experience AI agents have when interacting with a product, platform, or system. Without providing a good AX, agents can only understand and perform actions based on the context built into the system and what the underlying AI model was trained on. Improving the AX of a site through exposing an MCP is an excellent way to ensure agents have up-to-date information and access to the entirety of your product/platform. Using Netlify’s serverless functions to deploy MCP servers streamlines development, reducing overhead and simplifying management.
End users use clients that support MCPs to configure and connect to these MCP servers in order to improve the information and capabilities of their AI applications (hosts).
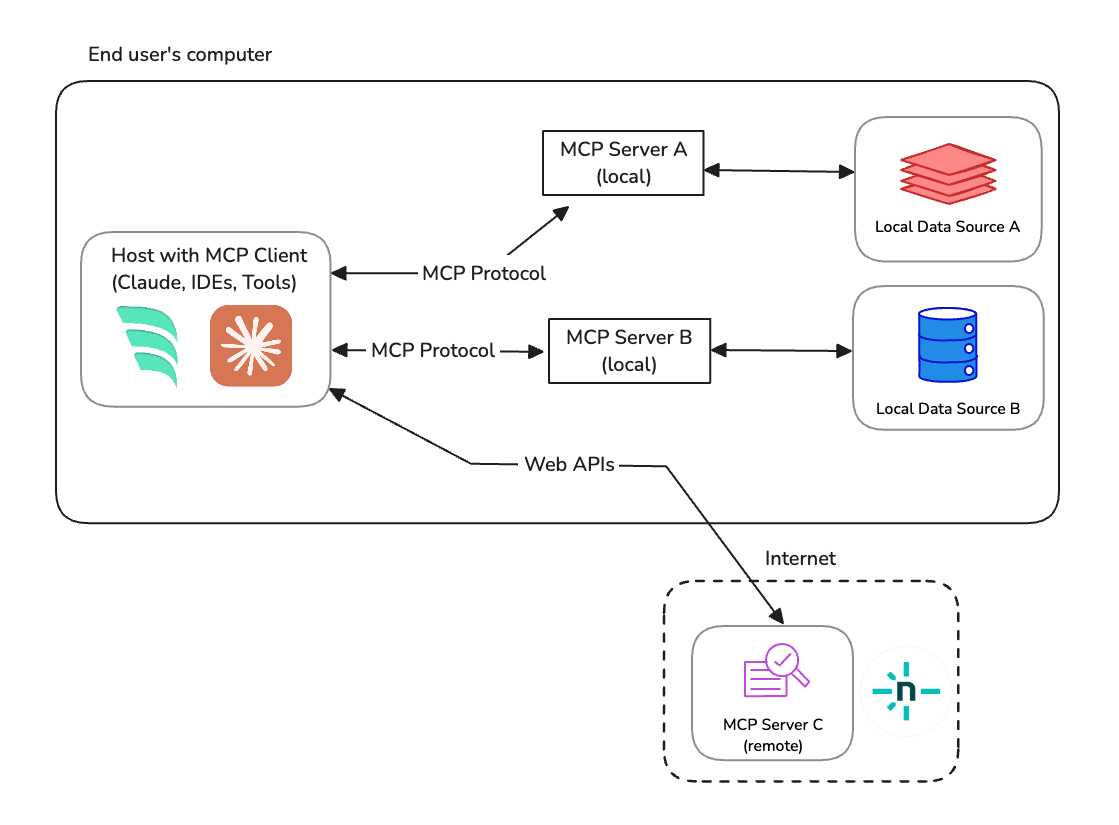
Effective agent experience (AX) requires providing the right context and capabilities to agents for them to work well with your digital service. Model Context Protocol (MCP) is a lightweight, emerging standard to empower agents with resources, tools, and communication standards to bring the capabilities of your platform to your consumers who use agents to interact with your service. End users use applications that support MCP to connect with various external services to make their agents more capable of supporting the end user.
This deploy button will spin up a new Netlify site with a serverless MCP ready to go!

Model Context Protocol (MCP) is an open standard facilitating structured interactions between AI agents and external systems through clearly defined client-server architectures:
MCP meets real users via the AI applications that they are using in their workflows. For example, developers using Windsurf or consumers using Claude, and so on. These applications expose the ability for end users to configure or discover new MCP servers they can work with.
At startup, these AI applications (Hosts) create instances of MCP Clients which handle the lifecycle of connecting and communicating with external Servers. The implementation follows these key steps:
Initialization & Discovery:
The Client and Server perform an initial handshake to exchange information about protocol versions and available capabilities, including:
Invocation & Execution:
When the AI model identifies the need to call an external tool (e.g., “fetch GitHub issues”), the Client sends this invocation request to the Server. The Server executes the underlying logic (such as API calls to GitHub), processes the request, and returns results back to the Client, which integrates them into the AI’s context for generating responses. Prompts and resources follow a similar pattern where the application determines when to use them and they apply the outputs after meeting the required schema or template arguments.
Local MCP servers run on the end user’s computer to satisfy the communication and server needs on the same device as the AI application that uses it. These local servers can use any of the available transports (though stdio typically is the more reliable method). Remote servers, by contrast, only use the StreamableHttp transport to communicate with clients via HTTP or SSE protocols. That said, not all clients support the latest transports, so you often find developers using a hybrid approach where they use a local MCP server proxy that has reliable client support and sends requests to the remotely hosted MCP server to run the logic. For the most compatibility, the remote MCP servers we build in this guide will run in this hybrid mode to ensure maximum client support.
Enough primer, let’s build an MCP!
To make this concrete, let’s take a real-world example where we will expose the ability for our customers to get context about our tool and perform certain actions based on the tools that are available.
At a high level, we will build the following:
mcp-proxy library for client compatibility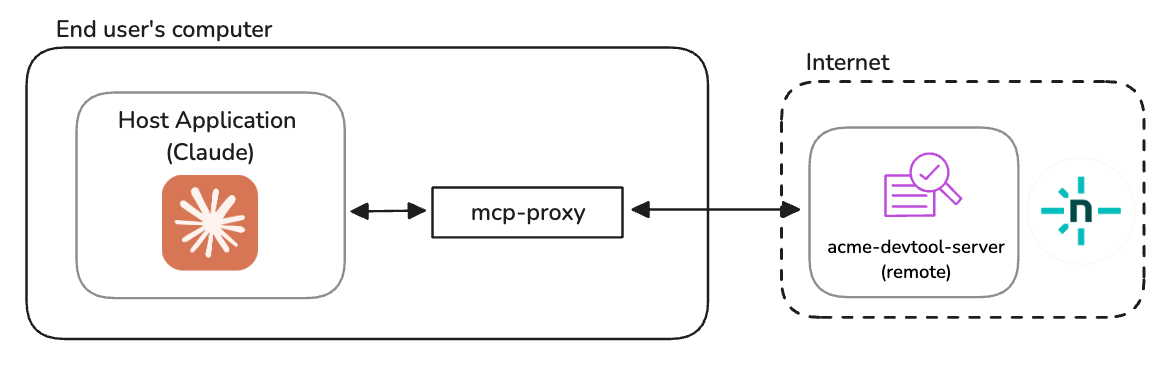
In our serverless functions folder (typically /netlify/functions), let’s add the following function:
import { StreamableHTTPServerTransport } from "@modelcontextprotocol/sdk/server/streamableHttp.js";
import { toFetchResponse, toReqRes } from "fetch-to-node";
import { z } from "zod";
import { McpServer } from "@modelcontextprotocol/sdk/server/mcp.js";
import {
CallToolResult,
ReadResourceResult,
JSONRPCError
} from "@modelcontextprotocol/sdk/types.js";
// Netlify serverless function handler which handles all inbound requests
export default async (req: Request) => {
try {
// for stateless MCP, we'll only use the POST requests that are sent
// with event information for the init phase and resource/tool requests
if (req.method === "POST") {
// Convert the Request object into a Node.js Request object
const { req: nodeReq, res: nodeRes } = toReqRes(req);
const server = getServer();
const transport = new StreamableHTTPServerTransport({
sessionIdGenerator: undefined,
});
await server.connect(transport);
const body = await req.json();
await transport.handleRequest(nodeReq, nodeRes, body);
nodeRes.on("close", () => {
console.log("Request closed");
transport.close();
server.close();
});
return toFetchResponse(nodeRes);
}
return new Response("Method not allowed", { status: 405 });
} catch (error) {
console.error("MCP error:", error);
return new Response(
JSON.stringify({
jsonrpc: "2.0",
error: {
code: -32603,
message: "Internal server error",
},
id: '',
} satisfies JSONRPCError),
{
status: 500,
headers: { "Content-Type": "application/json" }
}
);
}
};
function getServer(): McpServer {
// Implemented later in this guide...
return;
};
// Ensure this function responds to the <domain>/mcp path
// This can be any path you want but you'll need to ensure the
// mcp server config you use/share matches this path.
export const config = {
path: "/mcp"
};
There are a few important notes about this initial setup:
@modelcontextprotocol/sdk library to define the transports and servers used within the Netlify function.toFetchResponse and toReqRes that translates the request and response objects from standard Request/Response objects based on browser standards into the Request/Response objects that are provided from Node.js/mcp. We can choose any path name we want, but by picking this one, we will point our clients to <protocol>://<domain>/mcp in future stepsThis initial serverless function setup above is missing a crucial piece, the MCP Server itself! Let’s implement that based on the features that Acme DevTool has available. Our made up tool company, Acme DevTool, does one job with its service, it creates reports for its customers. Given this is our main job, we will focus on allowing agents to invoke this feature and additional context for agents to be able to parse and understand this data.
Let’s update our getServer() method above to have the following code
function getServer(): McpServer {
// initialize our MCP Server instance that we will
// attach all of our functionality and data.
const server = new McpServer(
{
name: "acme-devtool-server",
version: "1.0.0",
},
{ capabilities: { logging: {} } }
);
server.tool(
"run-analysis-report",
"Checks the data available in Acme Devtool and returns all of the important data regarding the latest numbers.",
{
days: z.number().describe("Number of days to analyze").default(7),
},
async (
{ days },
): Promise<CallToolResult> => {
const random = Math.random() * 100;
return {
content: [
{
type: "text",
text: JSON.stringify({
lastNDays: days,
data: Array.from({ length: days }, (_, i) => `Day ${i + 1} had ${random * days} growth.`),
}),
},
],
};
}
);
// providing a resource for agents that might need to take a given report
// and parse the information in it
server.resource(
"interpreting-reports",
"acme://interpreting-reports",
{ mimeType: "text/plain" },
async (): Promise<ReadResourceResult> => {
return {
contents: [
{
uri: "acme://interpreting-reports",
text: `Reports from Acme will include an array of text that informs the growth of over that number of days. It's unstructured text but is consistent so parsing the information can be based on looking at a single line to understand where the data is.`,
},
],
};
}
);
return server;
};
Ok, by updating our serverless function to have this MCP server implementation, let’s move on to testing this capability with an actual MCP client.
With our serverless function in place, we can run our dev server to host the site locally. Usually, this is done with the Netlify CLI and the command netlify dev on the repo. Once started up, our MCP will be available at http://localhost:8888/mcp. By default, the CLI command uses port 8888 but you should review the command output to verify the port that it’s hosted on and adjust your urls in the usage below if it’s different.
With our serverless function in place, let’s ship it to the web!
There are many deployment options to fit your style of working:
netlify deploy to ship changes to their site.Deploy this site to Netlify will create a new deployment.Check out our docs for getting started if you want to know more about how to start a new site on Netlify.
MCP comes with it’s own inspector tool that can be used to communicate with your MCP server.
To set this up:
npx @modelcontextprotocol/inspector npx mcp-remote@next http://localhost:8888/mcpnpx @modelcontextprotocol/inspector npx mcp-remote@next https://<mydomain>/mcp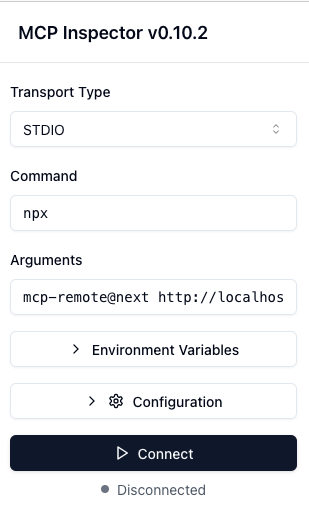
Now that the inspector is running, we can connect to the MCP and will be able to inspect the different options available to us. Under Tools, we will see run-analysis-report and we can invoke it with the desired args. Under Resources, we can List Resources to see our interpreting-reports resource is there and we can inspect its values.
As mentioned before, we are using a hybrid approach to have maximum client compatibility. However, this isn’t an absolute requirement if you understand where clients have known to support for the latest StreamableHttp Transport - in those scenarios, the mcp-remote proxy can be omitted.
Finally, let’s see this in action by using a proper AI application that supports MCP. For this, we will use Claude Desktop, but the instructions are pretty common across MCP supporting applications.
For full instructions, check out this guide
~/Library/Application Support/Claude/claude_desktop_config.json%APPDATA%\Claude\claude_desktop_config.jsonThe configuration we will give Claude will be similar to that which we give to the MCP inspector and it will look like one of the following:
Using the MCP server when developing:
{
"mcpServers": {
"acme-mcp": {
"command": "npx",
"args": [
"mcp-remote@next",
"http://localhost:8888/mcp"
]
}
}
}
Using the MCP server after its been deployed:
{
"mcpServers": {
"acme-mcp": {
"command": "npx",
"args": [
"mcp-remote@next",
"https://<domain>/mcp"
]
}
}
}
After restarting Claude with this in place, it’s ready to use!
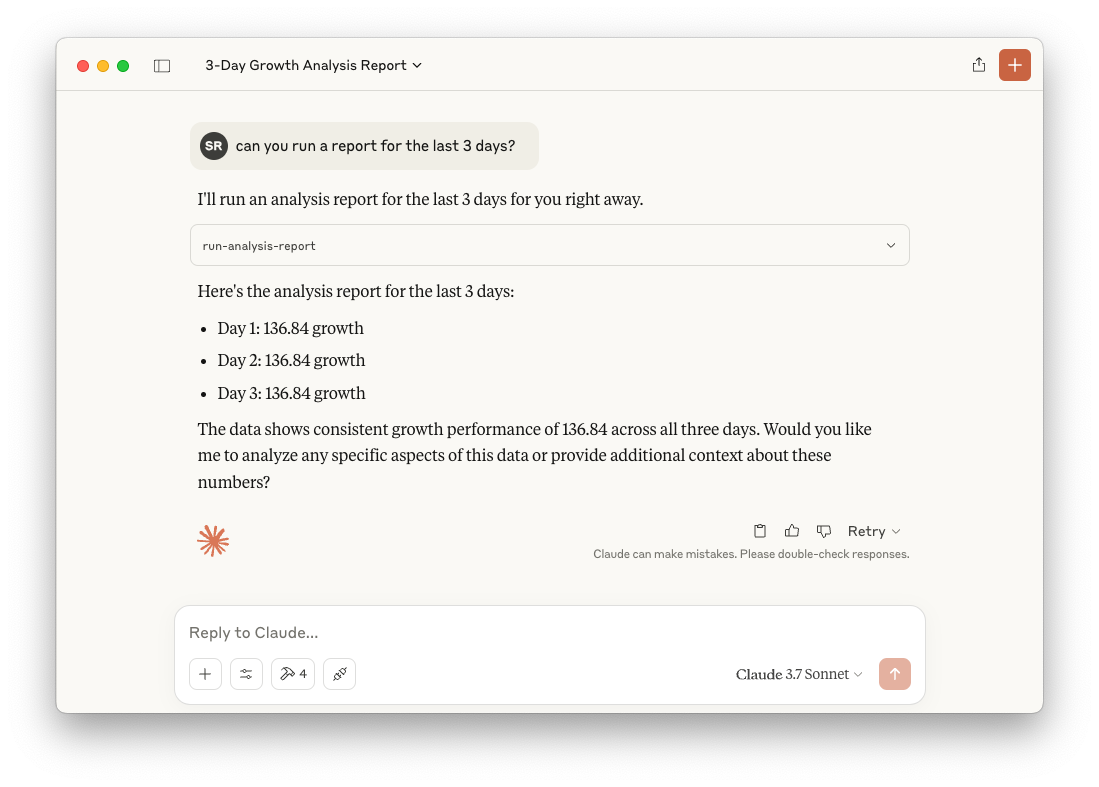
MCPs are a very emerging and exciting technology for providing a great AX and supporting your users. You can lean on Netlify to provide the best developer experience to create and host MCPs for your website.
In this guide, we’ve only scratched the surface of what MCPs can do. From authentication patterns to multiple layers of MCPs, and so on, there’s a lot more you can do with MCPs on Netlify.
The best way to explore this technology is to start building with it. You can start from scratch or use one of our examples to start with a site and a GitHub repo ready for updating.
此内容由惯性聚合(RSS阅读器)自动聚合整理,仅供阅读参考。 原文来自 — 版权归原作者所有。