





When choosing a disk image format for your virtual machine one of the factors to take into considerations is its I/O performance. In this post I’ll talk a bit about the internals of qcow2 and about one of the aspects that can affect its performance under QEMU: its consistency checks.
As you probably know, qcow2 is QEMU’s native file format. The first thing that I’d like to highlight is that this format is perfectly fine in most cases and its I/O performance is comparable to that of a raw file. When it isn’t, chances are that this is due to an insufficiently large L2 cache. In one of my previous blog posts I wrote about the qcow2 L2 cache and how to tune it, so if your virtual disk is too slow, you should go there first.
I also recommend Max Reitz and Kevin Wolf’s qcow2: why (not)? talk from KVM Forum 2015, where they talk about a lot of internal details and show some performance tests.
A qcow2 file is organized into units of constant size called clusters. The cluster size defaults to 64KB, but a different value can be set when creating a new image:
qemu-img create -f qcow2 -o cluster_size=128K hd.qcow2 4G
Clusters can contain either data or metadata. A qcow2 file grows dynamically and only allocates space when it is actually needed, so apart from the header there’s no fixed location for any of the data and metadata clusters: they can appear mixed anywhere in the file.
Here’s an example of what it looks like internally:
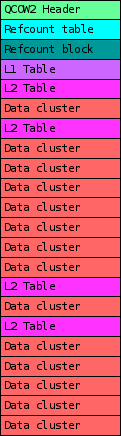
In this example we can see the most important types of clusters that a qcow2 file can have:
In order to detect corruption when writing to qcow2 images QEMU (since v1.7) performs several sanity checks. They verify that QEMU does not try to overwrite sections of the file that are already being used for metadata. If this happens, the image is marked as corrupted and further access is prevented.
Although in most cases these checks are innocuous, under certain scenarios they can have a negative impact on disk write performance. This depends a lot on the case, and I want to insist that in most scenarios it doesn’t have any effect. When it does, the general rule is that you’ll have more chances of noticing it if the storage backend is very fast or if the qcow2 image is very large.
In these cases, and if I/O performance is critical for you, you might want to consider tweaking the images a bit or disabling some of these checks, so let’s take a look at them. There are currently eight different checks. They’re named after the metadata sections that they check, and can be divided into the following categories:
By default all tests are enabled except for the last one (inactive-l2), because it needs to read data from disk.
Tests can be disabled or enabled from the command line using the following syntax:
-drive file=hd.qcow2,overlap-check.inactive-l2=on
-drive file=hd.qcow2,overlap-check.snapshot-table=off
It’s also possible to select the group of checks that you want to enable using the following syntax:
-drive file=hd.qcow2,overlap-check.template=none
-drive file=hd.qcow2,overlap-check.template=constant
-drive file=hd.qcow2,overlap-check.template=cached
-drive file=hd.qcow2,overlap-check.template=all
Here, none means that no tests are enabled, constant enables all tests from group 1, cached enables all tests from groups 1 and 2, and all enables all of them.
As I explained in the previous section, if you’re worried about I/O performance then the checks that are probably worth evaluating are refcount-block, active-l2 and inactive-l1. I’m not counting inactive-l2 because it’s off by default. Let’s look at the other three:
The qcow2 consistency checks are useful to detect data corruption, but they can affect write performance.
If you’re unsure and you want to check it quickly, open an image with overlap-check.template=none and see for yourself, but remember again that this will only affect write operations. To obtain more reliable results you should also open the image with cache=none in order to perform direct I/O and bypass the page cache. I’ve seen performance increases of 50% and more, but whether you’ll see them depends a lot on your setup. In many cases you won’t notice any difference.
I hope this post was useful to learn a bit more about the qcow2 format. There are other things that can help QEMU perform better, and I’ll probably come back to them in future posts, so stay tuned!
My work in QEMU is sponsored by Outscale and has been made possible by Igalia and the help of the rest of the QEMU development team.

此内容由惯性聚合(RSS阅读器)自动聚合整理,仅供阅读参考。 原文来自 — 版权归原作者所有。